Richard’s been in touch with this wonderfully documented HO layout build:
“Hi Al,
Richard here from Tuttle, Oklahoma…
This is actually my 3rd HO scale layout, it consists of Peco Code 100 turnouts and flex track, set later than the transition era.
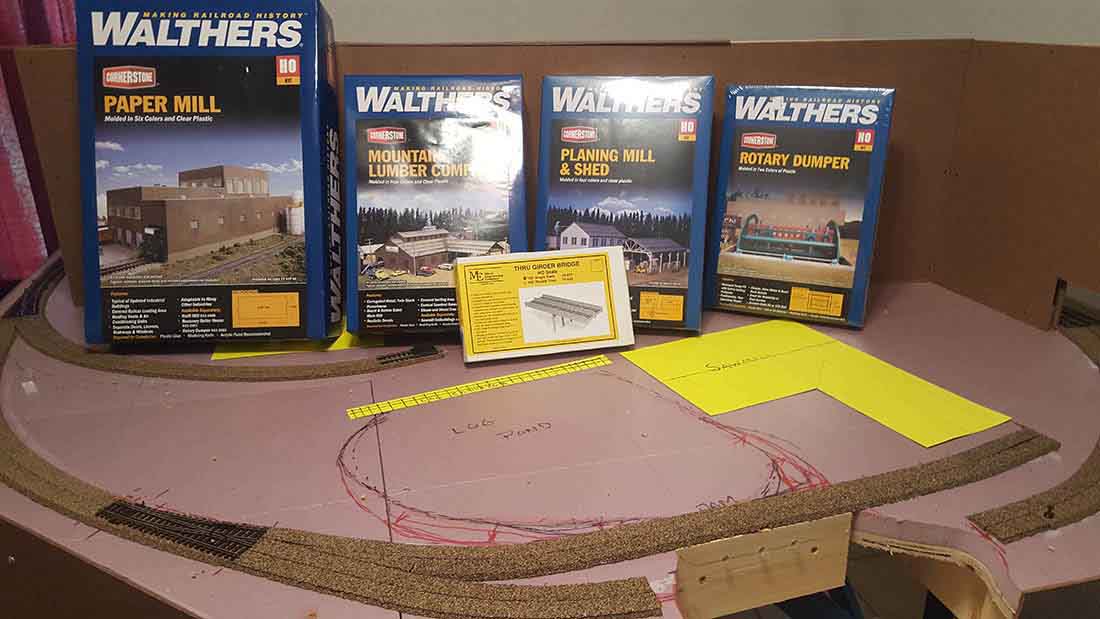
All buildings are kits that I weathered and assembled.
The scenery is 1inch foam boards covered with plaster cloth and painted… the favorite part of the layout is the drainage area from the mill pond.
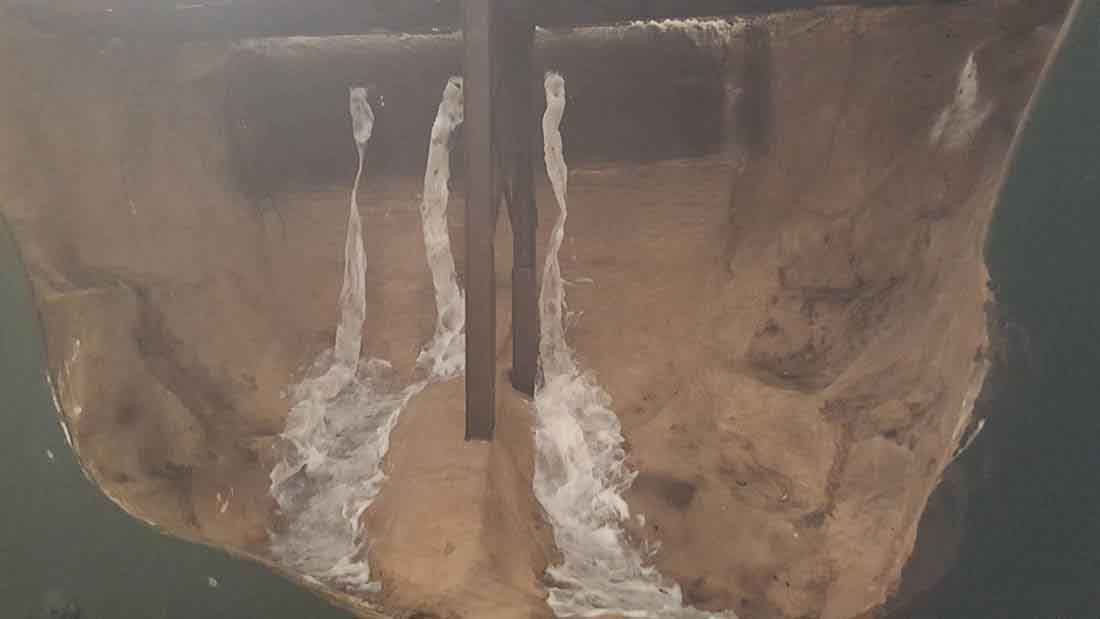
The dam is a piece of 3/4” board with 3 holes drilled into and plastic straws inserted for the culverts.
The cascading water is cellophane tape painted with artist medium… then painted and detailed…
As far as rolling stock, it’s a conglomeration of eBay, local train shop, and wherever… lol
Anyway, here’s a few pictures… hope you’ll find it interesting….


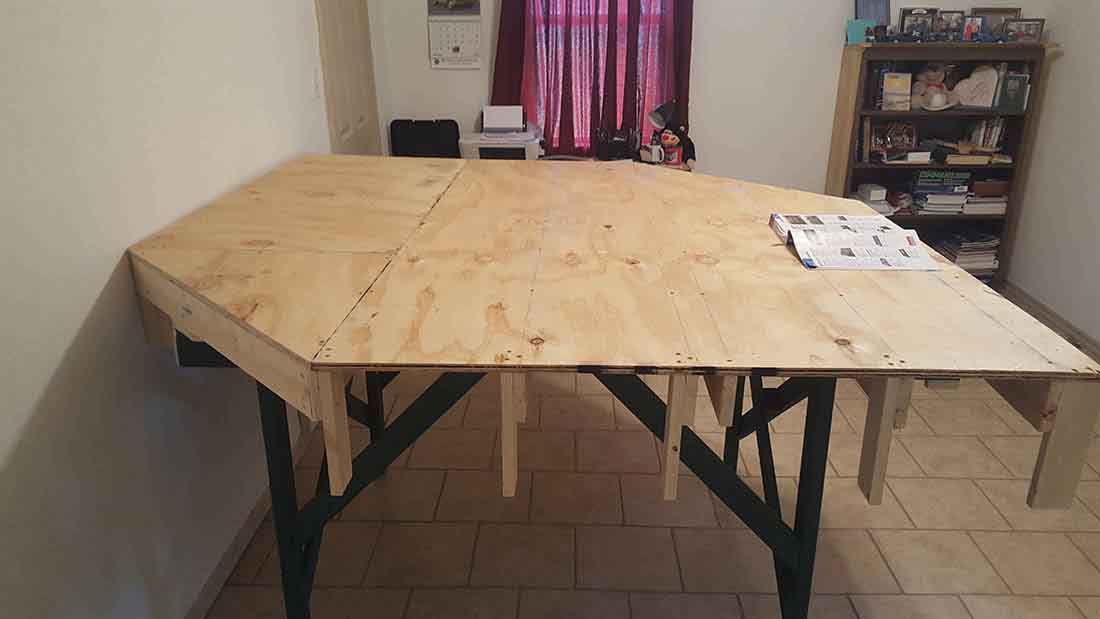
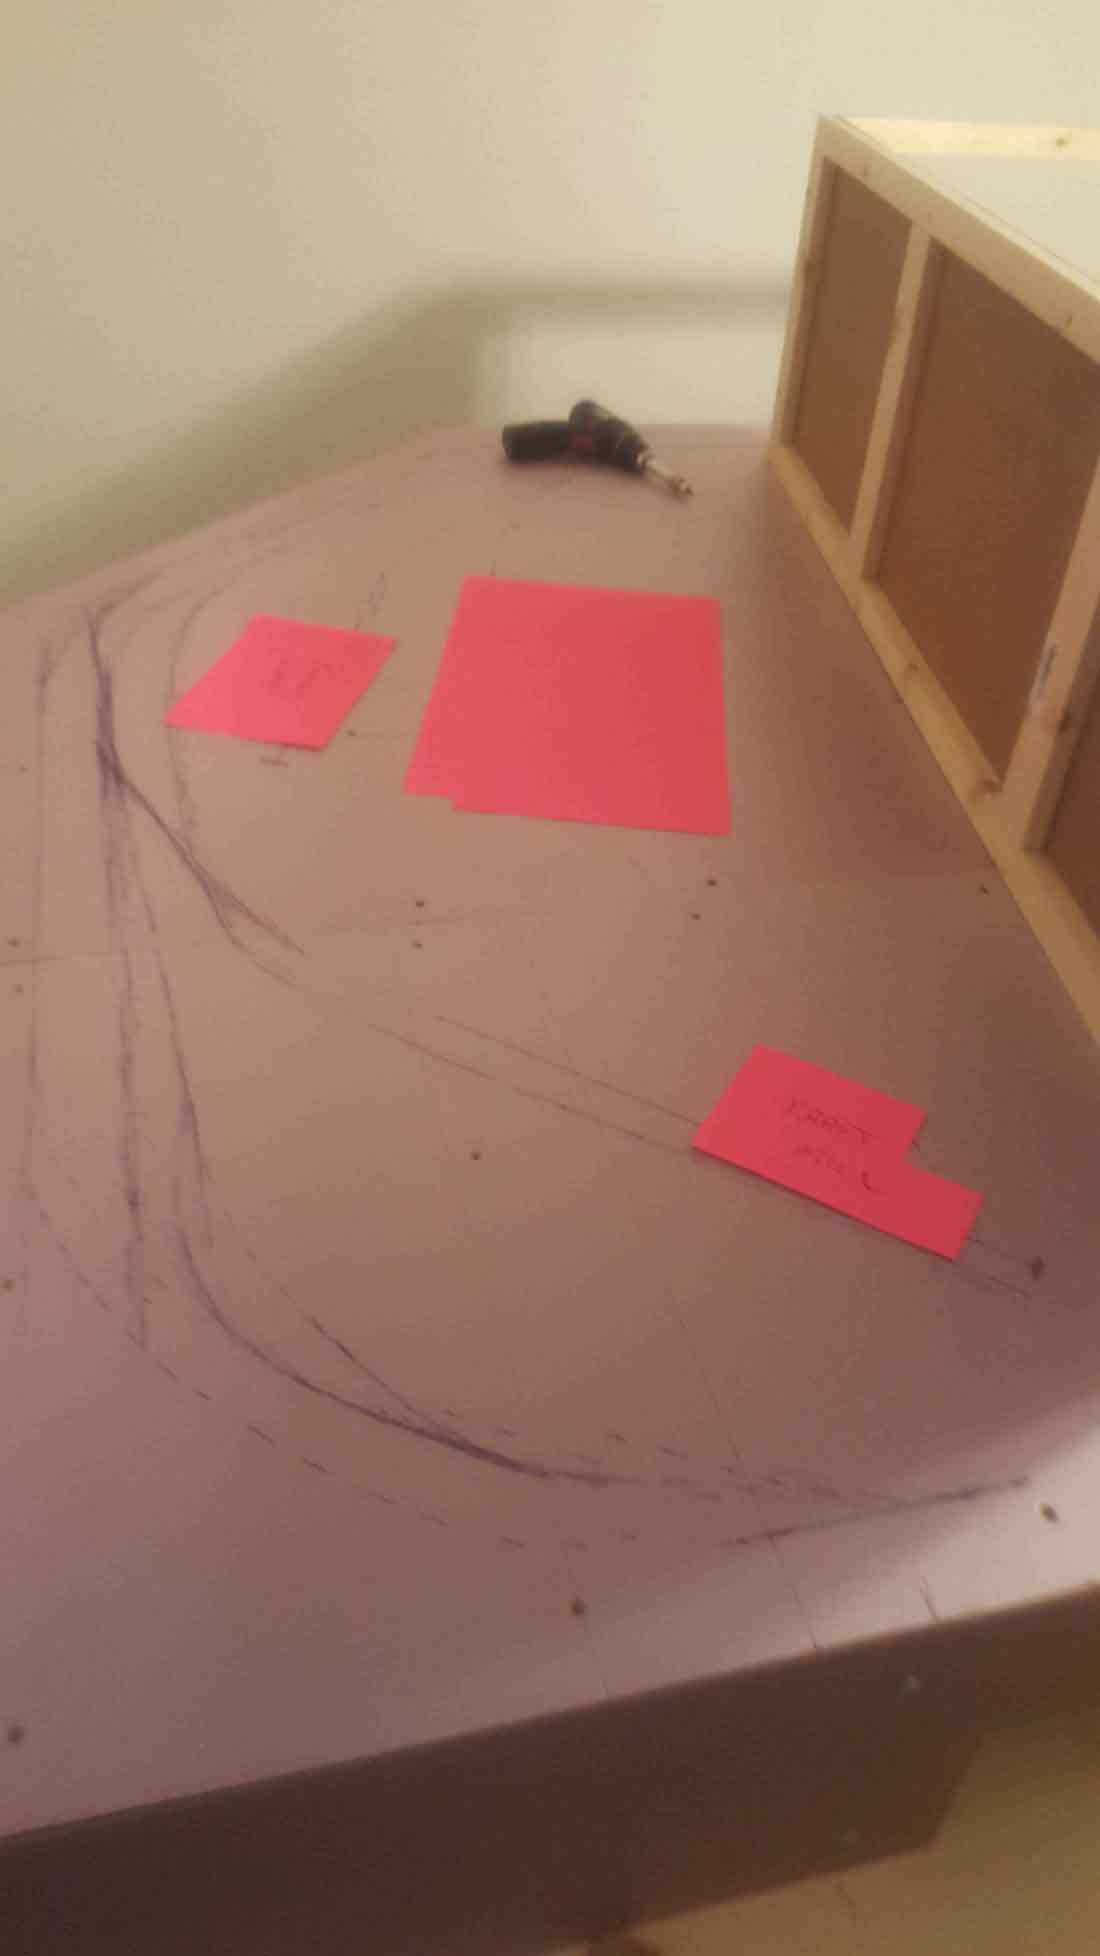
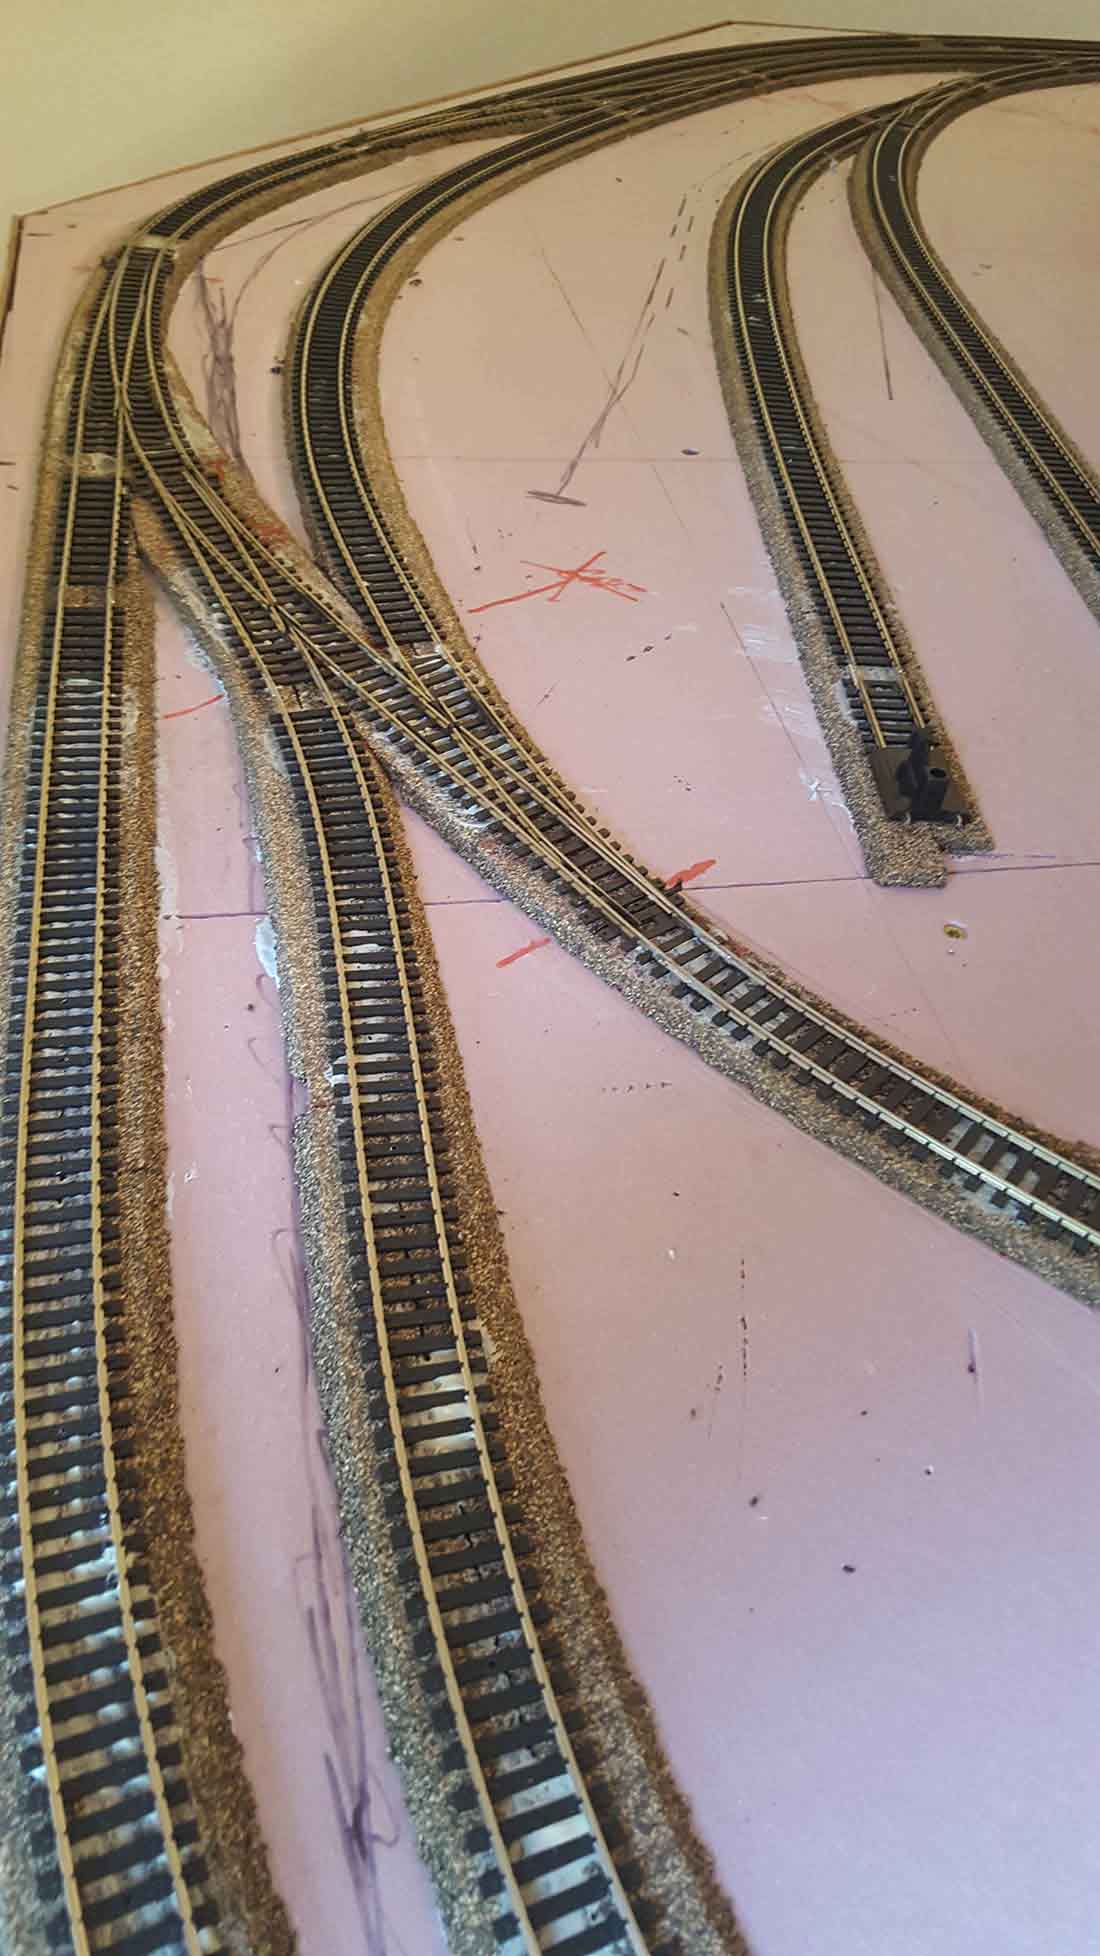
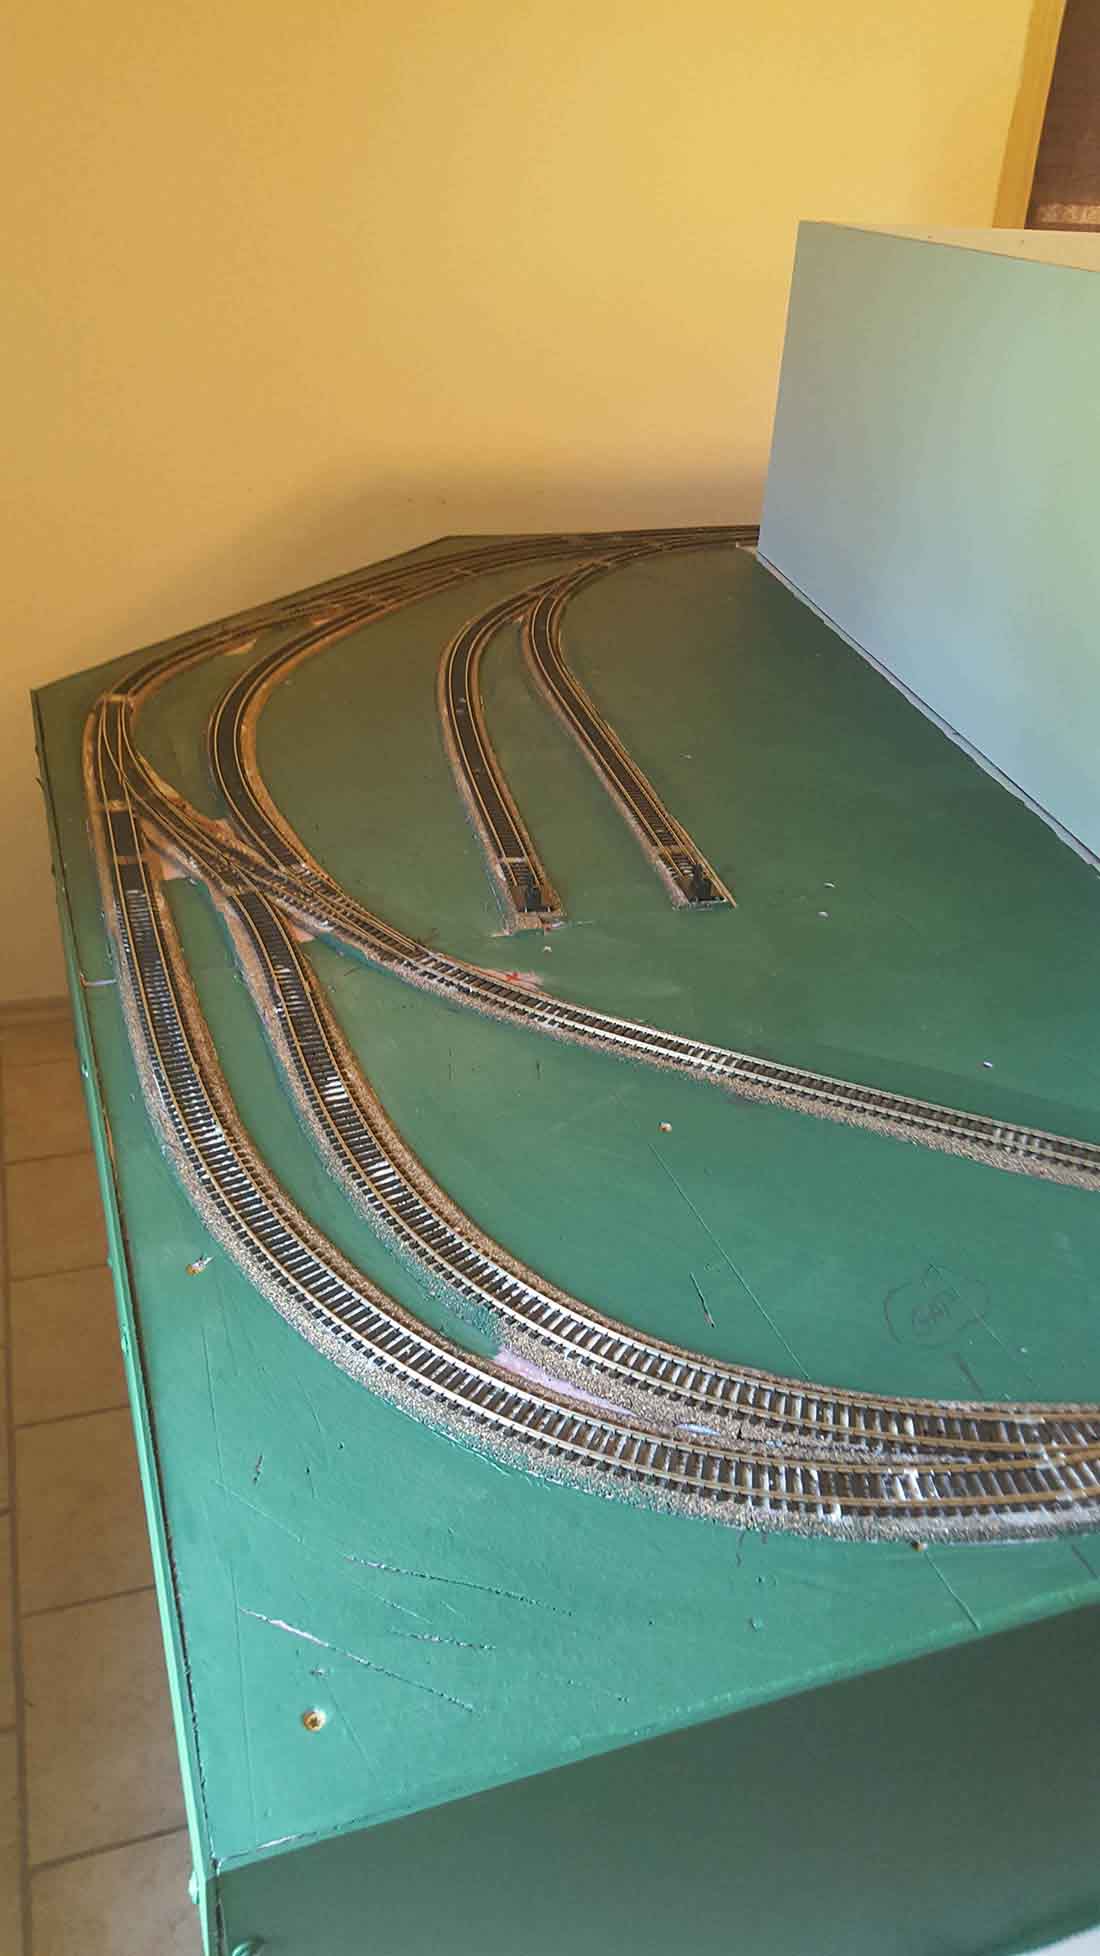
Construction began with 2×3 legs with a 1×4 L girder design with a 6 x 6 foot table size. Then topped with a 3/8″ plywood covering and 1inch foam board.
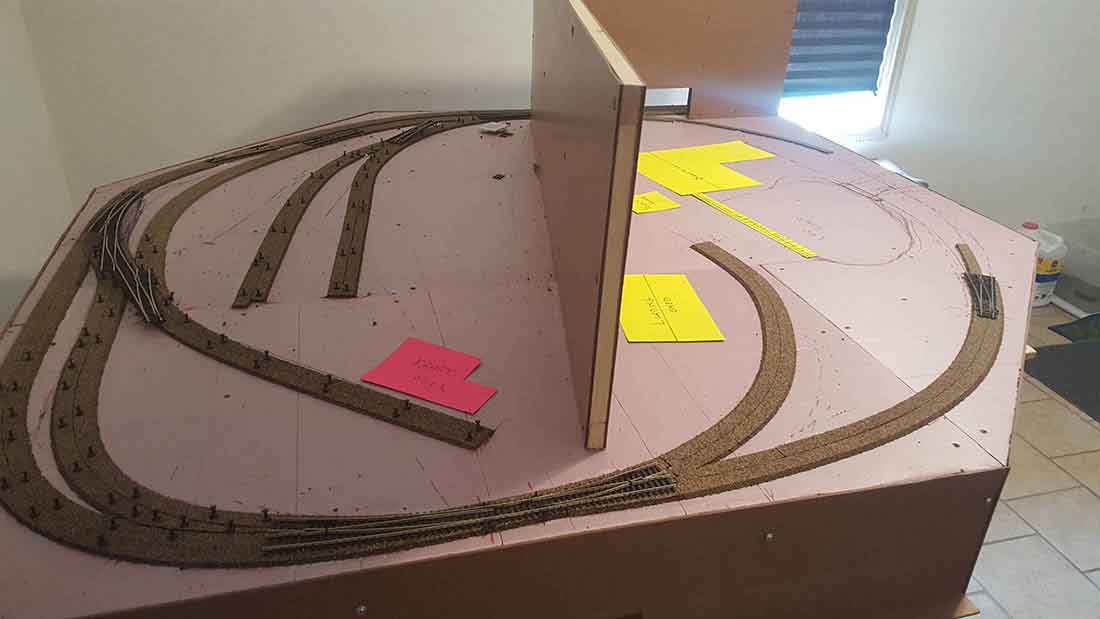
As you can see, layout of building cutouts were used to help align track and building layout. Now the cork roadbed was laid. Track was beginning to be laid starting with the turnouts.
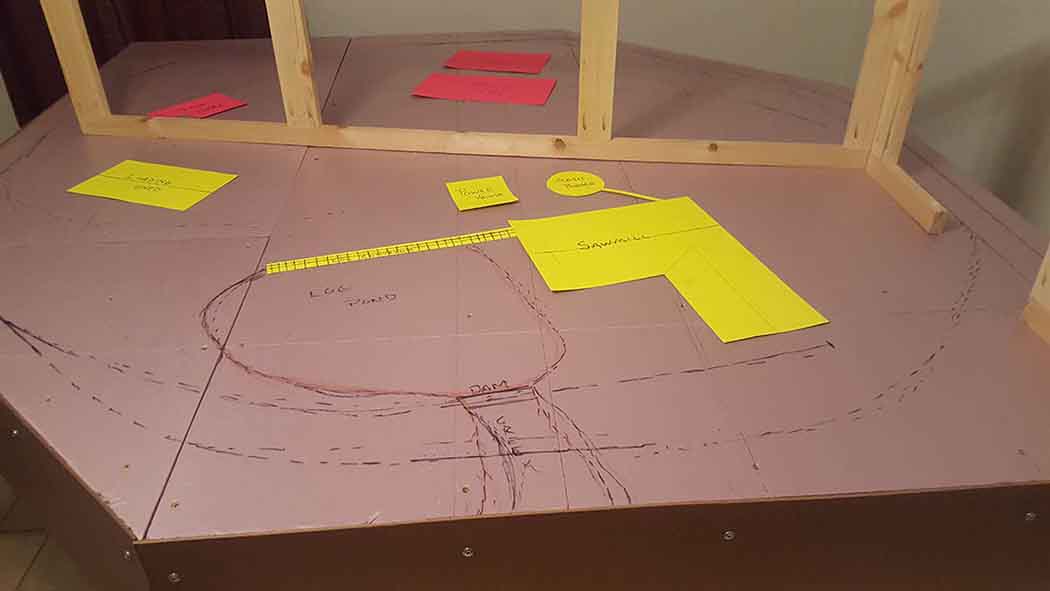
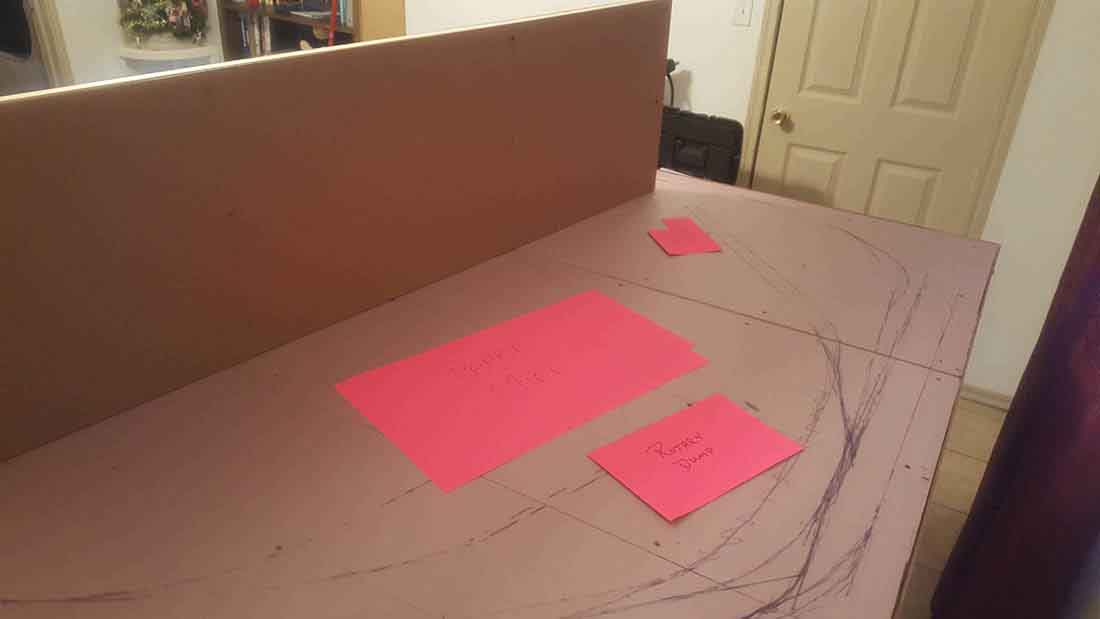

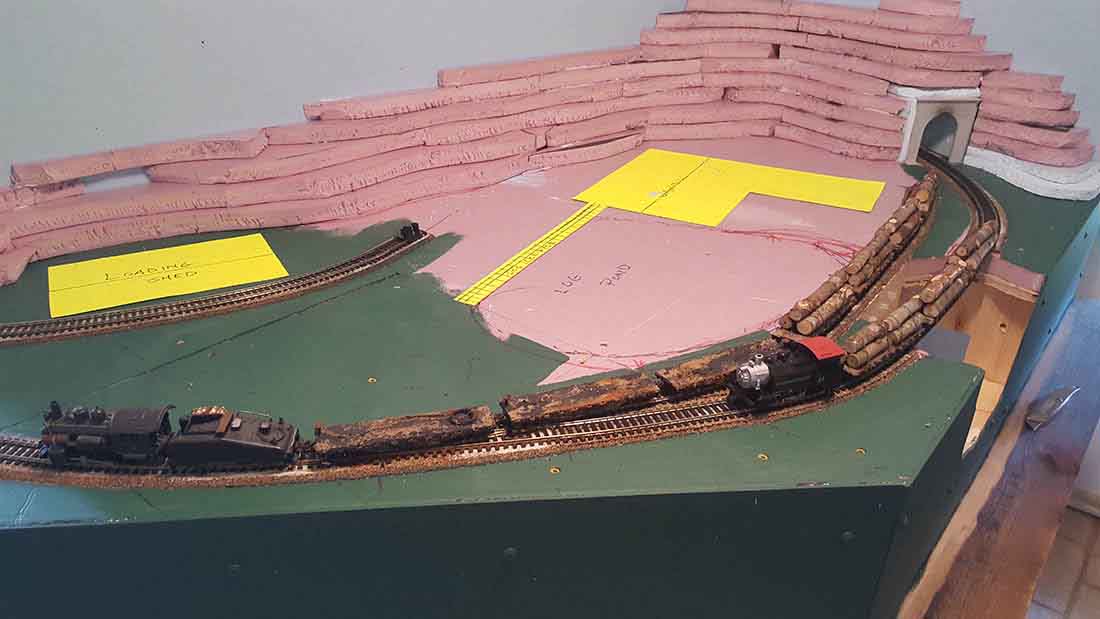
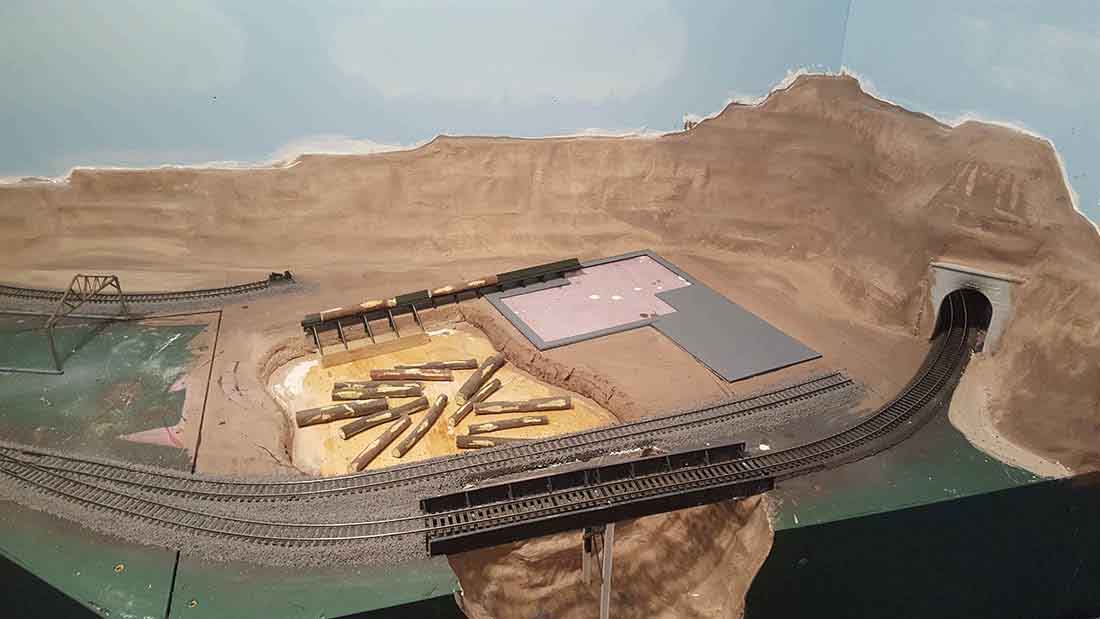
This next series of pics shows the buildings purchased… and the excavation of the dam and drainage area for the sawmill… the pond will later hold the logs that are unloaded from the railcars and will be recessed as if “floating” … as you will see in future pics.
Track has been laid using “spikes” only and then the foam board painted green for any missed plantings.
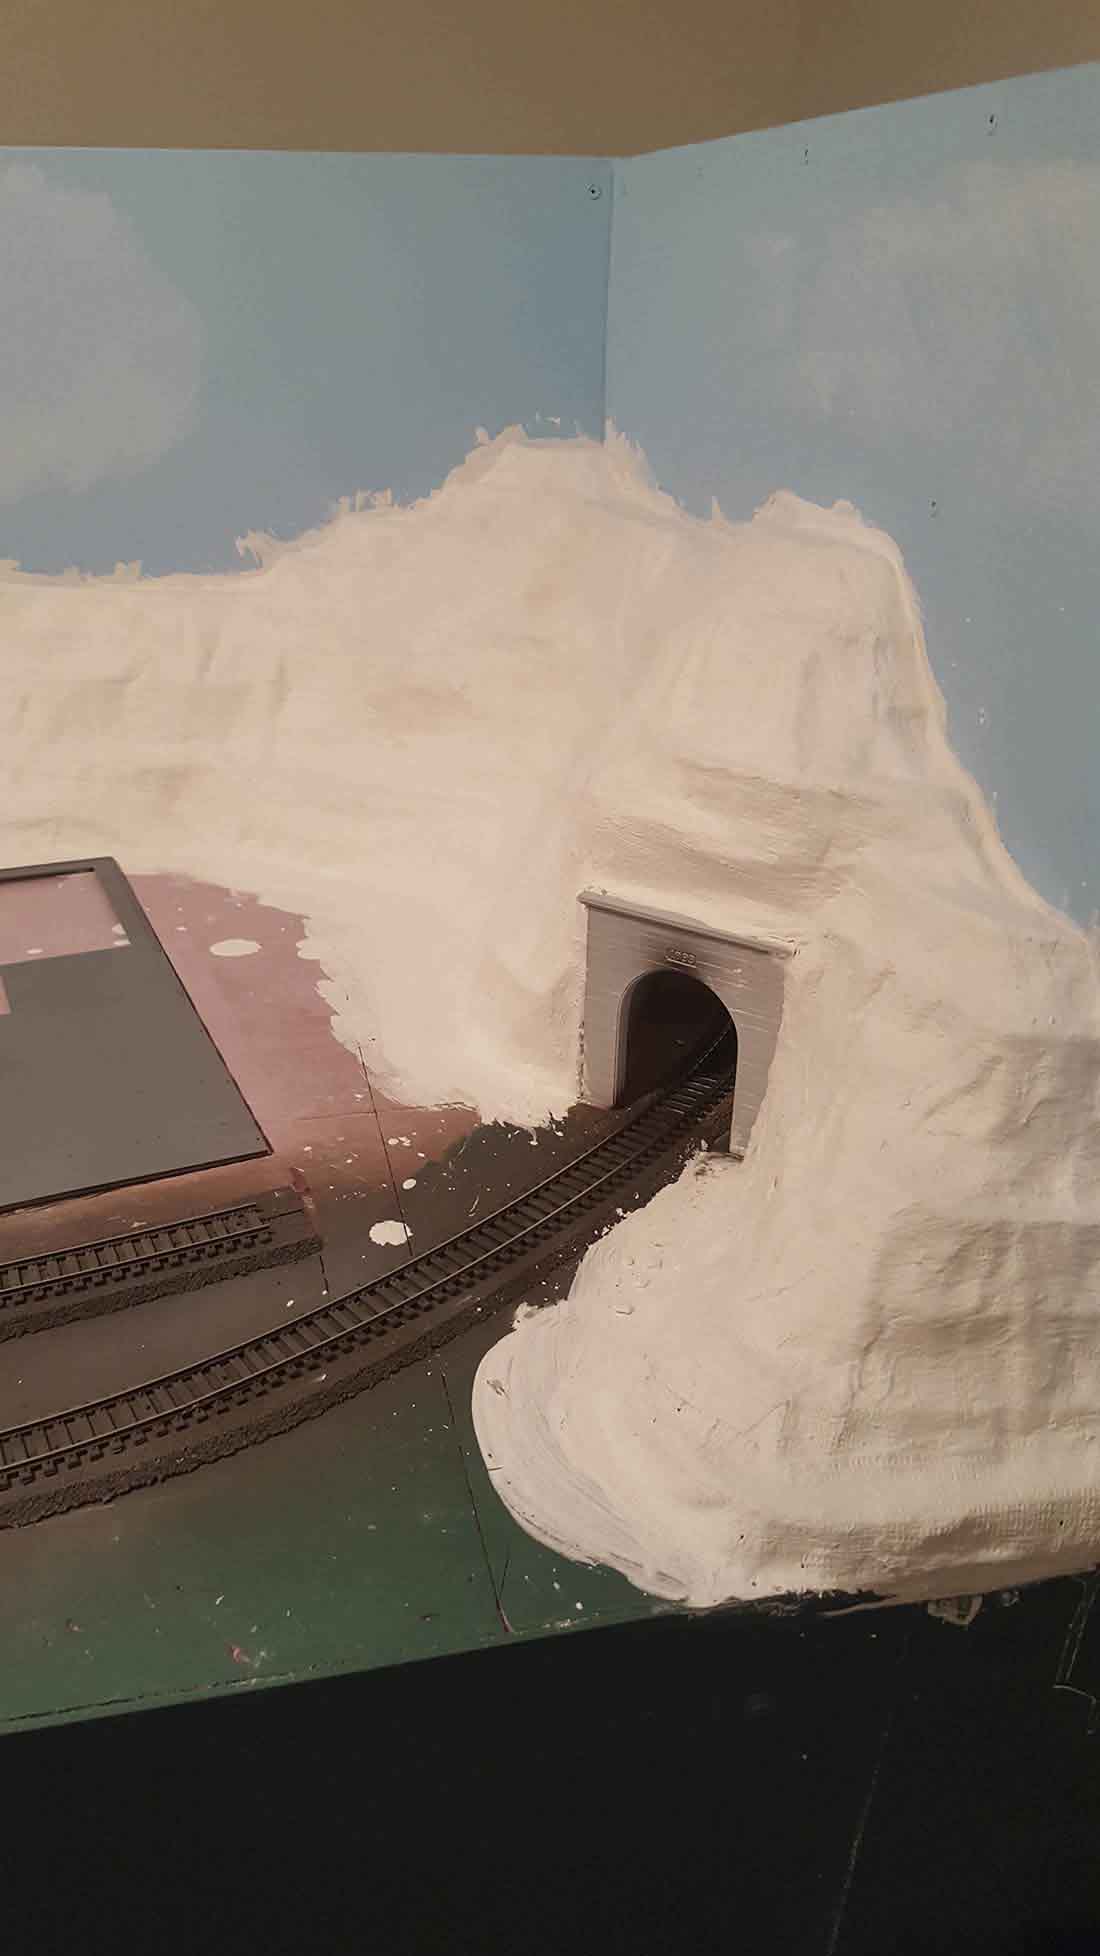
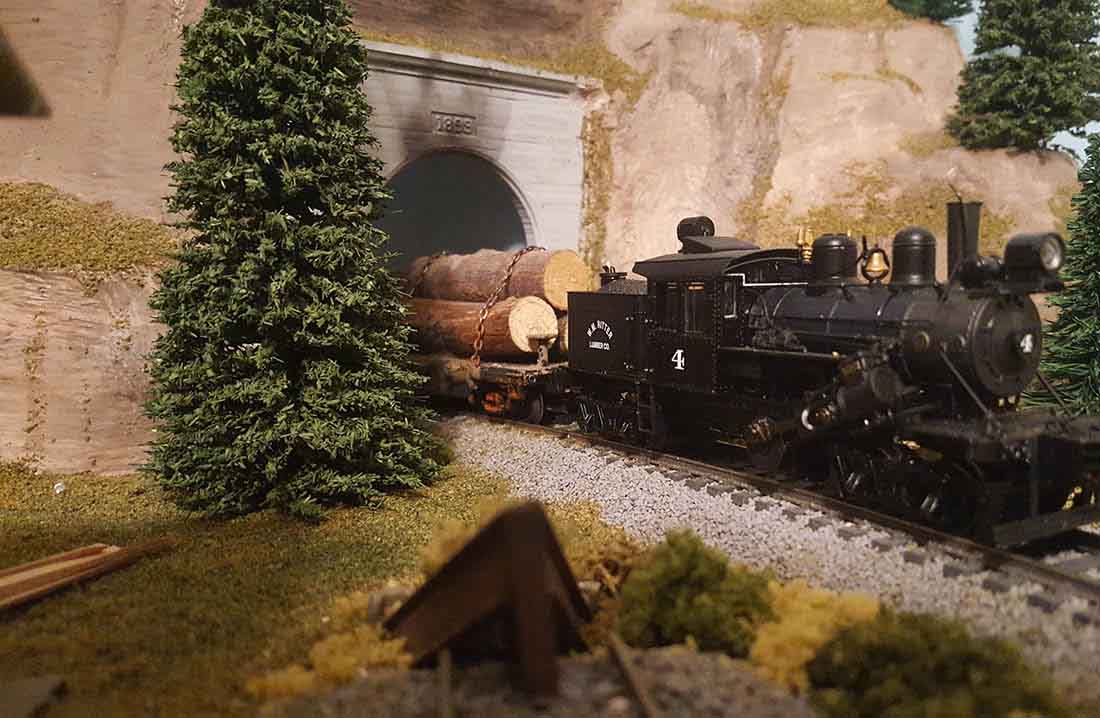
Mountains are being built using 1″ foam board in layers by just using my imagination and random breaking and stacking. You see how the tunnel portal looks as if it’s built into the mountain….
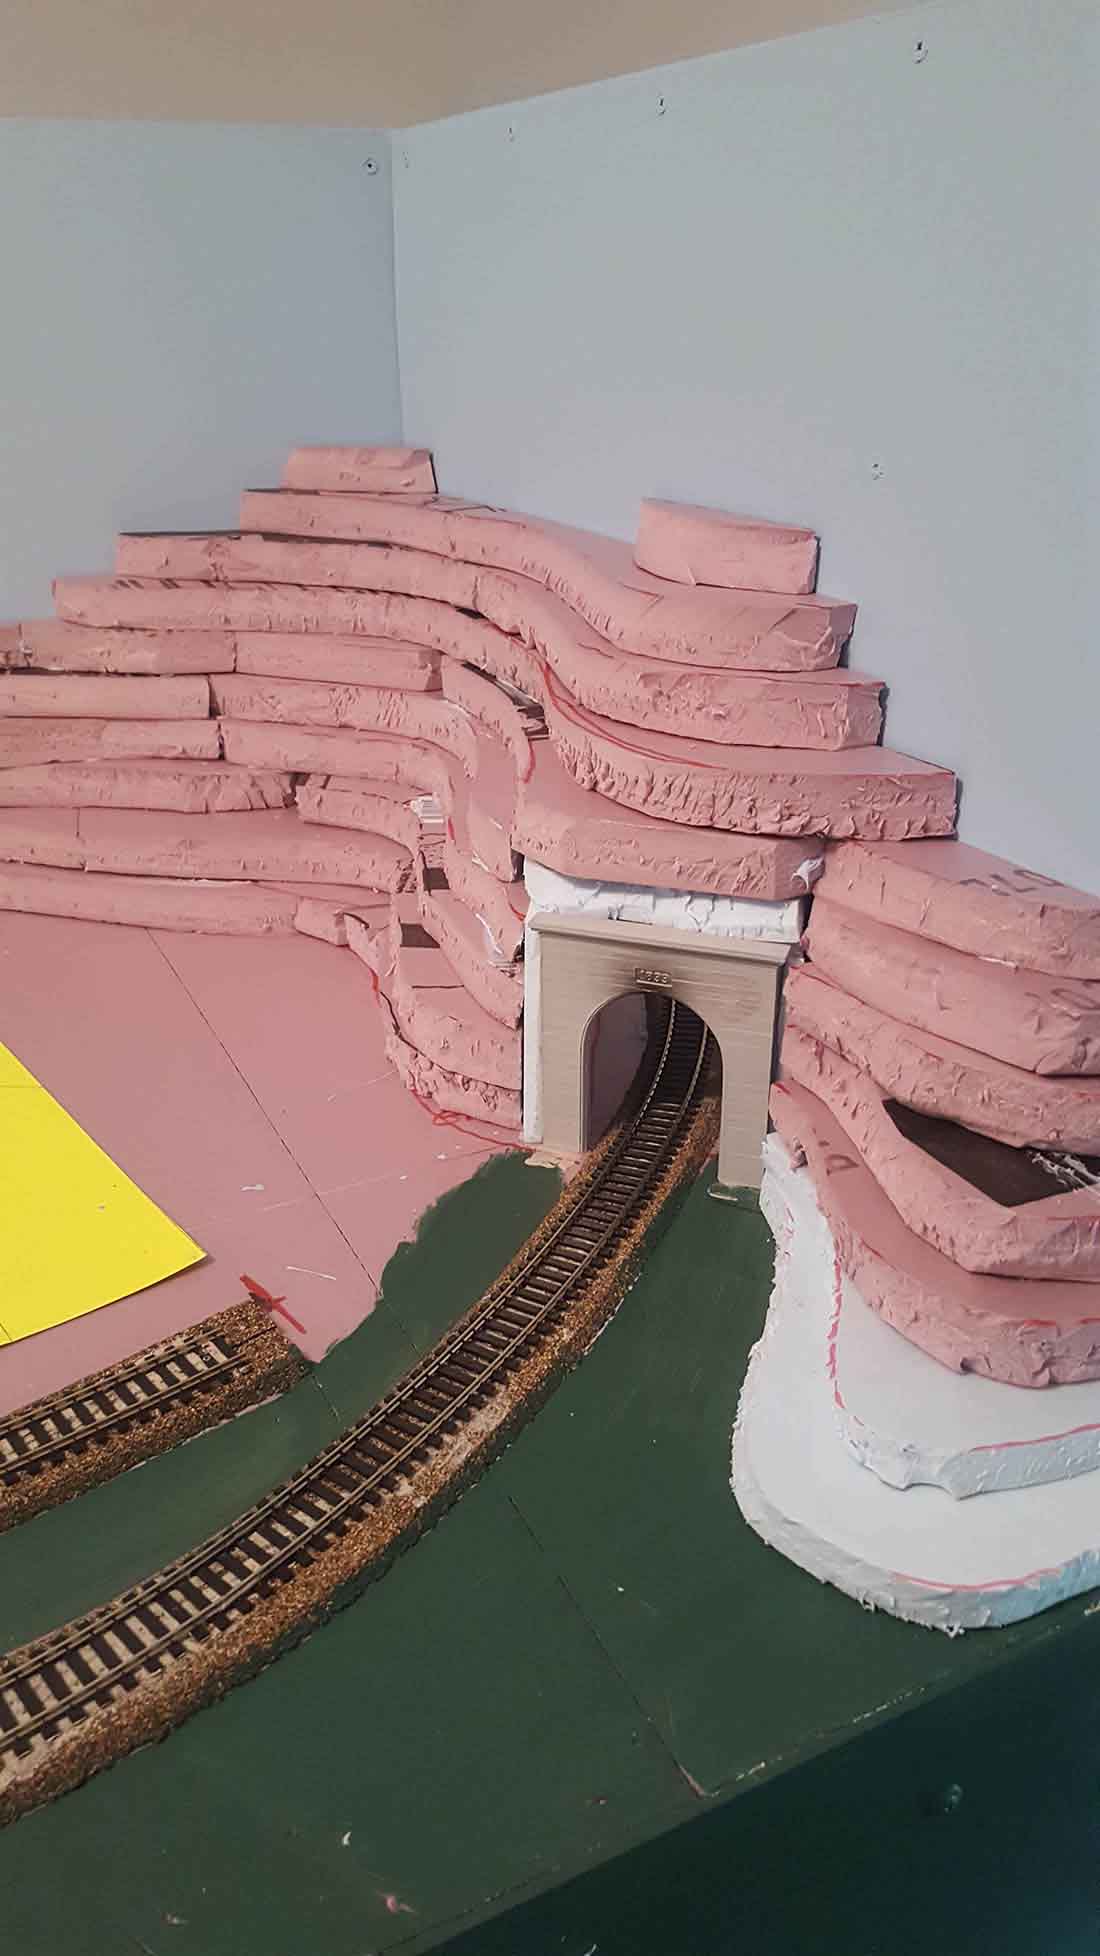
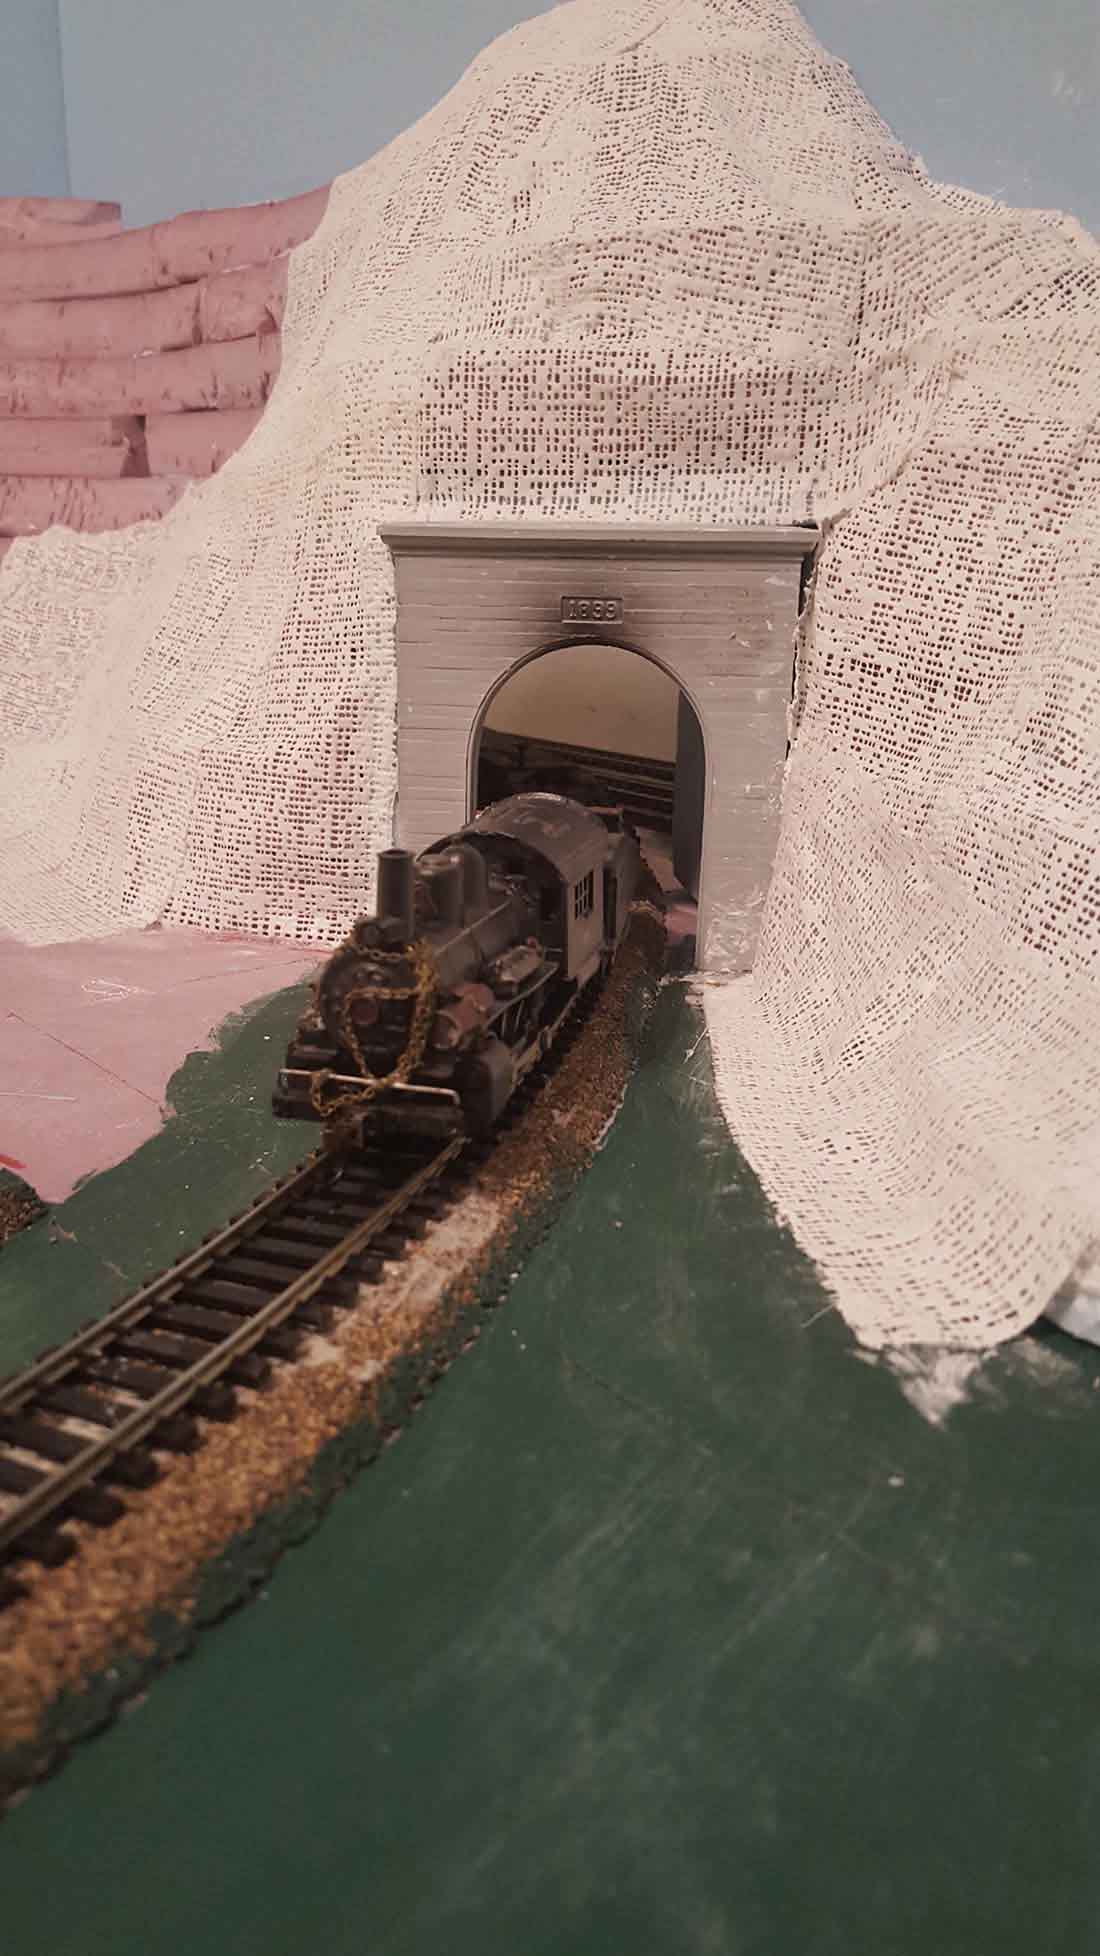
More mountain construction… plaster cloth over the foam board… once dried, painted with a thinned plaster paris mixture… the tunnel really looks good in its new home
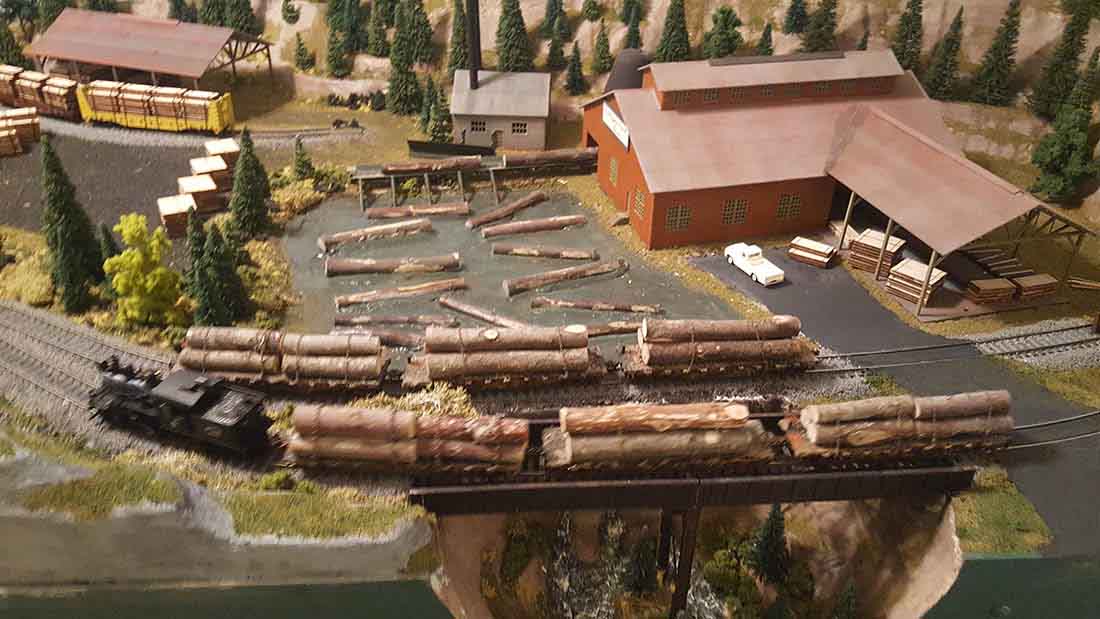
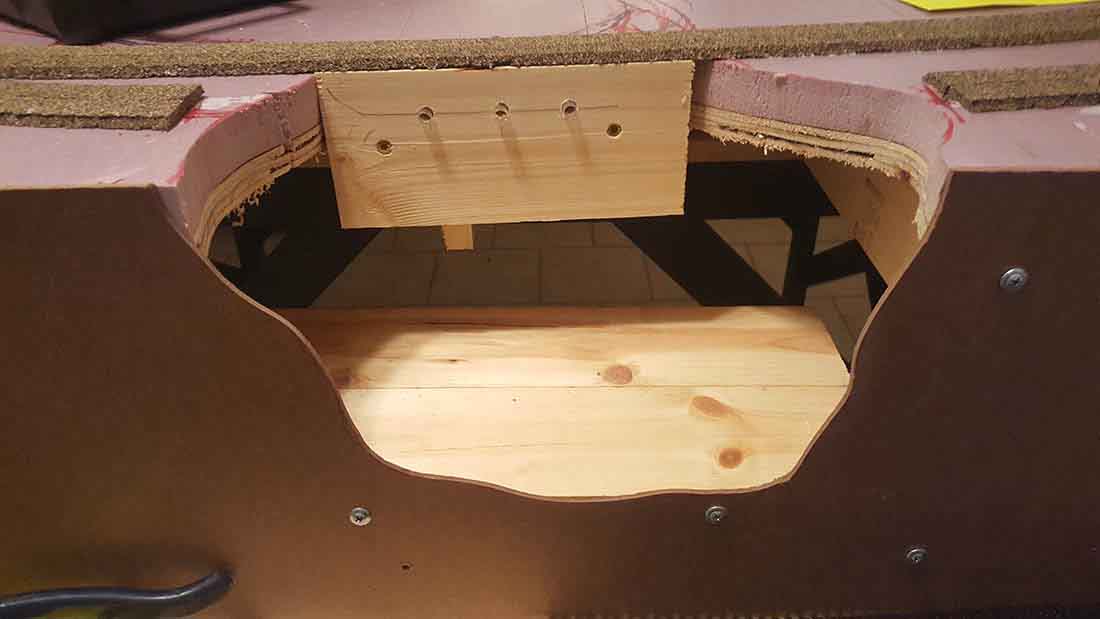
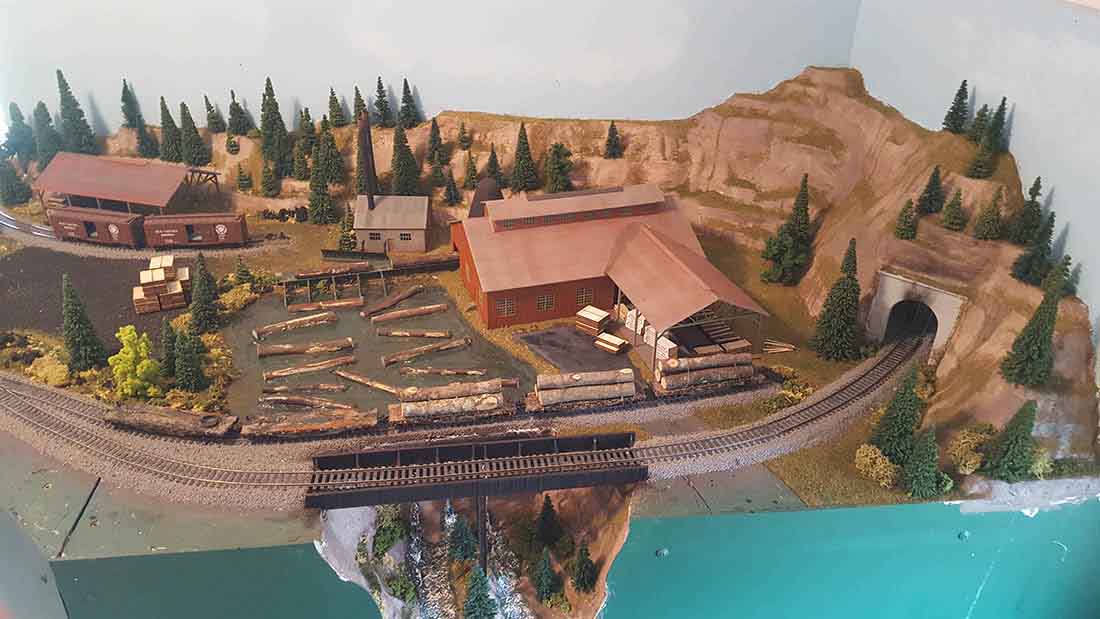
Now the best part of the build… the mill pond drainage area… as you can see the original creek was fairly deep so a dam was constructed along the rail line to utilize unloading of the logs…
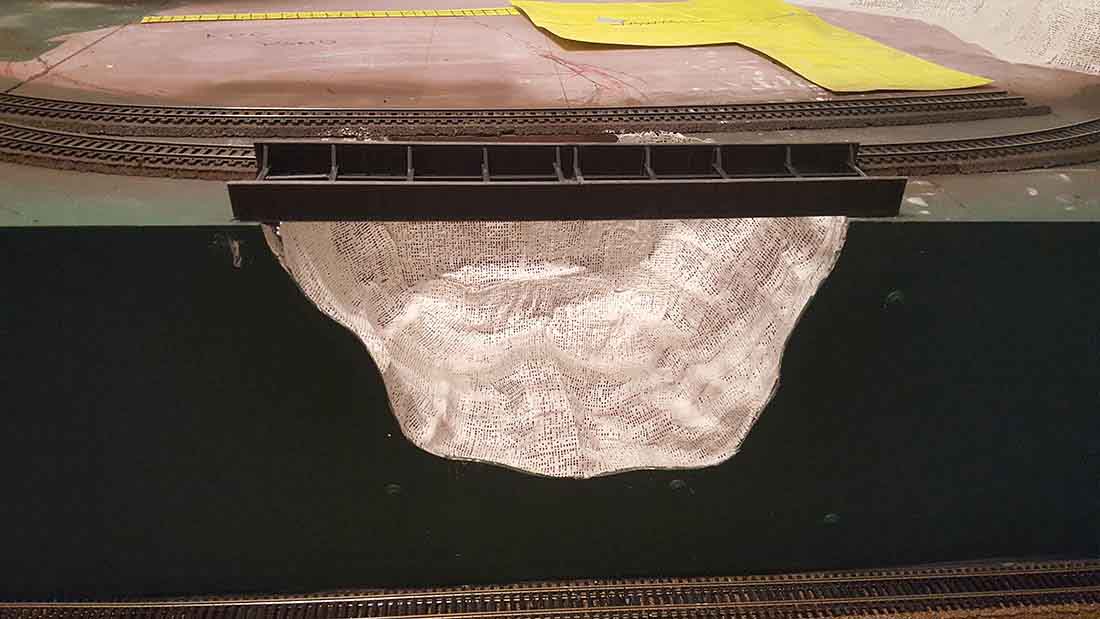
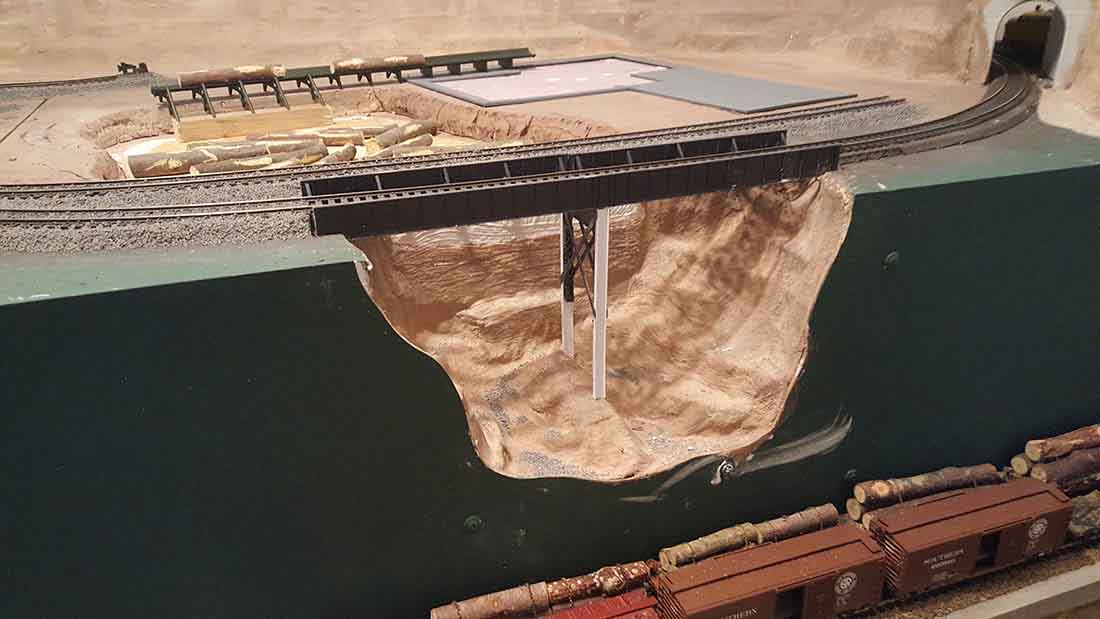
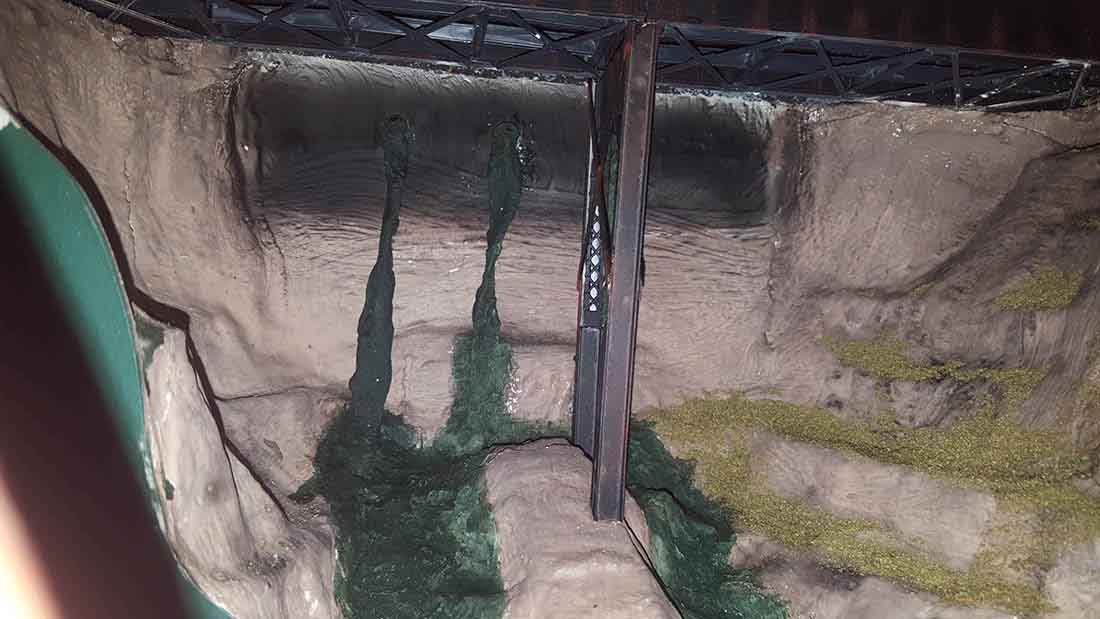
Mill pond drainage


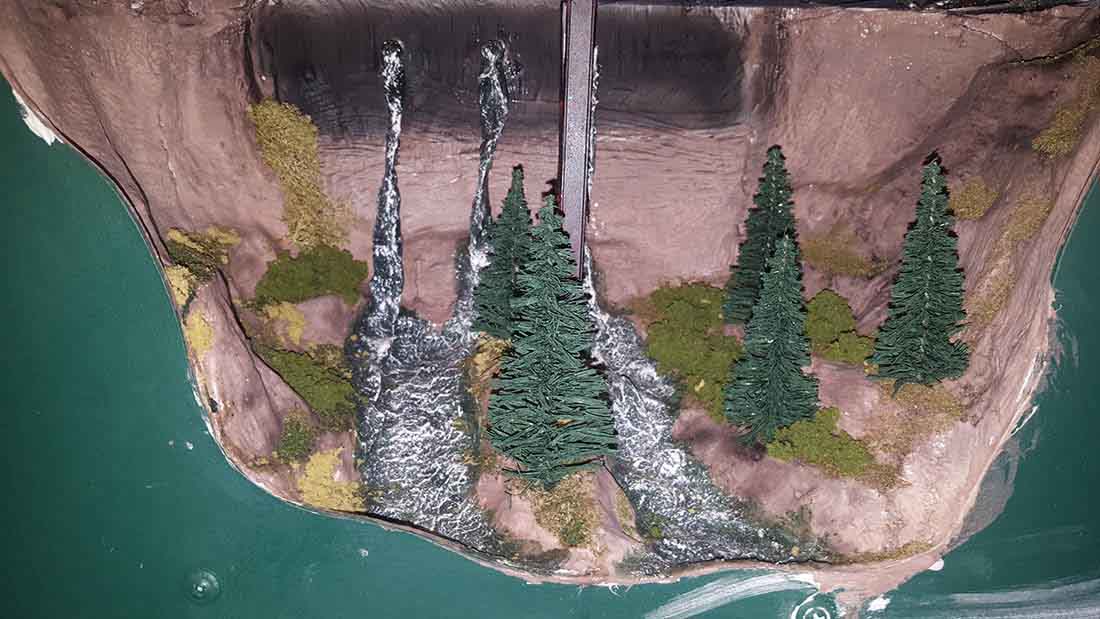
Mill pond drainage area finally completed

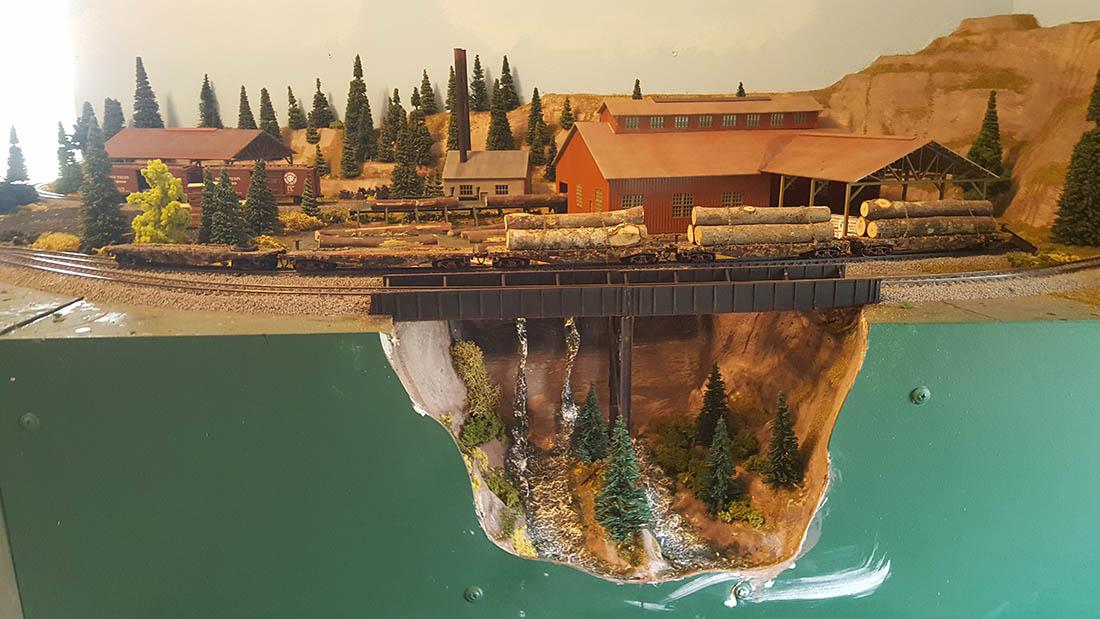
On to the mill pond and sawmill…. started with excavating the foam from the mill pond area… poured in a thinned mixture of plaster paris and while still wet pushed in the logs to appear submerged and then once dried, painted the water a dingy green to simulate dirty mill pond water.
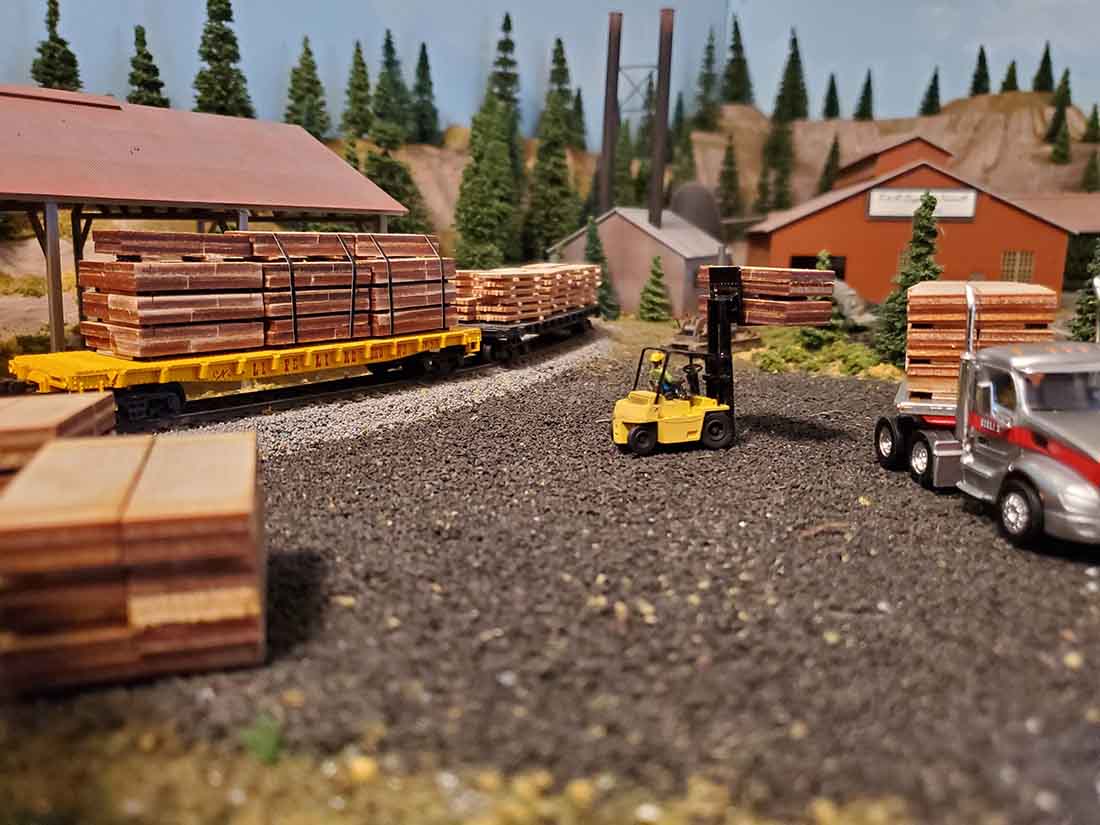
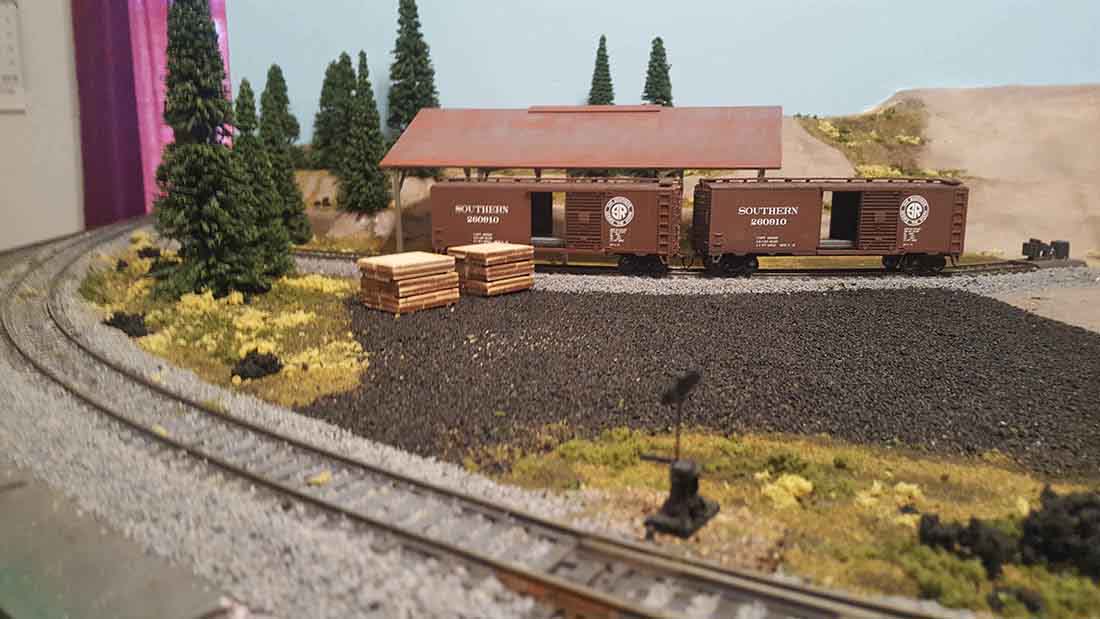
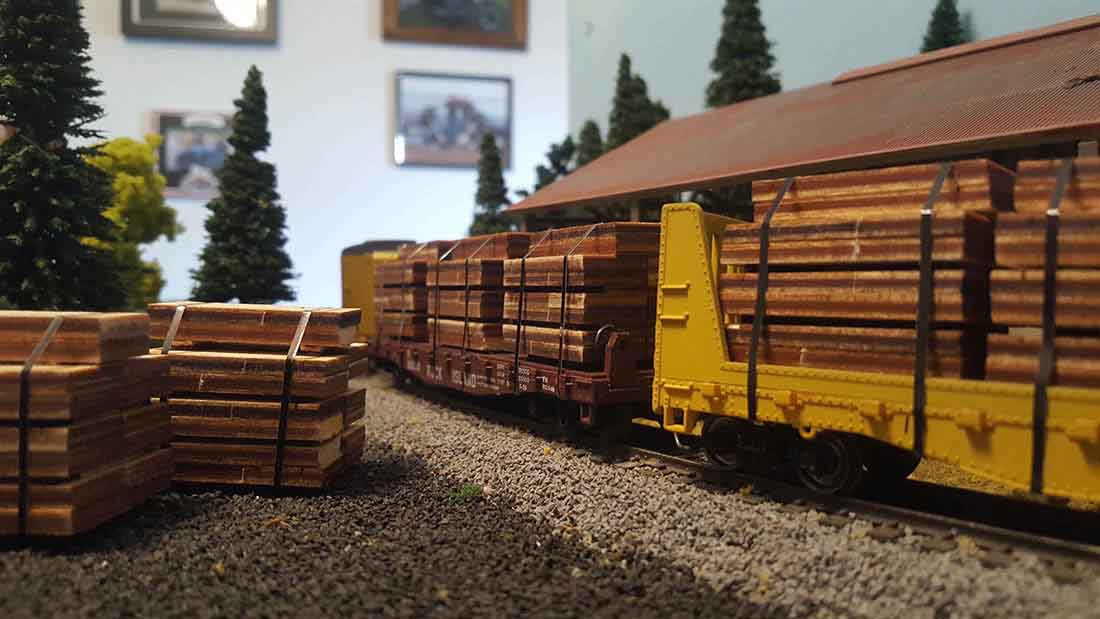
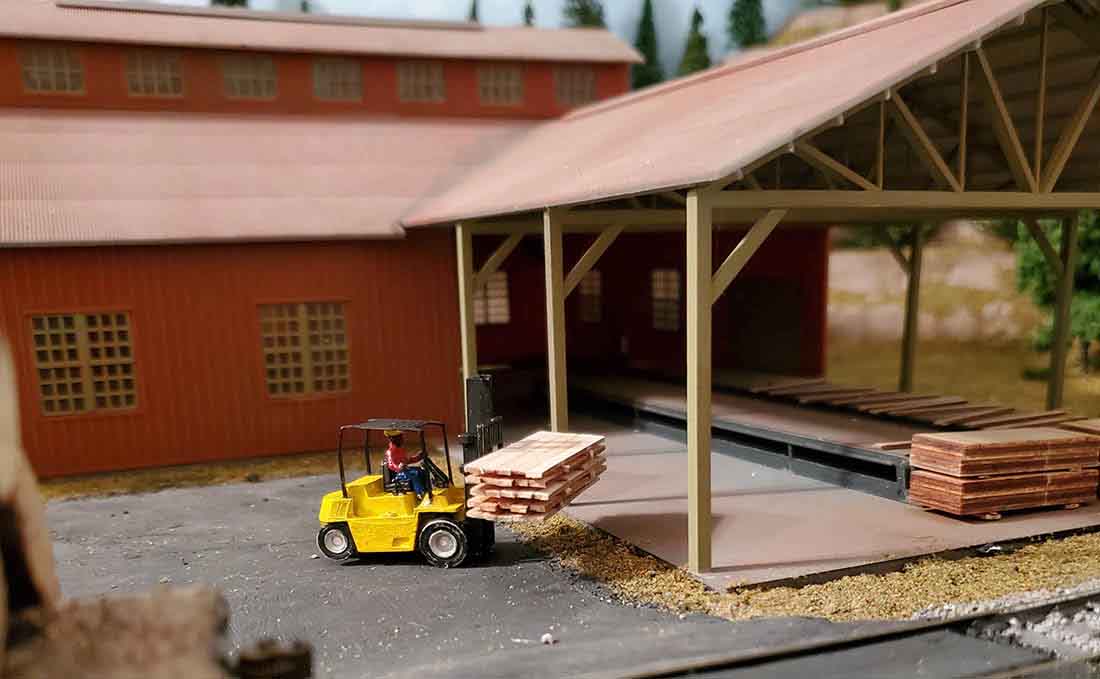
Then applied a gloss artist medium to give it a sheen appearance. The sign on the sawmill was printed on my printer and weathered. Trees have been added and many, many bundles of lumber stacks that had to be assembled.
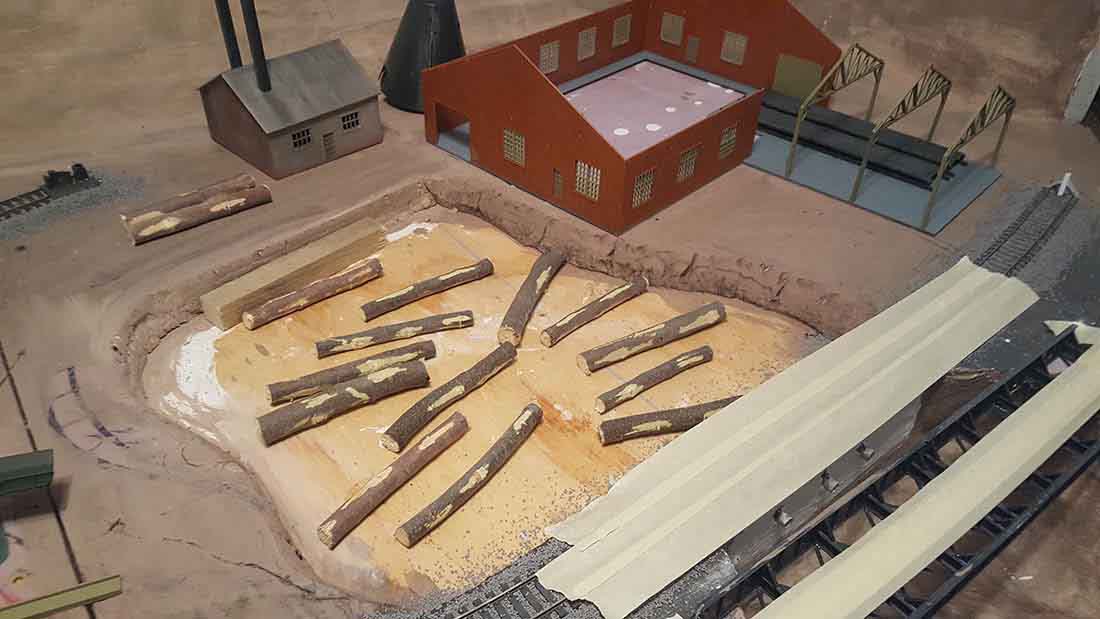
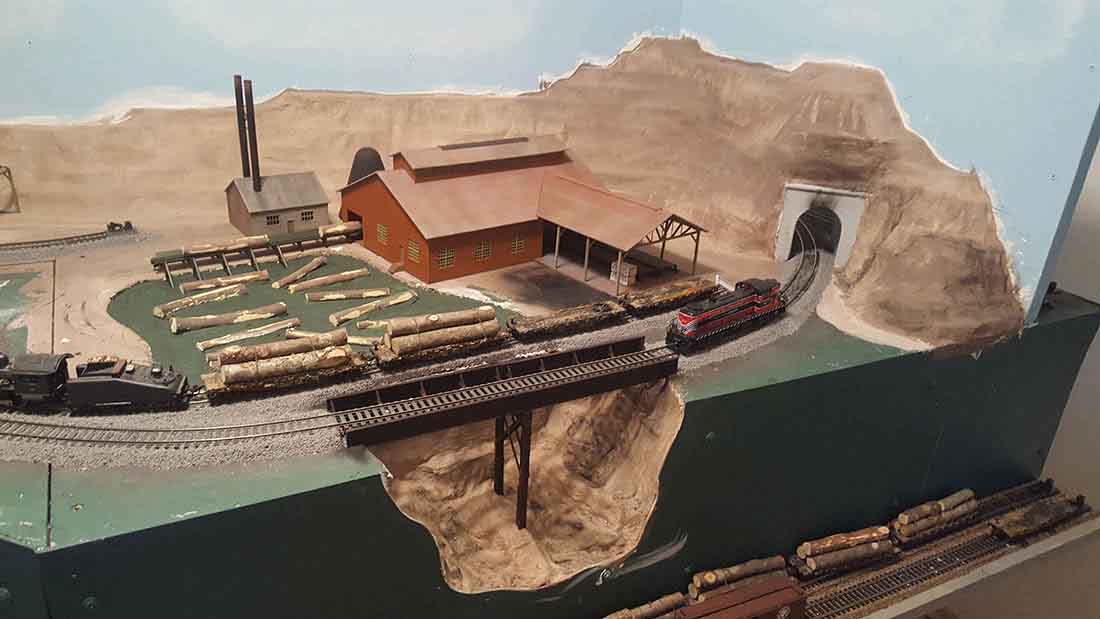

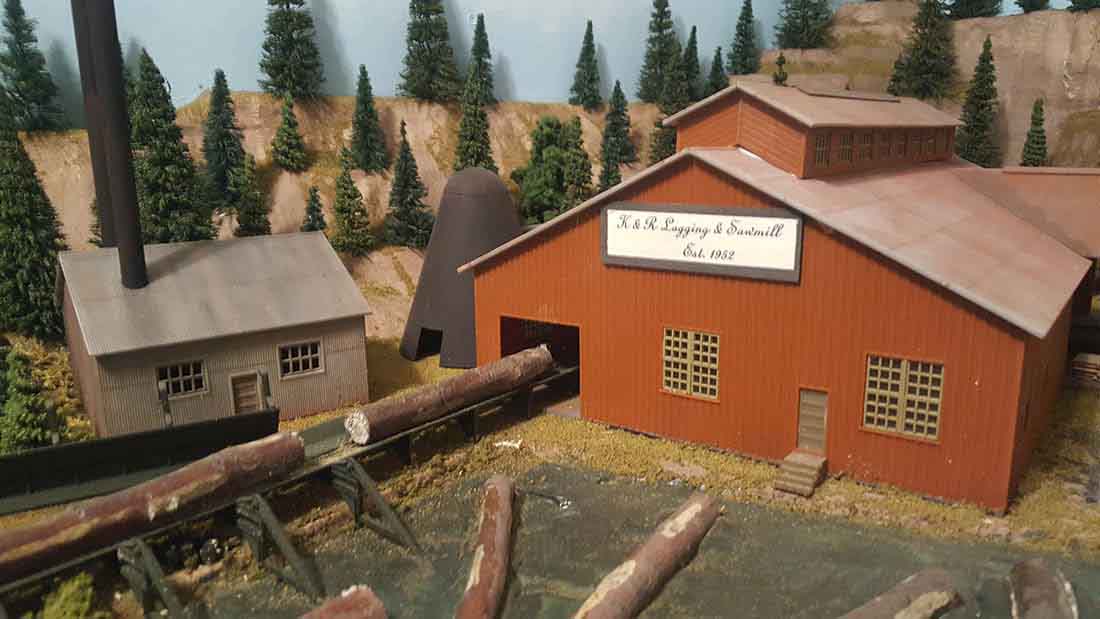

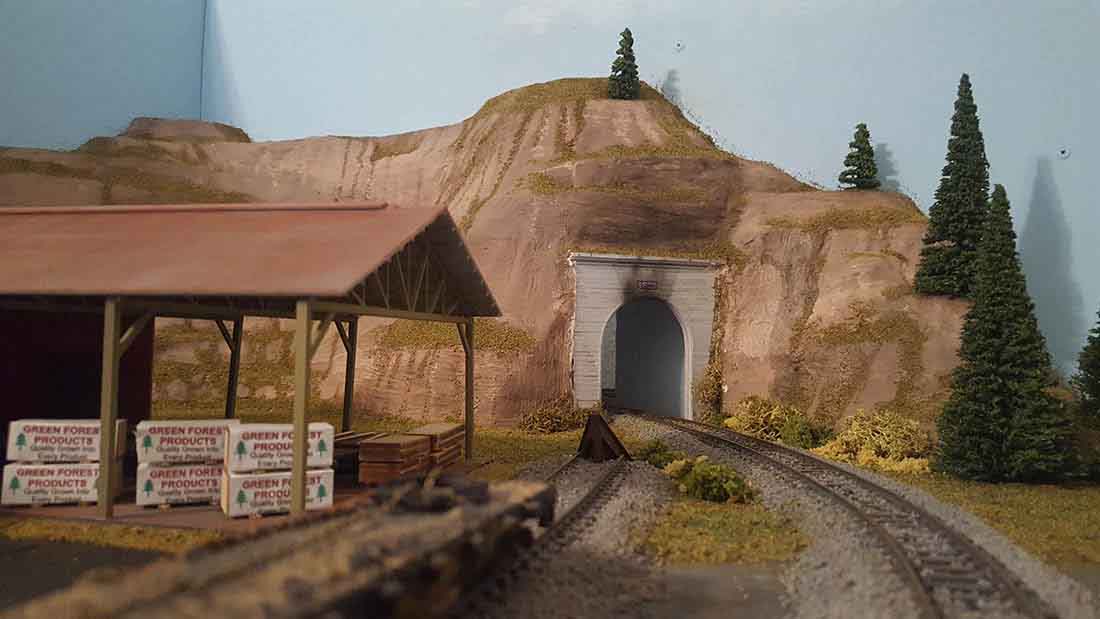
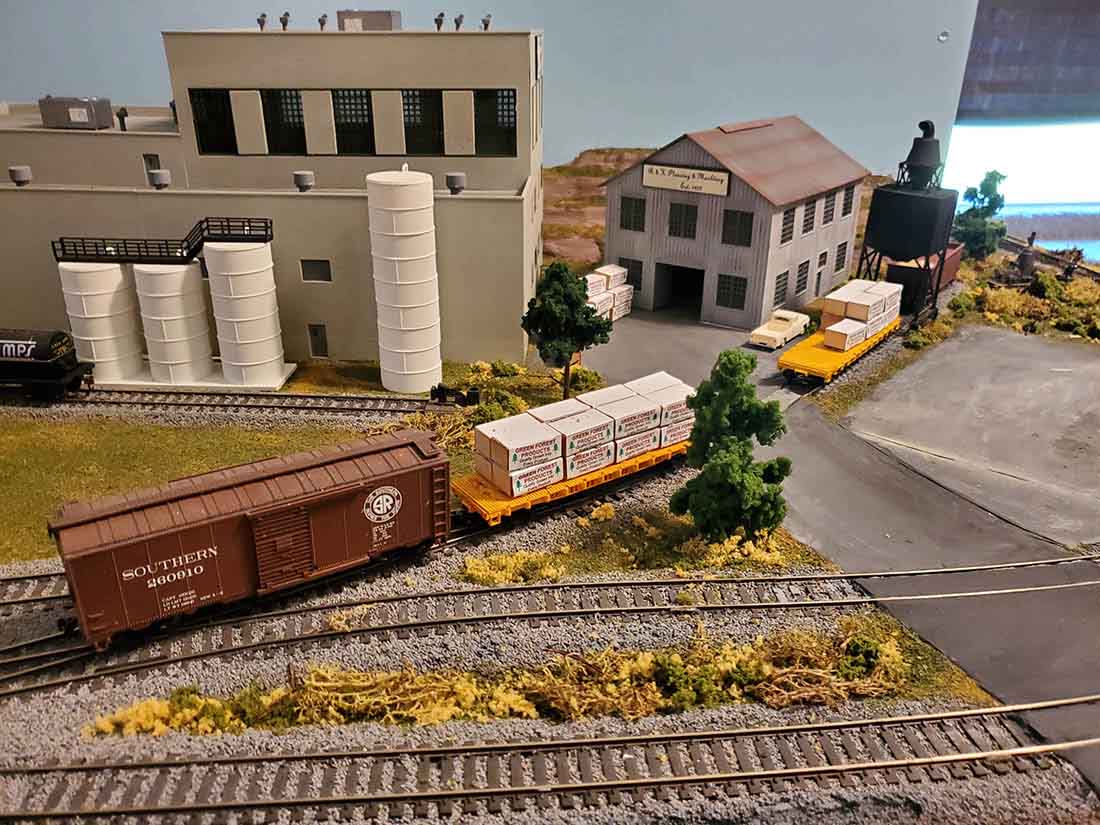
The lumber shed is a rail load out point along with truck loading. The tunnel portal shows signs of the older steam engines smoke stacks, which on occasion a steam powered climax makes an appearance.
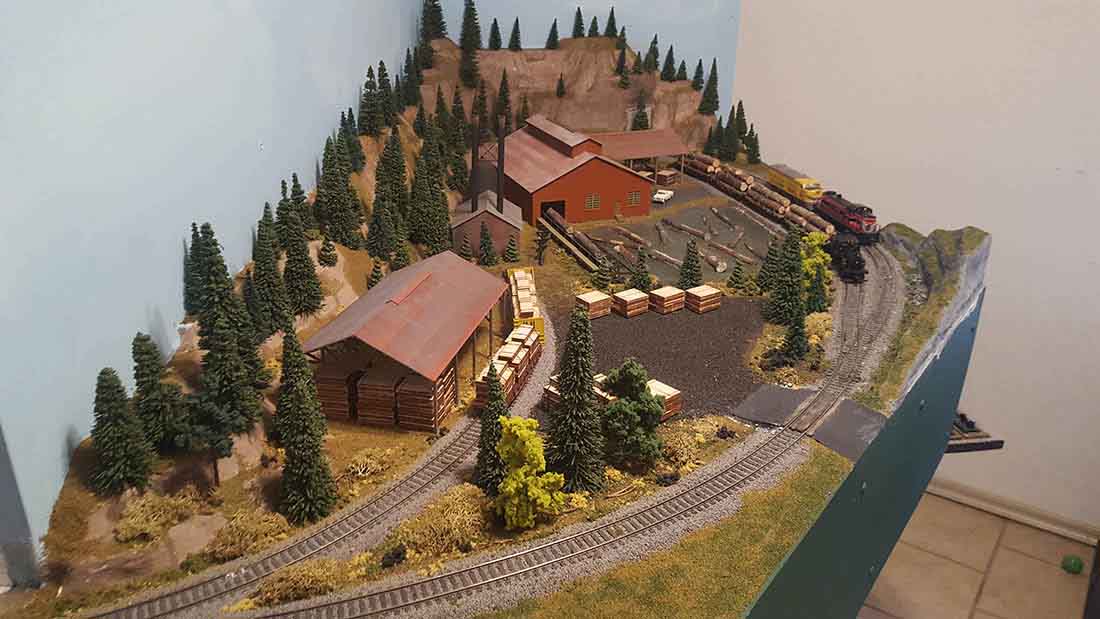
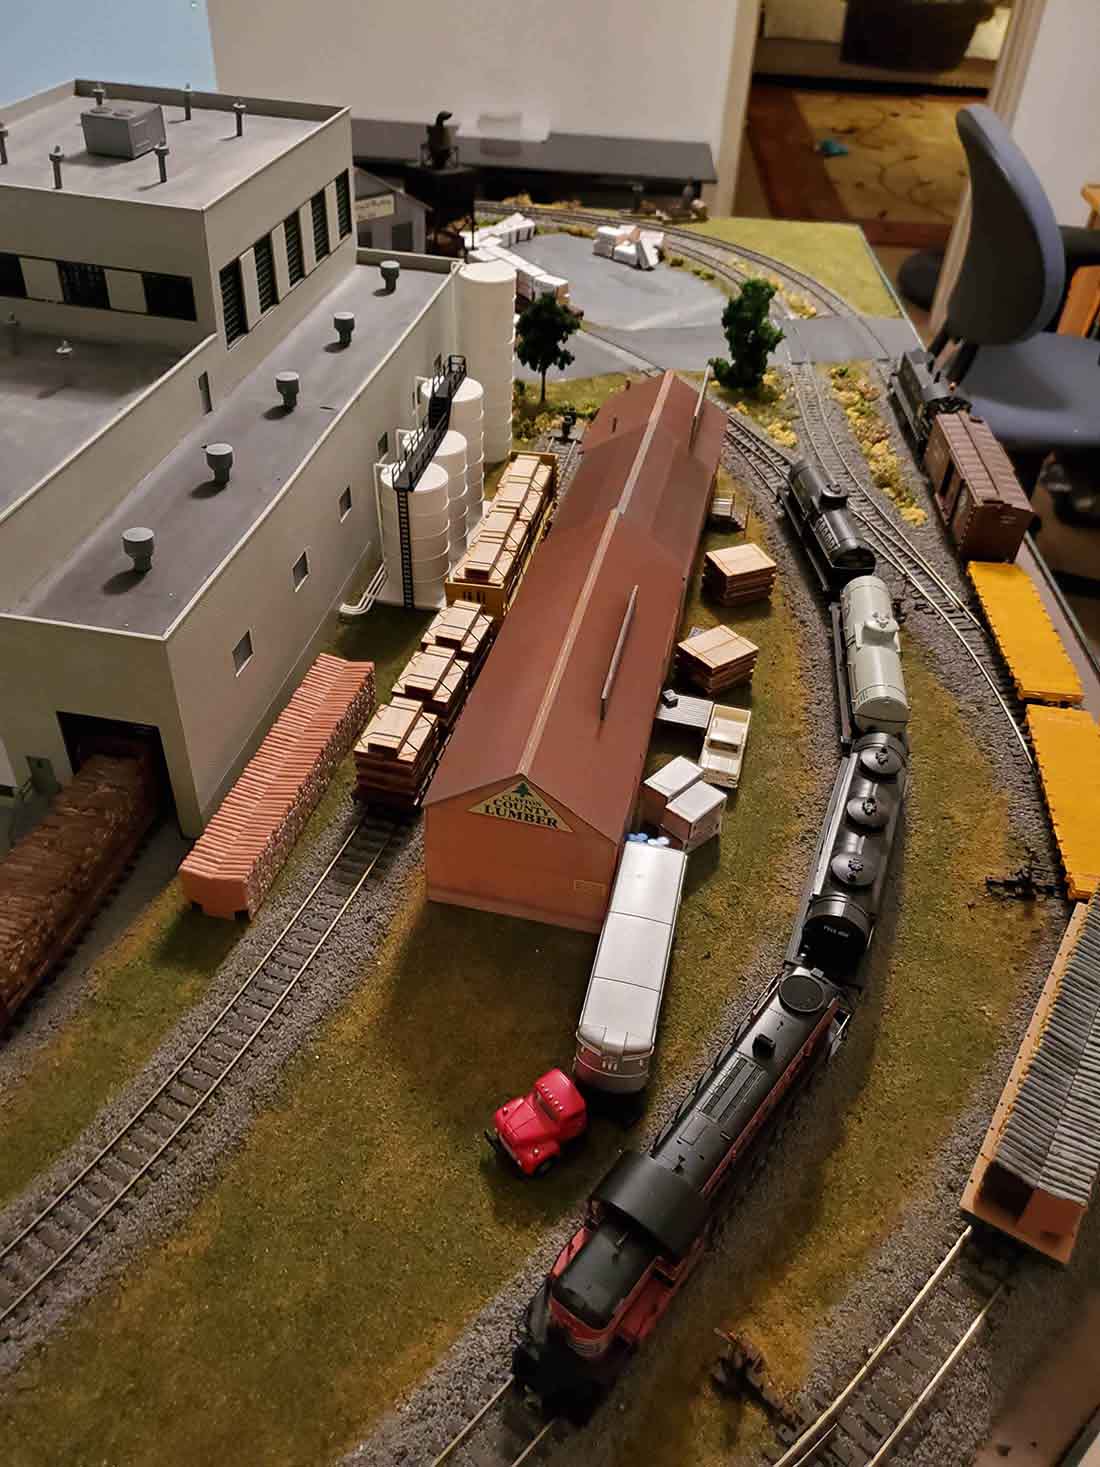
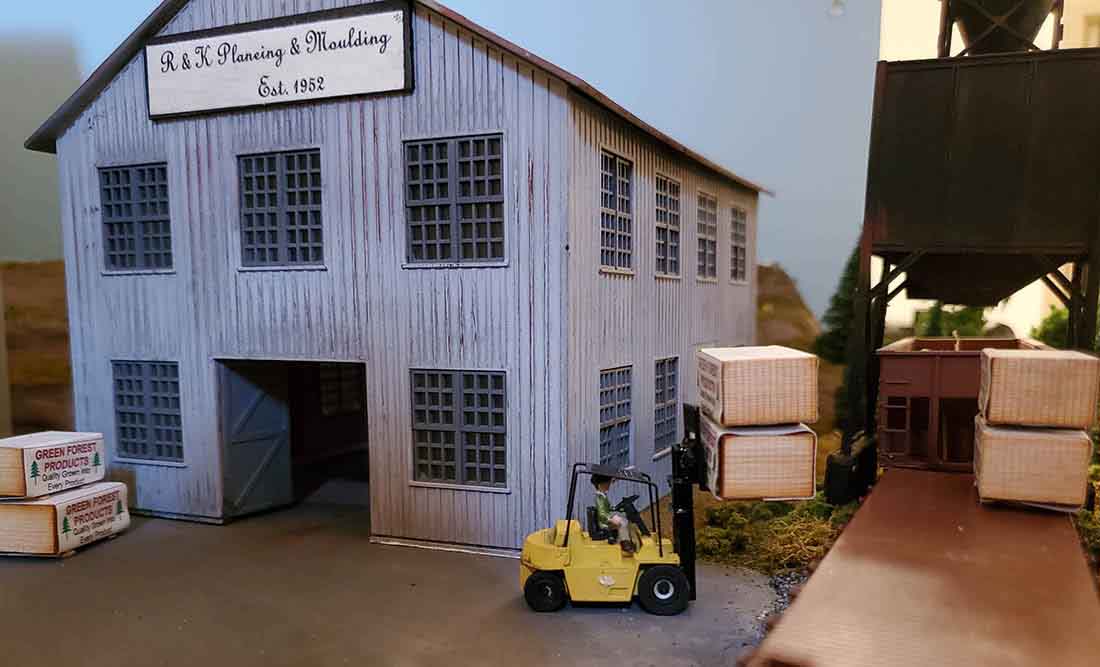
An overall view of the raw material side and the production and retail industry side separated by a backdrop
Well…. there’s the ole girl…. Steam powered climax and diesel powered F7
Well, Al…that pretty much sums it up… by the way… a new larger layout is in the planning stage…
Thank you for allowing me to share this endeavor… of just under 2 years in the making.
Richard of Oklahoma”
A huge thanks to Richard for sharing his HO layout build – what a layout and so well documented too.
Hope you enjoyed it as much as I did. Please do leave a comment below if you’d like to.
That’s all this time. Keep ’em coming.
And don’t forget the Beginner’s Guide is here if you want to get going on your own layout.
Best
Al


I would lik to see a three truck shay to go with your heisler. Great model building, and a lot of railroading in a small space. Thanks for sharing
Richard, What a fantastic layout ! The detail is incredible along with your modeling skills. And you say you have a newer, larger layout in the planning stages – WOW.
Nice work you have achieved there richard ….Dangerous Dave
Richard, nice to see a logging layout so well detailed. I like the detail added to your little 0-6-0 switcher with the slope back tender. Climax loco really adds to the logging theme. Well done.
My Home layout – HOn3 logging layout on shelves around the room with Shay’s, Heislers and a Mallet 2-6-6-2 loco.
Brian – the HOn3 guy – Knysna RSA🇿🇦
Great job Richard – very interesting subject and fantastic detail.
Brian, Wokingham. UK
What a fantastic layout ! The detail is incredible!
Well done, will inspire many modelers I’m sure!
Looking forward to the next one!
Peter
Looks like a lot of planning work and effort went into that lumber yard / saw mill.
Great job. Now for an action video.
The Critic
Well done
Thanks Richard, love seeing a layout develop all the way through, thanks for sharing.
Looks fantastic Richard ! Great attention to detail.
Ron
I love this layout. I’m doing a logging layout as well as a coal mine and distribution center. I’ll doing them for both. What I really like is the arrangement of your buildings and drying racks. It flows beautifully. I’m definitely saving this post. Thank you for sharing.
Thank you so much guys for all your comments….
And for Kevin…. I actually had a 3 truck shay kit… but I have tremor disorder and small part assembly is pretty much impossible, the tremors do come and go but I have my local train shop putting it together when they have time.
I’ll be sharing more detailed pics in the future.
The new layout will be a 15 x 6 U shaped with the long section being 2 1/2′ wide…. thnxs again to Al for the sharing opportunity…
That looks fantastic and really appreciate all the photos along the way during construction of it.
Very nice detailing and a great job of documenting the building of your railroad.
Richard
You are the man. You start off with all the pertinent info so essential to us that are trying to achieve your level of success. Great planning, execution and craftsmanship. I love the Climax and logging theme.
Cant thank you enough for the pics and very detailed narrative. Please keep us posted on any other plans.
Be well and safe
George from LI, NY
Very nice. Two things that help give a great effect.:
L girder construction helps make the drainage area easier to build. (And any other low spots. )
The two sided backdrop creates two distinct areas on one layout.
Maybe on your next layout, you can design an empties in, loads out situation. You certainly have the talent to get it done. Keep building.
Very Impressive!
The design and plan looks like something I have seen before in a magazine way too many years ago. That said, it is very well executed and the level of detail is fantastic.
One small note — Plaster impregnated cloth is popular as a scenery base. On the other hand, about a dozen years ago, I started using a combination of cloth soaked in thinned white glue (PVA) and paper soaked the same way… Strong and very light. Plaster is saved for rocks!
Very nicely done, Richard! The mill pond drainage cutout draws attention to your layout and all the detailing work you have done.
Stay safe, well & SANE.
Excellent workmanship.
What did you use for logs?
Well done! The only criticism I would have for the next one is with the water flowing out of the dam culverts. They don’t follow the laws of physics, so are jarring to the senses. The mill pond is very still, with a virtually still surface, which indicates almost no in and outflow, but then there is a large outflow out of the drain pipes under a significant pressure and the free drop is very turbulent, especially on the center culvert without reason. As a visual reference to how water flows, I might suggest attaching a garden hose to a short length of pvc pipe and mount it to a table or bench nearly horizontal or however the culverts exit the dam, then start the water, very slowly at first, then with small increasing pressure steps. Video the water flow from the side and straight on at each pressure change so you can watch it later and freeze frames. Position the camera so the pipe in the video appears similar in size to the ones in the layout to give a scale reference. I think you may be surprised that the water acts much differently than in our imagination, yet our subconscious is jarred when it’s not right.
Richard, thanks so much for sharing and for documenting the build so well. I’m in planning stage for an Nn3 logging railroad and have been trying to think about how to combine the downstream industries. Your splitting the layout this way is brilliant and definitely an inspiration for my plan. Can’t wait to see your next build.
Steve in Wilmington, NC
Hi George… thank you… but I have a question for you… where on L.I. are you in…. I grew up in the Hamptons, actually in Water Mill where my dad had a restaurant…. Richard
Richard, you have a great vision here. Congrats!
Thanks for this. It is a really good job and shows what can be accomplished in a very small space.
Hi Lew, I actually used branches from one of my trees on my property that was damaged during a previous ice storm… not sure of the species… sorry
Good job & great work. I do have one question however. On several pictures of the dam outflow there seems to be a rail line below the mill drainage pond.. Does that line connect to the surface level tracks or is it just a disconnected section of track to store your rolling stock?
You did a beautiful job on that. The scenery looks wonderful and works well in the space that you have. You have a great proportion of track to scenery which preserves the illusion of reality, and the building seem to fit really well. I’m not sure I would have had the restraint you did, I probably would have had way too much track. Really well done.
lots of hard work paid off.. very nice oh Chuck Frank is out there somewhere??????
Pretty neat.!!!! mine is going look something like that.
outstanding!
Very well done. Water actually looks wet. Would like to see a pic of the dam from the pond side as it is unclear as to how logs get into water. Very imaginative.
Hi Terry, the shelf below the dam area was just for additional rolling stock storage…. but thnxs for asking
Richard;
Wow, so nicely done, with a storyline in the scenes. Now for some serious criticism, I noticed that the forklift does not have the 2021 inspection sticker required, as well as no OSHA notices on the walls of the buildings……haha.
Some log hostlers working the logs in the pond would be a neat touch, but a quick glance through the internet did not show me any characters fitting. They had forest workers, but not quite the same. If you want to replicate that you may have to perform some surgery on existing workers.
I have used the plaster cloth, and I wonder if a dye in the water that activates the plaster cloth would add some pigment to the process.
Thank you so much for sharing! Ya done good!
MN Dan
Richard … continuously, I give myself all sorts of excuses to not build the layout I have been imagining off and on for over 50 years. No time, no space, no money, etc. Now retired it has been mostly no imagination, no inspiration … but you’ve ripped all of them apart. Especially the inspiration. I was blown away … with the details, in such a small space, and that covers only a part of your layout. Thank you … the inspiration is now there … I’ve got my measuring tape out, building some paper plans, and intend to visit my local lumber store tomorrow. Thanks again!
I really enjoy this site. the pictures and information are great. I hope to be able to start on my N scale layout soon. Live in Texas in Galveston county having to deal with a Winter storm.
Orion,
Trust me… how I know…. my last layout was in the early 80’s I’ve loved the hobby all my life, and like you I used all the excuses you have and probably more…. that’s what makes this hobby more enjoyable than any other hobby… to inspire and learn from and too others… no better compliment can be given as one that helps and inspires someone to to follow a passion and love of one’s inner self… thank you, Orion
Dan,
I absolutely agree with you… it needs workers… trying desperately to find the right ones, but nothing suits my vision… but have some on oder that I may just have to personalize… lol and thanks for the input…. Richard
AL, THANK YOU FOR WHAT YOU DO!!!!!..Being an old time builder,(first electric
train in 1948), It’s great to see a post I can identify with! The mega layouts you
post are nice but most of us will never have one. 3X6 tables are something
that is possible for the majority of us. Thanks again for posting Richards project!!
PS…My last HO layout was a DC 15X 25 ft. 50 amp ps with 36in radius curves.
and I archive every post I get….RJ La Jeunesse, Ohio, USA
The idea of the tape for a waterfall is good hide a fan behind a rock blowing on it would give movement too ? I’ve thought of putting a low rocky hill in front of a layout with a line running about half way down as you get closer you look over it to see more in the valley and taller hills on the back side .
Richard,
Richard,
Wow – what a great piece of work. Like another mentioned, I been collecting Ho RR stuff for over 40 years and have NO Layout, No Room, & not enough $$. LOL. Most of our lives right?? Your work energizes us and amazes us to say the least. I really hate to make a comment beings I have not “built a thing” but the water / pond did cause some???s Where does the water in come from and how or why are the logs in a pond with no river to get them there?? Similar questions were made earlier. I guess with Great Work -I just study it to a fault.
Thanks for the post – Again Fantastic HO Scene.
Richard, VERY NICELY DONE!!!!!
The added steam engines in the scene is GREAT! I love how things came together as you went on the build!
Keep up the GREAT work and HAVE FUN! ~Hemi
Just love those start to finish (step by step) layouts. I have learned a lot from them. Thank you. Great job Rich. Rocco from Haskell New Jersey.
No sure why Chuck Frank was so critical……..
IT’S A HOBBY NOT A COMPETITION!!!!!!!
Nice job Richard.
Well, too answer some questions…. first of all, we all strive for realism hence the constructive evaluation… secondly, the logs are delivered by rail and dumped into the mill pond. And as far as where the water comes from is a question I actually asked myself… I suppose I could have had a cascading waterfall…. but perhaps a under ground spring just under the base of the mountains behind…
The fun part of this hobby is that it’s never ending, changes can be made at anytime and in anyway… I appreciate all comments and suggestions… there’s an old saying I quote often… ” there’s your way, my way… and another way ”
Thanks to all…..
Charles in New Jersey
Great detail and explanation of planning and execution. I would love to have a logging portion of my (still) planned layout. I have one concern which seems to be noticeable for me in every layout with cut trees. The HO scale that these trees had to have been that are loaded onto the logging cars would be four to five times larger than any tree shown elsewhere on the display. Is this realistic to see cut logs as big as they are here (and everywhere). I wrestle with this scale difference every time I see a logging operation. This is not a criticism of your work, but in my mind the cut logs should be smaller in diameter. I also realize, in my own quest, it is hard to find sticks to use for this purpose that occur out in nature. Any thoughts from others? Again, this is not a criticism of Richard’s great work, but rather, a point of observation. Thank you for any responses.
Hi Charles, a God eye and observation… if you wanted to model the actual harvest area of logs, it’s a matter of proportion… the logs in the foreground would be larger or to say the size of the actual load and smaller as it goes away…. it’s also a part of imagination and not so as exact… just use your imagination and what looks good for you…. keep the faith
Beautiful layout, Richard. Truly top-notch. So many great ideas.
Great layout Richard. I am in the early stages of planning an N Scale layout on a similar theme. Downsizing to 1 car so the vacant side of the garage will be put to good use in the very near future.
Hi great looking layout. Good detail and loads of interest. If I had to comment it would be the size of the timber boards in photo no 3. They appear to be way over scale and well beyond the capacity of your fork truck. They are also much wider than any of the felled logs awaiting milling. A. Small comment but perhaps worth looking at
Thanks for the submission.
Can’t add anything else to what’s been said already. Only thing is the logs in pond are sitting too high in water. Should only see maybe top third of them; a few sticking end up at angle would be realistic (sunken). Divers would salvage for sunken logs which are quite valuable, have hardwood characteristics. Also a few men by water with peaveys and pike poles to load logs on conveyer and a man or two actually out on big logs themselves (carvin’ the logs). Yes, know of operations from childhood.
Regards, Rich
Good Workmanship.!!!!!! I hope mine turns out that good.
Richard, a really great looking logging layout,great job in the detailing. I too will have a logging theme on my ho layout. and I too have the exact same saw mill like yours. It came from a Walther’s kit.. now I can pattern my logging layout like yours.i wasn’t sure just how to set it up I also will have mountains around my logging set up, I love the way you’ve done the foam .it will help me very much.. thanks. val in utah..
Very well done I’m impressed
Wow! Great work.
A very nice logging layout with positive and negative comments. I feel the negative comments are warranted as they are obvious to the viewer. If it were my layout, I would welcome any and all comments both positive and negative. The negative ones serve to “educate” so the next project will be better. But it’s a model railroad, not a NASA project so anything goes. As long as you are having fun that’s all that counts.
nicely done,great detail and love the lumber yard,being a carpenter by profession.The forklift sets everything in perspective.My hat is off to you sir.
Amazing !! Keep up the great work!! I am so far behind!
This is a fantastic layout and scenery for only two years going.
I have a sincere question to ask. I love your layout and work, and my question is definitely not a negative reflection in any way of you your layout. Do you ever notice, despite the scale used, how we tend to load logs of mega size on flats and yet if these were to be “growing” aside or scenery trees, they would be totally dwarfed. I am not sure if this is an issue of old growth verses new or whether it is a disparity they we simply have to accept if we model logging in our layouts? What is the solution to model consistency in the layout? I have seen where some people will make a forest with an almost impenetrable canopy of green, which allows the viewer to not know the size of the trees comprising the forest. But if you are like myself, and I believe most of us, we use the standard 3-4″ quarter inch (~0.5 cm) tree trunks as our forests and scenery foliage.
What is the answer, ignore the size difference or is there a way to model it differently? I would love to hear the many thoughts out there on this subject.
Thanks for all the photos on the creation of your railroad. Beautiful layout and logging is a great concept for a relatively small layout. The design appears to give you a lot of operational capability In a relatively small space. Excellent work.
This is a beautifully thought out and executed layout. I think the idea of code 100 is smart as it helps assure more reliable running conditions
I do have one criticism
Where is the backdrop?
I think this would help the depth of field in your photos and improve the realism
“Loggin On” takes on a whole new meaning! Great layout!
Very nice job ,thanks for sharing
Looks pretty kool.!!!! I hope mine turns out that good.
Hello Al, you have a great model railroad site here. I would like to contribute a bit of my knowledge to your site. I am 87 and been a model railroader since the late 40’s. Although I have not been active during those 70 odd years due to other life issues, I have always kept my eyes and ears open with the intent of getting back into model railroading. Recently I started my final model railroad now that I am retired with nothing to stop me. It’s an on-going process, learning as I go along. I find that a most important point I wish to make is: to make drawings for everything you wish to make. Maybe there are those who can start from scratch and create a layout, but I am not one of those. Throughout my career as engineer/designer, making drawings whether they be pencil and paper or CAD, I found that a drawing was always the first step in any design. It’s a blueprint as to what it is you want to create. Once a drawing is made, the rest is comparatively easy. It’s akin to writing a book and trying to remember what you wrote. A plan (drawing) keeps you on track (no pun intended). Building a model railroad is the same as designing a 1:1 scale building, ship or any other man-made object, just in a smaller scale. Everything I build whether it be a train model, a full-size ship or a piece of furniture begins with a drawing. Even masters like Leonardo DaVinci started with a drawing before creating a work. So, I say to my fellow model railroaders; start your project no matter what it is with a drawing. The more detailed it is the better your project will turn out. Using a drawing keeps you on track and alerts you when something is going wrong. Dimensions are easy to mess up, but a detailed drawing eliminates this, especially CAD ensures that everything fits. I know not everyone has CAD, but even a hand drawn sketch can make the difference between a working model and one that may end up in the trash basket. I would urge anyone who wants to build anything to put it on paper first before continuing.
The photos show that you have some excellent modeling skills.
I was wondering about why the logs were even dumped into the water when they could be so conveniently mechanically conveyed directly to the mill area for storage and processing? It just seems like an unnecessary step!
Great Job Well Done!
To Charles Eyster; the size of logs vary widely. In the western U.S.A, the logs are often 6 to 8 feet diameter. To Mr.. Ron: I agree wholeheartedly. I am 88. I attended an engineering high school in Baltimore in the 1950’s. Engineer drawing was a required subject. I am glad for that, as I can still sit down with a drawing board, T square 45/90 &30/60 triangles and draw whatever I need.Oh yeah, No. four pencils.
Richard, you indicated somewhere above that you were looking for figures. May I suggest looking at Arttista.com They are not cheap but quite detailed and varied positioning.
Great work.
JoeS-in ME
Richard,
you have given me something to aspire to.
Bruce from South carolina
Re: the comments on the difference in full grown model trees too small for the relatively bigger logs on the log cars and pond on the same layout . I’ve seen some pictures of model rr’s where the larger trees harvested were represented by large stumps in among the smaller full size model trees. which represent a second growth forest, with the current harvested logs coming from a different (imagined) area. I have also seen the larger trees modeled but not to full height a 300 ft tree in HO scale would be over 37″ tall); with perhaps only the first 12″ of it’s height modeled. I have to agree with some, tho, that each of us has different toleration for “artistic license”, and we each have to satisfy ourselves first with our modeling efforts. Several of us do find that as our tastes change over time, we redo past “finished” areas of our layouts to reflect new tastes and/or improved skills – one reason why this hobby never grows old.
Tom, the reasons logs were dumped into a mill pond was to prevent cracking and splitting…. nowadays the logs are delivered to mills and stacked with water sprinklers keeping them wet for the same purpose…. but thnxs for asking…
Update…. after moving from Oklahoma to Arkansas, no new layout has been designed or started due to having to remodel the “fixer upper”… still not quite sure as to what to do… I’m back and forth on whether to redo the logging layout or something for more continuous operation with some form of mining industry, so… still planning
I want to thank everyone for your comments which truly warms my heart… should I redo the original layout, all comments will help me create an even better creation…
Richard
Update… I’ve narrowed my layout plans down to 3… 1) Rebuild the R&K Logging RR, but with an extension to a tree harvesting area… 2) Using the The Thunder Mesa track plan, but updating to a 50’s era theme adding the logging & mining theme… or 3) the Inyo & White Mtn RR…
Any suggestions would be appreciated….
Fantastic wood mill set up Where did you place the rotary dumper on your layout I could not find it. What would the dumper be used for?? scrape lumber for the heater system during the winter time ?? I hope mine layout would be close to yours. Great positions and set ups.
Best wishes, Steve from Ormond Beach, Fla.