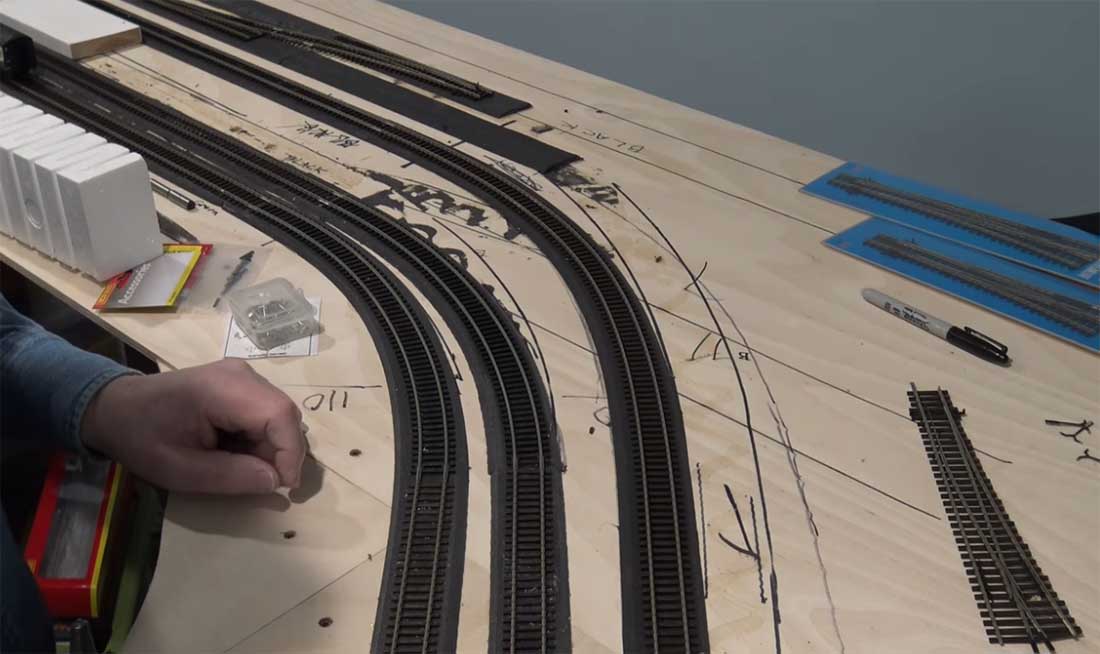
Rob’s been in touch with how to make curves out of train track roadbed:
“Hi Al,
I have heard people say my favorite track bed, Woodland Scenics Road Bed is hard to work around curves.
Hearing that, and having the need to install some around a curve today, I put together a short 4 minute video demonstrating how I do it.
I love this stuff because it is such a great acoustic barrier between the track and the wood of the bench that supports it. I don’t want to hear wood reverberating when my trains run over the track, I just want to hear the wheels. I have absolutely no connection with the company that makes this stuff.
I hope this is helpful to someone out there,
All the best, Rob – Farland Howe”
Rob’s how to make curves out of train track roadbed youtube:
Now on to Terry:
“Al: Thought I would pass along this tip for members who are still old school and using block sections to control their trains:
I’ve been in the train mode for over 50 years and of course during that time I’ve torn down as many layouts as I built and reused track, insulated spacers etc.
A few day ago I was trying to fix a section of track that caused constant derails. It was the end of a curve going into a switch with an insulated connector on one of the tracks.
Several readjustments of the curve had no effect and it wasn’t until I finally took a real close look at the connector that I found the problem.
The insulated connectors, which as most know, looks like a regular one but have a short pin that sticks up to block the space between the rail almost like an upside down “T”. (—/—)
To my surprise I found that over time and reuse, the “T” pin had worn down or broken off at the base and left too much space at the top for the rails to join without a wheel being caught while passing over!
Replacing it with a new insulated connector solved the problem immediately and of course reduced the number of civil suits filed by injured passengers against the Damnit Railroad to zero!
So my tip to others…is check the “T” to make sure it’s still intact. Sure saves a lot of unneeded worry and concern.
Terry
Idaho USA”
“Hi alistair thought you might like to see the progress of my 6’ x 3’ layout still a lot of work to do, with careful planning and the right choice of track it can be achieved as I could not find any track plans to fit my space
Regards
Michael”
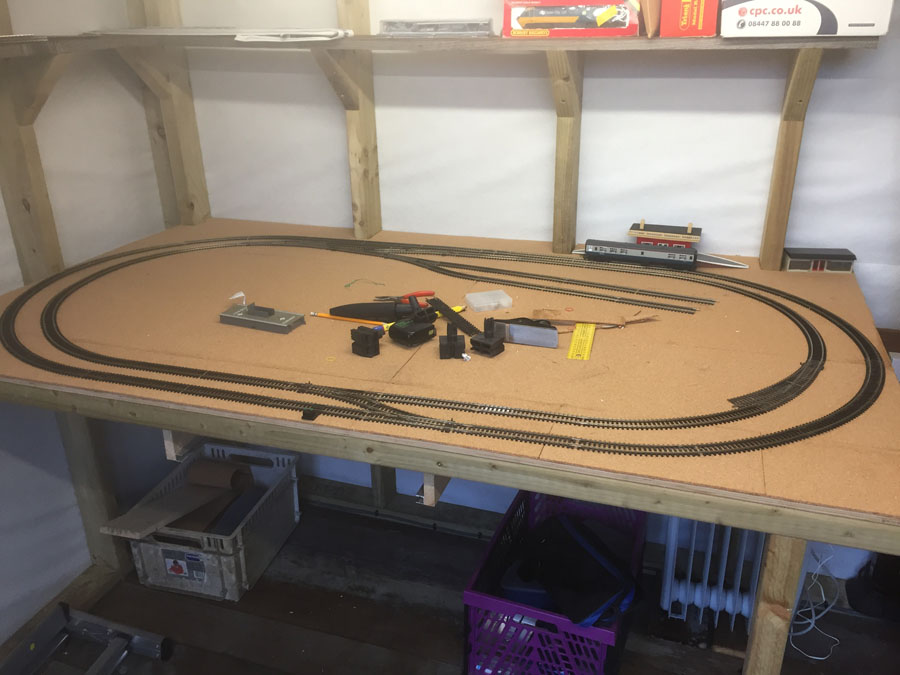
Some folk ask me why I keep posting pictures of layouts that are bearly more than a bench with some track. I’ll tell you why: this hobby is all about making a start. It’s more than half the battle.
And speaking of making starts, the Beginner’s Guide will point you in the right direction – it’s cram packed with tips.
But now on to something else – something I do get a lot of mails on: finding stuff on the site.
If you fancy ferreting through years and years of posts and would like to find the pages relevant to your layout, then I suspect you’ll like this: a search box! I’ve called it the Golden Key.
In a nutshell, it lets you search through every post I’ve ever done (and believe me, there’s a lot of them).
But it comes at a cost. Sorry. Don’t worry though, it won’t break the bank – just $9.97. And that’s for life too. So one payment gets you a life time of searching. You can search until the cows come home, it’s yours for good.
Truth be told, without the Golden Key there wouldn’t be a site at all.
Anyhow, here’s what ‘the golden key’ will do for you. Press play and have a look:
And just to soften the blow, I’m throwing in with it, one of the printable buildings – this house below:
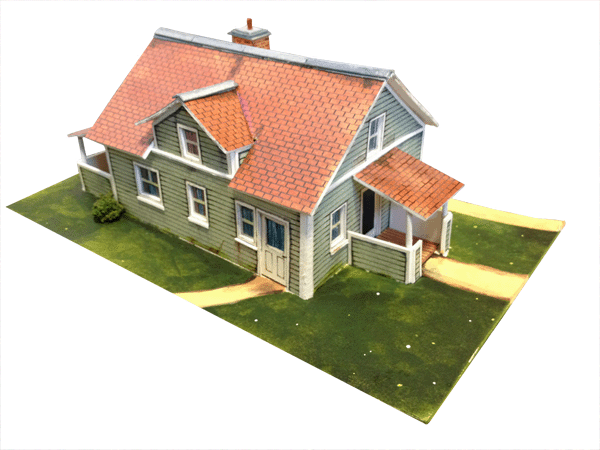
(If you’re new to the print out scenery, you just download it, print it and stick it together. It’s a lot of fun. Here’s John making one of the prints:
My word, I don’t think I’ve ever posted 3 youtubes in one go before.
So there you have it, the Golden Key and the green house, all for just $9.99.
Just so you know, the Golden Key sells for $19.97 on the site, and green house $9.97, so you saving just under $20.
And what’s more, you’ll be able to search and ferret through the blog until your hearts content.
That’s all for today folks.
A big thanks to Terry, Michael, and to Rob for his ‘how to make curves out of train track roadbed’ youtube.
Please do keep ’em coming.
Best
Al

Can any members advise me how I should lay flexi-track on the woodland scenics polystyrene flexible curve risers? I cannot really pin it or glue it to fix the curves track, can I?
I have only used Woodland Scenic road bed on my lay out. What I have found out, is that it also help if you take very smooth sanding paper and just rub it once on the bottom of the bed to make it less smooth., It help with the adhesion on the board.
Glue your track to the Wooland Scenics track bed with the same glue. Use weights or even nails to hold it till the glue sets up, about 20 minutes.
Rob McCrain
The insulated connectors I use (Atlas) don’t reach to the top of the rails even when new. Is there some brand that does reach?
I found that ordinary “T” pins are useful in securing the track to the roadbed. Either way, these are used to hold down both the track and roadbed while the glue sets up. I tried to leave them at least overnight. Thay are reusable and can be bought at any place office products are sold.
Re: insulated connectors- Their function is to electrically isolate sections of track and it does not need to reach all the way to the top of the rails as long as it creates a gap.
I buy model buses, trucks, cars etc. for my layout. I try to make my layout as close to reality as I can. But it just does not make sense to have these vehicles without drivers or passengers. Why can’t the toy manufacturers ( for train layouts at least) have people in them. I cannot insert people in them except in open top buses which I have done.
I have put down over 80 feet Woodland Scenics ( ST1474 ) track bed on my latest layout. I am still learning this hobby, however I do think that if you plan to use this on less than 22R, you should cut it down the middle, make a center line where your track goes, and glue one 1/2 strip at a time. I like the contact gluing method that is on the back of the box the track bed comes in. I say this because when you make a turn you are stretching the outside and shortening the inside which will make the inside a little higher than the outside, this is not good as the outside rail in a curve is what keeps the cars on the rails. As far as the insulated connectors go, the old ones that I bought 20 odd years ago had the center spacer,(for lack of a better word) that came to the top of the rail. I do not think this is a big deal , as I cut some off that rail so the other rail has no space.
Just saying
NV Bob
Thanks for the layout info keep up the great work.
Flex track and foam roadbed: i use track pins to hold the curved track in place while it sets up. I put them usually on the outside of the outside rail of the flex track. Use as many as you want. I also use the track pins to hold the foam in place until it dries. I use latex caulk adhesive for both the foam and the track. It is going to be covered with ballast anyway. Woodland scenics has several videos on this subject.
Hi Al,
I really like the way John puts the cutout’s together does he have his own web site i would like to see more of what he does. Hope you can help
Rob