Steve’s been in touch – he’s put together a check list on adding a model railway station to your layout:
“Hi Al
After an unexpected larger amount of time free at the weekend I have continued with the station project! with some hopefully acceptable results.
There are three parts to this story!
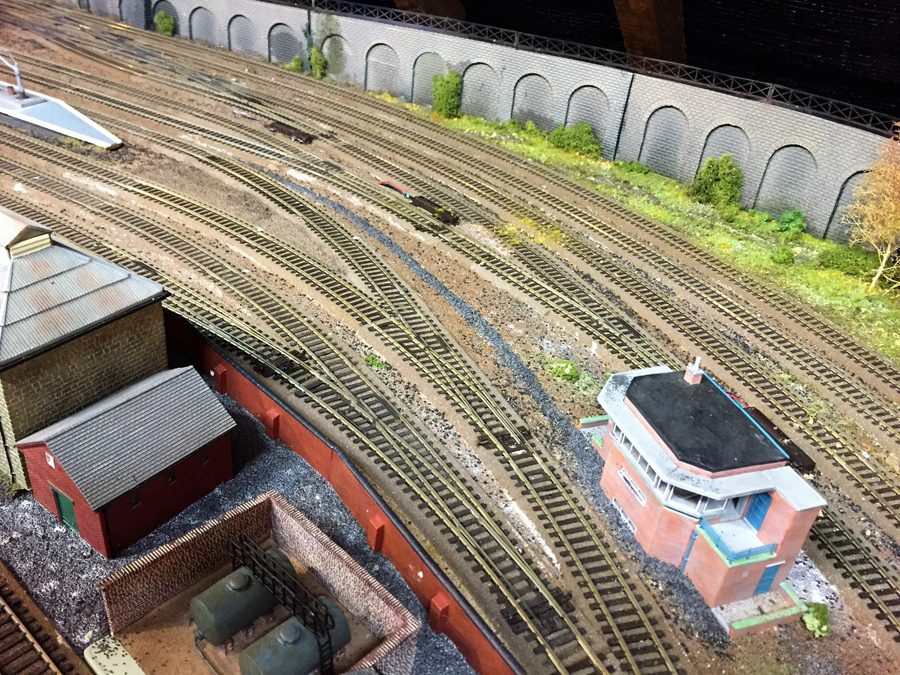
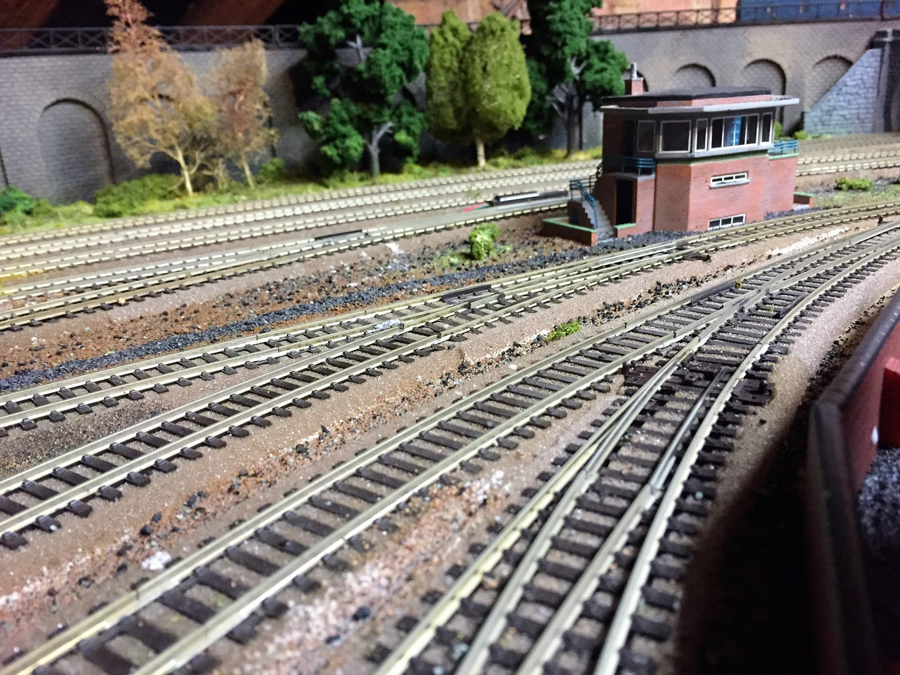
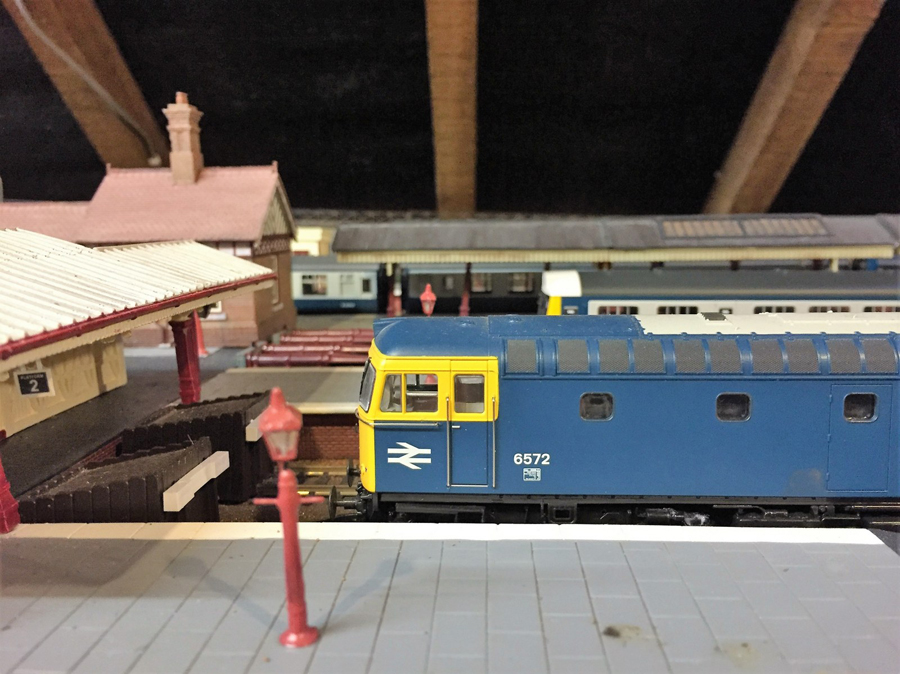
1) The first three are the signal box views at the main station entrance, this was not finished last time and the lack of a proper signal box was correctly mentioned, but it is getting close now so here are three views ,this shows the main entrance with the tracks splitting into the platform roads, (the small signal box out of view shown previously control the engine shed and some freight sidings off view). The box is basically in the middle of it all which hopefully the views show
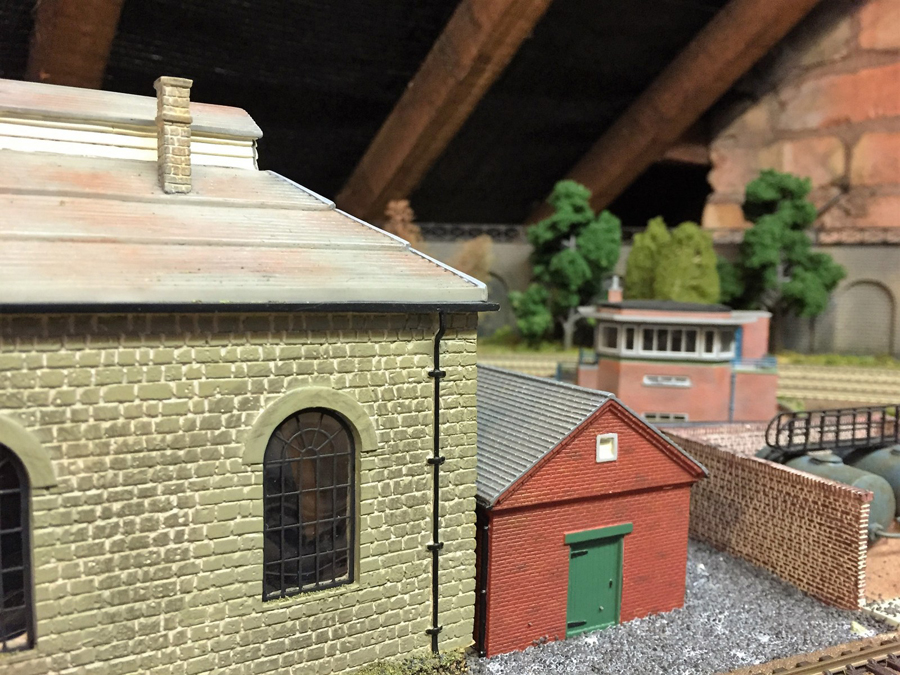
2) The second lot shows a single shed near the model railway station for servicing and quick turn round, this is my first attempt and would welcome suggestions. I have tried to show an old steam shed which is now being used for what was then modern diesels reminiscent of the sixties and seventies, there is a new fuel depot behind the old shed.
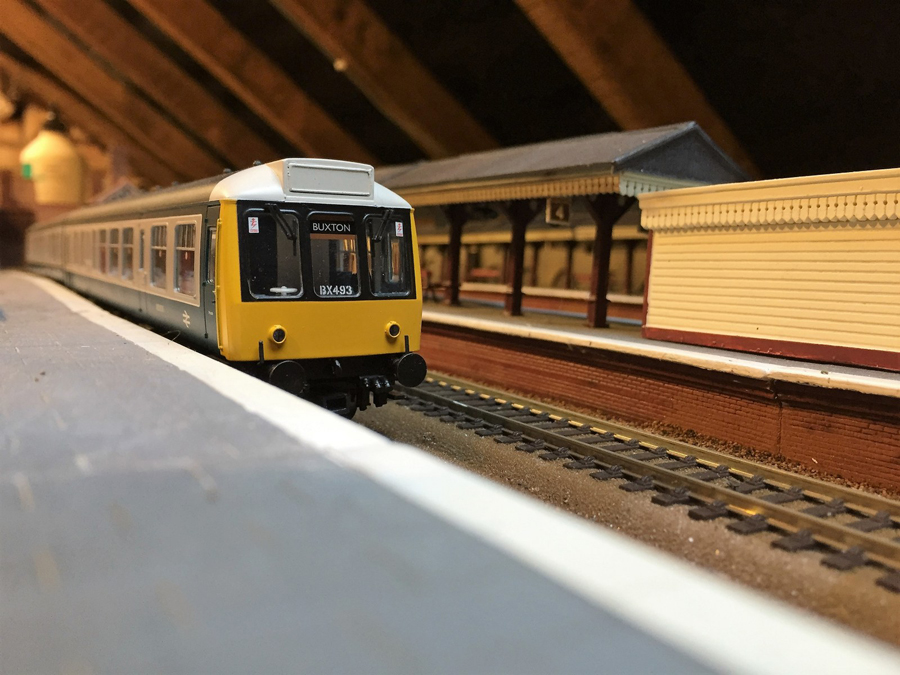
3) the third lot shows the platforms at close quarters in an attempt to check if it is convincing. Platform heights do indeed vary up and down of course but I think I have this about right for a model station.
I have made an attempt at some scenery for the first time having studied the great videos from this site which can bee seen in the background (as ever thanks to dangerous Dave and Everard Junction on U Tube – both great for ideas and training on how to do it properly!).
So far so good but finishing touches are always necessary. Covering wires and various items related to analogue is always a challenge and requires finishing here but that’s for another day!.
Please note the glue is still wet on some of these pictures and tidying up is required in a few places, that’s for the next time!
Al you mentioned about a procedure list for people who might be interested from my amateur attempts at building the model railway station procedure list – so here it is!
1) ensure your board is dead flat use long spirit level in multiple directions first before you do anything make adjustments at this stage – trust me its painful after !
2) thoroughly clean the area and re check you have sufficient room for the model railway station! sounds crazy but you should take into consideration the station approach car park etc
3) lay the track in place but do not fix taking care with the spacing and centre to centre references from points at the station throat this will look a mess if not carried through.
4) lay the platforms upside down so that the edge stones which protrude out act as a guide to space the tracks between platforms I find this works perfectly assuming no curves.
5) try two or three carriages up and down the carefully placed set up plan and either make adjustments and then lightly tac the tracks in place
6) for off the shelf platforms and if you use the foam ballast as I do then you need to lift the platform up slightly to correct this to look right. I know this is open for opinion and platform heights do indeed vary however I think on my layout at least it looks correct see photos submitted n this blog. I use thin balsa for this you can buy a pack of various sizes which is easily cut with a sharp blade. Place under the platform and re check everything so nothing touches
7) If all OK lightly glue the platforms in place without moving the track (which is lightly tacked in place ) do this slowly and carefully running the eye regularly along the extending platform to avoid any creep or misalignment this does take time to get it right! I used a 4ft straight edge to check this regularly as the platform was laid
8) recheck all clearances and if OK then pin the track in its permanent position.
9) Add secondary fixes such as security walls fencing and hand applied ballast between the tracks and weather the platforms
9) Add details such as lights, buffer stops,signal boxes etc
10) Finally add the roof if you have one or canopies etc.
Steve”

Model railway station:


And Hall of Fame member, Mark, sent this in, which I loved:
“Hi Al.
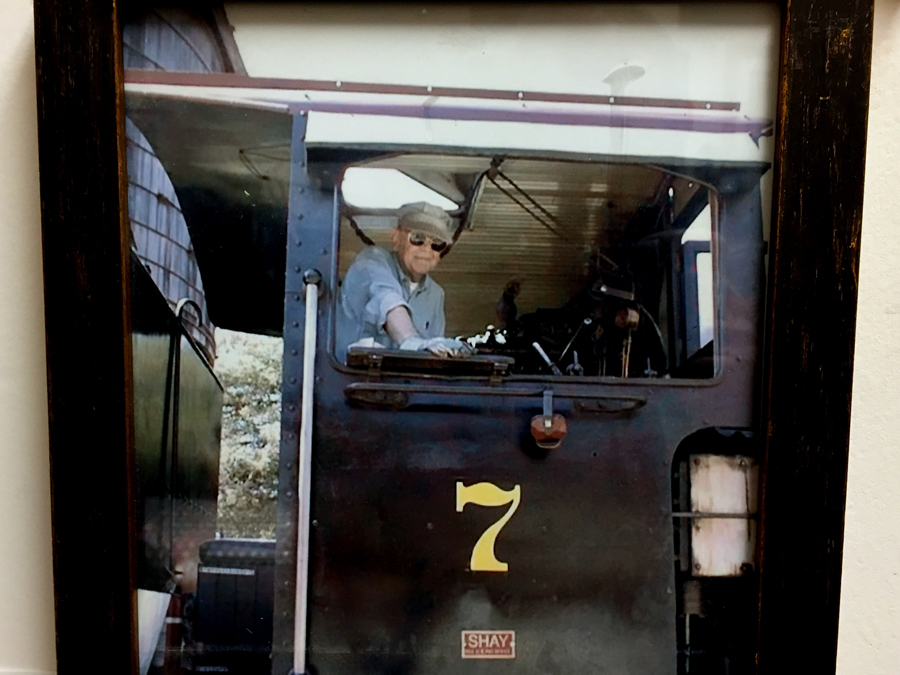
Here is my tip for the day. Model Railroading is fun! So why not include YOURSELF on the layout?
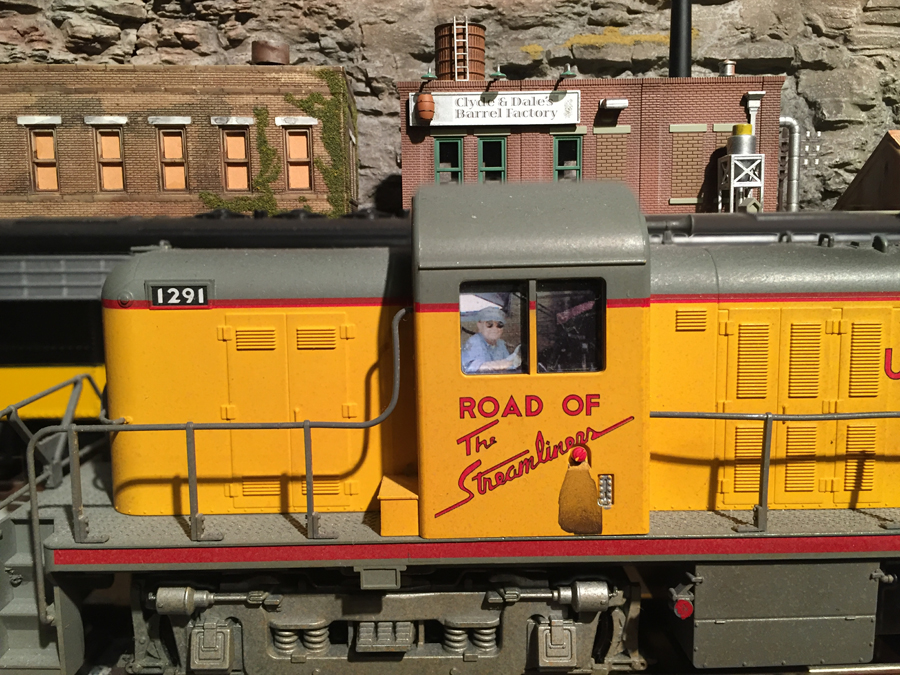
Using my iPhone, I snapped a shot of a photograph I have hanging on my train room wall of me driving the Shay #7 Locomotive after a run from Bear Mt in California.
I reduced the digital image, cropped just my photo and mounted it inside one of my UP engines on the layout. Now I am a permanent part of my own layout. I even get to “rail fan” and watch other locos pass by! (See short video clip).
Using this tip, you can place a photo of yourself anywhere on your layout – in a restaurant, at the market, in the control tower, riding inside a boxcar, etc. The real fun comes when you ask a visitor if they can “find” you on the layout. I had one determined fellow look for over an hour before he discovered “me” in the UP loco.
Mark”
And here’s the video:
I couldn’t agree with Mark more – if you’re not having fun, what’s the point? It really did put a smile a my face.
A big thanks to Steve too for sharing his model railway station check list.
So if you fancy having some fun of your own, but you haven’t made it out of the chair yet, the Beginner’s Guide is here.
Best
Al
PS More HO scale train layouts here if that’s your thing.
Need buildings for your layout? Have a look at the Silly Discount bundle.

Reading and looking at all the material and expert advice on this site is so inspiring at least. I’m a newbie to this hobby and need every little bit of anything provided. Thanks for your continued share of this wonderful hobby.
Gary Doc Stilson
This layout is coming along fantastically – one piece of advice – see dangerous Dave’s article on ‘rusting’ track maybe early days for you but bear it in mind. Thanks for sharing your layout with us, its most appreciated.
Great idea there Mark , shall have to try that ..and wellSteve , that is a nice looking layout you have built there , I am sure we will see more from you in the future , well done …Dangerous Dave
What is “FOAM BALLAST”? Great layout!
Thanks for all the ideas and information Steve. And thanks Mark for the idea about using your image on the layout somewhere – that is very convincing in your case!
Made me wonder about putting family members in the waiting room…
Thanks to everyone for taking the trouble to post stuff – and Al for running the site.
Always a pleasure to see what you share with us
Well done Steve!
Mark what a great idea!
Dave F.
Outstanding layout,excellent track work.Could we see a diagram of the layout.
It`s really fantastic! It`s superior masterpiece in laylouting,really! I wish i could do anything like this ,it`s a piece of art !
What do you have for me? I’m in the process of reviving (tks to U) my 027 gauge Lionel layout. All responses R appreciated.
what a groovy idea with the digital pix of yourself in your own layout….
perfect finish….
keep em runnin fellas
stjohn in long beach calif
Sue and I are sort-of present on my layout, around our favourite hotel pool, just in the form of suitable Preiser figures that looked near enough. I must confess mine is perhaps a tad slimmer than he ought to be!!
Rod
Hi guys, thanks for the positive comments, this does spur us all on,and to answer a few questions raised
1) foam ballast is a roll of 5m foam roughly resembling ballast with the track bed indented into the foam making it easy and reasonably realistic to lay the track directly onto it. Points and crossings are available as dedicated foam ballast with all the track pattern indented. The maker is Peco. There are other makes and I note similar is available in the U S without the track indentation but a good alternative .
2) yes agreed re rusty rails and yes I have seen D D ,s video showing a good idea not taking the rest of your life to achieve a decent and authentic look. I will do this later as the track looks a little toy town!
3) track plan I don’t have to send on the internet but I will have a go at taking a sequence of photos clockwise which will give a half decent picture soon. Basically it is a roundy roundy with a junction at 12 and 4 o clock for the through station on the inside of the main lines with large engine depots at each end fed off the stations. I will show these as the develop and send a few photos before the scenery is laid.
Today is re laid the first of two engine sheds complexes (23 locos accommodated) and took all the wires out forgetting to mark them first. I spent the next two hours unraveling them and marking them up which I should have done the first time. Another lesson learnt !
Good modelling
Steve
I like that I might try it.
I recognize mark’s engine as Roaring Camp #7 engine from Westside Lumber Co
The Sonora shay. I was on the board after my father passed on for a while
Assum idea. I’ll be putting images in my trains and RC planes. Uh on second thought maybe not in my planes. Lol
well done Steve! Just one niggling little point – how do the signalmen reach the new signal box? Shouldn’t there be a walkway on the layout?
Hi Steve, what is the name of your layout? Is it on U Tube yet? Really would make excellent viewing, I’m sure. Looks really impressive. Well done Steve.
Kind regards. John.
great tips and I do like the photos and the portrait is great.
Hi Steve, have you decided on a name for your layout yet. Kind regards. John.
Thanks for the positive feedback it really helps keep going and keep pushing the boundaries of what you think you know!
I have not got a name for the layout yet but it should be some made up name somewhere in the south west of England in the 1960,s. I will have to give this some thought. I am that busy developing it that a name never crossed my mind.
I am working on the engine shed section now again for the first time which I will be sending Al some photos and notes shortly.
Regards Steve
Hi Again, yes the one point about the pathway to the signal box has been added and appreciate the reminder this was to be added and I took the photos a little too early I think as I have added other details since. I think you have to stand back and look and look again and you always find something missing! fences and walls are another really important detail and often overlooked or because of insufficient space. I am really trying to get this right and to be realistic thanks for the advice once again
Regards Steve
Great idea on reducing a picture of yourself to add to your layout, thank you,
Looking good Steve, and love the original idea of the photo Mark – nice one.
Brian, Wokingham, UK
Foam ballast is fine, and can help reduce noise a lot, but if you plan on your layout lasting a long time, it does seem to become brittle with age and eventually break down into a gritty powder, we’re talking a good number of years here, but if you want ‘permanent way’ you might be better with cork.
nice looking layout steve, like your yard, and nice buildings. Steve nice shots of yourself in your engines!!
Steve, Nice work on the updates. Your signal tower is exceptionally nice. Is it a kit or scratch-built?
Mark, What a great suggestion with the selfie photos added to your layout. My only suggestion would be to use some photo-editing software or simple masking to eliminate the light area above your head in the photo. Just blacking it out or carefully cropping the photo would probably be sufficient.
Mark, that’s just a wonderful idea. Thanks for sharing!
Mark, your the best. Thank you for sharing that with us. We are a part of the layout not just creating it. Excellent.
Well done Steve!
,excellent track work.
and I love the original idea of the photo Mark – nice one.
Peter Rothwell
I may have missed it, but recently, Al asked for input thoughts on differentiating by scale. It would seem that the majority of the contributions are for N and HO scale. I would opt for the HO as it is the most realistic scales with the majority of manufacturers producing items in support of it. I have many O gauge from sets once owned by many of my uncles (who had no children). It has, unfortunately never interested me having three railed trackage. The S gauge, again, just never had the realism that the small scales have.
OK, on to Mark’s fantastic suggestion to include yourself or photos in the cabs of the locomotives! Just when, you think that we’ve seen it all, a new idea floats up! I have been loading my steam locos with seated engineers. The newer diesels with windows does not allow this. Mark’s photo idea will allow this to be done without destroying the windows!!!! Bravo!
Just picked up some nice ideas!
For the gentleman getting his Lionel trains back I would suggest not using any o27 or 072 track, but to use a flexible track like Gargreves. More wider curves will make Lionel trains look more realistic and not toy like.
really nice addition, i like the photo idea.
I like your track routing looks real
awesome
Steve, I love your scenery, and great tips on setting track and platform!
Mark, what a wonderful idea! I never would have thought of doing that, but definitely will do so as soon as I have a chance!
Love Mark’s Photo in the Cab!!! What a Hoot
Mark,
What an excellent idea about putting your picture in the locomotives. Now I’m going to have to try it on my N scale engines! Probably a bit small but nevertheless I’m going to give it a shot.
The layout has a lot of wonderful detail and the full size trains are fun too.