Steve’s been in touch with a helpful post on how to change model train wheels:
“Hi Al
I have started collecting old Tri-Ang “Transcontinental” locos and stock, mainly from nostalgia and to display on shelves, but I would like to see them running on my proposed layout now and again.
Given the relative crudeness of these models, plus my railway is supposed to be in Northern England, some might say “why?”, but I like them, it’s my railway, so I’ll do what I want!
The wheels fitted to these older models don’t like newer track and pointwork – and vice-versa.
I was surprised to find that some of the old locos ran OK through my Peco points and didn’t “bump” along the chairs on the Peco Streamline track, but nearly all of the old coaches and wagons with open axleboxes ran terribly.
With the help of e-Bay and some cotton buds, I have rewheeled quite a few items of stock so that they run OK on my Peco track and points.
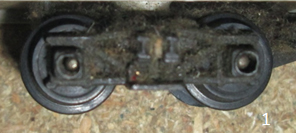
1. The original Tri-Ang open axle boxes. The axles can be pushed right through, allowing the wheels to be removed. This is MUCH easier to do from one side than the other – see photo 3 to see why!
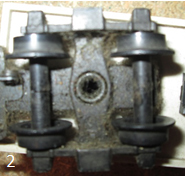
2. The axles are split which gives a variable “back-to-back” (the distance between the backs of the two wheels) This, together with the very deep flanges and the very wide “tyres”, means that these wheels will usually ride very roughly or even derail on more modern track such as Peco Streamline or even the more modern Hornby track.
3. The Tri-Ang axle. Note that at the right-hand end there is a small ridge which bites into the plastic of the wheel on that side.
When removing wheels, you need to push the axle out from the OTHER end. You can tell which end is which by holding both wheels, turning one of them and seeing which one makes the axle rotate with it.

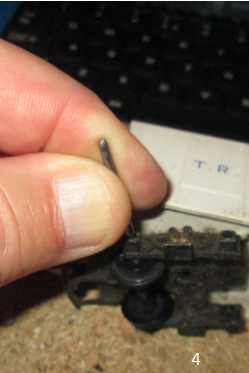
4. Using a suitable metal rod (I am using one of the Tri-Ang axles here – with the ridged end away from the axle box) GENTLY tap the axle through using a small hammer and a lot of care.
Older vehicles use metal boxes, newer ones use plastic but still have the split wheel/open axlebox arrangement. Plastic is not as tough as metal, so extra care is needed.
5. If the axle is not too badly gunged-up with oil and dirt etc you should be able to finish removing it by pushing through by hand using an old jeweller’s screwdriver or similar and/or pulling with pliers on the axle.
In extreme cases I have had to break the old wheels or saw through the axles using a razor saw (careful!). Generally however, they come out OK without having to use such major surgery.

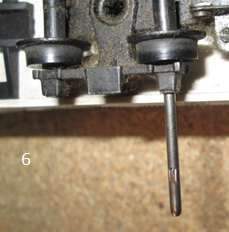
6. Here you can see the Tri-Ang axle almost completely removed. You should be able to see the ridged end of the axle towards the bottom of the picture.
As I said before, this is the direction in which the axle should be removed – if you drove it through in the opposite direction, the ridged bit would just cut into the plastic around it and make it much harder or even impossible to remove.
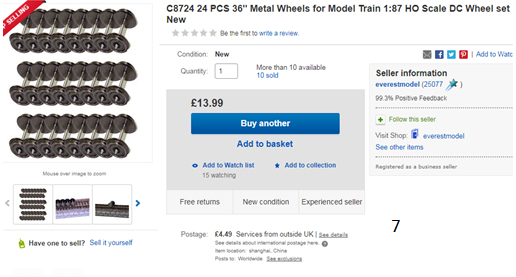
7. These are the new wheels I used. Most of my newer Hornby stock has been fitted with Bachmann coach or wagon wheels. It’s a good idea to stick to one wheel standard for best running, but I could not find Bachmann ones nearer to the smaller diameter wheels required for HO models.
So e-Bay to the rescue. £13.99 plus very reasonable (and fast) postage from China gives sufficient model train wheels for 9 bogie vehicles so the cost per vehicle is a couple of pounds.
Model train wheels:
8. The coarse-scale Tri-Ang bogie frames are over-sized for the length of the new axles, so you need some kind of bearing to take up the slack as well as allowing the wheels to rotate freely but without slopping about. You could use Peco brass bearings, but these would need careful fitting and some means of packing them out to make them fit on the new axle ends.
Enter the cotton bud.
![]()
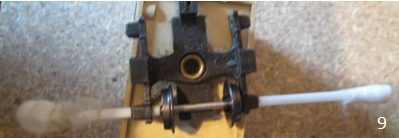
9. Take two cotton buds and trim off one end of each to remove the cottony bit from that end. You will see that the stem of the cotton bud is hollow and the diameter is either a force fit or just a tiny bit larger than the holes in the axle box.
If necessary, open up the hole a little until the stem of the cotton buds can be pushed through the holes opposite one another while still being a tight fit. A round needle file would be a good choice – I found that a suitable size of jeweller’s screwdriver did the job but don’t tell any real engineers!
This allows you to ease the cotton buds in and out so you can first trap and then centralise the new wheelset. This one has been trapped but needs to be centralised towards the left by twiddling the left cotton bud out a bit and the right one in a bit.
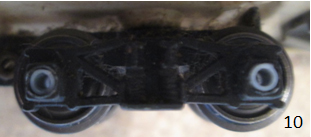
10. Once you have finally adjusted the buds on either side so the wheels rotate freely (and they are more or less centrally positioned between the side frames), trim them off with a sharp blade. You should be able to re-use the same stem a few times until it is too short to handle.
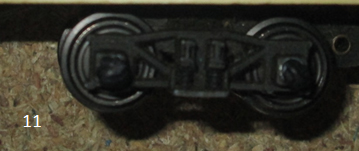
11. You could just paint the new bearings black and leave the axle boxes open, if they don’t bother you. I filled the open ends with tiny blobs of “Protastic”, which is like black Blu-Tack, making sure to avoid the ends of the axles . I guess you could use ordinary Blu-Tack or any other suitable gunge/filler and then paint it black!
Using a non-setting substance allows for future maintenance and easy bearing replacement if required.
Regards
Steve”
Big thanks to Steve for sharing his way of changing model train wheels.
I know so many of you are attached to your old stock – so hopefully Steve’s how-to will help a fair few of you out.
That’s all for today, folks. Please do keep ’em coming.
And why let everyone else have the fun? The Beginner’s Guide is here.
Best
Al
PS Latest ebay cheat sheet is here


Very interesting reading with good pictures. Most of my stock has new or newer wheels now but there are still a small number with the old wheels like you show. It really does make a difference to how stock rolls and especially reducing derailing over points and crossovers.
HI Steve, brilliant idea, i had the same idea but using peco bearings, one side with the “top hat” the other side plain, top hat and wheel set are inserted and the plain bearing slid in from the other side.
The difference??? yours is a Darn site cheaper, i can collect the wife’s Q tips and use the rest.
Mark
Why not replace the whole truck. A bit more expensive but a lot easier.
Well done Barry ..should be a great help to many ..Dave as in Dangerous Dave
I didn’t replace the whole truck (if by “truck” you mean the wagon) because I wanted the original wagon for nostalgic reasons. If you are using “truck” to mean the bogie carrying the axles then maybe, but then the old bogies as well as the old wheels would be scrap.
Regards
Steve
Inpressive!
Thank you Barry for the intriguing video on switching rods. My Uncle John used wood dowels on his Lionel Layout back in the 60s and although not quite as impressive as yours. The art has always made me wonder about humidity changes (rust) and hot and cold temperature changes vs the metal rods. Are you using any kind of special material for your rod project?
I replaced my plastic wheels as well. I never thought about it until I bought newer cars with metal wheels and saw how they rolled smoother and derailed less often. I stopped buying cars with plastic wheels I prefer the smoothness of the metal wheels.
Great to see that an old idea is still a goodie Barry.
I mange to free up my hands when confronted by so many movable parts by holding things in place with “Plasticine” or “Blue Tack”.
You just have to be careful not to get any in the moving parts.
Well done. I have three Triang “Overland” cars (Victoria and SA Joint stock). I am pretty sure that they are repaints, but good ones. They have plastic wheelsets on rounded axles, however the axle boxes on the bogies aren’t open as you describe.
I intend using Athearn wheelsets with 28mm pinpoint axles as replacements. Your cotton bud idea might yet come in to play if the holes in the bogies need tweaking.
Steve…… interesting work….nice article……..its amazing what you can do and find with a little research.
Next time show some pictures of these trains.
Steve,
You certainly said “it” best, as your expression applies to everyone associated with model railroading (or any hobby). Specifically, your expression “it’s my railway, so I’ll do what I want!” applies to all concerned. Congrats for simplifying the justification for all hobbyists! Good luck, and keep ’em rolling.
DJfromNJ
Good idea to use cotton buds, Steve. I replaced similar wheels but inserted brass bushes into the holes. I used a spot of super glue to hold each in place. The result is certainly smoother running and few derailments.
This is fairly simple to do and makes such a vast difference. I used the plastic tubing from cast off pressure pack cans that contained lubricants such as WD40 or similar. Changing the entire bogie in this type of rolling stock is not as simple as it sounds.