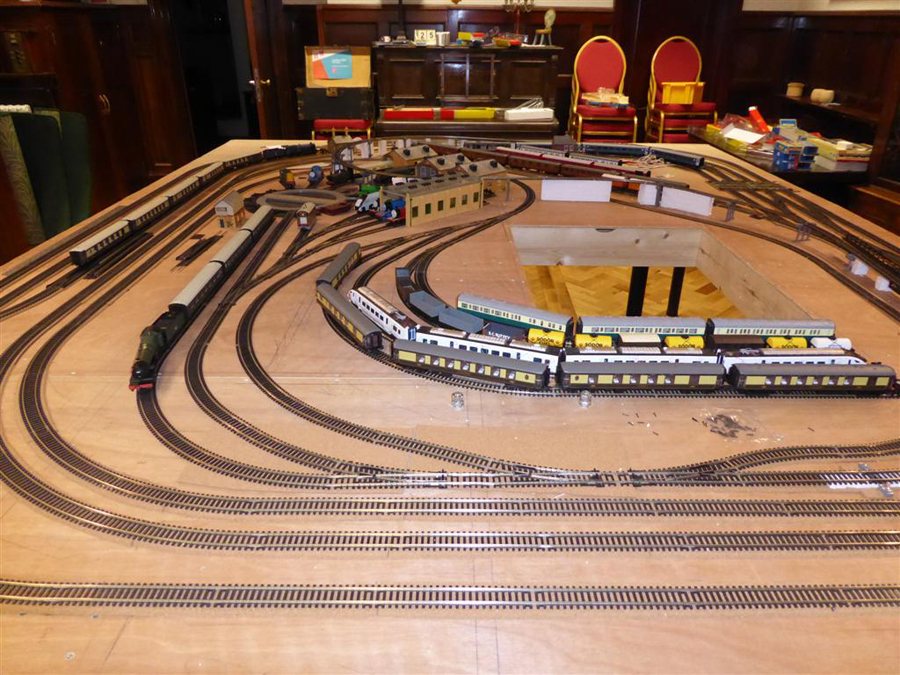
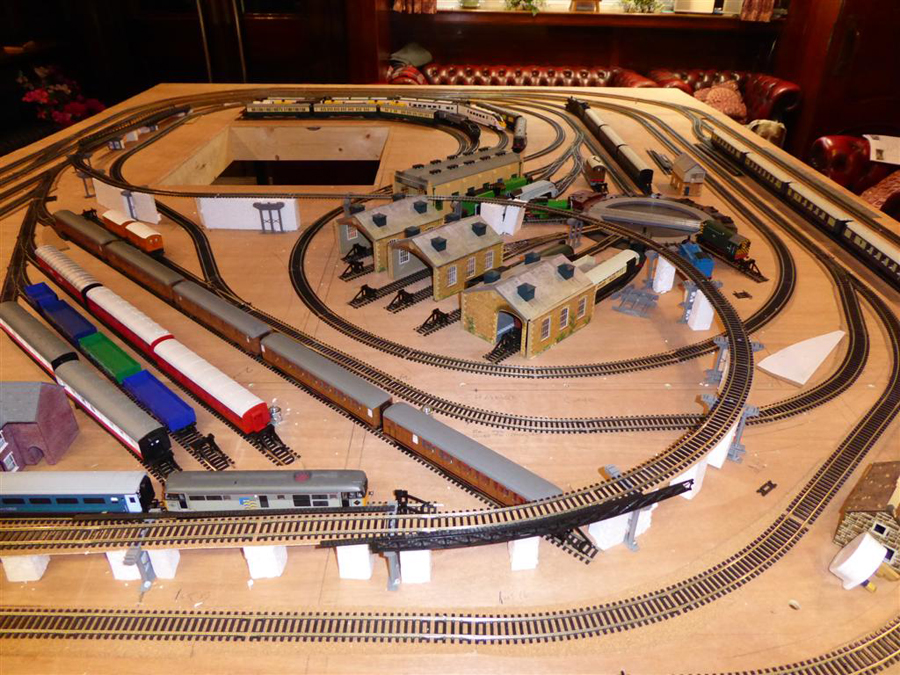
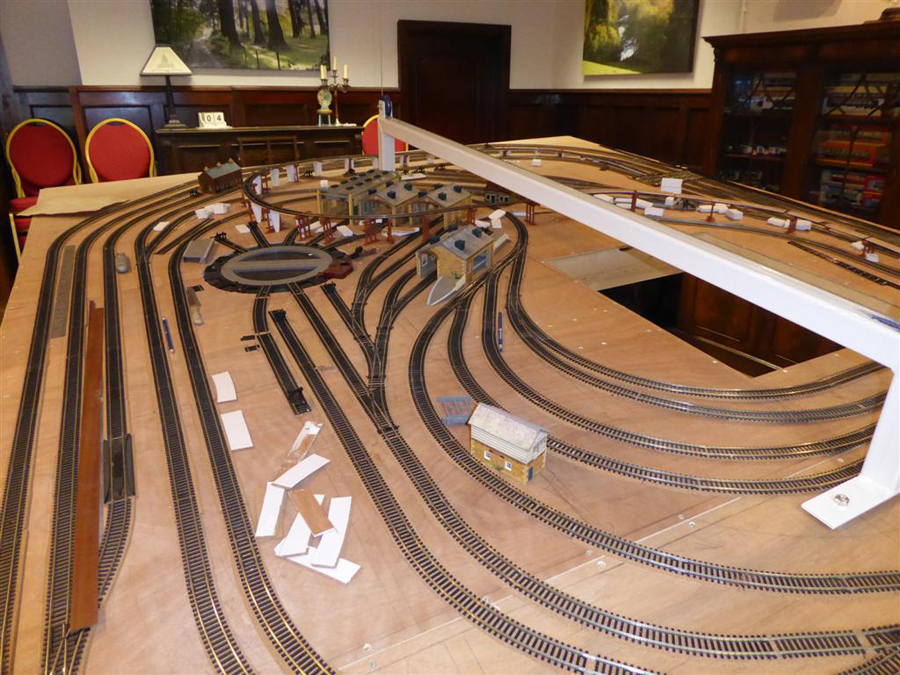
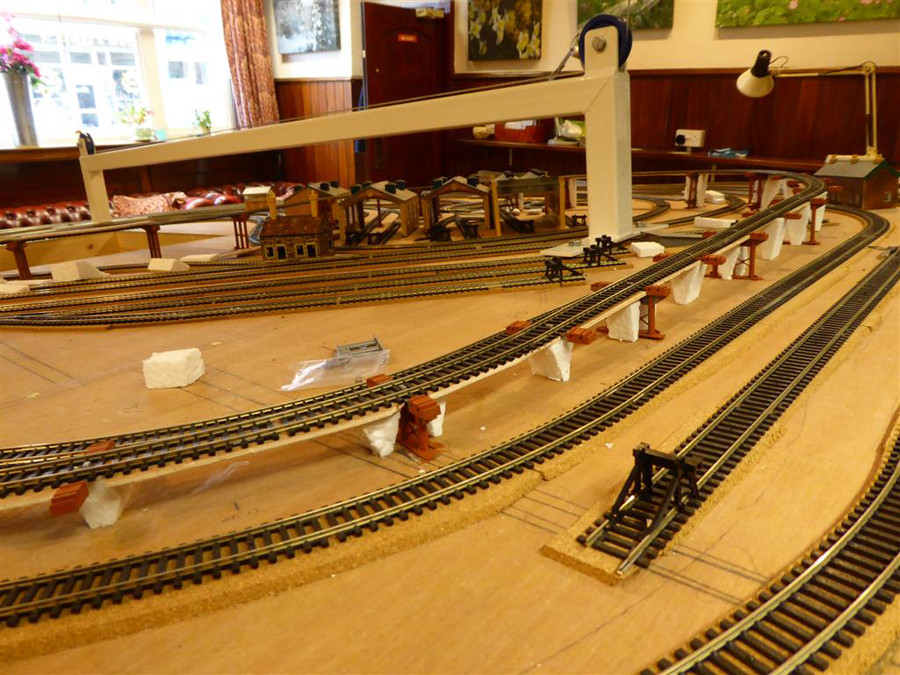
Peter’s been in touch with his suspended layout 10×8.
“Good morning Al,
Last year I bought your Beginners Guide – very useful, thank you and each day when I receive an e-mail from you I look with interest as my 10′ x 8′ layout is just starting to take shape.
So my plan is to construct a railway with all rolling stock bought with grand-children in mind (or by them) so the theme has to be from all ages.
We have a hall that is multi-functional (dances, meetings etc) but I have ceiling space for the track.
Tomorrow I plan to start wiring all the points, I am trying to leave wiring the track until later – play time would be too tempting!
Later I will try to find some theme park rides (fun fair), but that could be a good year down the line (Ha!).
Look forward to hearing from you.
Cheers,
Peter”

“When I run my wires under my platform I put names on them so I know what they are for.
I use masking or adhesive tape to write on.
I do not just mark the ends but also if it is a very long run I mark in several places.
Also I run my wires through screw eyelets, this way I do not weaken the structure of the platform.
Also I use these to run wires under my ramps for track on mountains, this way the wire does not hang down and catch on other things.
Theodore”
“Hi Alistair,
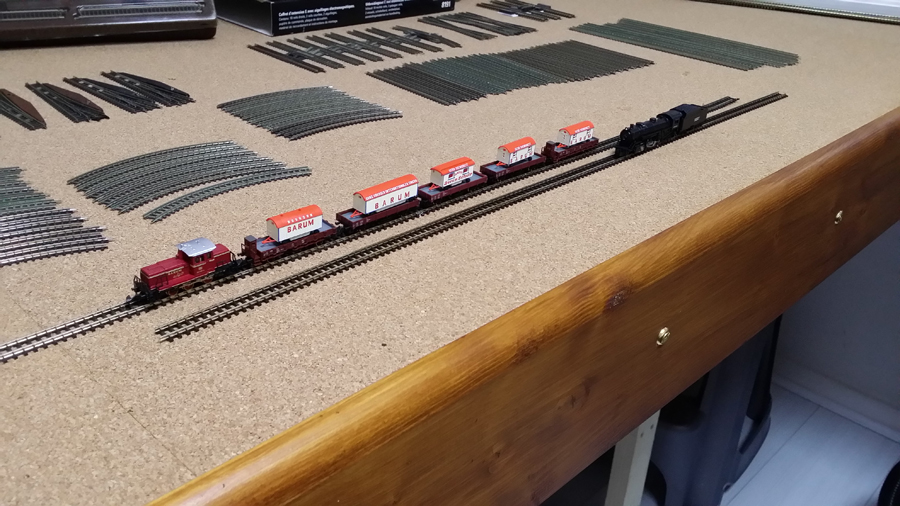
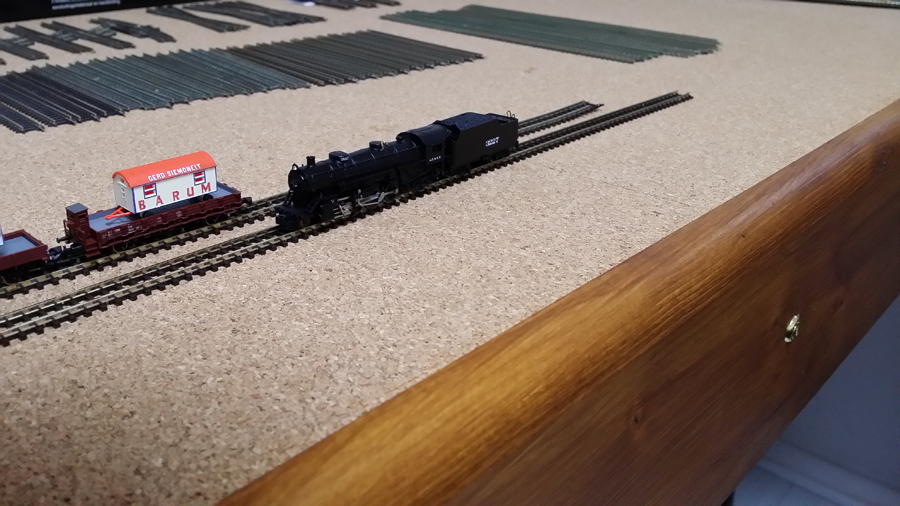
I thought I’d been spending to much time on the things that I could do when the trains are up and running, so I’ve had a bit of a stock check and decided to get some track down, this is what I have at the moment, but I guess I’ll need more!
I’m experimenting curving long lengths of track as I want to keep the joints to a minimum.
I’ve been successful with soldering droppers to silver nickel rail, which I thought was going to cause me a headache…. not at all.
Hope you like the Barum circus train it was a rare find!…. didn’t tell the wife how much I payed for it by the way!!!
Sleeper retaining pins are way too small so I’m going make myself a little fixture that fit’s between the sleepers that allows me to drill a tiny hole in the baseboard for a flat head screw that bridges two sleepers hence retaining the track.
Just a last thought……. if any of you are nearing my age, 63 next week. Don’t go for ‘Z ‘ gauge it’s a tad small.
Happy modeling all.
Keith.”

I do love it when your tips come in – even after all these years. Please do keep ’em coming.
A big thanks to Keith, Theodore and Peter.
And if you’re still sitting on the side lines, you can dive in here with the Beginner’s Guide.
Best
Al
PS Latest ebay cheat sheet is here.

I really like the Drop Down Layout, If the under side had a covering, similar to the ceiling design, this would really, put this over well
I am going to send pics of me shelf layout in the near future, I have been a firefighter going on 36 years and had trains as a child and in my grown up life never had the space in the first to homes. I now have the space and finished to 1000 Swift in my basement which contains a fire house looking museum with the beginnings of a HO shelf layout. So stay tuned for pics.
Thanks for all the emails of ideas.
Eric the firefighter.
Love the idea of raising the platform to the ceiling. Would like to see information as to how this is done. Motor, pollies ect. Except for the expense this could be the answer for a lot of folks with limited pace
Hi Al, I watched Peter’s layout with interest because I have a 4’X 8′ layout that is kept under the ceiling in my garage. Because dust is a big problem I attached a little curtain to the ceiling and when the layout is wound up it hides under this curtain keeping the dreaded dust out. Very effective.
Good luck
Werner
Down-under
I was very interested to see the ‘ceiling layout’ as it reminded me of my first layout I had as a boy in the late ’50s.
We lived in an old house in East London and space was at a premium. My dad built the layout so it could be lowered onto the dining table from the ceiling using a home made winch under my parents bed in the room above. He used old parachute cord threaded through holes drilled through the floor.
As the layout was raised so was the light fitting. We had subdued lighting before it became fashionable. My mum had a lot to put up with!
I have seen this type of suspended layouts in garages but, not in homes. What a great idea for condo living in large cities where space is at a premium! Where there is a need for a layout us modelers will find a way! Great job, thanks for the idea!
Fantastic layout. Good idea to hoist up your layout using the vertical space. I suppose it is a motorized haul up.
Sad to see you don’t like Z Scale. I’m age 82 and Z is NOT too small. Look around on YouTube and other locations to see some of the Z Scale spectacular layouts. Scenery is often MUCH better than N or HO.
I think it is unusual to wait untill everything is done to run trains on the layout. There could be any number of problems with the track that will only show up when it is run. Perhaps this one will start up flawlessly. Great place to store it though. I am impressed. Rob
I think he did a great job on the hanging layout. If there was some scenery to hover the hanger it would fool everybody. I have considered a hanging layout but using the block and tackle approach , hanging from the 4 corners opens a whole new scenery approach.
Great Job!
Love the hanging layout idea …Dave
For a long time I have thought about doing something like this and now as retirement gets closer I am seriously considering it.
Like the other person who commented, I would like to know the details as well.
This a extremely very gd idea, this would be something I would love to have sitting in my living room or empty bedroom some day. No let me restate that comment, This is what I want no questions asked .
wow Interesting idea Ted the drop-down-from-the-ceiling layout
would like to see it when its finished
and Keith as for the Price of the N gauge circus train NOT mentioned to the wife
well…..
promise I wont say anything to the lady….
hahahhaa
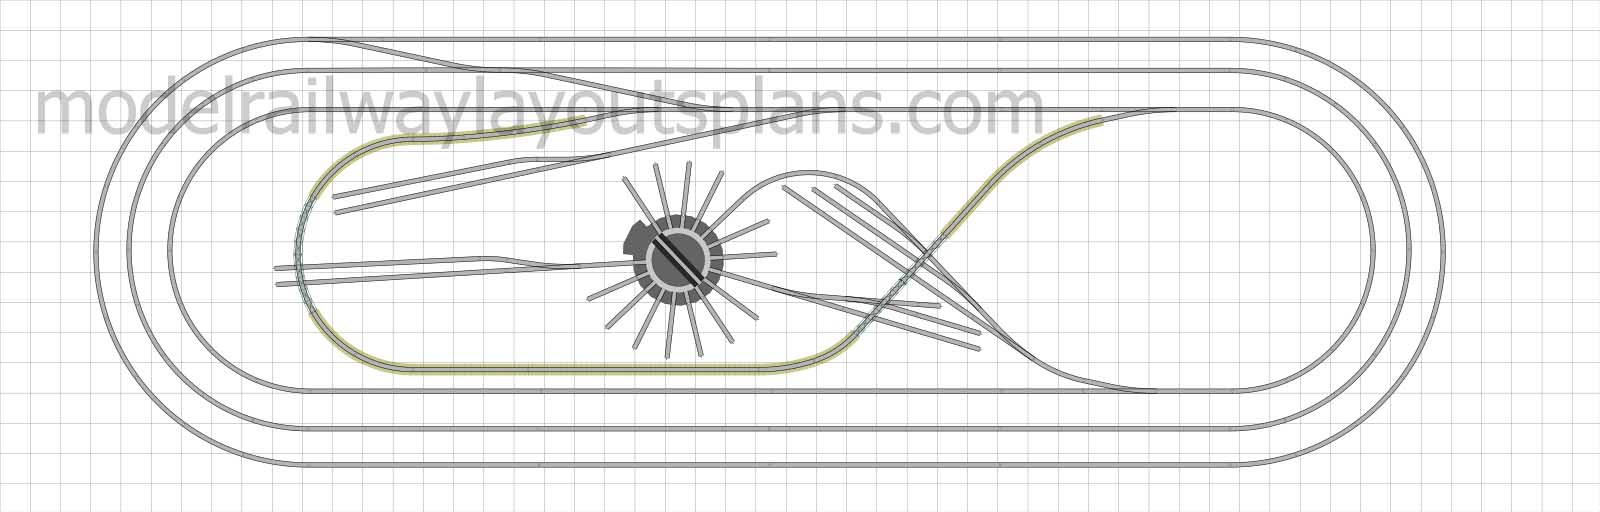
First the track plan looks great. Assume it is HO scale. Wish I had ceilings high enough to do this. How is it balanced with the center lift points? You could add designers and or lighting on the underside.
An imagination barring none. The rafters involved would have to be very strong and be able to carry such a load. It is nonetheless a brilliant use of airspace.
The ceiling would have to be a minimum 8 feet.
Electrical conduits would be in the ceiling above the layout.
Great Idea for the hanging layout. But you should use atlas flex track. one track is supposed to curve one track is rigid solder on the rigid track. when you go to bend it you will see what I mean. Keep all flex track say on to the left or right side then you will know that it is uniform. But you need to run your trains as if your curves are to tight it could cause derailment and if run trains you will actually work on your layout faster as you will think of what you might want to add for future development areas. IHC has the fair rides. I have all of them including the motors. Get ahold of a Walthers Catalog and you will be amazed as to what the have in stock ok. Good Luck with running your trains. Darrel.
Totally Awesome
Kayak lifts work great for raising and lowering layout. Check load rating when when shopping. Kayaks can weigh 60-80 lbs,
I am very interested in the lift arrangement used in the first entry. I did not see any lines that would indicate a block and tackle system. I thought I saw a single bar traversing the layout. Is that correct? Fantastic work. You ever notice that the people that send in photos and videos seem to be not only superb engineers but very artistically inclined. Great Work by all.
I like the idea of the drop down layout, Just be careful about reverse loops, in Dc
You will need an isolating track to change the polarity.
With Dcc no hassles I believe though I could be wrong.
Very nice Peter!
My brother-in-law built a 4’x8′ layout with 1/2″ plywood sheet reinforced by 1’x3″ framing, and covered with about a 1/4″ thick plywood for a soffiy painted white with a sand finish to match the LR ceiling. Small holes through the 1x3s for wiring doesn’t sertiously affect the strength. My wife was happy with the result.
Rather than the elaborate hanger beam and electric winch, we used hooks in the ceiling and ropes with loop in the middle and end in order to raise or lower in two stages to minimize the angle between ends.
We weren’t in the apartment long enough to figure out how to minimize sway or the odd jolt.
Hanging Layout; like the concept, especially to overcome difficulty of wiring under the baseboard- food for thought for a future project!
Re: Hanging Layout.
Thank you all for your encouraging comments. They are very much appreciated.
I am in the process of re-designing the pulleys, actually already designed the improvement but now have to action them! The winch works well but the board is uneven when being raised and lowered.
Thank you also for advice of powering up the layout sooner than later. I will do that also.
I will report back to you all later; possibly as winter draws in. (Even in Wales we have summer and a time to be outside and enjoy the countryside.)
Cheers,
Peter
I like the open framework Peter used for his layout. If anyone else wants to use a grid-work frame for overhead storage (or for portability) I would recommend using 1″ foam for the base rather than plywood. It is so much lighter.
As someone mentioned, I would drill small holes for routing wiring. It looks like the framework is 1×4 lumber. Even a hole as large as an inch should not weaken the structure – just keep larger holes centered in the board. Small holes for wiring will not weaken the structure. I have a 5’x8′ portable layout, foam baseboard, and my wiring goes through holes in the frame. No weakness noted.
You should consider some kind of cover for the bottom for neatness. LED lighting on the underside would be an interesting ceiling accent.
Still in Training,
Carl Halgren
I had an O layout hanging from my bedroom ceiling when a kid. It was built on the side of an old packing crate, about 5′ x 9′. It raised and lowered via a manual winch bolted to a wall, with the lift ropes routed via pulleys and fastened into the ceiling supports. Very solid. It actually inspired several friends to try similar setups.
Theodore , beautiful living room to be marttered by the underside of your layout. Make panels that are removable to hide that tacky underside.
The Critic
just the right thing to do… I have it in 2nd floor and the winch in the attic. Unfortunately, my room is of regular only so I keep it as slim as possible: no lights below and no tall building, but still 2 levels, one of 13x4f and one of 8x4f.
I agree with Rob, you really DO need to test as you go along. Tracking down a mystery short circuit once everything is pinned down, or trying to rectify kinks or twists once its all connected to everything else, can be very difficult.
I HAVE to ask: How did you get that layout to raise and lower? I’ve tried to before, but can’t ever seem to get the balance just right. I’d LOVE to see how you did this, so that I can get my layout to raise and lower, so I can get my garage back for the car!
Hello Keith. Right now I’m working on z scale layouts and looking at t scale! I’m going to be 66 this year and I have glasses and magnifying glasses and still taking locomotives apart and put them together it is quite a challenge though! In Germany I had a fleischmann ho layout and when we moved to the United States I ended up with a g scale from my girlfriend around a tree and the rest was history I built a large outdoor g scale layout with ponds and bridges. Now I’m going to start building small layouts for sale anything from n to t. I’m actually going backwards from g down to small but still manageable at this point. I noticed that people are absolutely fascinated with miniatures. Sorry not I’m going to do it as long as I can. Good luck and keep us posted!
Peter,
Very clever design to raise and lower the layout. I assume when you lower it to working height it rests on tables, so you have solid support. Are you really laying all that track directly on the tabletop without any roadbed? It seems like that would be quite noisy when the trains are running. I was also impressed that the framework that attaches to the pulley system is removable from the layout so that it doesn’t necessarily interfere with the aesthetics of the model railroad.
Keith,
If you can work with Z scale, more power to you. I’m 74 and decided N scale was too small for me to work with. I do agree that the smaller the scale, the more spectacular the scenery can appear in a given amount of space. My solution is a 32 x 48-foot shop building that has an 11-foot ceiling, so I can make some pretty tall scenery even in HO scale. Of course, first I have to empty out most of the “stuff” already occupying the building before I can do much model railroading in there. 🙂
Looks great, Keep up the good work.