Peter’s been back in touch, this time with his stunning Toronto Hamilton & Buffalo Model Railway:
“Hello Al,
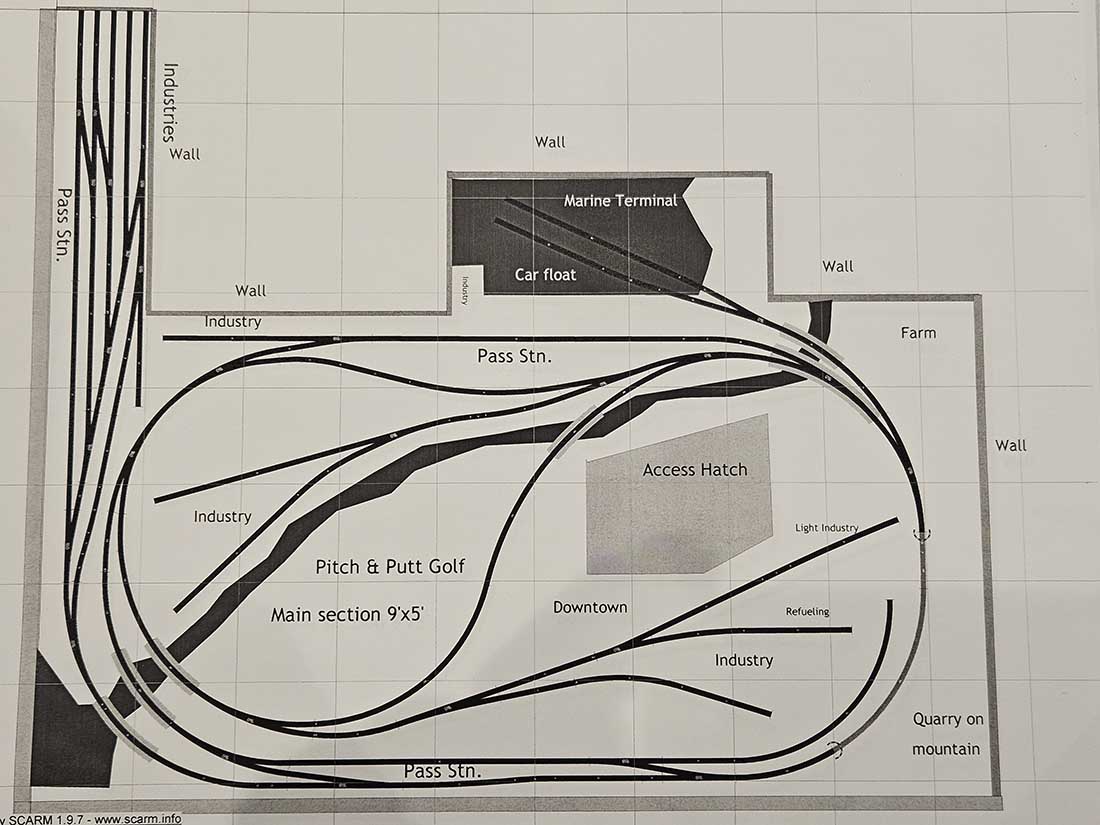
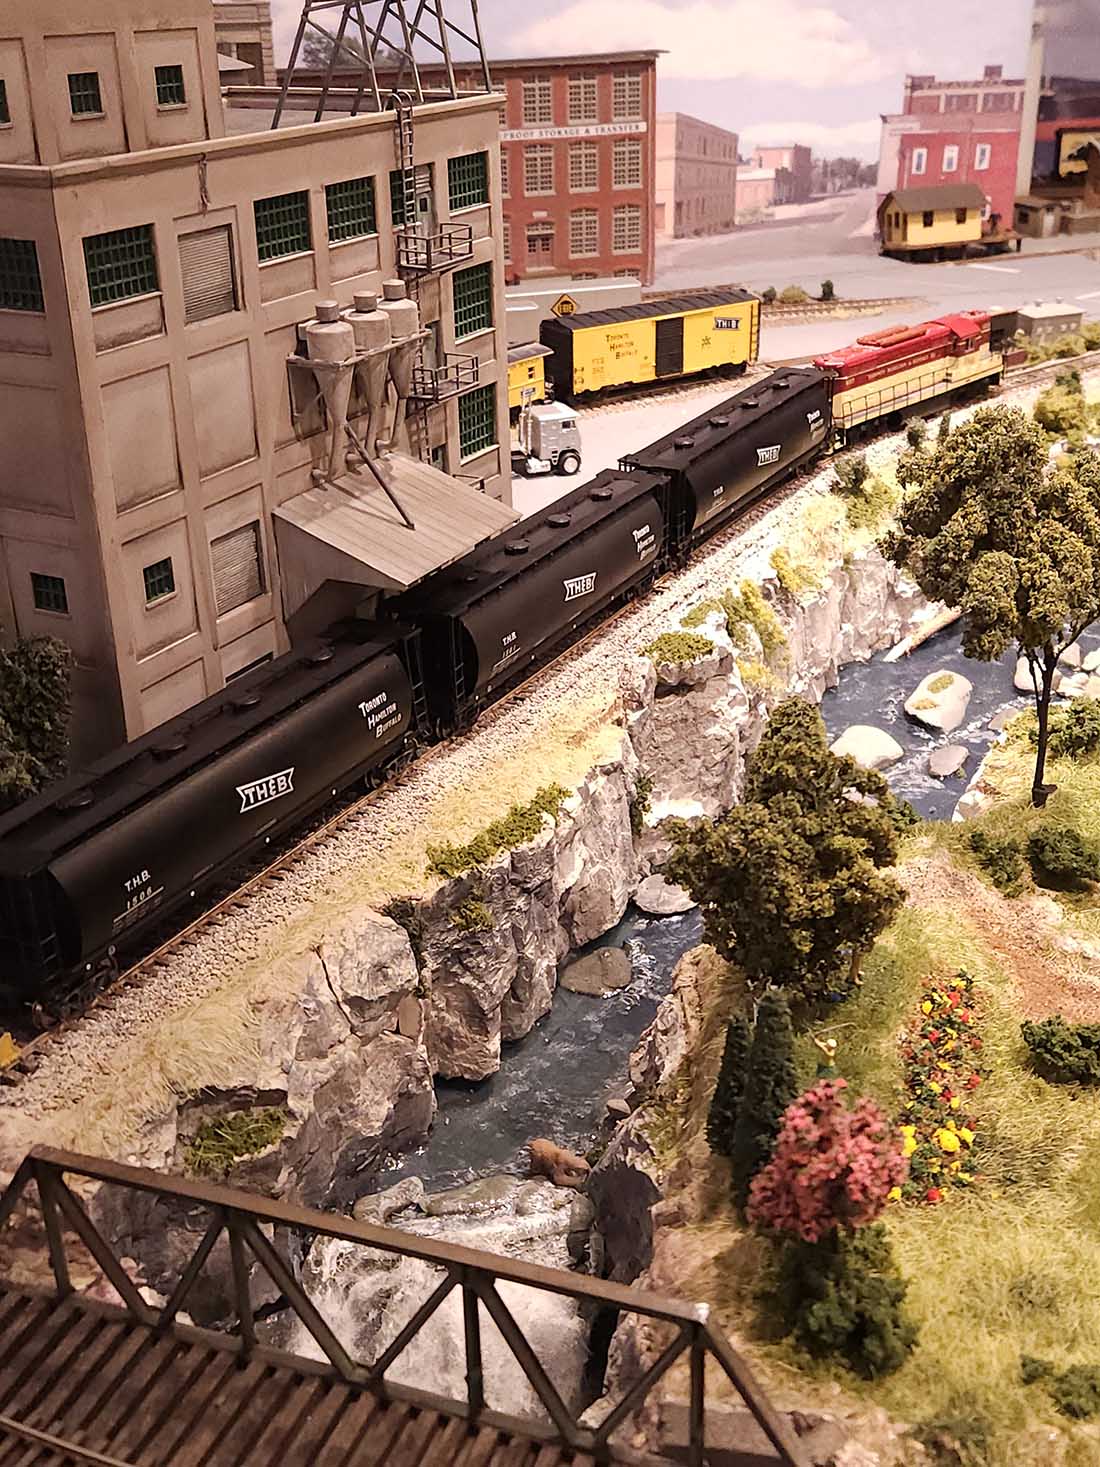
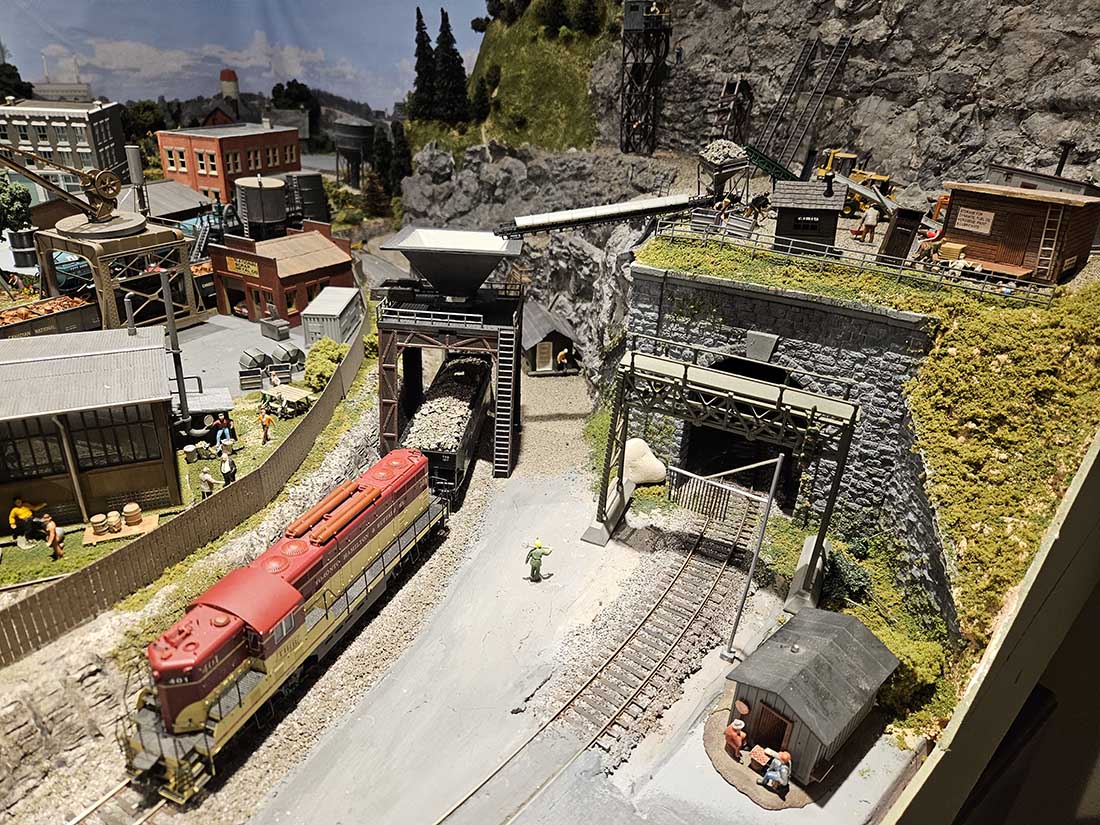
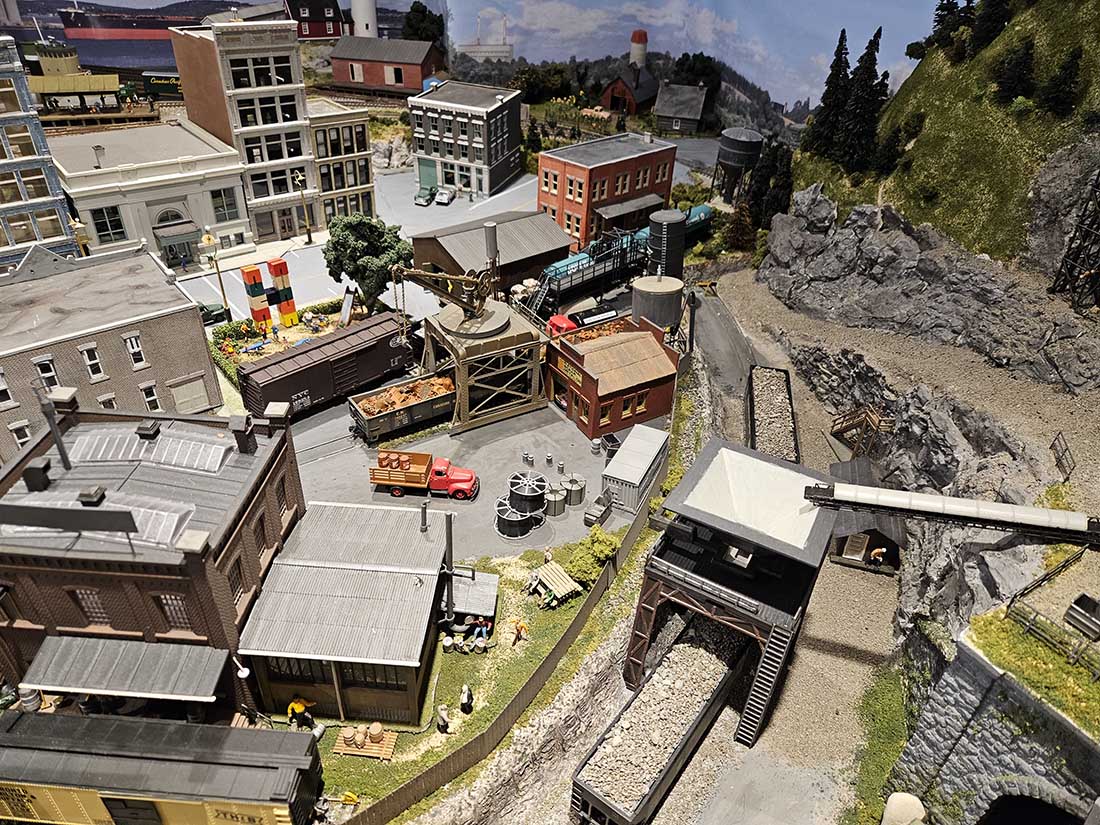
It’s been over two years since you posted my first “trial” switching layout. This gave me the confidence to proceed to my Empire Layout – inspired by the Toronto Hamilton & Buffalo Railway (TH&B), and fictitiously known as Amaranth Falls.
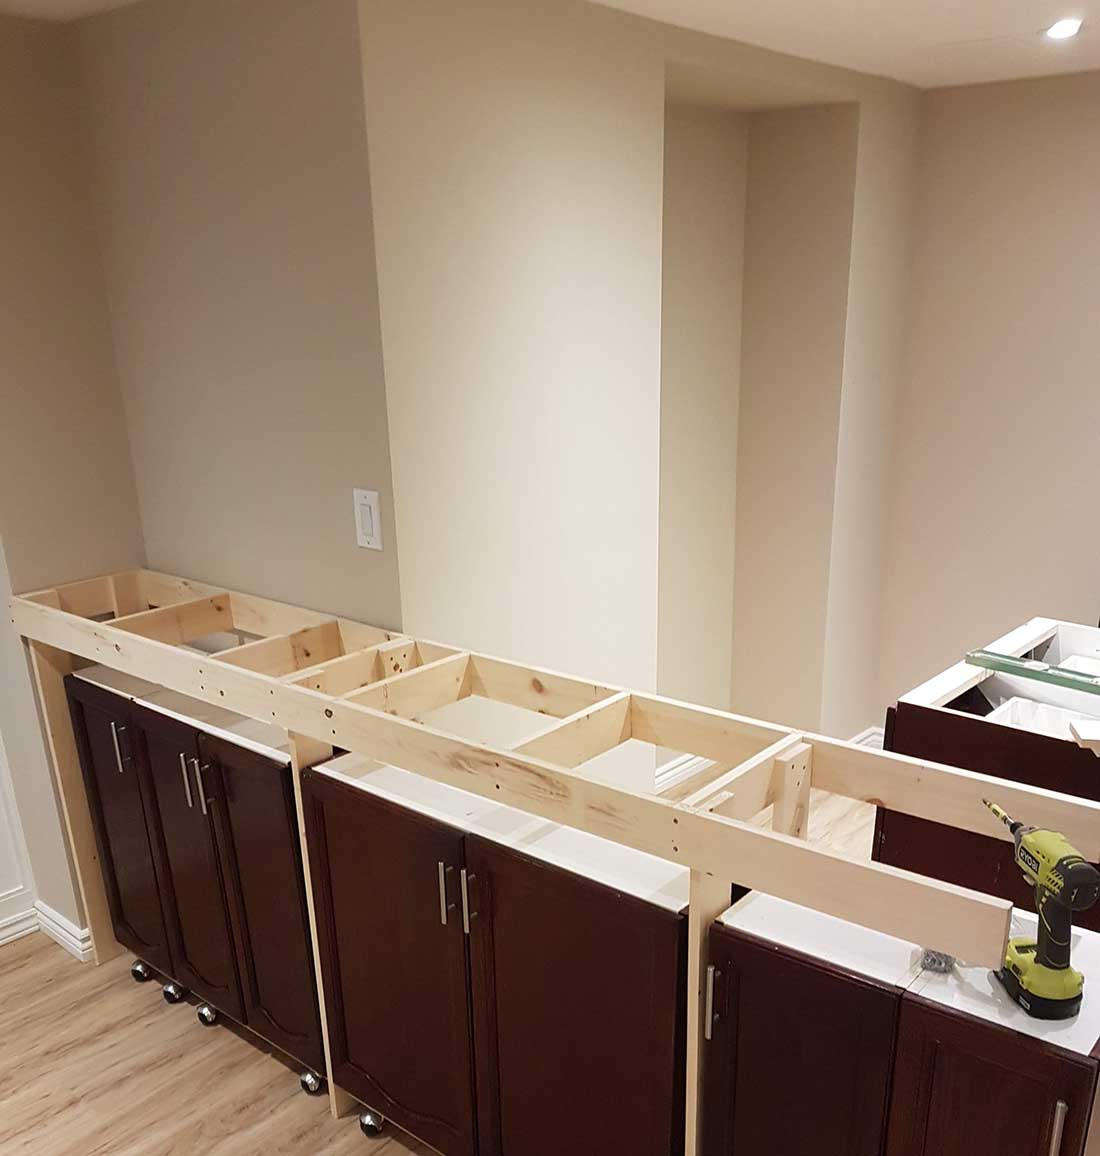
I started with benchwork that allowed a set of donated kitchen cabinets, mounted on casters, to slip under the benchwork making a more appealing facade to everything, and providing storage space for rolling stock.
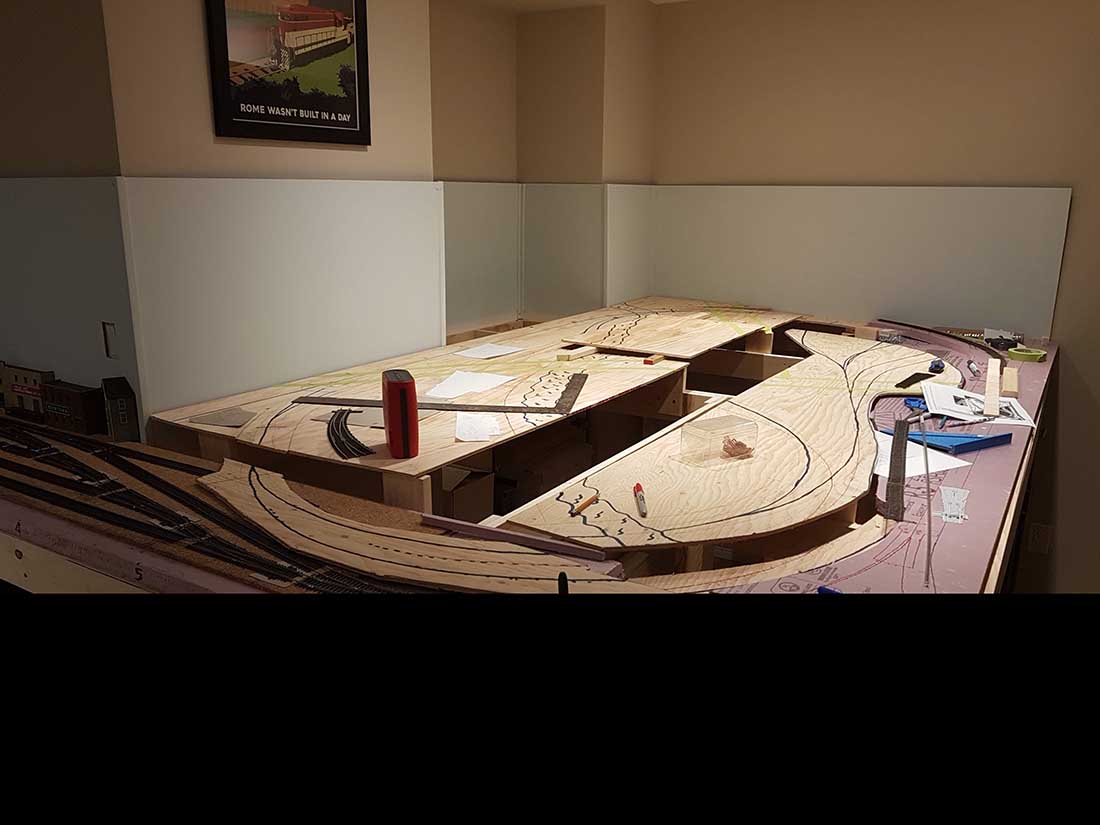
I have an unusual and choppy space to fill, but the large section is a 5′ x 9′ space with a side fiddle yard.
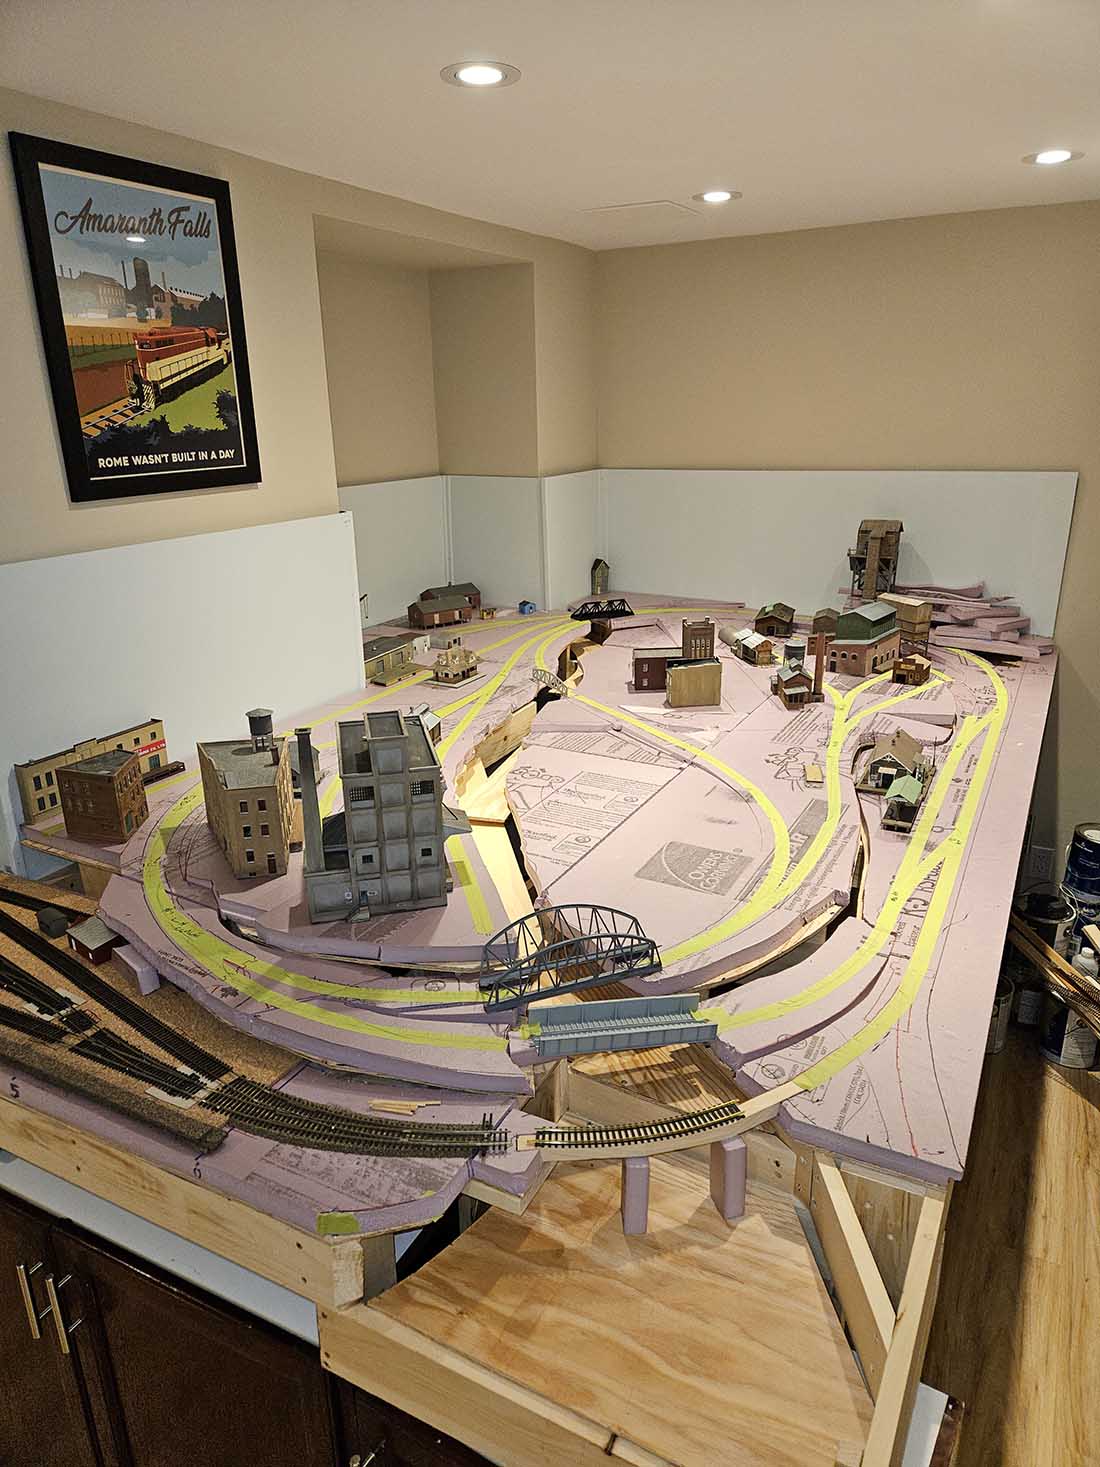
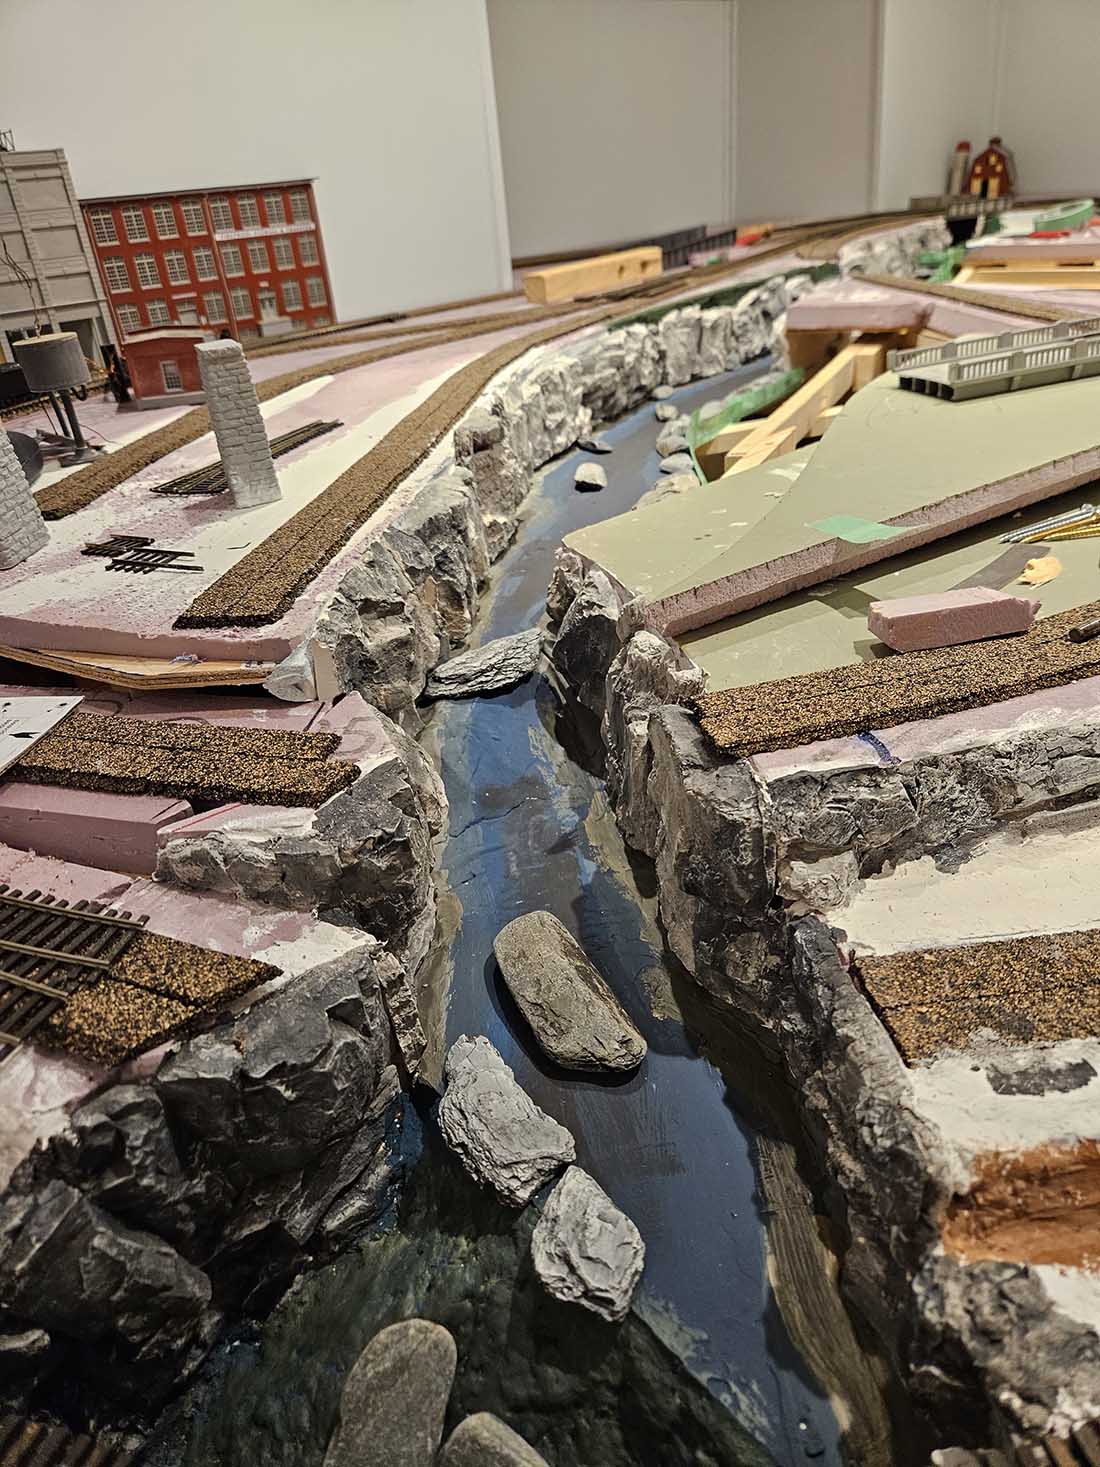
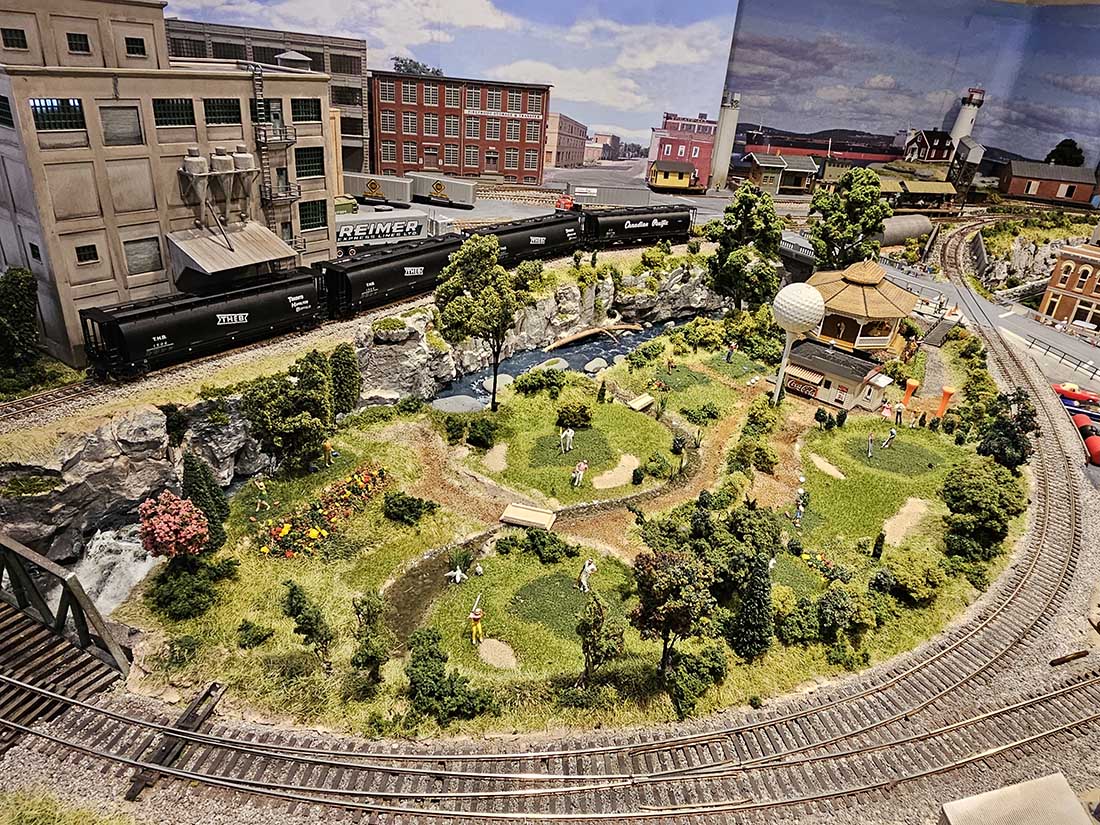
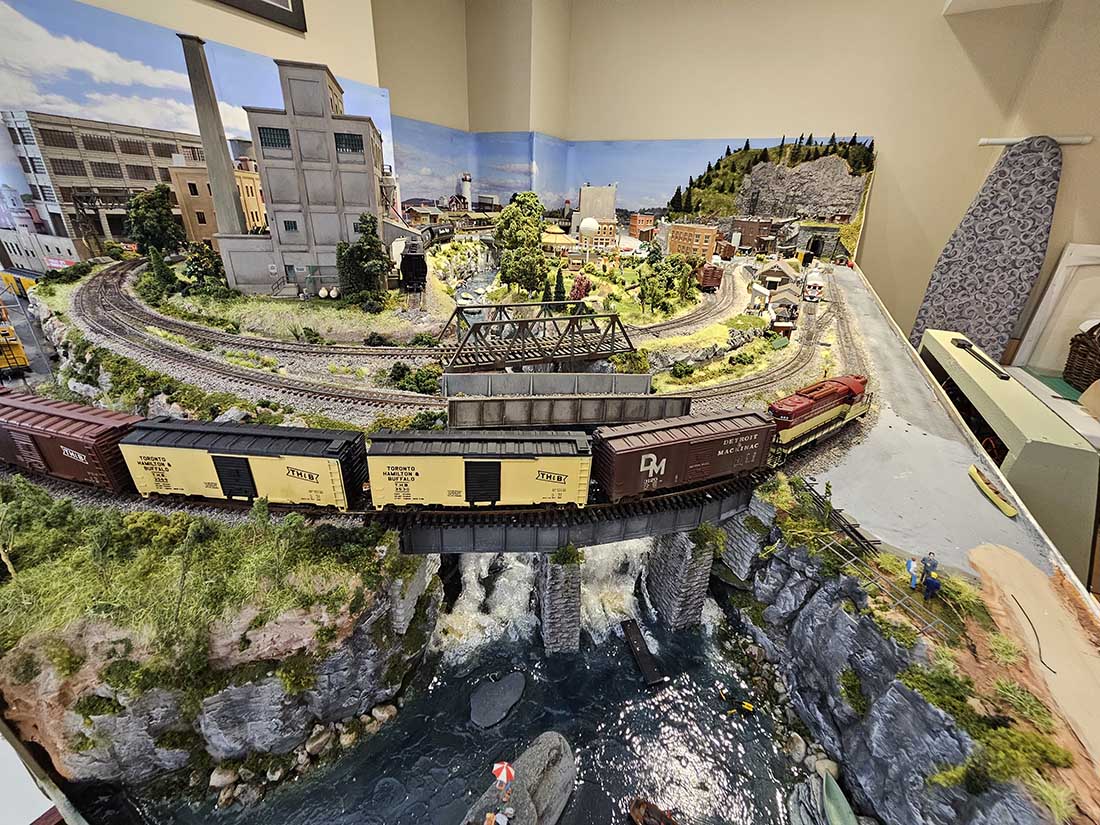
The photos show progress throughout the various construction phases. It was challenging putting a river flowing down a 5 inch drop with numerous falls and rapids…. and a golf course!
More photos to come once the final lighting, signage, fencing and level crossing lights become installed.
Peter”
(Peter’s last post is at the bottom of this one: Model railroad grass.)
Next up is Frank.
He has a problem – can anyone help?
“Alastair,
I have a BIG problem and is a great one (I hope) to go into the section asking for help.
As you are aware, I have told you about my building a model railroad, I have come up agains a BIG problem.
I am using Kato track but it does not provide any way of communicating it’s position to an external device (an Arduino to control signals).
I am wanting to use a SPDT Reed Switch to communicate with the Arduino, but the issue was how to get the turnout to tell me which way it was set?
My first idea was to mount the reed switch UNDER the turnout and using the position of the magnet inside the turnout to operator the reed switch. It does work but it is a LOT of work to dig out the table below to install the turnouts with the reed switches below.
A second idea was to put a magnet on the peg of the turnout and put the reed switch on the side of the turnout. Several attempts with small magnets but it didn’t work because of the field of the magnet.
The third idea was to mount the reed switches INSIDE the turnouts. Again, this does work, but again, it is a LOT of work.
I am still looking for a solution, though, having built AND wired a lot of the layout, I am rapidly painting myself into an impossible corner.
I am open to any idea that is simple and works.
Thank you.
Frank
Surrey, BC, Canada”
That’s all this time. A big thanks to Peter for sharing his Toronto Hamilton & Buffalo Model Railway.
And if anyone can help Frank, please leave a comment below.
PS More HO scale train layouts here if that’s your thing.
Need buildings for your layout? Have a look at the Silly Discount bundle.

Railroad is immaculate. Especially as it looks built in living room (sure not usual attic, basement or garage). Just what you want to see, everything to scale, nothing looking rushed or haphazard.
They’re out there, many way better than I could imagine and some that literally need the garage door shut down and locked. Looking at blog is like going to a car show but not entering competition yourself… years ago had flamed out PT Cruiser, thing right out of 1940’s. Pulling into restaurant parking lot for dinner as car show going on same place, was ushered into parking for car show lmao. Told them no no, just here for lunch. Of coarse I went over to show too. Same difference exactly as with these RR’s?
R
Very nicely done , the water and ripples are superb. Great scenes , not overcrowded , just a very nice layout . Good work , thanks for showing the various stages of progress. One often wonders what’s under all that .
Part two: Frank has a very interesting trouble here. Not sure if the Adrunio is supposed to control loco movement, switching or just signal control lighting, everything? First thought would be photo-eye/infra-red and diode configuration as engine passes over pre designated spot independent of rail voltage and/or any polarity differential. Have the train control rails using insulated method with only common presence being engine triggering operation(s)
Believe the actual ways of old in real life did just that by completing grounding circuits as approaching signals/gate crossings, intersections. The model RR version a bit updated certainly.
Also with DCC duplexing signals using rails for conveyance is any ramification involved there? Anything that’s using less wiring is always the best I say. And yes, did much work on landline circuits with alarm systems, remote controls. Unbelievable maze of tiny wires…
R
Peter
Great job. I really like the cabinets below. Your modelling skills are right up there and the water features are spot on.
Frank
I’ve never had success with reed switches due to proximity issues. I use infrared sensors now with relays and all works great with the most flexibility for hiding in scenery. Try contacting Big Al for blogs from me & John from Baltimore regarding IR .that he can send you.
Big Al
I ‘m back to abnormal. Never stopped reading your stuff. You’re the best.
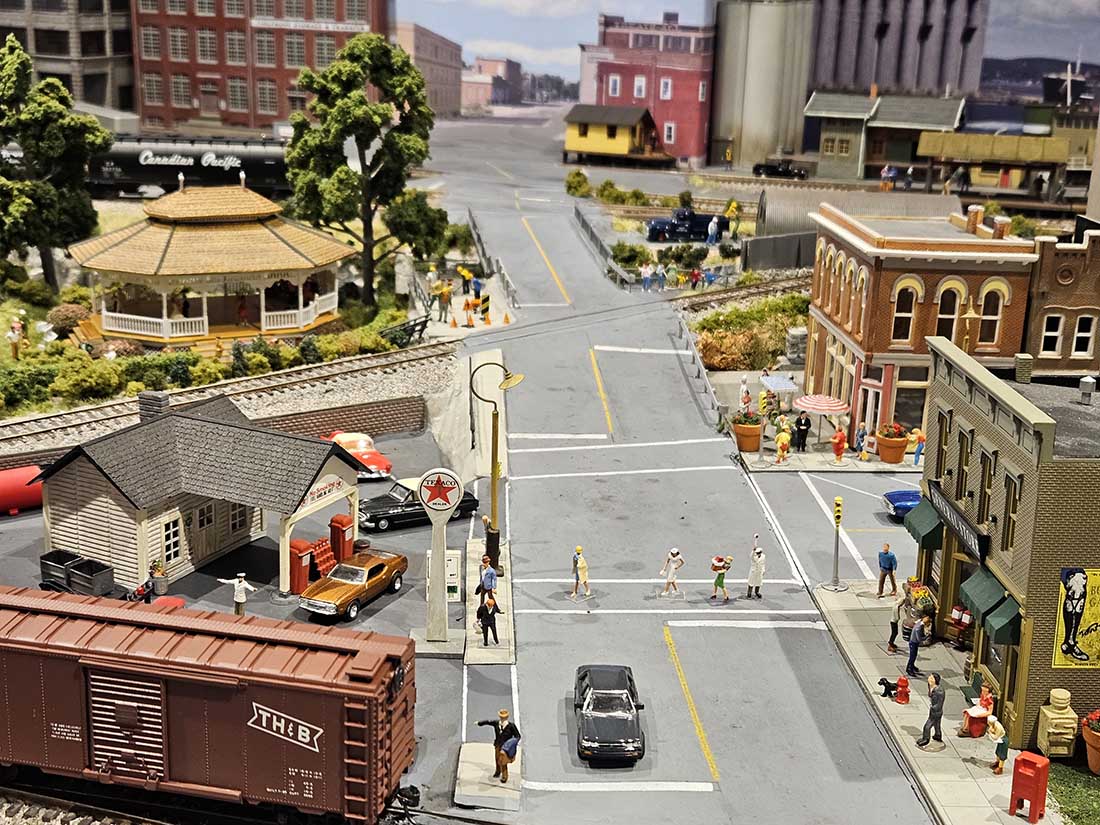
Peter, sometimes, the space we get is all there is to have. You have indeed risen to the occasion and designed a layout that works in your space. I like the scenes you have created too. I like it all, but I like the rock load out and tunnel area best.
Frank, instead of reed switches, try looking into infrared detection. I know about reed switches and have used them for third rail arcing (successful) and Faller Road vehicle brake lights (not successful). Why not use infrared send and receive units plus a detector circuit and relay? Check with John at Azatrax, he can fix you up.
Rob
Hi Frank
How about moving from magnets and Reed switches to optics ? Very off the top of my head but a light weight square of black paper attached to the same peg you attempted to mount the magnet too- as it switches it moves from blocking to allowing light between source and photo base of transistor device / many many examples out there of these circuits -I could send you one I’ve built if your interested
I agree with Frank – I am using Bachmann E-Z track and cannot always tell the position of my switches. Do not like trial and error to see where my trains are going. I wish Bachmann would create an interface to plug in line with their switch wires to light up which direction the switch is in
Peter, you’ve done an amazing job with your layout! You built and organized it so well that it looks so much larger than 5’x9’ and the scenery is outstanding. I’ve been working on plans to expand my 4×8 and thought it would still seem small, but after seeing your photos, I’m more optimistic. And the fiddle yard is such a great use of space. Great work and it provides so much inspiration!
Peter, much enjoyed your Toronto-Hamilton Buffalo layout, especially the gorge and falls modeling. living in Buffalo, I’m also modeling the Western New York and Ontario area (not prototypical 🤪) and looking forward to including area highlights. Smart move putting those cabinets on coasters.
Very well done. The water feature is really impressive. And the street scenes are amazing and with great detail. The recreation area is also quite unique. Again, well done.
Jim AZ
Hi there, I also would like to know which way the switches are thrown on my Kato HO track layout. I use simple LED lights green for non-diverging and blue for diverging routes mounted right next to the switch. I use a double pole double throw switch . It tells you which direction the train is going. Since they Kato switches are momentary just a separate push button to send a 12 V to the switch to throw it Separate from the toggle that controls the LEDs. when that double pole double throw switch is thrown the opposite direction. It reverses the polarity. Just press the push button and you are all set.
I hope that helps.
Dan
Nice layout – good interest and well done.
A caution/advice I give to everyone: Be absolutely sure you can reach every inch of trackage and you have enough ‘wiggle room’ to repair/ tear-up/replace tracks, especially those hidden by scenery.
Ask me how I know!
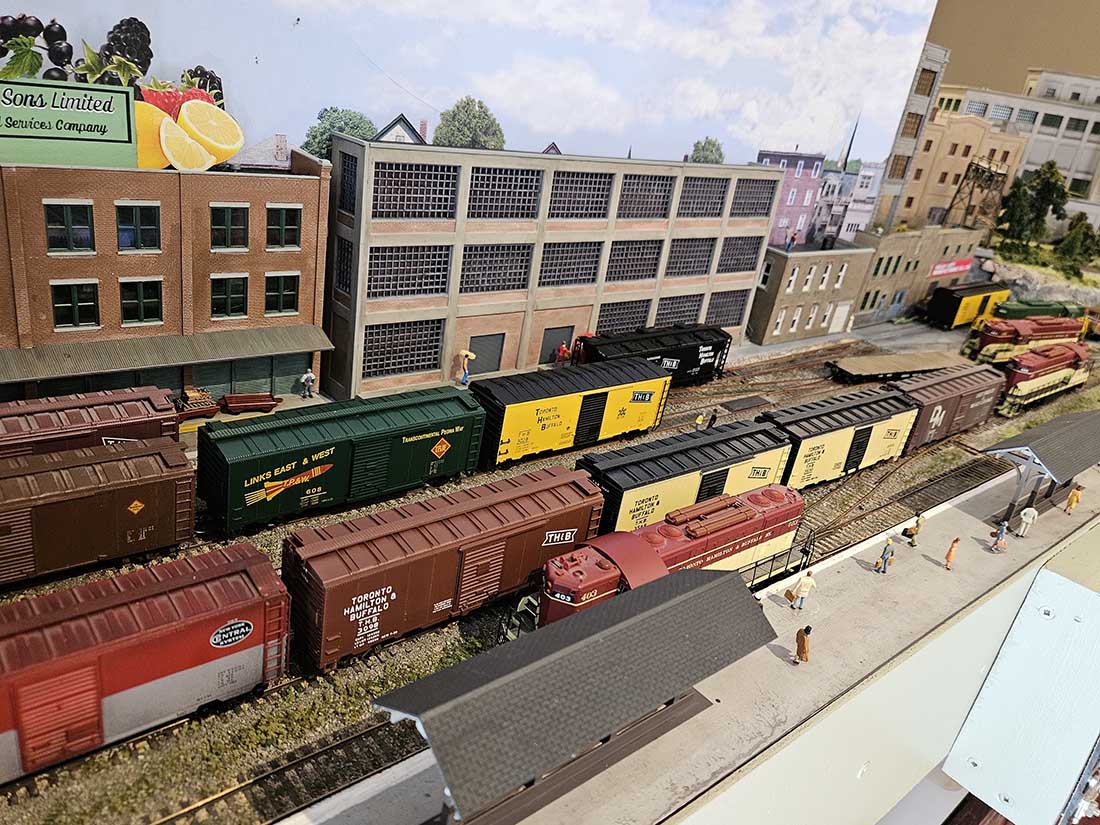
Very nicely done- coongrats- wish mine looked as good, I have a few TH*B as well, but your cars are outstanding!!
Frank,
I’m not sure about the turnouts you are using but what about using the arduino to control the turnout, that way the arduino knows the position of the turnout and can control control signals. If you want to get fancier use a microcontroller with WiFi to send signals to a central controller to coordinate signals and control board. Just a thought if you want to get into computer control.
Great work! It’s all good, but what really stand out for me is what you’ve done with the gorge and river.
Peter, what’s the minimum radius for your really nice layout.
Looking good my fellow model railroader!
SOOOO good to see a second tier RR being modeled! We seldom saw TH&B frt cars across IA or up/down the Q’s & Milw’s lines from Savannah to Twin Cities. neat RR!
Dan, the minimum radius is 20″ used on the reverse loop section curve. The others are 24 and 26 inch radius.
Guys,
I appreciate the comments but I am in a corner. Too much of the wiring is already installed and using an Arduino to control the turnouts does not solve the problem of “which was is it now?” especially is someone changes the turnout by hand. (No one would do that . . right?)
The detection is ONLY turnout status not block occupancy.
The idea of using optics is something I had not thought of. Thank you. Again though, I am using (I mean trying to use the reed switches to also illuminate the push buttons showing the turnout status.
As you can see, I am in a very tight corner. There are solutions but they are complex.
Thank everyone for your suggestions.
Respectfully,
Frank in Surrey, BC
Peter, that’s a very cool and interesting layout you’ve created in a somewhat restricted space. The room looks like it’s nicely finished and lighted for your layout. You’ve created a lot of interesting scenes and I applaud your use of so many figures to add life and realism to your layout. I was impressed by your combining both cookie-cutter and foam sheets to achieve the vertical separations of the track plan. Also, your use of backdrop buildings and the photo backdrop at the end of your business district street to extend the depth is excellent. Thank you for sharing! You’ve given me a lot of great ideas to improve my layout.
Frank, another option is using an atlas snap relay. You simply wire it as in parralel with the switch machines and it has two single throw outputs that you can use for signals and turnout position indication. No modification of the turnouts needed to install reed switches.
Henry, Again, the problem is two fold. The first, and more serious is that I have gone too far with the wiring and don’t have room for more electronics. The second, and ultimately more serious is that if a turnout is thrown by hand, the change will not be recorded in the push button lights.
To quote, “Oh what a tangled web we weave!” (blub, blub)
Again, I still thank everyone for their suggestions.
Respectfully,
Frank in Surrey, BC
Check out little wicket videos there’s a raft off stuff there using a Adrunio and the scripts you can use less current sensors and servos for switching also automation with a sensor shield and mega Adrunio you will have enough inputs and outputs for a very large layout all so use micro switches on servos for control panel for turn out position
Well done, Sir.
What is the par on that golf course?
I never expected to see the TH&B here. My grandfather was a crane/hoist operator for many years with the TH&B and my father worked with him on occasion during the depression. I grew up just outside of Port Maitland where the TH&B had a yard and docking for the car ferry that brought coal cars destined for the steel mills in Hamilton across the lake from the U.S. (before my time)
Very impressive layout and very well executed and a whole lot of detail with something more to add later.
Worth repeating .. that’s is one stellar layout .
Every aspect is just stunning . Magnificent work !
Thank you for sharing and inspiring .
Outstanding river.
Wow- THB from my neck of the woods- those cars are very hard to find.
Congratulations, I will continue to watch this one!!
Peter, You made one gorgeous river gorge there! Very well done.
Nancy from Gig Harbor
Peter, excellent work. Is that the Niagara River, above the falls?
Frank, I have no advice. My layout is set in a time when the train stopped and a brakeman got out to throw the switch, so all my turnouts are manual.