Warren’s been in touch with his 4-6-2 Pacific locomotive HO scale:
“Hello, Alastair;
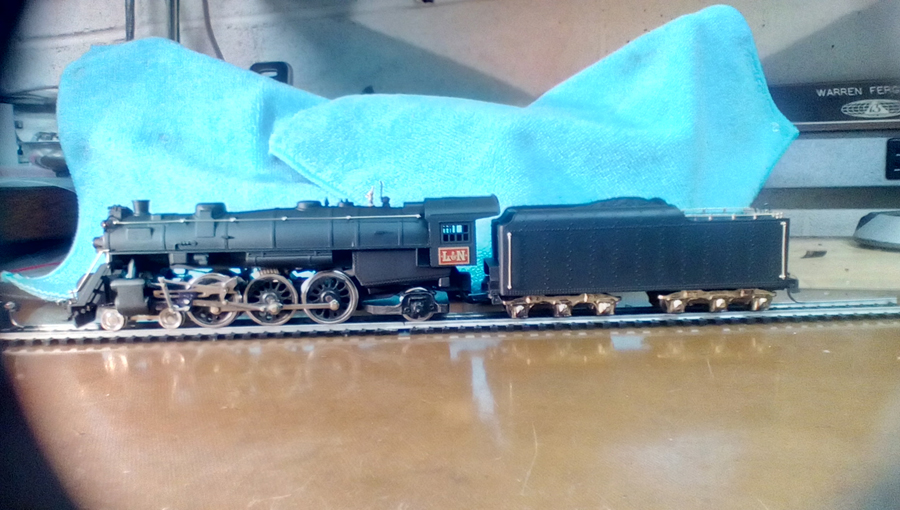
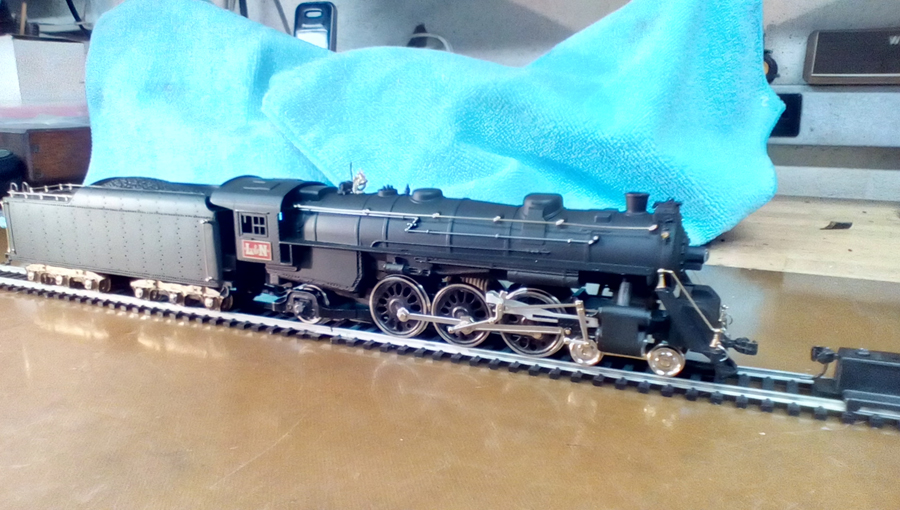
I have attached pics of a Mantua HO gauge 4-6-2 Pacific loco and tender I have restored.
I bought it on eBay for a few dollars, and I liked the way it’s built, so I decided to “fix” it.
It had started life as a C&O unit, painted blue. There were a lot of miscellaneous problems with it, and I had to find valve gear for the left side.
I grew up in a little town on the Louisville & Nashville railroad in Alabama, so of course I’m modeling the L&N.
I found the red/gold L&N heralds on the cab from a gentleman in northern Minnesota. His company is Northern Scale Models, and he’s a pleasure to deal with.
Once I had all needed parts, I started by rebuilding and reworking the drivers and trucks.
All the driver rods have been bushed to eliminate excess movement, and the valve gear rivets have been tightened to prevent the gear flopping around.
I removed all flash in the driver wheel spokes and used gunmaker’s liquid blue to darken them.
I made the front truck from brass stock, and used brass wheels on it I bought online. I found the brass trailing truck spoked wheels online too, and had to rework the axle to fit the truck.
After finishing the chassis, I removed all mould marks on the boiler, polished out flaws, and added the details seen, including Sunbeam generator, brass bell, pop-off valve, boiler feedwater heater, class lights, air and signal hoses, pilot steps, & coupler lifter.
The paint I chose is Badger Engine Black, and it’s a great product. All handrails are handmade from .020 brass wire, and the throttle linkage is .020 steel wire.
This is my first effort at restoring (aka kit bashing?), a metal loco, so I hope you will cut me a little slack on this one.
One area I haven’t tackled is decals. I’ve tried on another loco, but they just look like decals. I can’t figure a way to seal edges and blend them into the paint without ruining the paint.
If anyone has ideas, I’d sure appreciate your help.
Thank you for all you do, Al, I read your blog faithfully each morning.
Warren”

“Hi Al Another view of the log train shown previously. Scenery finally getting there along the shelf towards the yard.
Ballast and roadwork is next on the to do list at the town and yard.
All the best
Brian.”
Latest ebay cheat sheet is here.
A huge thanks to Warren for sharing his 4-6-2 Pacific locomotive HO scale, and to Brian too.
Some impressive stuff there – I do love seeing the different scales, scenery, styles and my inbox each day. Please do keep ’em coming folks.
That’s all for today folks.
Please do keep ’em coming.
And if today is the day you get started on your layout, the Beginner’s Guide is here.
Best
Al
PS Latest ebay cheat sheet is here.
PPS More HO scale train layouts here if that’s your thing.


What a splendid model Warren, I hope it gives you many years of enjoyment.
That is a very nice job on the resto of the loco and tender, beautiful.
Warren- great job on the Pacific. One of my favorite models. I have not done this myself but on another modeling site I follow, several fellows have written about using a clear coat spray after the decals are applied. Many mention “Dull-coat”, not sure if that’s a brand or not.
Nice work Brian. Lot’s of moving parts on those Shays.
Bob
Warren,
For your decals, use a decal product like “Solvaset” to set and soften decals. Then apply a spray coat of clear over the model and there will be no edges!
Hope this gives you the finish you are looking for!
Pat Gorman – Corry, Pa
Amazing job on your engine – I can’t imagine the time and patience it took! Regarding the decals – how about using rub off lettering? I haven’t done it, but I’m guessing that you can generate such things on a computer so you can have the size and font, or graphic you want.
The product Warren needs to make his decals look like they were painted on is a decal setting solution. Several companies offer the stuff. It melts water slide decals on to the surface of the model. The process is to first apply a gloss coat of clear to get a smooth surface so you won’t have any “silvering” of the decal. You can skip this step if the model was painted with a gloss paint to start with. Apply the decal with the setting solution and let dry. Don’t panic when the solution looks like it has destroyed the decal. Just let it dry. When dry spray a flat or gloss clear coat over the model as required. I have models over 30 years old with decals that still look like new that were applied this way.
Cheers,
Stan J.
Nice story on the 4-6-2. Log train was a welcome change
I have always love that style of engine Great job
What a great job on the rebuild Warren and Brian’s layout is so cool !
that redo on the loco is fantastic ! I have used the (Solvaset) stuff and the guys are right , it works very well and has several names depending on what company has produced it .
Be well and stay safe Sir !
George
Enjoyed both articles.
Excellent work on the Mantua Pacific. Those old metal locomotives could be challenging to work on. (Do not ask me how I know.)
As to the decal situation… I have found that the Dry Transfer type are now essentially impossible to find. I am also having problems finding anyone who can/will print custom water slide decals in white. The solution does seem to be “solvaset” which is a Micro-Scale product (they actually have a whole line of products specific to applying decals) and the Dull Cote (An old Testors product). In both cases I would suggest checking out some of the many modelers sites and publications to see what they use. When Rustoleum bought Testors they seem to have changed the formulation for Dull Cote but there are many other matte finish clear sprays available.
John from California
Warren and Brian, thank you for allowing us to see your wonderful ideas.
nice work!! I have rode on the L&N 152 light pacific many times at the Kentucky railroad museum they had cab rides for a extra charge not been there in a wile do not know if they still offer that It was great fun to get to do it.
nice work…I just finished a Bowser (all metal) of a Chicago area railroad; if you live in the US, I’d try S.C. Johnson’s “Pledge Floor Care Finish” in the large clear bottle with a blue label…apply and let it dry overnight, just like a paint…add decals & setting solution; wash when dry and cover with lacquer “Dullcote…or Glosscote” there are also acrylics from Vallejo, etc…Pledge get it from Amazon or WalMart… Vallejo, hobby shop/Amazon
Fantastic, it would have been great to see a before and after picture. Nice job, not sure if I have the patience.
Has anyone tried 3d printing to create hard to get parts, it seems you can reproduce anything.
Beautiful work, Warren. Factory-fresh quality.
Thanks Brian and Warren.
I love how you restored that old Pacific Warren, especially neat and clean job. Looks like a new engine
NICELY DONE Mantua 4-6-2!!!! I myself have several Mantua loco’s and one type is the same as you have here. (I have one dating to 1948!)
Question? DCC or old school DC Cab Control? AND to add to the questions, old open frame Mantua DC-90 motor, or did you remotor it with a can?
a great resto job on the train.love the logging train thanks for sharing.
Beautiful restoration, and somehow the metal models have an air of real heft about them that you just don’t quite get with plastic.
My 4-6-2 is DC only at this point, and has the original DC-90 motor. It runs very well as it is. I keep playing with the idea of switching to DCC, but I love running the trains as they are, as well. Question for you, do you know when the model I have was made? Thanks for the tips, everyone. Warren
OK folks … I am 81 1/2 years on this earth…. when I was around 3 .. ot 4, my Dad would take me along to the local grain elevator for cattle feed, grinding, etc… occassionally there sat on the tracks (and we would pass it sometimes 30 ft. away) one of those BIG, BLACK, AND SCARY looking locomotives …. NOTHING in my meager existence was SCARRIER …. steam emitting from various orifices, and when it started moving, the huff and puff sound was eiriey and scarrier. And I noticed that my (past) 2 to 3 year old grandson would back away from one of those models on the floor when it was coming around the curve … with all those simulated sounds ,,,,, WHAT IS IT that makes one of those black locomotives frightening ??
Brian, I love your logging train. I have not owned a Shay, but I’d sure like to expand my empire to include one in a logging operation. One question: are the logs you use factory made, or do you make your own? Congrats on a wonderful operation! Warren
Hi
Alastair,
The recent rebuild of a US loco sparked off something in my head.
The restorer mentioned obtaining spoked wheels for the rear end of his loco.
I have made fruitless searches across the Internet to try to get my hands on something similar for one of my GW tank engines.
Could you please advise me how to track down the correct type of pony truck wheels?
The existing wheels were cast from a solid mold of plastic which to my ageing eyes looks pretty stupid.
Especially as the other wheels correctly imitate the prototype.
If you can help, I’d be very obliged.
Warren, I am sending my Tyco Pacific to your shop for a refit…..haha. great job. Mine still runs like a champ, but I need to dig in a bit to replace the bulb. Did you switch to an LED for the headlight?
Don at Northern Supply is a gem of a fella, but he is close to the Twin Cities.
Brian, there is nothing like a shay, great work.
Mn Dan
Very nice looking locomotive. I’ve done the same with several 4-6-2 and 2-8-2 Mantua engines. Rather than give you my advice on decals, I’d go with what Stan Johnson said in his comments. I’ve used the same technique for many years and it works great. The only thing I might add is, if you use solvaset, brush it on the decals quickly and then don’t touch them at all until they’re dry. It essentially dissolves the decal and turns it to paint. And you know what happens when you touch wet paint. Again, nice job!
Warren…… a lot has already been said but I had to comment. Great Job….looks better than new.
Brian…. I love that logging train… especially the engine. And your detail in the layout is superb…really great.
Beautiful, would have been great to see her in action.
Bob Shipley. Dull Coat is a name of a spray-on flat finish made by Testors. I have several cans of it as I use it frequently on the military armor kits I build.
Warren you did fantastic! Someday I will try what you did.
Love the logging layout too !
My mom worked at Mantua many years ago. You’ve done a great job with the locomotive.
Answer to Warrens question on my logs.
I used some purchased resin cast logs to make two different masters to fit on my logs trucks. (Logs were available from Walthers in the USA)
From the masters, I made a silicone mould of both bundles of them and then cast them in resin. Therefore they are a bundle of one piece cast logs on the log trucks.
Once removed from the mould, I then painted and weathered them to look like real logs.
Hope this answers your question and if required, I can send Alastair some photos of the different stages of the logs being in their raw state.
Brian – the HOn3 guy in Knysna RSA
Beautiful restoration!
Warren, Great job on the Mantua rebuild! I doubt I’d have had the patience to track down all the parts you needed to fix it. Ditto the other comments regarding using Solvaset and Dull Coat for decaling. Also, I thin Micro-Mark and/or Walthers may still sell ink-jet printer make-your-own-decal kits, I have one that’s about 15 years old, so probably too dried out to work anymore.
Brian, thanks for the new video of your log train. From the new perspective of this video, it doesn’t look quite so close to the edge of the layout. Great idea casting your own log bundles, I never would have thought of that but I’ll be pleased to borrow the idea for some brass skeleton log cars I’ve been working on lately. 🙂
Joyful experience.
Ambitious project, well done!
Warren- Here’s the link to the Micro-scale site. Anything and everything you would need for applying decals.
http://www.microscale.com/
Warren, decaling is not hard. This is my nearly fool proof way of decaling. First gloss coat the model. Cut the decals out as close to the lettering. Dip the decal in warm water and set aside for the adhesive to loosen. Coat the area where the decal is to go with MicroScale MicroSet. Gently slide to decal into position and gently blot excess liquid and allow to dry. After drying recoat the decal with MicroScale MicroSol. VERY gently with just the weight of the bristles of a soft brush you can get the decal to conform to rivets, panel lines and even ribs. Take your time and reapply MicroSol as needed to soften the decal. To remove air bubbles, gently pierce the decal with a sharp #11 knife and pat the decal down with a soft brush. When all done, coat the model with the desired flat, semigloss or gloss finish. It will look like painted on numbers.
Hey Warren! That restoration looks “The COCONUTZ” nice job.