Ken’s been in touch again – this time he shows us how he built his turntable.
And Chris has also sent in a video of his rather fun layout.
“Hi Al,
Here is the turntable at the mine. Because of the small size I decided to make it myself.
So here you see the rough cut out and temporary turntable with track, to get proper dimensions and proof of design. The turntable is not powered at this time.
I have also started on the road, made out of drywall compound, and painted with basic grey house paint.
The tunnel portals are hand made, cut from ¾ inch plywood, coated with drywall compound, painted with the same grey house paint. Here you also see the beginning of the ballasting, following all the tried and true methods of gluing, except mine is real sand, sifted for size, cost 20 cents for a bucket. Again, I live in Mexico and here you need to be very creative.
This next picture shows the 2 crossings where the road and track cross. I had 2 bags of ties that were for the original layout years ago that never got used, so I dipped them in black paint, common house, dried and now used to fill in blank spots made at rail joints and here for wooden crossings.
Ok, progress, the turntable pit done. Took many ideas, each discarded as impractical, till I finally hit on the method I finally used. Again because of its size I figured I needed several separate components, the circular track, for show only, the bottom of the pit, the walls of the pit, the turntable, and a way to electrify it. Turning for now is manual, may or may not change, we’ll see.
The base needed to be as round as possible, so center hole and compass with blade, sanded to finish. The walls were cut from cardboard, glued and pinned in place, and layered for rigidity, not easy but far easier than the rail. The rail was cut from a piece of flex track, curved, fitted, glued and pinned to dry. Everything is coated with my favorite item, drywall compound. Here it is finally mounted in place. Also there is a notch in the wall height to allow for the rails to pass and rest on as the locomotive enters and leaves.
The turntable was far easier. Material is 3/16 inch thick, cut to shape and glued together. Power comes through the center.
Here is the underside of the turntable, the rod is the center pivot point and one side of the electrical connection, the washer is the bearing surface and the other side of the electrical connection. I found that I needed weight to insure a good connection as well as electrical conductive lube. The base of the table has a brass tube and corresponding washer.
The weights are old auto wheel weights, needed to insure good electrical contact. Also here you see the mine area is now ballasted, the road is in and scenery done. Colors are combinations of common house paint.
This picture shows how small this turntable is, it is now fully functional.
Here are the 2 loco’s that work the mine and deliver the loaded and empty cars.
You also see the “ finished” scenery, tunnel portal, road, and pad for the 2 stall engine house, and the car repair track. Both loco’s were purchased in the early 70’s, still running smooth as silk. The electrical switches are for the 2 engine tracks, and the turntable, also the approach track is likewise controlled, as is the car repair track.
Hope you enjoyed this and someone out there finds it helpful.
Ken, from Mexico”
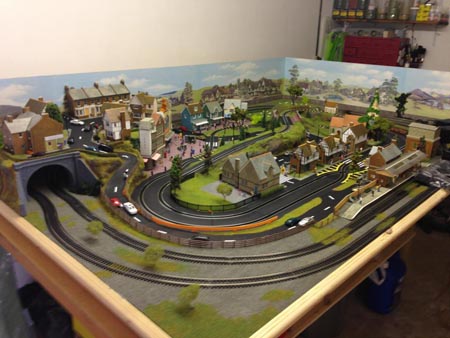
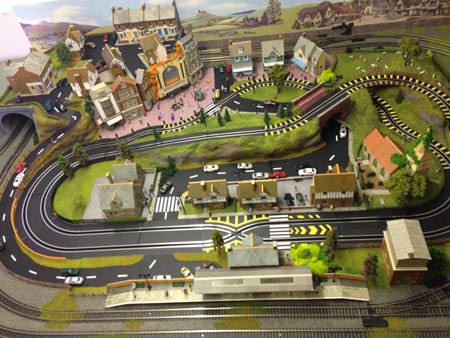
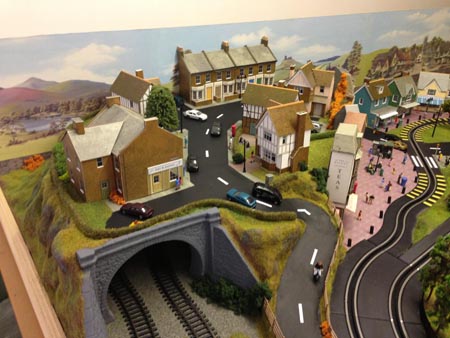
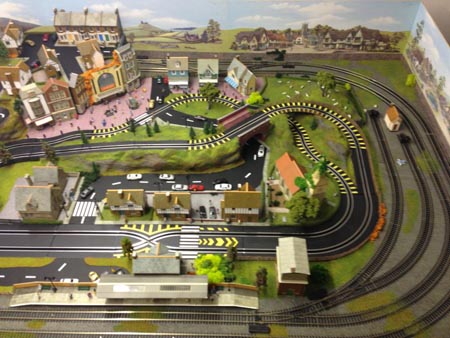
“Hi Al here is the latest layout i have done:
The fun bit about it, it has a mini scalextric set in the middle.
That’s all folks! As always, please do keep ’em coming – and a big thank you to everyone who has contributed so far. I hope you enjoy reading them as much as I do.
I have bit of a back log at the moment, so if you’ve sent anything in, please do bear with me. I’ll get to you as soon as I can.
Latest ‘ebay cheat sheet’ is here.
Best
Al




great work Ken
THATS A BEAUTIFUL SMALL LAYOUT.
A prime example of engineering ingenuity. Great job, Ken. I could purchase a turntable, but you have inspired me to build my own. It will be a lot more fun. Those locos are a couple of real gems……beautiful.
love the small lay out. Drywall compound will crack and fall apart in a short time.
Good morning
This project looks very interesting. I missed part one and two could you send them to me at my email address?
Thank you
I really like the 6 x 4 layout, thanks for sharing.
Very nice,you planed it really good,a small space that looks open hope those Ore from you.
Hola Ken,
Nice turntable … very creative. I also like the sand idea for ballast. I’m sure being in Mexico has given you a few challenges in building your railroad. I love the brass loco’s. Nicely done.
Bob
Nice how to on the “home made” turntable. Ok Chris the 4×6 layout looks great. How much does it cost? Not to many layouts with the Lemans grand prix running also. Too bad that DCC cannot be used to control the vehicles on that track. Then U could use more cars and it would look more lifelike then.
Thanks for the pix of the turntable. I can use the idea on my layout to solve a problem I am having with laying track for a yard operation and getting several switching turnouts in a small area. Never thought to use a turntable for anything other than access to a roundhouse!
Hey Ken, nice going using what is available. When you get further along, it would be nice to see how you are doing.
Rob
Chris,
You have quite an exciting layout with the race track there. Why don’t you send some video with everything running.
Ken, good ideas and good job. Could we see a diagram of the plan layout?
Chris, great layout. Maybe a video in the future with everything running.
Great modeling job, excellent craftsmanship(hope it operates just as well??!), and really another grand idea(all of them are) for the moving autos!!!!
CHEERS!
That’s a nice layout.I been trying to figure out when you swing the turntable.how do you get the connection back to the rails seeing there will be a tiny gap between the rails..but I like the layout.
very nice layout
To builder Kim, there is no physical connection between the rails of the turntable and those of the layout. The electrical connection comes through the center of the turntable. The rod is one side and the washer is the other side. There is a center tube and corresponding washer in the pit that supply the power.
Thank you for your comment.
both layouts are great love the race track in the middle. i think the turn table is great.hope to see more photos.
hello ken I was trying to put a turntable on my lay out and got stuck but you have shown me the right way to sort out how to power big thank you
There’s alot of items around the house a person can use on his Model Railroad Drywall mud is one of them. I can understand living in Mexico is a challege I went there on a Church Project, I was asked to make pews, me being a carpenter figured that it woudn’t be a problem. Wrong you should had seen the wood they gave me to work with. lol
How much are you selling the 6×4 2track and 2siding for? And what scale is it?
I love this turn table, stuff glade to see it , I dont really get it , but just not my thing I guess , I am the guy to doing the wrong thing just laying track and running trains , might put a few houses arround build a bridge or two but al ways changed the lay out , haha thanks would like to send pictures but do not know where send thanks
Hi Ken from Mexico.
This is Walter from Mexico enjoying retirement and modeling in On30 scale. I’m in San Miguel de Allende, GTO, where are you located?
Why not paper towels soaked in dry wall compound over chicken wire or screen? Dry wall compound will crack.
would not have use a turn table for that location. Wast of time and effort, Should have you a turn out instead, Would have look more realistic. And dry wall Really crack, heavy and not the easy medium to work with.
Ken Have you considered using motors and gearing from a VCR or an old printer from computer they usually are small voltage motors and using gear sets to slow or speed up movement
Great job well done
Ken, What a creative guy you are. Loved the turntable how-to and your vintage brass climax and shay locomotives. I have a PFM class B shay that I bought in 1960 for $25 in Chicago. I also have a PFM Hillcrest Shay that I got for about $70 in the late 60’s. Both were unpainted brass and I was not proficient at painting my own locomotives, so I found a guy at a local hobby shop (Websters) who took them apart, painted them and installed Kadee couplers on them for something like $15 to $25 each. I still have both of them in my display cabinet and hope to run them again soon on my test layout that I’m building.
Chris, You’ve managed to cram a lot of interesting layout in to 6 x 4 feet. Al said there was a video but I couldn’t see it here. I think a good video will help you sell it on eBay.
Where is the video ? I’d like to see it with everything running. Nice work !
Chris, nice layout. I’m in the design stages of a HO layout with trains and racetrack. I even have an at grade crossing where the race cars will have to stop or try to beat the train through the crossing!
I love the idea of mixing slot cars with trains, but HO scale slot cars are really 1/64th so you have to match them with a scale larger than HO.
Also slot cars often tend to move rather fast, but once they are broken in they run smoother.
I love slot cars as much as model trains.
Frank in Orlando
Love your home made turn table I’m wanting to do something like yours to our lumber yard not really big enough in our small space to make a good 18 degree continue loop we tried but train derail on curve( about a 16 degree curve ) so we simply run forward and then back up
Thank you,thank you,I’ve been building a turntable and trying to figure the best way to power the center track. The center shaft and washer contact was just a perfect idea and will be my next attempt. My turntable will also be manual for the time being. I have installed power and a switch but haven’t found the right motor and gears yet.Mine is an indoor G scale,so much larger. Thanks again,best to all.
Al thanks again
I believe that is the first time I have seen a slot car track used with an HO Train layout since I did it 61 years ago.
I actually used a slot car track as my main highway with my HO scale Train layout and also used an N-scale train around my mountain as a mine train!
Sure wish I had photographed it back then, but I wasn’t interested in photography then and we certainly didn’t have cell phones then, just dial phones! LOL