First things first, those of you who couldn’t watch Arnie’s stunning new video last time, it’s here.
Now on to Matthew, who has a done a brilliant job of explaining LED lighting for your model railroad.
“Hi Al,
I have been absorbing all your modelling tips and now it’s time for me to give something back…
I am an electrician and have great experience in wiring up LEDs in models (remember my Thunderbirds Tracey Island?).
The easiest way to wire up LEDs is according to their power source & LED voltage rating.
Say for a 3V LED, and a 9V battery power supply, you wire up 3 LEDs in series: 3+3+3=9V.
Then if you need more than 3 LEDs in the model, you can connect 3 more 3V LEDs in series (or a series circuit), then connect this series circuit in parallel with the first series circuit.
This way you don’t need to do any calculations for adding resistors, or look up the resistor table to find the right one – less mathematics, less soldering. It’s got to be good, eh?
Because LEDs consume very little power, or in other words draw very little current, you can connect many series circuits of 3 x 3V LEDs in this fashion.
In my Thunderbirds Tracey Island model I connected:
4 x 1.5V AA batteries in parallel for a total 6V power supply.
Then I connected 4 x 1.5V LEDs in a series circuit.
I connected 10 of these series circuits to the batteries. 40 LEDs in total.
Once you have the circuits and the power supplies sorted out, you can add switches to control each circuit of 4, or more LEDs separately.
Before I used these LEDs in my model, I tested them vigorously.
I ran my 10 parallel legs of 4 x series LEDs off 6V battery power for 8 days continuously.
My conservative calculations estimated 3 days of running time, so they well exceeded my estimations.
Because these LEDs use very little power, they are awesome.
NOTE: Battery voltage is DC voltage. So, all of the above relates to DC circuits only.
Now, because everyone in the train modelling world uses 12V DC output from the power adapters.
I live in 240V AC land, so my power adapters are 240V AC input via 3 pin flat plugs, 12V DC output.
UK and Nth America will be different inputs but I think we all talk the 12V DC output language.
So, for a 12V DC circuit using bright 3V LEDs:
4 x 3V in series = 12V
Or
8 x 1.5V LEDs in series = 12V
How to arrange your LEDs series circuits
So, arrange your series circuits around your models, run a twin wire (+ and -) back to the power source for each series circuit.
Connect all your positives together, connect all your negatives together – no resistors required!
Then, you can decide how you want to switch them. Easy.
I have also wired LED interior lights in my VW transporter 9 seater.
I have estimated you could wire a house in LED lights and have them running for 1.5 days continuously off a 12 V DC battery. How good is that?
I am willing to help any modeller with composing circuits of any voltage, using any LEDs, with any amount of switches, in any layout, because you guys have given me so many good modelling tips so far.
Have a good day, Al!
BTW, I now design optical fibre networks. So as soon as Intel develops the optical micro processor, we will all stop warming up the planet with excessive amounts of heat dissipation from electrical devices. It will be all electrical supply to optical converters. If we transmit at visible wavelengths, then we don’t need an extra electrical device to convert the light source into a wavelength we can see…
Wouldn’t that be nice?
Our power bills will be a lot less.”
“Hi Al,
Thank you for the time and effort that you put into running your “Tips and How To” Site.
I wonder how Meany modellers throw away a great power supply for running their accessories each time they up grade their computers. The computers Power Supply. I run several.
Each power supply has mutable out lets in 3.3v, 5v &12v that I use to power up several bus-bars. The outlet wirers are colour coded to give you the voltages and the amperages of each supply.
I hope that this will help a little with recycling old computers.
Cheers,
Geoff”
“Hi Alastair,
I started this layout with my kids and taught them how to build this railroad as their skills increased.
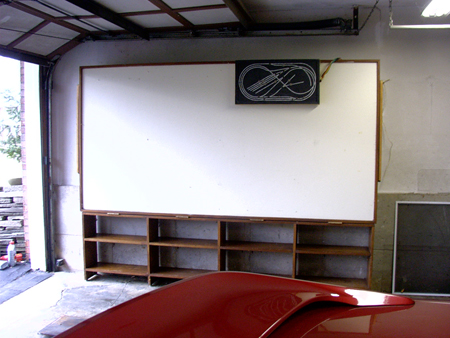
We didn’t have much room so I built it as a wall unit 10″ deep with shelves to store rolling stock when it was folded up against the wall.
They used the 4 x 8 flat side to post their school work.
All the wiring is in a 2 inch space between the railroad bed and the outside.
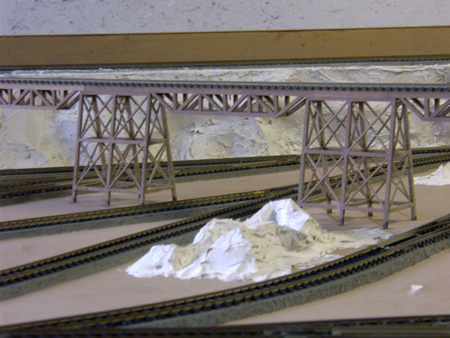
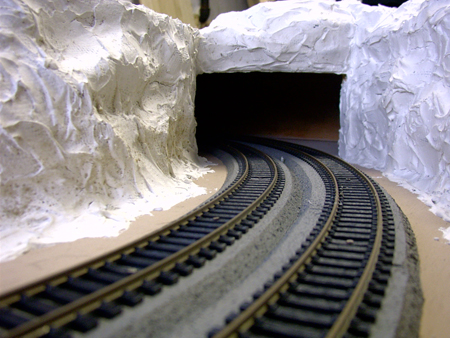
Two support legs swung out as it was lowered down to operating condition. All the scenery is crushed screen wire tacked in place and covered with plaster. We never finished it as they went off to school and their jobs took them else ware. So it sits in the garage gathering dust. Sad.
I enjoy looking at all the layouts that you post. Really nice work.
All the best
Harold”
That’s all for today folks.
Please do keep ’em coming.
And if today is the day you get started on your layout, the Beginner’s Guide is here.
Best
Al
PS Latest ebay cheat sheet is here.

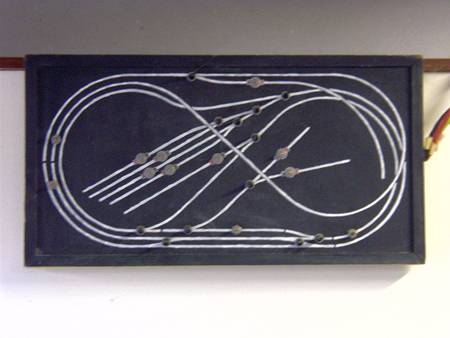
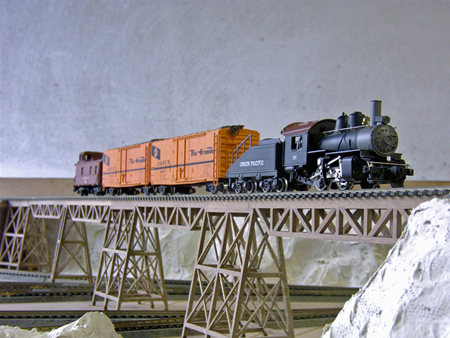
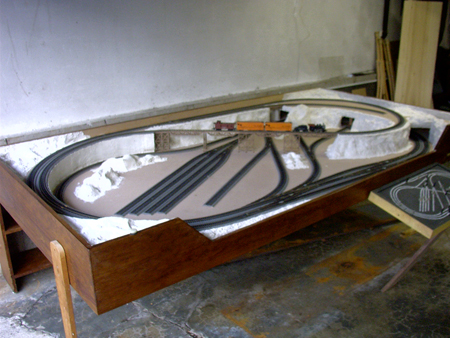


Nice trackplan. New subject – here we have a Gantlet track, is it called Gauntlet track in your country?
Thanks, Max
Hi Al
Very interesting information, and nice layout for continius operation.
I am looking for fiber optic information, specially how to glue the fiber optic with the leds and dont loss bright intensity
Thanks again for the bunch of information you give us.
Cheers. Guillermo. from the Patagonia Argentina
Interesting use of the leds, but if you connect 4 x 1.5v batteries in PARALLEL all you get is higher power at 1.5V, not 6V. They need to be in series.
I also think the track plan is very good.
Is this a 4 foot by 8 foot layout?
Thank you.
Bob F.
Hi Mathew,
interesting article. I found a little flaw though. Let me quote you: “4 x 1.5V AA batteries in parallel for a total 6V power supply.”
You probably wanted to write “in series”.
Paralleling batteries increases the current, but the voltage remains the same.
Keep up the good work.
Cheers
Mic
Kitchener, Ontario, Canada
I use the “old” phone P/S to power my LED’s on layout–with sw’s push buttons on the 117v side to conserve $$$—-this way there are several dioramas with different themes
now-wish I had pursued my ambition as an electrician-wouldn’t have any problems understanding your article-but will keep as a reference-thanks for the info!!
Harold “Get the layout cleaned up & RUN IT YOURSELF” I am 68 yrs young when I fireup my trains on my layout.I have inerloop with industries & a outer loop for FASTmail.I can play with it for hours.What a enjoyment.
Thanks to everyone for your input and the pictures … very helpful information indeed.
Thanks Al
Best,
Tom N
HI Harold
I love to get instructions from you how to build this wall layout. Where are you located so if it is possible I would love the come out and see it. If it is close by Southern New Jersey very close to Philadelphia area.
Matthew,
There’s an error in the early part of your post “4 x 1.5 AA batteries in PARALLEL to give 6 volts.”
The batteries need to be in SERIES to yield 6 volts.
Thanks for the details. Very well written.
–Ben Z
grea layoutt
Why would You want to run a bunch in series. When lights are in series and one burns out all the other will not light. (remember the old Christmas lights) If they a group of street lights or a house was lit in series it might be hard to find the bad light. In Parallel if one gose bad the good ones will still be working. Most all street light and House in real life are in Parallel even the new Christmas lights ar that way.. May God Bless
73s Bill
I’m glad that some others spotted the Parallel / Series mistake – I had stated to question my own knowledge !!
Hi Mathew,
Great article on LED’s, but I have one question, not being a ‘Sparky’ or wiring knowledgeable, it’s where you say -‘Then if you need more than 3 LEDs in the model, you can connect 3 more 3V LEDs in series (or a series circuit), then connect this series circuit in parallel with the first series circuit.’ How do you set up series to run in parallel with the first circuit? Thanks for your info.
Tom. O.
If possible, dimentions of your layout? Very interesting but it seems too complicated for a Ho scale if it’s 4×8. Thanks
AWSOM LAYOUT. LOOKS LIKE SNOW.
Harold, dont just let the layout sit there abandoned and unfinished, just because your boys have moved on. Get to it and have a go and finish it yourself!! You will have hours of fun doing it I’m sure.
With regard to the LED information, I am an ex-electrician and I think a couple of circuit diagrams would not go amiss when trying to describe something like this.
At Last an Easier way to Read how to Wire LED’s Safely . Thanks
Al
I just saw your recent post where Harold had pictures of his unfinished layout hanging in the garage. One of the last words of his story was ‘sad’. I am not looking at the layout through his eyes, but I would beg to differ. To me that layout, its ingenuity, detail, and story made my day.
To all of us would-be modelers, half-done layouters, dream-track planners, etc. You, Al, your posts and all of your fellow contributors keep our blood flowing for model railroading (and modeling in general). Some of us who no longer have the means or the space or the time live vicariously off your posts. Those of us with fond memories of our childhood train sets that have long since disappeared; or those of us stuck in too small apartments, driving wheelchairs, bed ridden, halted by severe arthritis or otherwise unable to model just now, love what all of you are sharing.
I, for one, look forward to each email and gain another nugget of wonderful information or inspiration. All the stories build on the corporate knowledge and we all can learn from the ideas, mistakes and Q&A. Each layout, big or small, new, or not-yet-finished tells the story of a dream. For some of us who will never again have a layout or hold a model locomotive or paint a scene, you keep our dreams alive. We may no longer be in our basements working on our tables or soldering wires, but we can still sketch out ideas on paper or in our minds of what could be someday. Keep up the great work, and God Bless.
For Harold; that great looking layout may just be waiting for the next generation of grandkids, new neighbor child or the yet unknown modeler on Craigslist just looking for a started layout to build his or her dream on.
this is for james! if will find out any photo finishers in your area call and ask if t5hey have and scraps of mat board. i do and i can get it free just go pick it up i went this past momday and picked up some large ones halfsize hope you can find some
Better to connect a resistor in the circuit as it will give the LEDs a longer life. Depending on the colour od the LED. As the current drawn by LED varies with colour- there is a web site in the internet which gives the current drawn by each type of LED. Also another web site gives the circuit diagram and the resistor to be connected either in parallel or in series (“LED circuit resistance calculator”) depending on the way one wishes to connect the LEDs ( in the above the author chosen Parallel circuit) –
Hi I want to know if you are from South Africa
Al –
To the comment about the hanging unfinished layout, I too would suggest that it is anything but sad.
I am 70 and retired. Every morning my layout gives me something to look forward to. I cannot tell you the number of friends we have with no interests at all – neither music, painting, carpentry, reading nor even a good game of chess rousts them out of bed in the AM.
I enjoy them all, (my interests and my friends( and have to figure out a way (with an obsessive/compulsive personality) to balance my agenda and still have time for wife, friends, etc.
My wife teaches piano in our house. Every afternoon the basement receives little callers who filter enthusiastically downstairs to make a progress check on “Mr Gretchen,” and race upstairs for their piano lesson. At six to ten years old, they have been inspired by the thrill of a creative, long range endeavour.
I won’t bore you with my philosophizing any longer, except to say that anything that provides this much creative pleasure doesn’t actually need to be “finished,” does it?
When asked what I’ll do when I’m too old and sick to remain in our house, my response is a simple one: Sic Gloria Transit Mundi.
Fred
Is it possible you could make some simple wire diagrams and post them? It would help understand the series to parallel circut connection. Thanks Tom
Harold,
I too built a small layout for my son, started when he was 6. Then it sat for about 30 years until HIS daughters saw it love to see the trains run!
Quick question:
Is it HO or N ?
Brian
I believe any number of 1.5 v batteries in parallel is still 1.5 v ?
This is what I was told about 60+ years ago – has it changed recently?
Hi Folks
I’m a comms technician for 30 years. Voltages only add in series. Adding any number of 1.5 v in parallel is still 1.5v output.
Parallel batteries same voltage, series adds voltage same current.
Leds are really diodes and range from about 1. 5v drop to about 3 volt drop. The best way to run them is insert a variable resistor in series and adjust untill you have the right brightness. Brightness of LED is dependent on the current through it. Parallel LEDS require more current, series require less. You should always have at least some resistance in series with any power source. and LEDs. You can run an LED in series with a Tortoise switch machine and it will show both when the unit is running and when it is stalled. Remember reverse voltage and the LED will not light, it is a diode.
Great post! Have nice day ! 🙂 ezcuh
A very nice layout. I would enjoy hearing how it is constructed, what size it is and what company built the trestle. A wiring diagram would help too. Thanks to everyone and you folks amaze me with your talent.
Hi Alistair and all. I have a little tip for uncoupling n gauge engines. I purchased some small round magnets on ebay and superglude one on to the end of a stick. I then super glude a small piece of paper staple to the coupling on the rear of a 4F I have. All you need to do is insert the stick with the magnet and it lifts the coupler on the engine. You can then just move the engine forward a bit and away you go :o) Hope this helps others with uncoupling. It works very well.
Thanks for all your hard work Alistair. Please keep it up. Thanks too to all the modellers that send in tips and tricks . This tip should also work for other scales.
The reason for the piece of staple is because I use mostly graham farish rolling stock with rapido couplers and they are all plastic. If you have metal couplers you obviously don`t need the piece of staple. Best wishes to all : John.
Harold,
What a great concept and layout. You and your kids really came up with a phenomenal work around for the limited/shared space of the garage. The engineering of the shelves, the fold out and down layout, the layout itself, the work on the scenery thus far, with the bridge, etc., is quite ingenious. Thank you for sharing the pictures. It is easy to see your engineering and architectural skills.
My eye caught the four hinges that hold the layout to the shelf unit, the fold down legs, the hinged control panel, and the layout’s “snugness” to the wall…all great stuff. One can see a tremendous amount of strategic planning, attention to detail and finishing, and you still have room to park the car. That was the way to do it.
Looking at the layout, it appears that you need to paint the hills and rock formations, maybe start adding some ground cover, and possibly paint some highway or streets, set up a village; all projects that can begin to move ahead. A day or two a week and the sadness of watching it just collect dust and deteriorate will be over. And, even though your kids live elsewhere, I would imagine that they occasionally come home for a holiday, or just to check in. When they do, instead of sitting around the table with Cell phones, texting and reading emails or playing games, your time together can become: “back to the garage, let’s build a city.”
While this may have started as a project with which to engage the kids, it can become a legacy project that can become the escape for them when they need that vacation, that quality time with their ‘ole man.’
Get started, and don’t forget to send us your pics along the way. Thanks for sharing your layout and space saving concept. WOW!
Mark
Arnie, Thanks for the LED electrical lesson! (I know most of it, but that isn’t speaking for others!) So. thats always appreciated in posting for others to learn………. HOWEVER, Harold, that Trestle you’ve built for the layout is done ASTOUNDING!!!!! NICE work on that, the dual main line in or out of the tunnel is done very well! Can’t wait to see more of this as it comes along… will be watching!
Keep up the great work!
Matt thank you for your time and sharing of your experience.
I will keep your notes close by when I get to the place where I can begin buying such expensive items. For now I going to use those little battery operated tea lights. Look great in pumpkins too.
Why can’t someone just say that for an LED to run on a 12v dc input use a 1k resistor Or WHATEVER IS CORRECT. I am no expert at anything mathematical and find all these formulas confusing. I’m sure they aren’t necessary. Just a simple answer is all I need.
I THINK the resistor I need is 1k but cannot remember. I thought that I could get a straight answer from the net. WRONG! I have found there are many egg heads trying to prove how bright they are that none of them can see the wood for the trees.
A simple answer or confirmation is all I require.
Thank you.
Matthew, Thanks for sharing your electrical LED lighting knowledge with us. I am guessing that you chose to wire the LEDs in series because they seldom burn out the way the old Chirstmas lights did when wired in series. Still, one burned out LED takes down the rest of the string thats on the same series circuit, so I’d opt for the inexpensive resistors and parallel circuits.
Geoff, Great idea to reuse the old PC power supplies. Wish I’d thought of that before I gave away all my old desktop PCs.
Harold, The only sad thing about your wonderful fold-down train layout is that you’re not having fun running trains on it and adding to it. You’ve done so much of the hard part of layout construction. It seems a shame to let all that work go to waste when you could be finsihing the scenery, adding buildings, lighting, roads, people, etc. If you are physically unable to work on it anymore, then maybe you could involve some newighbor children in workig on it with you. In any case, thank you for sharing your story and the photos of you layout.
I will leave all the led users for all to sort out, but that layout is great. I sure would like to see it finished and used like you intended it to be use. I also am a mid 70s senior who love to build and play with trains. My wife looks forward to me going into the garage, out of her hair, to run the trains. My layout is 8’x16′, full of HO trains. That is not much larger than your layout, but at my age, like a lot of people, I can tinker day or night. Who cares? Like a lot of people posted, tinker and enjoy.
Run the daylights out of that posted switcher and cars. Paint some snow, build a station. Enjoy, enjoy,enjoy.
Thnx,
Bud
FJ: I use 1k resistors for single led’s that are hooked up to my 12v power supply. I have not had any problems with them.