Dean’s been in touch with something we seeing more and more of: 3d print model train stuff…
Have a look at what he’s done:
“Al, from Dean in New Mexico.
It’s been a while. My layout has suffered since I’ve been working on developing new techniques for creating n-scale buildings using high-resolution resin printing.
In this post, I talk about two techniques for printing parts: FDM (fused deposition modeling) and SLA (stereolithography) to show how I made an improved engine house model.
With FDM, a plastic filament is passed through a heated nozzle while the nozzle is moved back and forth. Each layer is typically 0.5 mm, so the resolution is low.
Here’s a picture of the main building of the engine house being printed.
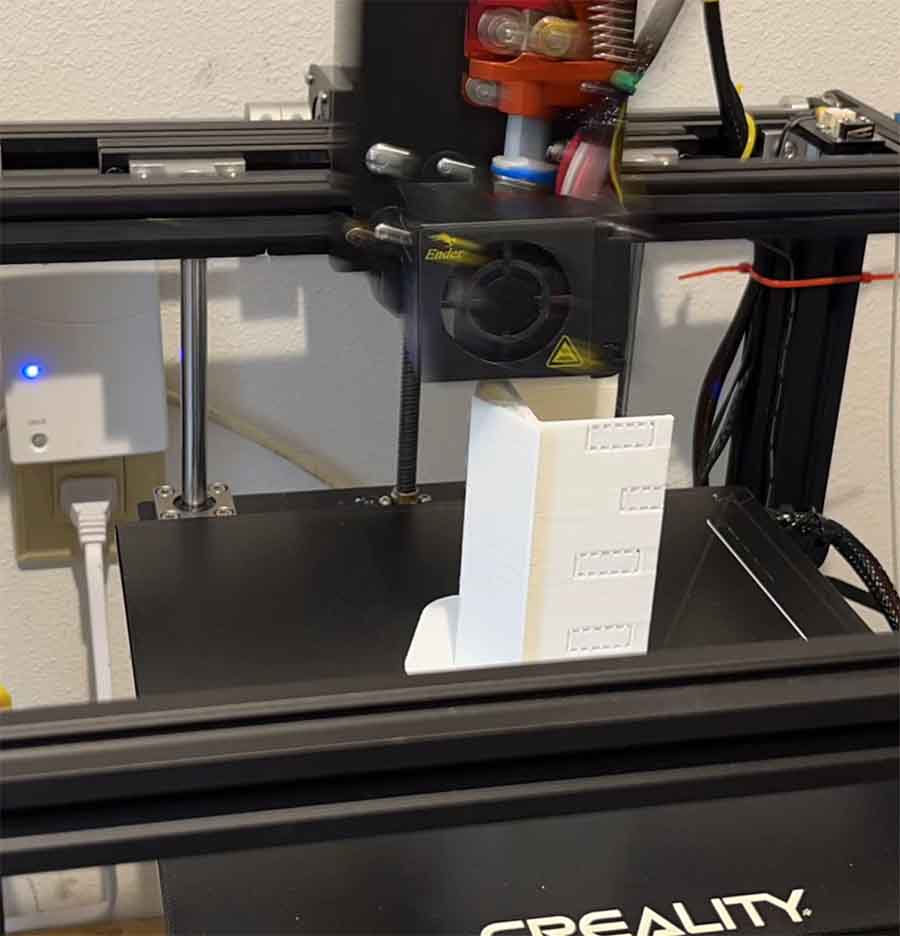
After each layer is produced, the build plate moves down. Note that the software puts in removable supports in openings and a “raft” to hold the part tightly to the build plate.
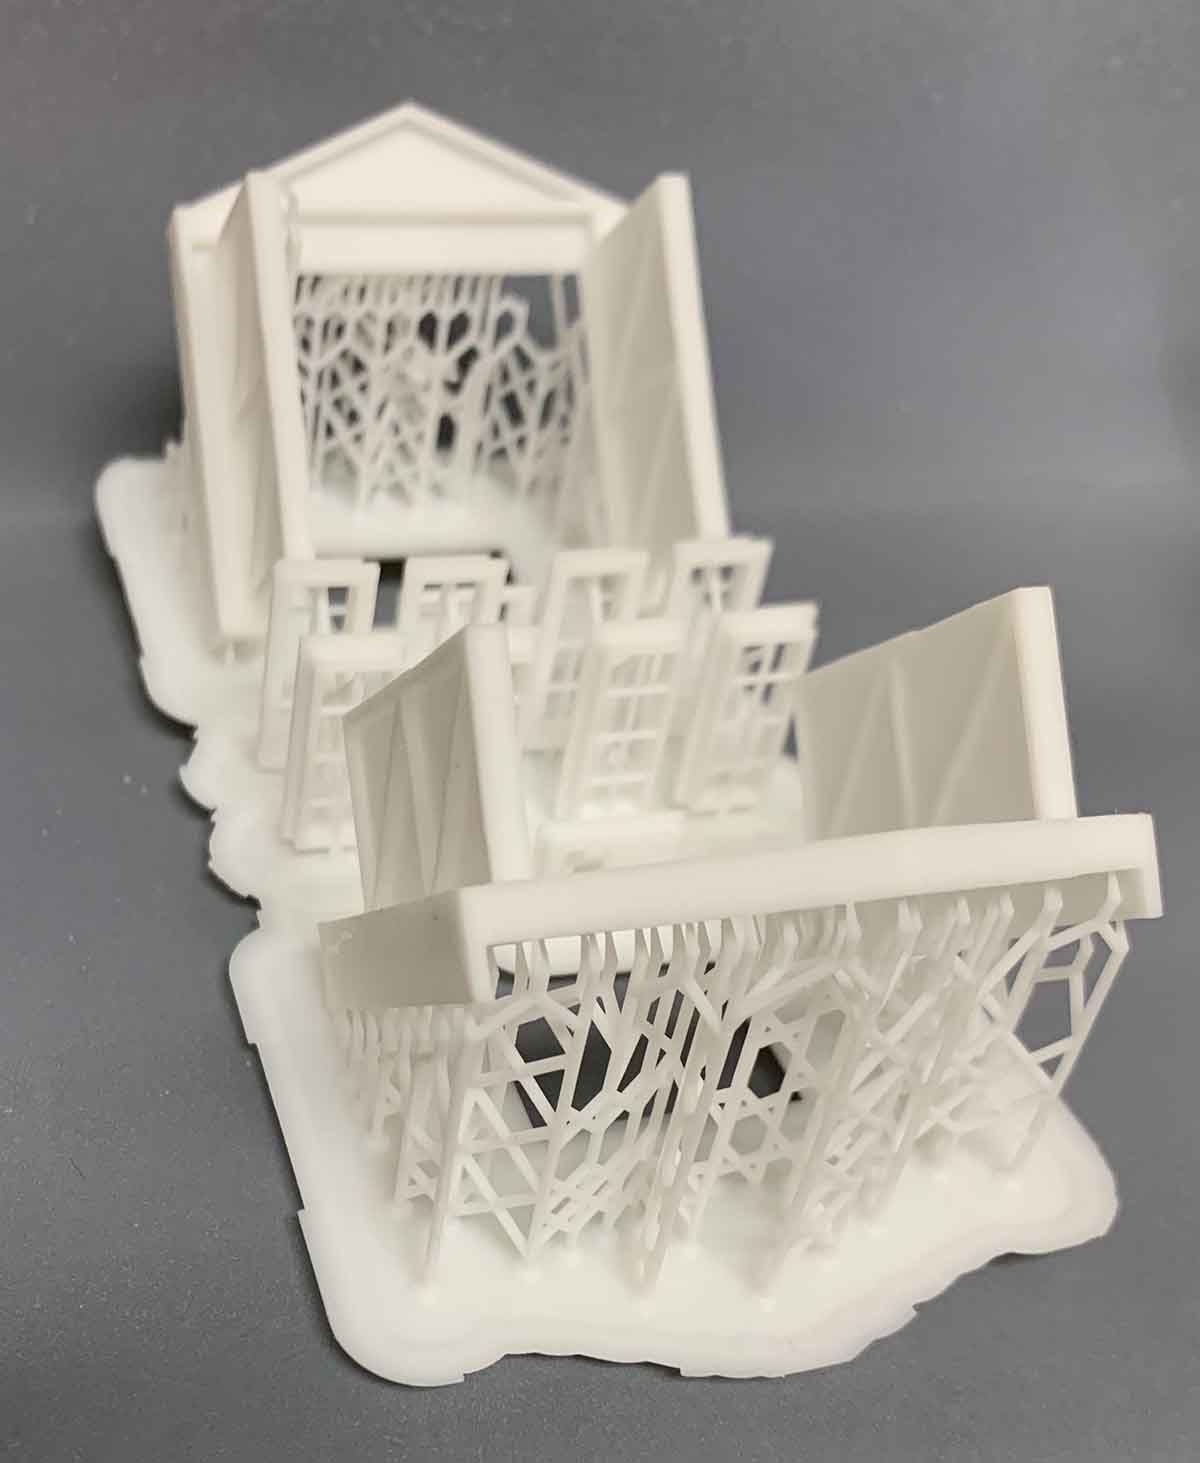
With SLA, a light-cured resin is exposed to an ultraviolet LCD screen. After each layer is developed, the build plate moves up, typically by 0.05mm.
Thus, it is much higher resolution than FDM printing. But after the model is created it must be washed with isopropyl alcohol to remove excess resin, then cured further in a UV light station. And the resin is somewhat toxic. Here’s a photo of the end-door assembly and the windows and doors for the engine house. The skinny rods are supports to hold up the parts
Here’s another photo of a small chimney part produced with SLA. It is just a series of cylinders and a cone cap.
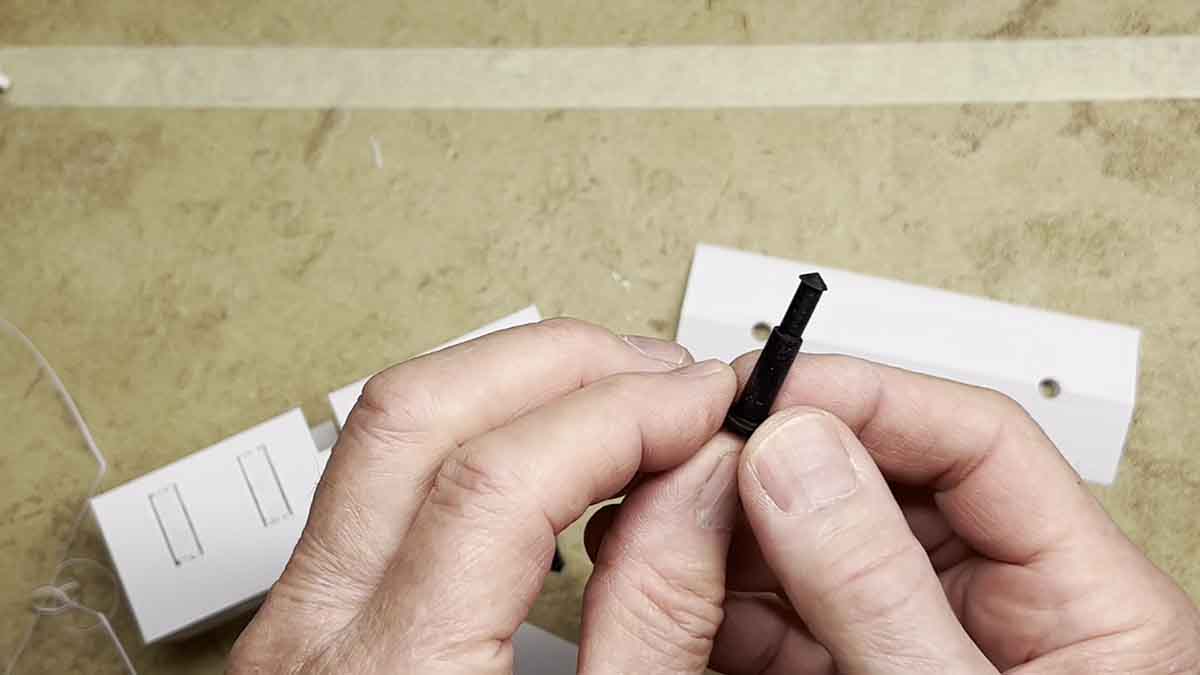
And here’s a better photo of the door end-piece.
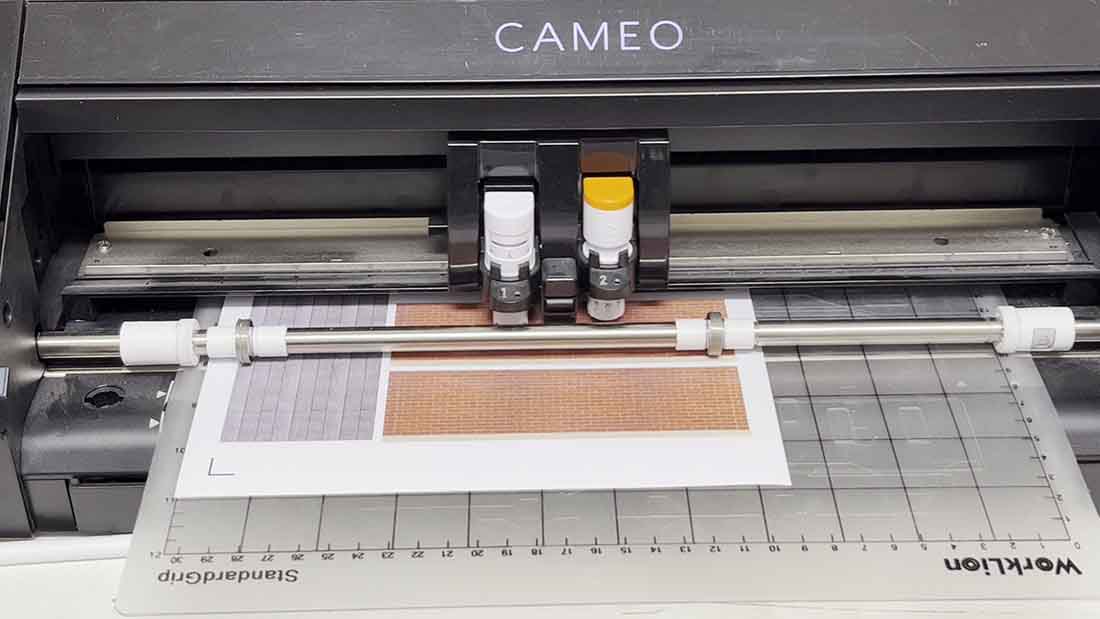
Paper parts are printed on a normal printer then cut with a high precision cutter machine.
I use a simple free program (3D Modeling, by Microsoft) to produce models for both the FDM and SLA techniques. The paper parts are made with another free program, Silouette Studio. Here’s an outline of the free software and equipment I use:
3D Builder (make FDM model) à Creality Slicer à Ender-5 Pro (print FDM model)
3D Builder (make SLA model) à Chitubox 64 à Elegoo Mars 2 (print SLA model)
Silhouette Studio (make paper model) à HP printer à Silhouette Cameo (cut paper model)
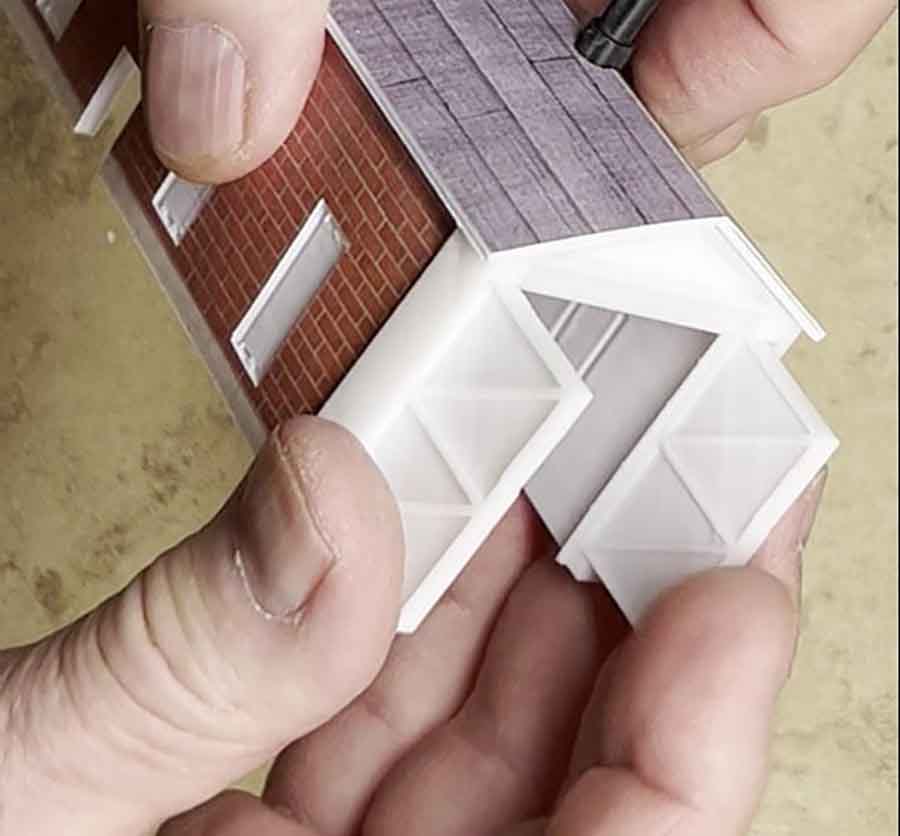
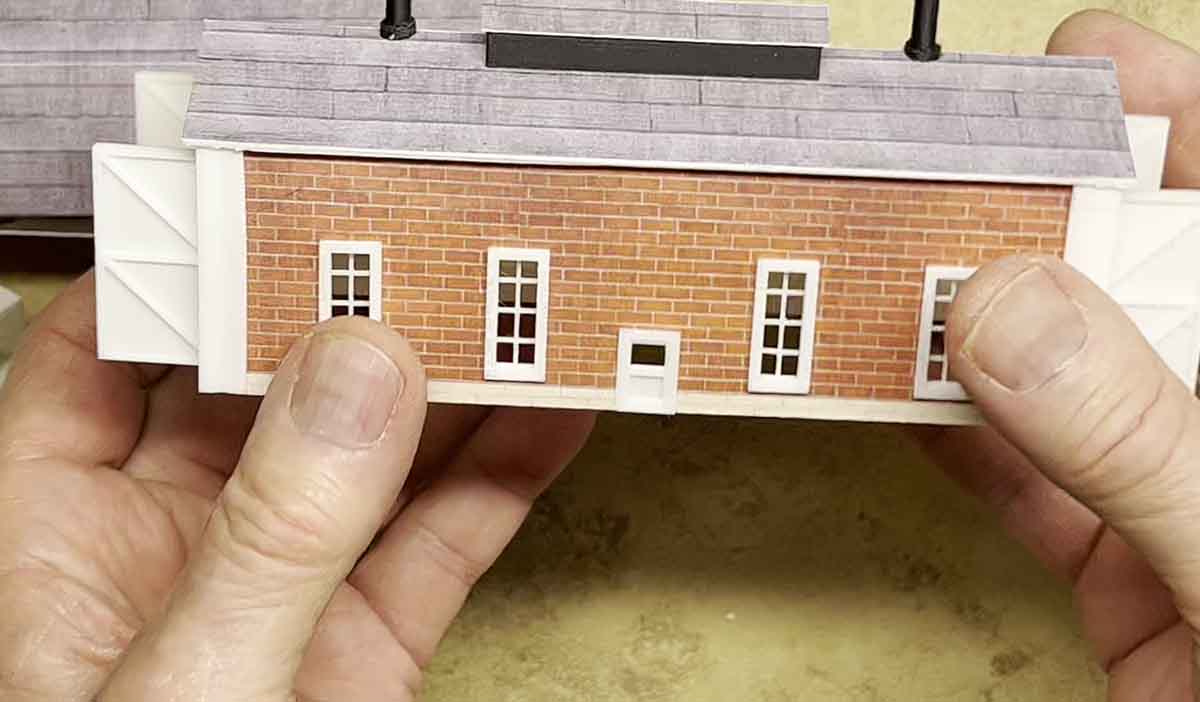
Here’s a photo of the final product.
A big thanks to Dean for sharing his 3d print model train stuff. Mindboggling really.
Course, I’m biased, but much prefer the good ‘ol fashioned Printable buildings.
Now on to John, who has sent his track cleaning solution – there’s quite a few of these on the blog now, but I still enjoy seeing how people attack the problem:
“Some time ago, Al featured a motorised track cleaning wagon that I built using an old toothbrush motor and various bits and pieces that I had in my spares box.
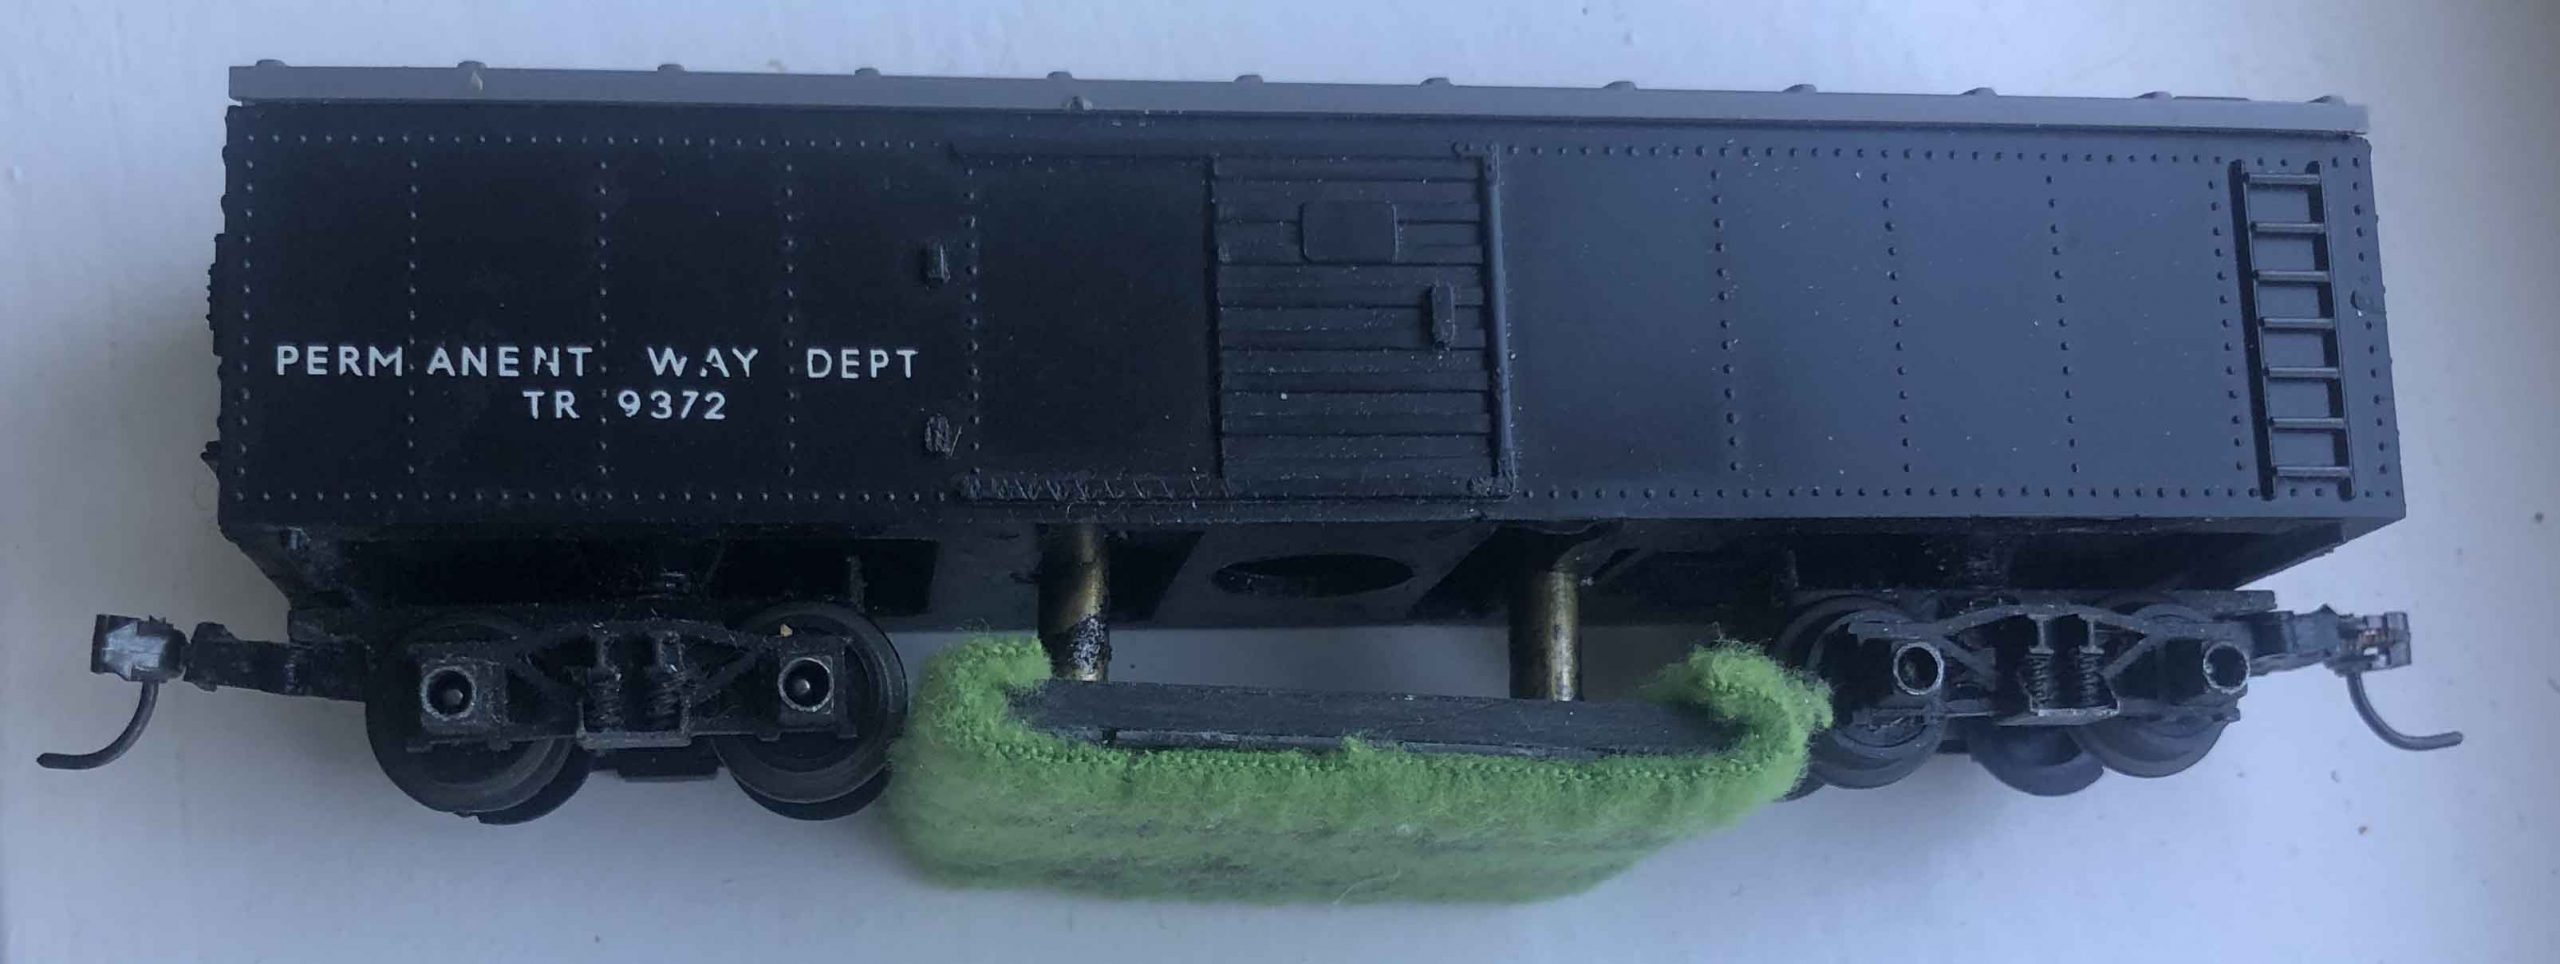
The following, shown in the diagram (not to scale) and photographs, is one that I have built from an old Hornby ‘Permanent Way Dept’ track cleaning wagon.
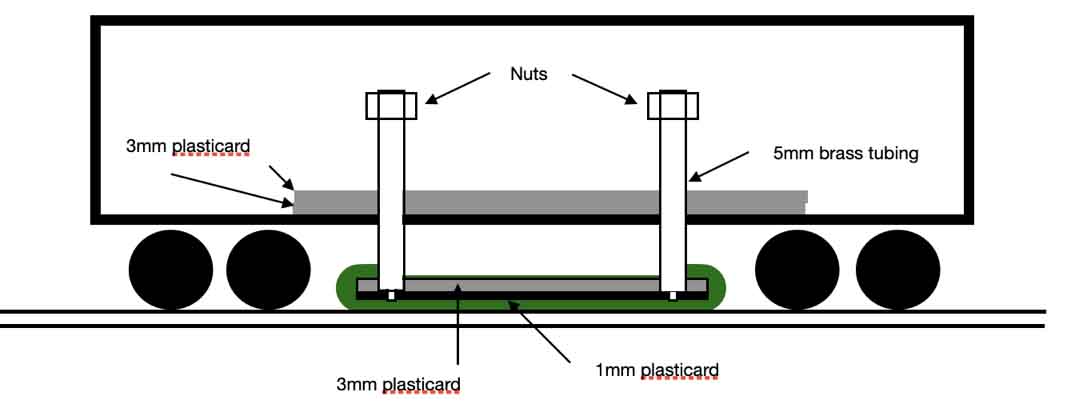
I removed the original metal part inside the wagon and then glued two pieces of 3mm plastic sheeting on the floor of the wagon, one on top of the other.
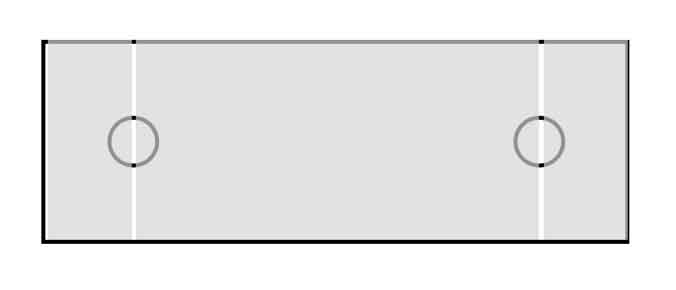
I lined up the upper piece of 3mm plastic sheet of the pad to where I wanted it to be and (using a drill press to ensure that the holes are perfectly vertical) drilled two 5mm holes through the three pieces and the floor.
Using super glue, the brass tubing was then carefully glued to the upper piece of the pad. Ensure that the brass tubing is free to slide up and down. (A little oil on the tubing did the trick for me.) I then glued 1mm plastic sheet below the 3mm sheet but this time there was a slot from one side to the other.
I then took some soft felt, laid it along the bottom of the pad, folded it over the ends and glued the ends. (It will be a simple task to remove the felt and glue a new piece on when required. Two nuts are attached to the tops of the tubes. The weight of the tubes with nuts plus the weight of the plastic sheeting results in the pad being free to move up and down and is always in contact with the rails.
The original wheels were very broad resulting in the wagon frequently derailing at points or crossovers. Each axel was cut through and the original wheels removed.
Using super glue, I glued a small brass bush into each axel hole in the bogeys. I bought two sets of Hornby 10mm wagon wheels and to insert these into the bushes, it was necessary to carefully bend the bogeys to enable the wheels to be inserted.
The metal is quite soft and I am not sure how much bending it will take before breaking, so care is necessary. Once in place the bogeys are bent straight again.
A spot of oil was inserted into each bush, the wheels spin freely and I experienced no further issues with derailing!
To clean the track, I use a syringe to insert some 70% rubbing alcohol into the brass tubes.
The small holes in the 1mm piece of plastic sheeting, with the slot from side to side, allow the rubbing alcohol to seep through into the felt and spread from one side to the other.


I am pleased with the result as it works very well.
Regards
John”
A big thanks to Dean and John.
I would love to know what your thoughts are on 3d printing – please do leave a comment below.
That’s all for today folks.
Please do keep ’em coming.
And if today is the day you say no to boredom and missing out on all the fun, the Beginner’s Guide is here.
Come and join us, it’s right good fun once you roll your sleeves up and start.
Best
Al
PS Latest ebay cheat sheet is here.
PPS More N scale layouts here if that’s your thing.


Such amazing technology that will only get better and easier to use. A great demo. I think about the next step, someday we might be using hologram imaging on our layouts, with people actually moving and doing things, traffic on the roads.
OK, maybe not in my lifetime!
That’s great. Is that printer expensive?
Thanks Dean for the very clear explanation of 3D printing. The simplicity of the design programs you use for buildings is something even I could master. I had an N scale motorcar printed for me and the resulting shell was incomplete and virtually unusable. I have been debating weather to try it myself, and starting with simple prints like your buildings to learn the process seems very possible for me. From there perhaps I could work up to more detailed engines and vehicles.
as a former Mechanical Engineer, I love tech and tools, I want to ask since there is no price on seff fufillment, no gauge to set on goodwill, roughly how much to build that roundhouse? No I am not comparing, just curious. I know there are many types of the resin thread some inexpensive, some $$$$ so just a guess? I see in the future parts in a minimal layout, buyer buys several walls, several roof pieces and with a general guide can build anything instead of being limited to “a” kit already limiting size and looks. IMHO I like it, pure enthusiast, right here,
The 3D printed items look good, and I have one, given to me, on my layout. However, for the average model railroader, it seems cost prohibitive. Looking at the price of the lowest priced 3D printer, cost of the plastic to load them with, cost of software, high precision cutter, and whatever else is needed, it isn’t cheap.
Besides that, what is the average age of a modeler, and would he be willing to learn all the new technology? At 84 years, I am happy with the old school ways of kits, and scratch building (not to forget Al’s fine printables).
All the dollar investment needed would surely buy me a lot of train stuff for my layout. Most of us have been retired or near ready to retire and have fixed incomes.
I’m sure this is the way of the future, but like buying an electric car, I don’t think it’s ready for me yet.
Dean
You are a very smart & talented guy and your building is more precise and cleanly cut than old traditional ways. Thank you for the video.
Big Al asked to render an opinion here so this is MY thought process which may differ 100% with others and that is perfect. If two people had the same opinions then you dont need one of them.
So-The structure of a model building can be anything-cardboard, wood, plastic, metal etc BUT the finish such as brick, siding, block etc is the visual element and to me the key factor. In the video the 2D printing of the brick was the important point.
3D printing is such a daunting and expensive endeavor for most people. I who use CAD everyday- 2D- for engineering plans find 3D very complicated and I can understand why most people are intimidated with it.
IMHO 3D printing should be relegated to making stuff like an engine block, welding tanks, crab traps, junk, detailed elements etc- stuff you cant seem to get and leave the simple tasks like a building wall alone and do it the old way. If you need a small adjustment of the building with 3D you have to start from scratch but the old way just a quick slice does the trick. If it aint broken dont fix it.
Finish products such as brick and clapboard siding are not cheap and a guy like me will spend forever to use every bit & have no waste. To 3D print siding than to buy it is more expensive in the long run.
John
Very clever. Falls under the KISS principal.
Pretty Kool.!!!!!!!!!!!!!!!
Here is my 2 cents on the subject.
Having just purchased a 3D printer myself, I find so long as you have the time and space, they are IMHO, worth getting. I am working in HO so using a 3d printer to make larger buildings (firehouses, town halls, etc…) does take a bit of filament and lots of time (hours and sometimes days).
My printer cost $219.00 delivered and it came with the slicing software and a full large spool of PLA . So far, all I have built are smaller things like doors, windows, billboards, and, a cattle loading ramp and the spool is still quite full.
Another good thing is that if you need more than what is offered to buy or you break something, just turn on the printer and let it do it’s job.
Now if I were to go out and buy these few items and pay for the shipping, it would cost me anywhere from an 1/8 to a 1/4 of the price I have invested in this machine so far.
Another thing I forgot to mention is there is a lot of files free for printing on the web that others have already drawn up so unless you’re looking to build something that’s not on the market, you do not need to own or learn a CAD program (which there are also a lot of free CAD programs on the web).
I am in the process of trying to learn a little CAD but at my age, 77, the mind takes a lot longer to absorb this info so as I said before, I search the many 3D sites out there to see if someone has already done the work for me.
I think 3D is going to be in this hobby for a long time until, maybe, holograms become the norm. Until that day, buying, building or however you do it, we love our trains.
I purchased a few 3D models online because they looked good in the picture and they were very inexpensive. When they arrived, I was very disappointed with the quality. There were holes in some areas, and a bunch of extra plastic that was very difficult to remove in others. Maybe it was the seller, or maybe the technology, but either way, I am not buying any more 3-d models online.
I bought a 3D printer a couple of months ago specifically for making custom items unavailable elsewhere for the model railway. I have had zero experience with 3D printing prior to buying it but there is lots of help on Youtube etc.
The initial expense for the machine can be a lot but the 3D printing filament is relatively cheap, around $30 Canadian for a 1kg spool that lasts a long time.
Although I bought this for the railway, before printing anything for that, I ended up printing replacement case handles, missing parts for garden equipment, fairy housing and bridges etc for my grandaughter’s fairy garden and several other pieces of customised home hardware. I eventually got around to printing lots of different kinds of fencing for the railway and the software allowed me to match that to the exact slope and length of platform ramps, which I couldn’t do with off the shelf kits. Websites like Thingiverse offer lots of free designs and they have a model railway section which has some nice signal boxes and designs for spare parts like buffers, in fact I’ll be printing replacement buffers and ladders to fix up a damaged used loco for a friend and I found the designs for those already done on Thingiverse. Designs can be scaled in the slicing software so you can download a G or O scale part and just rescale it for OO/HO and I’m brand new to this, knowing practically nothing but the 3D printer has definitely proven useful for the railway and around the house and fairy garden.
Dean – Wow! Excellent job – you’re really mastering the different elements of the 3D printing process – very nice quality. A little beyond my kin, but I am glad there are early adapters paving the way for those of us who will catch-up later. 🙂
John – Very creative! Thanks for taking the time to share your work, and showing us how we can build our own basic track tools that every modeler needs & uses.
Dean, IMHO you are showing all of us a fantastic integration of 3D printing and modeling. I wrestled with developing board or brick textures for 3D items printed in FDM material I have generated. I too utilize the SLA for generating the fine detailed items. In one aspect, I was stuck in the forest and not seeing the trees. To apply a printed paper of the model over the basic structure, reserving the details for the SLA – brilliant. For those concerned about cost and learning curves – yes, 3D can have an expensive upfront cost. Learning to model in 3d is a new way of thinking for us modelers. Before 3D we typically ‘add’ lines and shapes and components together to get a desired result. With 3D printing we have to think backwards and take materials or shaped away from a solid (or laminate shapes) to get the desired result. You made a great demonstration with the engine house. Your process works for creating a very detailed model and incorporation the surface appearance paper models bring to the hobby. Cheers, David
Isn’t IMHO a little town in Sweden or someplace?
If it’s an abbreviation, please, ALWAYS tell the reader what it means the first time it’s used, unless it’s universally recognized (such as Dr, 3D, USA, UK or anything else that everybody already knows.
FOOD FOR THOUGHT: The 3-D printing and all the latest technological advances being developed to get us to the moon again and Mars, we have seen in the last couple of decades, yet nobody has come up with a replacement for the common car windshield wiper. There has to be a better way than that bothersome, hypnotic, blade wiping back and forth in front of you, and almost useless in a driving rainstorm.
Totally unrelated to modelling but I thought about it during this 3-D discussion.
Funny how the mind works!!
For George R Broad, To your concern, the Meme ‘IMHO’ dates back to 1986 and when capitalized is the abbreviation for ‘In My Humble Opinion’ while others use it for ‘In My Honest Opinion.’ There are some reports it was first used as far back as February 23rd, 1984. As the acronym has been in use some 36 years, I didn’t perceive the long version was required. Thank you for your feedback.
I think the finished 3D printed models are just too perfect. At my age (88) and budget, I much prefer putting together a scratch built structure out of wood or styrene. Looks more realistic.
i love the track cleaner! good idea. the 3-d printers used to be about 300, depending on their size. some went for about 2000. thats the really big ones. i might try to get one, now i have more than one reason to get one. yey.
Very smart ideas, congratulations
remarkable how fine work for N scale they will do . as time passes the price will drop on 3D printers I see them about 200$ on some sites . good idea with the track cleaner !
Thank you john for the step by step instructions on the car cleaner method.
Great comments on 3D printing; a coming technology. In the city I live in, the city closed a high school because of declining student population and converted the facility to a community use. They have created a place to go for the community to use. One of the areas is called The Marketplace. Within this area are 3D printers and dlicers to be used by members for a daily, weekly, monthly, or yearly fee.
Use of the equipment includes some instruction on use. This would allow an introduction before purchase at a slightly lower cost.
I am most grateful for the IMHO explanation.
I can do without the 3D printer.