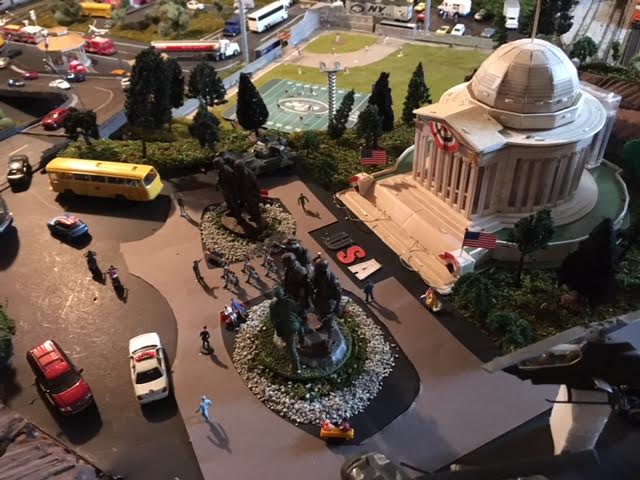
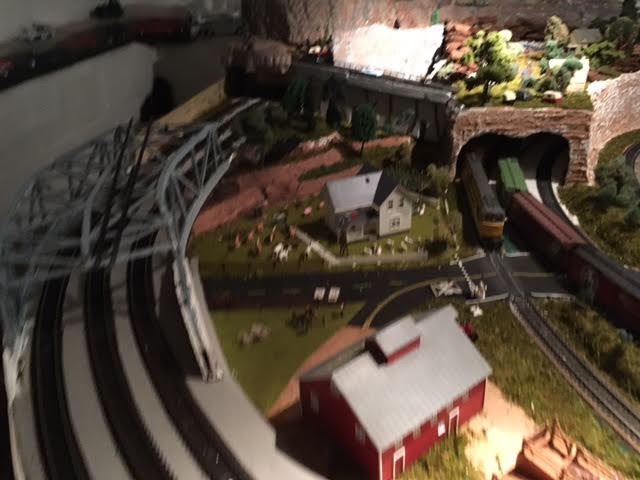
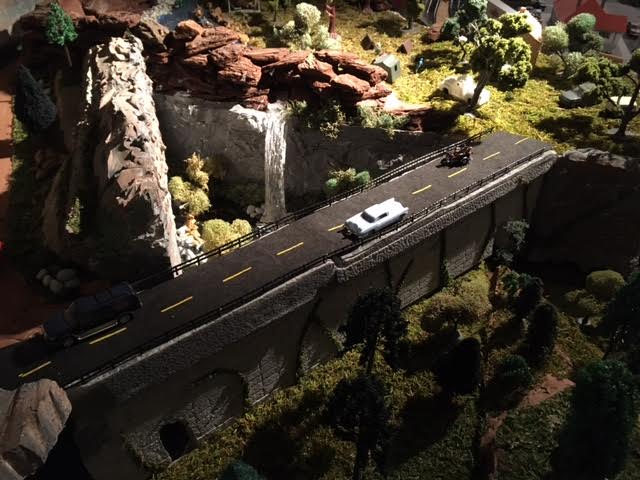
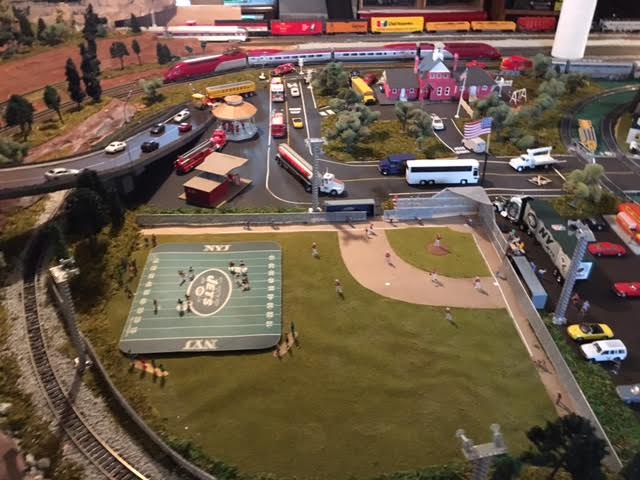
Peter’s been in touch with his HO scale Lincoln Memorial layout:
“Hope you like my layout is 10ft x 24ft not a RR club, my own.
The building is a puzzle of the Lincoln memorial which was close to HO scale.
The 2 soldier figure monuments on left and right were pieces I had in glass display domes that I cleaned up to stand free.
The helicopters and the F-17 are 1/72 scale model kits, all the vehicles are HO scale as well as figures in the scene .
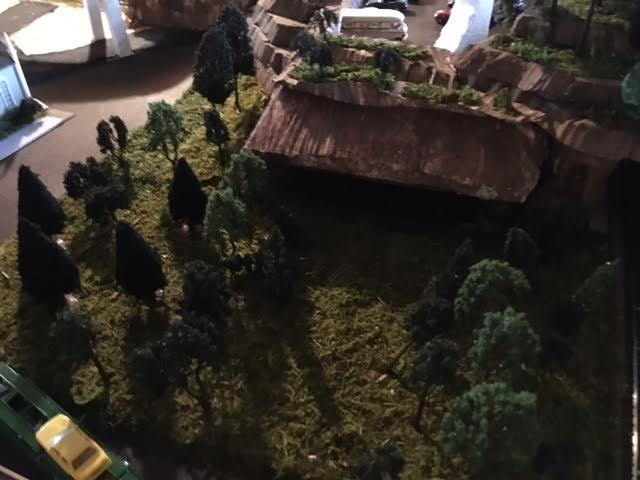
It is built over the top of a mountain which the trees and the shaped styrofoam gives the region effect, I’m glad you like it and I’m sure others will too, I’m very proud of it and it’s a great conversational display.
You being in the magazine business is there any way to get this to Washington DC in the VFW magazine, I am a veteran from the Vietnam era, I was a volunteer and went over 1967 – 1968 in Siagon , I was in the USAF and most proudly a Bronze star recipient, very proud to have served.
Love my hobby and have been doing it for more than 55 years, just love it and how it relaxes me, always coming up with things to make or do.
Thank you again, hope it can go further.
Peter”
Fantastic – a HO scale Lincoln Memorial layout, made from a puzzle! I do love seeing the things you lot come up with.
“I am sending you some photos of some of the details that we have come up with at the TVMR.
This is a new layout after our move from an old location that was sold causing us to have to relocate.
We have a COMPLETE NEW HO layout going in and are going to be adding our N Scale layout on the right hand wall from front to rear of the facility.
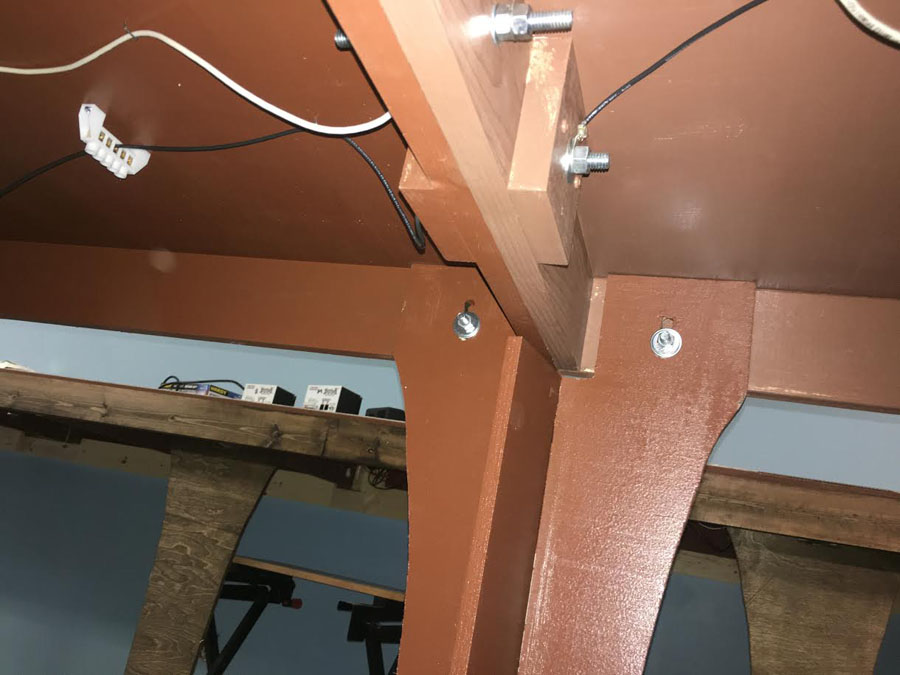
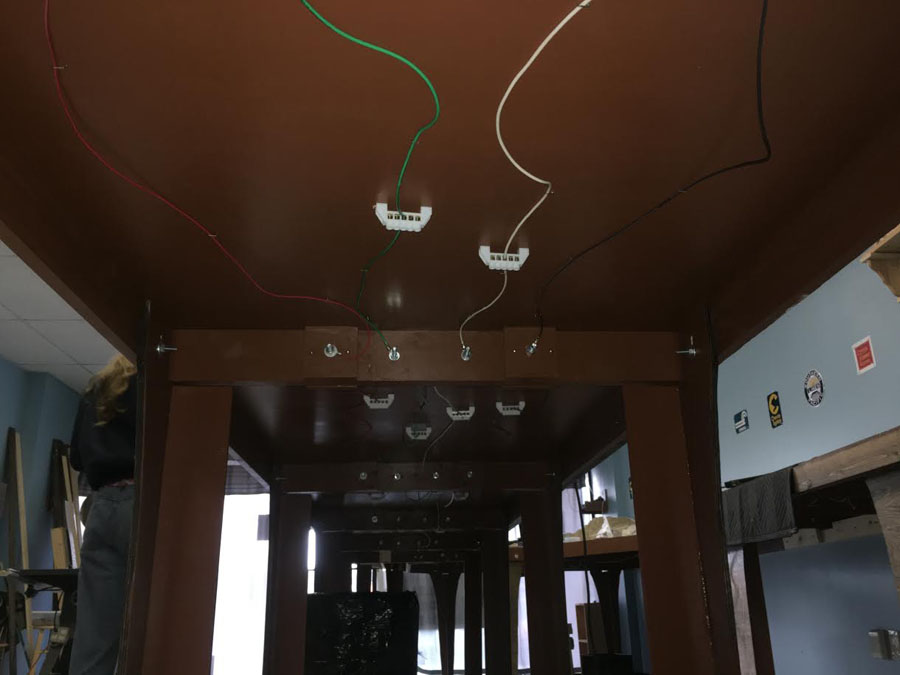
These photos are of the details of the buss installation for the track power and accessory power.
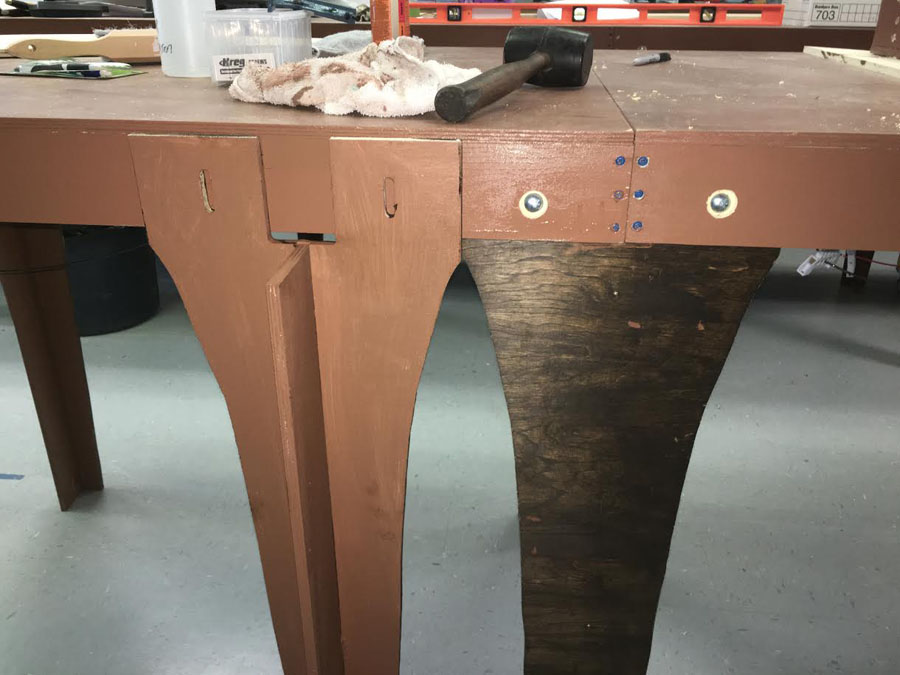
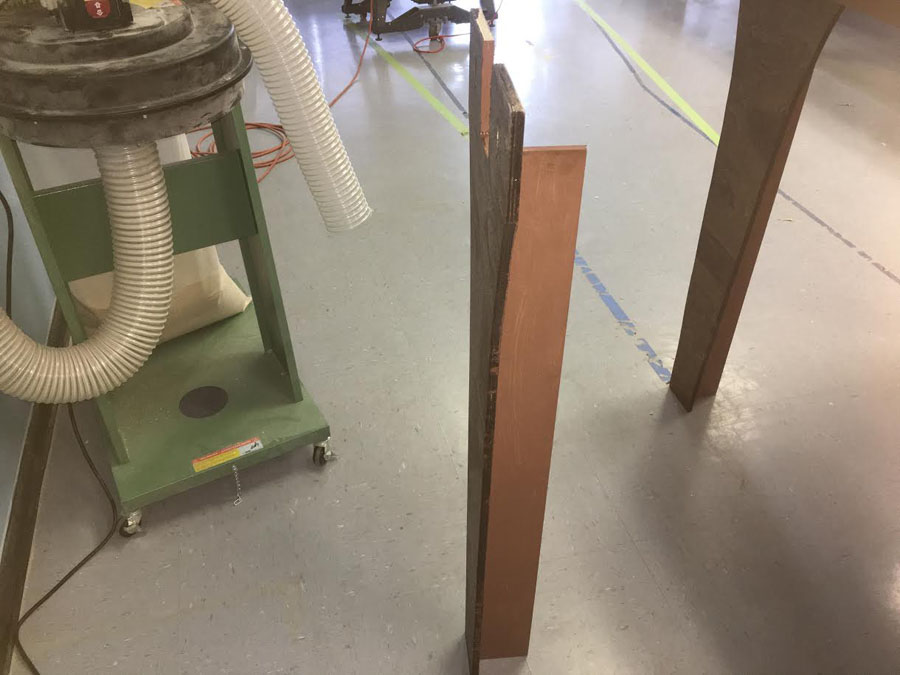
There are also details of the leg design I came up with to replace the 2×2 square legs that are so incredibly unsteady.
These legs are so strong that it is hard to believe the benches are not anchored to a wall.
I will be sending more photos of the members working like santa elves making the legs and assisting in the manufacture of the bench work.
We are a small club but since our move we have had people join the club in anticipation of our great new layout.
It is an exciting time for us at the TVMR Club.
George”
“Hi Al
Enjoy you’re emails and info. Like you, I’m restarting the trains a bit later in life.
Just read the soldering tips email (good stuff) and I would suggest two other tip.
It’s a good thing to have a wet sponge around to clean the soldering tips especially when you’re doing a lot of soldering.
For de-soldering w/o destroying small parts, I suggest copper braid, 0.050 inch & 0.100 inch.
The braid wicks up the solder really good.
Sometimes, you may need to add solder to make the wicking process work better.
Personally, I have 2 soldering means; 1- a soldering gun (150Watt) for those larger jobs, and 2 – a temperature controlled soldering station (Weller WESD51) with a 0.039 inch tip.
This lets me solder parts as small as 0806 onto PC boards.
Cheers
Leo”
A huge thanks to everyone, especially Peter for sharing his HO scale Lincoln Memorial layout. I would love to see more pics of your layout – be great to see all of it too.
That’s all this time folks.
Thanks for all the comments on the Beginner’s Guide. Course, I’m biased, but if you want to get going on your layout after a few decades off, it’s a great place to start.
Keep ’em coming.
Best
Al
PS More HO scale train layouts here if that’s your thing.
Need buildings for your layout? Have a look at the Silly Discount bundle.


I enjoy many of the layouts, designs and solutions that folk come up which are to be commended. However my one criticsm is that many are far too busy and all the space taken over with little apparent thought to the character and setting of the model. Perhaps avoiding cramming everything in order to fill the space available is a maxim to be considered. Were all the roads depicted on some models always full and with spotless trucks and cars? Anyhow at the end of the day it does come down to personal choice. However, if someone chooses to post an item for general view are they seeking applause or comment? Is it a model railway or a train set that one is modelling is maybe a question one might reasonably ask!
Good looking legs (I would tell that to all the girls but my wife would object) but I’m surprised they are more rigid than two inch square, what is it makes the difference? Could you give some dimensions please? Mine are just 2×1 with angle braces and I rather wish now that I’d made them more robust.
Rod
I like the lag detail pics, they look good and strong – much lighter too!? On the first piece; who or what is the TVMR and where are they based? I’m thinking “Tamar Valley Model Railway” Cornwall/west Devon borders. Looking forward to seeing more from both sources.
Appears legs are made with 4 pieces of 1/4 inch plywood of 2 shapes. Two different shapes butt glued and then glued to an opposite pair. The slots at the top allow table height adjustments to keep level.
Please send pics or drawing of the actual construction. I have only made assumptions about the leg design and there are likely many who would appreciate more precise details.
Thank you for sharing and awaiting more as project progresses.
Thank you Al, as your site is a benefit to all.
Bruce from SC USA
Two different legs entirely. One made with one solid front and other of two like 90 degree pieces on either side of table cross brace.
I should have looked closer first.
Bruce from SC USA
I was interested in the connectors used for the under baseboard wiring and wondered where they can be o trained from?
I really happy to see veteran.s add service relate to their train layouts they are very proud of their country and the service with pride to see that pride developed in their hobbies remember why they did what they did. Keep those train plans going. Can’t wait to see more
looks real tough
Salute to my USAF Airman Brother….!!!
Wowww great layout….
SOOO much detail….
keep em runnin fellas
stjohn in long beach calif
I like the lighter weight legs for support if they can support the weight of a 220lb. person along with the village at the same time if you need to get up on it to fix or retrieve things !
I have always used the open frame system for my large villages since I hade problems with the all table type support long ago ! It is easer to make structure under the R.R. with the open frame system and I use firing strips or 1″x4″ to support the entire system depending the amount of weight I expect it to carry .
but if it works for you then I say more power to you sir !
the idea is to have fun so please don’t take offence to my prattle
George
The monument on the layout is the Jefferson Memorial, not the Lincoln Memorial.
Mr. Al
I noticed you were dropped off the email list and that my email address was incorrect. I’ve since entered in my correct email address below.
I do appreciate the emails on the different ideas. There great and really set the bar high.
I do have a question however.
When running just regular DC do you or anyone recommend the train yard be under a separate power for individual track or for the entire yard from the main line and it’s secondary lines.? I’m in the development stage for an HO layout and the engines and locomotives as well as the rolling stock are from the era of my youth .1950-1960. They were found in storage boxes recently after my mother passed away. Need input please
Blessings to all
chris
layout pictures look great. great design on the table legs.
Nice layout Peter. You sure put a lot of detail into the space.
I to am an USAF Vietnam vet but no medals just a collection of matchbooks from the clubs.
I believe the legs are 3/8″ plywood. Experience tells me that 1/4″ is to flimsy, even structured this way. One feature which adds strength is that it is wider at the top which adds support like using angle braces. I like the way it is notched to fit around the cross brace. On my first layout, I used 1/2″ plywood triangles attached to 2 x 4s for legs. It was overbuilt, but then, I had 3 kids playing around it.
I first got into model railroading in my teens. My father superdetailed a 0-4-0 Camelback to look like the one which pulled his train to NYC every day. I accidentally dropped it down the cellar stairs and totally destroyed it. (sad day!) College came, I lost interest in trains.
Like some of those above, I was in the USAF during Vietnam. While stationed at SAC HQ in Omaha, I got back into model railroading. My kids lost interest, and so did I, until a few years ago. Now in my 70’s, I am building a 5′ x 8′ portable layout.
Still In Training,
Carl in Kansas
Regards the wiring query above, a lot depends on the track layout, you don’t need a second controller if the train in each storage siding is isolated when the entry turnout is set against it, but one thing you do have to watch is that if your sidings are double-ended (loops) then you need to guard against short circuits which would occur when the turnout one end is not set the same way as the one at the other end, you need some insulated rail joiners in both rails somewhere between the turnouts on each storage road.
Rod
Wonderful. I would love to see a layout plan.
Tell us more about TVMR? Where is this located?
Following on from Jerry Birbeck’s comment, it is true to say that there is no right or wrong approach since “Rule 1” (i.e. it’s my layout so I’ll do whatever I want, or words to that effect) always applies!
I have always been rather intrigued by the different styles between US/European and UK layouts. It seems that layouts in the UK are generally more “sparse” whilst US and European ones are often more involved. I only have any experience of full-sized railways in the UK, so I don’t know whether the “busier” approach for non-UK layouts reflects what the full-size ones actually look like?
The approach one prefers may just depend on what you get used to as you are introduced to the hobby -in which case the two differing approaches will tend to be self-perpetuating.
Anyway, as I said before, rule 1 applies 🙂
Leo……thanks for the tip on the Wesd51
Peter….thanks for your service and layout looks great
Love the ball field Rid the football field looks outa place. Put it in it’s own area.
Other then that great layout. Show us a video.
My Buddy was in nam recently passed from agent orange (cancer) . Thanks for serving Sir .
The Critic.
Comment to Chris Leseberg: If the layout is a DC system with “power blocks” then yes, many of us use a different DC throttle for yards, switching areas, and in a few cases I’ve seen, even stations. Vendors make plastic rail joiners that insulate the blocks. In some cases a “transition block” of a foot or so is needed with a double-throw-double-pole switch to help assure the polarity and voltage is somewhat consistent – IE the locomotive doesn’t run into the next block, then reverse back out of it, and/or go out of the block and race away or slow down.
I guess the biggest advantage is trains can run the main line unattended and switching can be done at the same time.
John from Baltimore
Pretty kool. But would like to see more.
First, thank you Al for this blog…it’s the best. I sent in pics of my N scale layout
before I removed everything to clean it. i will be converting to DCC. It had been left uncovered in an unfinished basement for 10 years, natural weathering (dust).
I had to chime in as another USAF Vietnam veteran exposed to Agent Orange (prostate cancer, hypertension, hearing loss) that the VA just awarded some compensation. Veterans have until Aug 9th 2023 to file a claim under the PACT act.
I ordered some F4-C in N scale fighter/bombers, and Jeeps from Shapeways. The plan is to include part of an AirForce base on one corner. My existing trackwork is ok, but I’m going incorporate some KATO switches/turnouts.
It’s summer now so mostly out doors stuff. What a great community, always learn something.
Semper Lupus
Harper
Nice work, but it AIN’T the Lincoln Memorial…Don’t know what this was sold as, but you’d better take a trip to DC to see the real deal!!
That would not be the Lincoln Memorial, but instead it Is the Jefferson Memorial
For those wishing to make a portable/ lighter wt. system, consider making the deck a torsion box. Thin top & bottom plywood with a grid of thin spacers between. All glued with Titebond original or similar. To speed gluing use a small paint roller. To press a large area consider enclosing it in a bag of plastic film and pulling a vacuum with a shop vac. The glue sets sufficiently in less than ½ hour for gentle handling.
Hi Peter…. Not sure if I have seen one of your layouts before but regardless, great job! The pictures are a little fuzzy on my end but that’s okay. It’s probably just my 70 year old eyes…
One thing that really caught my attention is your attention to detail. You actually put some planning into the layout table (legs, supports etc), and you opainted it! You are a man after my style. So many layouts skip those details which I believe is important. You wouldn’t scimp on details on your home with studs and joist, would you?
Keep up the great work. I can see that you are a Jets fan so I’m sorry that you are going to live with the Aaron Rodgers mistake your team made…. Good luck with that!!! Go Pack Go!!!!
very nice layout. good work. other are too critical.
excellent
Lincoln memorial???? C’mon man……that is the Jefferson Memorial
I don’t understand the criticism that is given about another person’s model. If you don’t have anything nice or constructive to say, why waste our time with your obvious ill mannered comments. Its a very nice layout that looks like there was ample thought and planning involved to make it work. As far as the negative comments, if I were you I wouldn’t pay any attention to them. Keep up the good work and enjoy our hobby.
Yeah, that’s the Jefferson memorial!
nicely done layout with a strong historic component. Army retired major here. Oak Park Society of Model Engineers is a historic theme Chicago to DesMoines on the Chicago great We4stern RR with alot of historic touches and scale models of Chicago Grand Central Station and all the servicing buildings. Austin
Town Hall, the Oak Park Marshall Felds and Unity Temple, downtown Galena.