Got another installment from Cameron today on his shunting puzzle construction.
His last one is here – but one or two have got in touch saying there is a mistake in the electrics (have a look in the comments).
“Dear Al,
More as promised.
Lanarth – Part 9 Uncoupling
Scale 1:76. 00
DC
Track Peco HO Code 100
Location – British, Southern Railway, Western Region
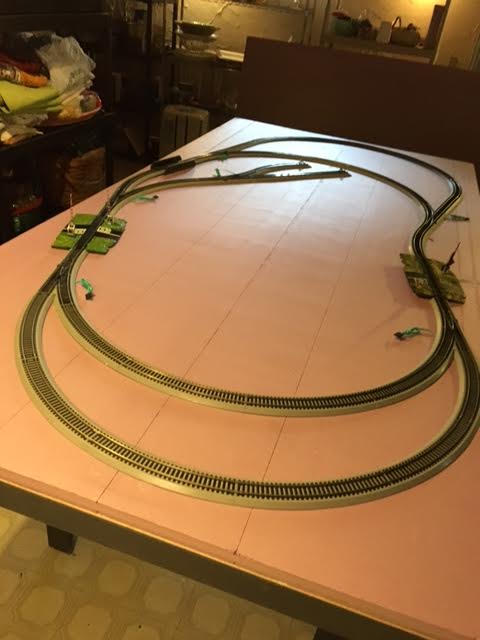
Coupling and uncoupling happens frequently on a small shunting layout. For a Inglenook shunting puzzle, like the one I was building, it occurs even more.
My other layout uses Kadee coupling hooks and because I wanted to use the same stock this new layout needed to accomodate them as well.
Kadee offers permanent magnetic uncouplers but these are not suitable when you are constantly going back and forwards over the uncoupler at low speed. At slow speeds they will disengage even when you don’t want them to.
The other option they offer is an electromagnet operated by a switch. These work well but are expensive and require a lot of electrical current to work.
After some pondering I came up with a simple solution that is not electric.
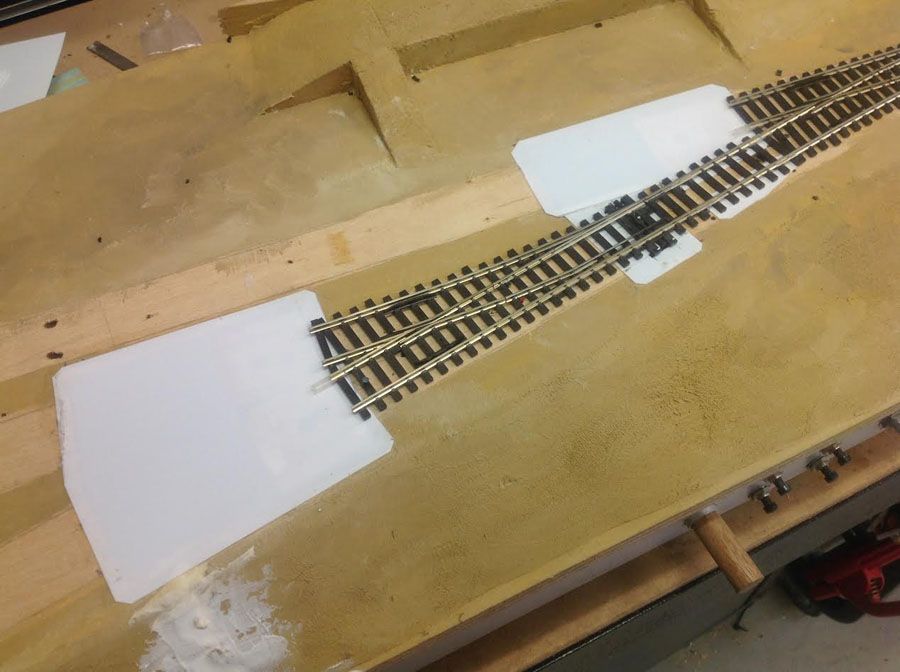
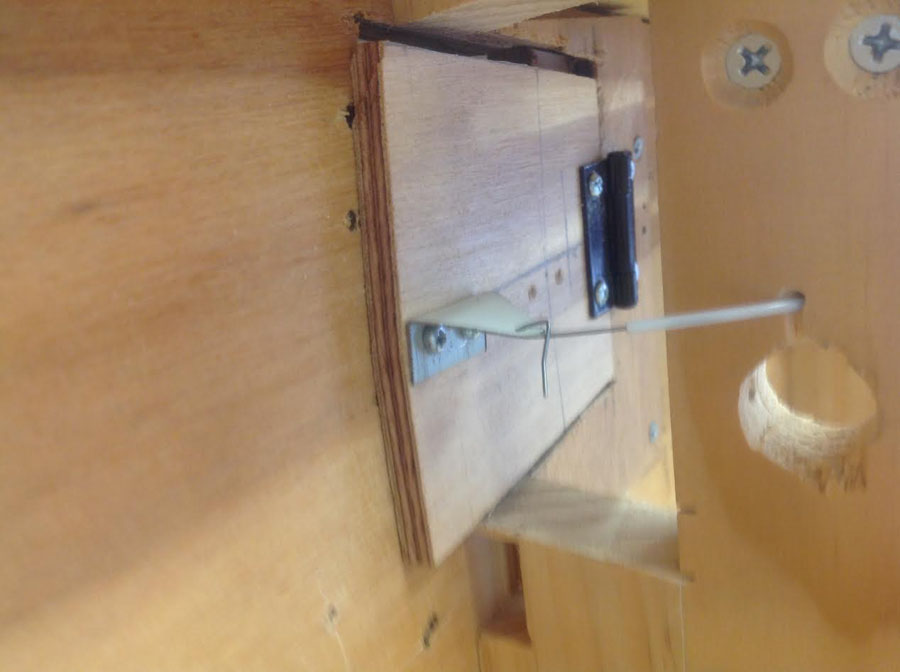
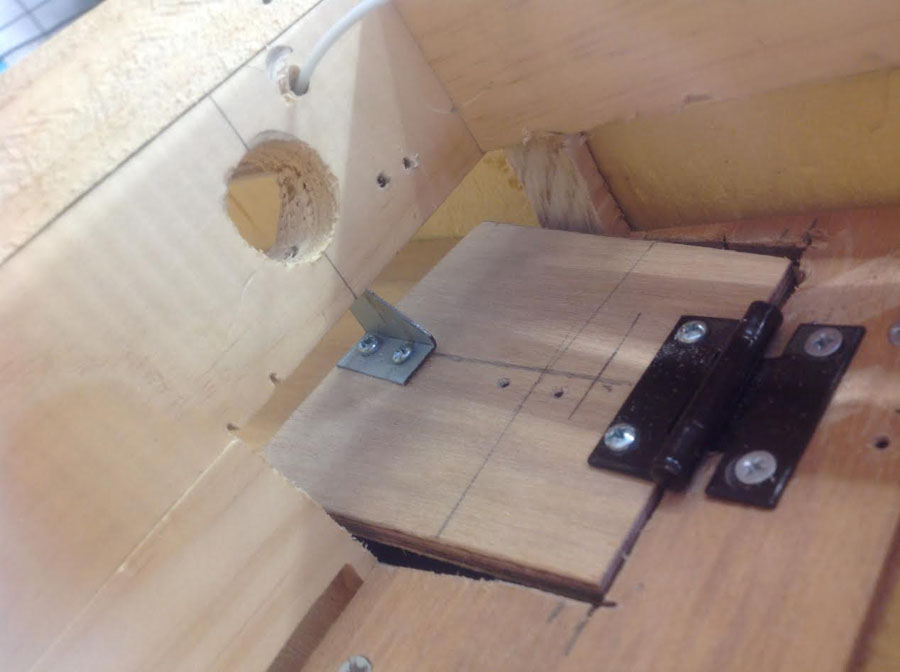
I utilised the Kadee under track magnets and mounted them under the board on a hinged flap. With the flap down they don’t activate the couplers but once the flap is up you can uncouple.
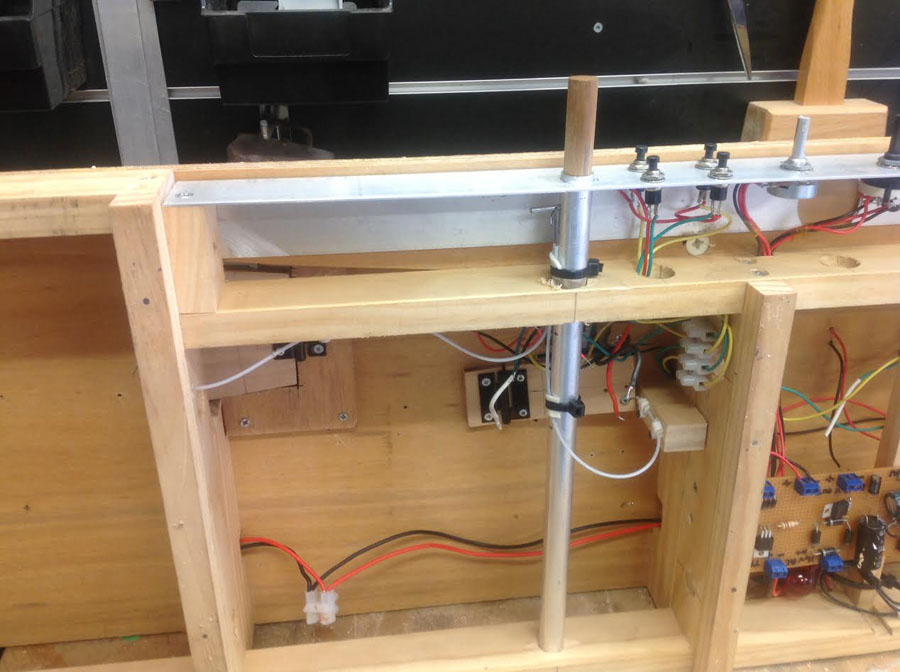
The flap is operated by a wire in tube method. Both the wire and tube can be purchased quite cheaply at model aeroplane shops.
For my layout I have a push rod that moves the wire in tube. The push rod is simply a timber dowel in an aluminium tube.
I found that I could bring both wires to the same push rod so the one push rod operates three uncoupling locations.
You can see the uncoupling locations as large white plastic patches on the layout photo bellow.
The wire in tube is the thin white tube under the layout that runs from the push rod to the flap.
Apologies in advance if this post is a bit confusing.
Hopefully you can get the idea from the photos.
I am very happy with the result and it works surprisingly well.
Cheers
Cameron”
I think Cameron’s shunting puzzle post today demonstrates in spades how there is always more than one way to get the effect you want – and if it costs less than an expensive option, even better…
Now onto Jack:
Jack’s been in touch with some thoughts on building your first model railroad:
“Hi Al,
I have been reading your blog for some time now, and finally started a 4 x 8 HO layout for my 7 and 9 year old grand daughters.
I followed the video “Building Your First Model Railroad”, figuring I’d build the Madison Central as it is described. Once I got into it, I found ways to modify it.
I added another track loop at one end and a mountain and tunnel. My wife had given me a ferris wheel some years back and I wanted to use it, so the downtown area on the Madison Central was deleted, to be replaced by an amusement park. I wasn’t going to do a lot of detailing, but the more research I did, the more possibilities I found for adding detail, and the more excited I was to get going.
The point is, you can follow the video and have a decent first layout. But if you use your imagination, you can make it your own. For me it was a way to stop the procrastination and start modeling.
Now for my tip. I was at Home Depot and saw they had free 6″ x 9″ linoleum samples, some of which resembled concrete, stone and wood. I took 8 of these and when I got home I noticed that the back side was textured. I sprayed the back with black paint, then a thin coat of Rust-Oleum Aged Iron textured paint (thanx to Kathy Millat and her blog). Looks like macadam. I’m using it for streets and parking lots. The material is flexible and cuts easily with a knife or scissors. Here are a couple photos.
Jack In Pennsylvania”
And lastly, Hall of Fame member, Rob, has sent in his latest ‘how to’ video for his new layout:
“Hi Al,
My new video – In it I install a Tortoise motor for point/turnout control and explain the tools required and an effective technique for getting one installed.
I also show the new control panel I am building and a great little economical and portable paint booth I have discovered. Plus of course a little running. I demonstrate the smoothness of the foam inclines by running a steam locomotive up the ramp with 5 coaches behind it at very slow speed. I have not tested it to see how many coaches it can pull on the 2% incline, but it is more than 5.
Well, if i am going to ever get this layout done, I better start cracking on it.
Thank you so much for all that you do.
Rob”
A huge big thanks to Cameron for sharing his shunting puzzle construction, and to Rob and Jack too.
That’s all for today folks.
Please do keep ’em coming.
And if today is the day you poke boredom in the eye, the Beginner’s Guide is here.
Best
Al
PS Latest ebay cheat sheet is here.
PPS More HO scale train layouts here if that’s your thing.


Pretty kool idea…Mike
It looks like a clever low cost solution. I like it. Rob McCrain
Hello the Victoria Model Railway Club uses Kadee couplers only. The so called look a likes do not even measure up to the reliability of Kadee’s. Metal wheel sets are also mandetory as they do not collect dirt and grease as much.. Keep up the great work (to coin a phrase from Sir Topham Hat) “Really useful items” As soon as I can compose a missive for our club layout, I will forward atwo videos that were taken at an exhibition last Oct.
regards
John
Great solution, but I will stick with the manual uncoupling, just because I am not that clever, and too labor intensive. I put my effort into my modeling, and scenery.
I too use manual uncoupling; but this presentation seems to be very catchy; perhaps I shall give it a try. Tom.
Ingenious Cameron.
Good to see someone giving the scale and gauge details – I have noticed this is something several folk have asked for. Cameron has gone further and given track and location details as well. Hope it becomes the norm.
I like your system. Easy to install and operate. I have seen putting the magnet in a trough. The one I say could be moved between two tracks. Saves on magnets. Manual is more reliable over electronic.
In the American colony’ s we refer to ideas like this as KISS.
Keep It Simple Stupid.
Bill in S Tejas
guess that Cameron’ idea should catch on because a lot of modelers use these
couplers should come aboard. EXELENT !!!!
Domie Maine
Bright idea Cameron, kerching. Well done. Now if only we could persuade our club members to use the same type of couplings… At present we have stock running regularly with tension lock, sprat and winkle, three link, Kadee and a several rakes with internal close-coupling systems such as Keen. All the owners seem convinced either their chosen system is best or it would cost the too much to change.
Rod
great how to, its probably a goer for me keep sharing we modellers are always looking at things that are a bit cheaper.
Like your ideas Cameron,keep them coming and thanks for sharing.
It seems to me this is similar to what pipe organists know as the “tracker system” of controlling the pitch and quality of organ pipes (no really good electrical controls for organs before the 20th century – similar to RR air brakes). The “Rahway Valley Railroad (Aldene Yard) is “bucket list # 2” I have been retired for five years and still have not unpacked my HO railroad- which dates back to hand laid track. “BL # 1 should be completed by April, The RVRR lets me model six railroads within a two-mile radius (RVRR, Central Railroad of New Jersey, Erie-Lackawanna, Pennsylvania, Baltimore and Ohio, and the Reading, (1950s).
James Jeffery Zetto, I’m also thinking of modeling the Central/North Jersey area since it offers several different RRs to interchange with. I’m in Monmouth County… Where are you located?
KRH:
Originally Westfield and Fanwood (Union County, on the CNJ). Left there in 1968 for Detroit, Saint Louis, Cape Cod, Central PA, and Houston (TX). By the way, Houston is
not the most user-friendly town fir model railroaders, especially if you live north of the city. It also lost its best electronics supply store (Fry’s) to bankruptcy. On the other hand, Texas does have a goodly number of steam and tourist railroads; the state is so big and they are so far away. Amtrack comes through three times a week.
I consider that genius !!!
As long as you have ‘Tension’ on the coupling, there shouldn’t be a problem
Looks pretty good.
I like the idea as so many of model rail roaders are getting their brains to figure it out . If cost is involved the ideas gust keep coming.