Jon’s been in touch with his attic layout:
“Alastair,
Thank you for your time putting out this newsletter.
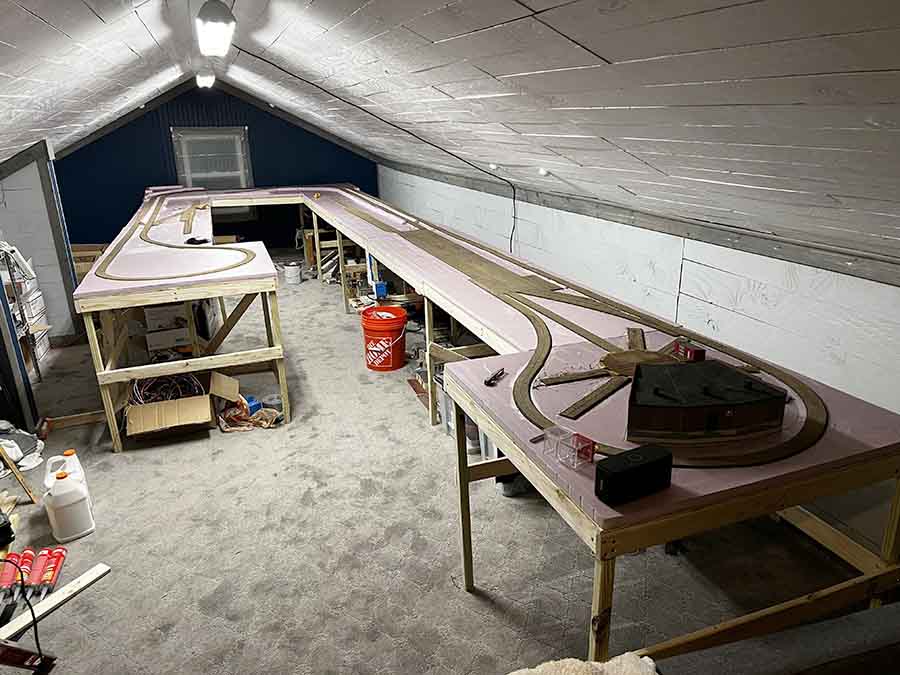
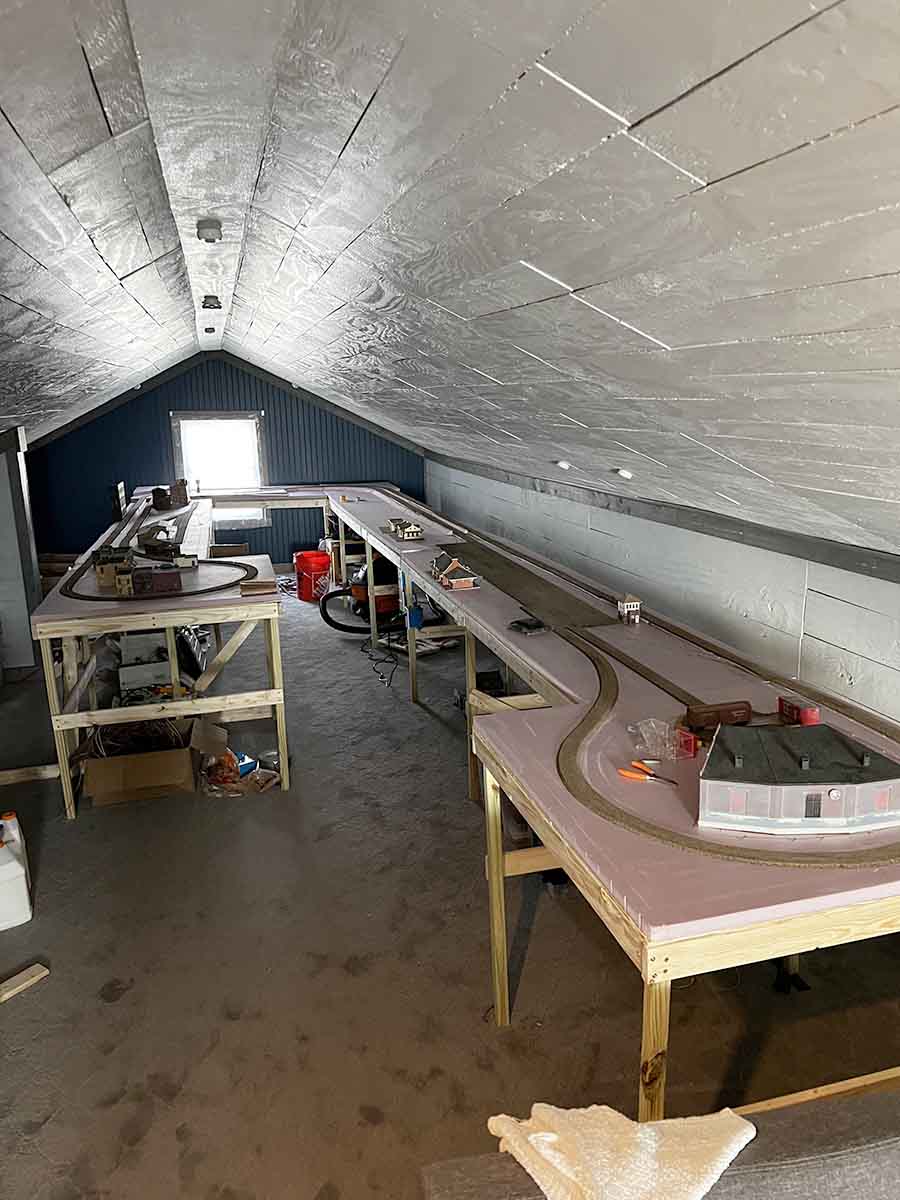
I wanted to share the progress on my pike.
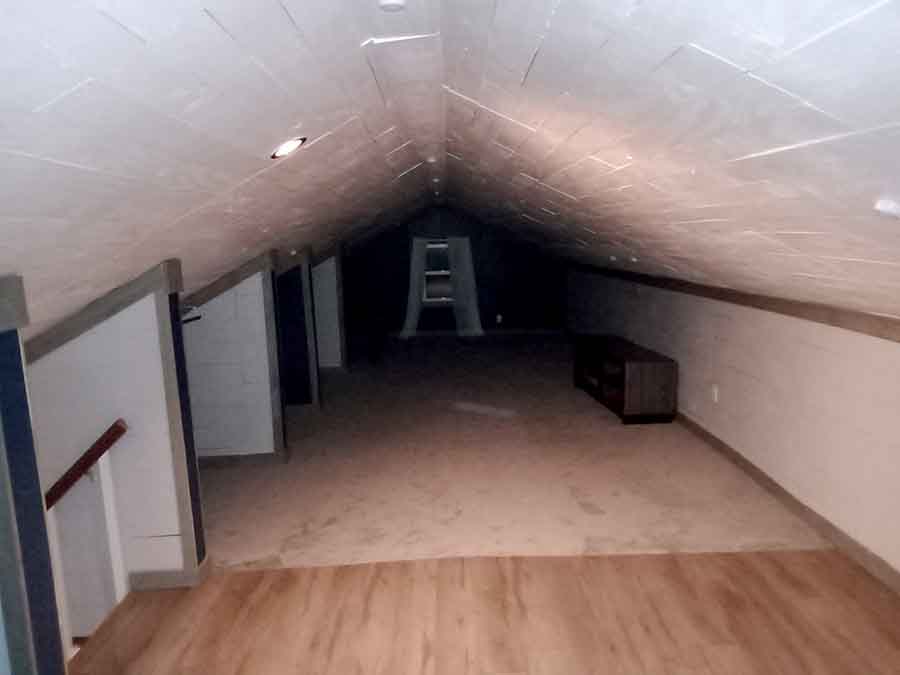
The attached pictures are of the room which is about 700 square feet.
The long leg is about 35 feet long then a 10 foot across then down 25 feet before it turns back.
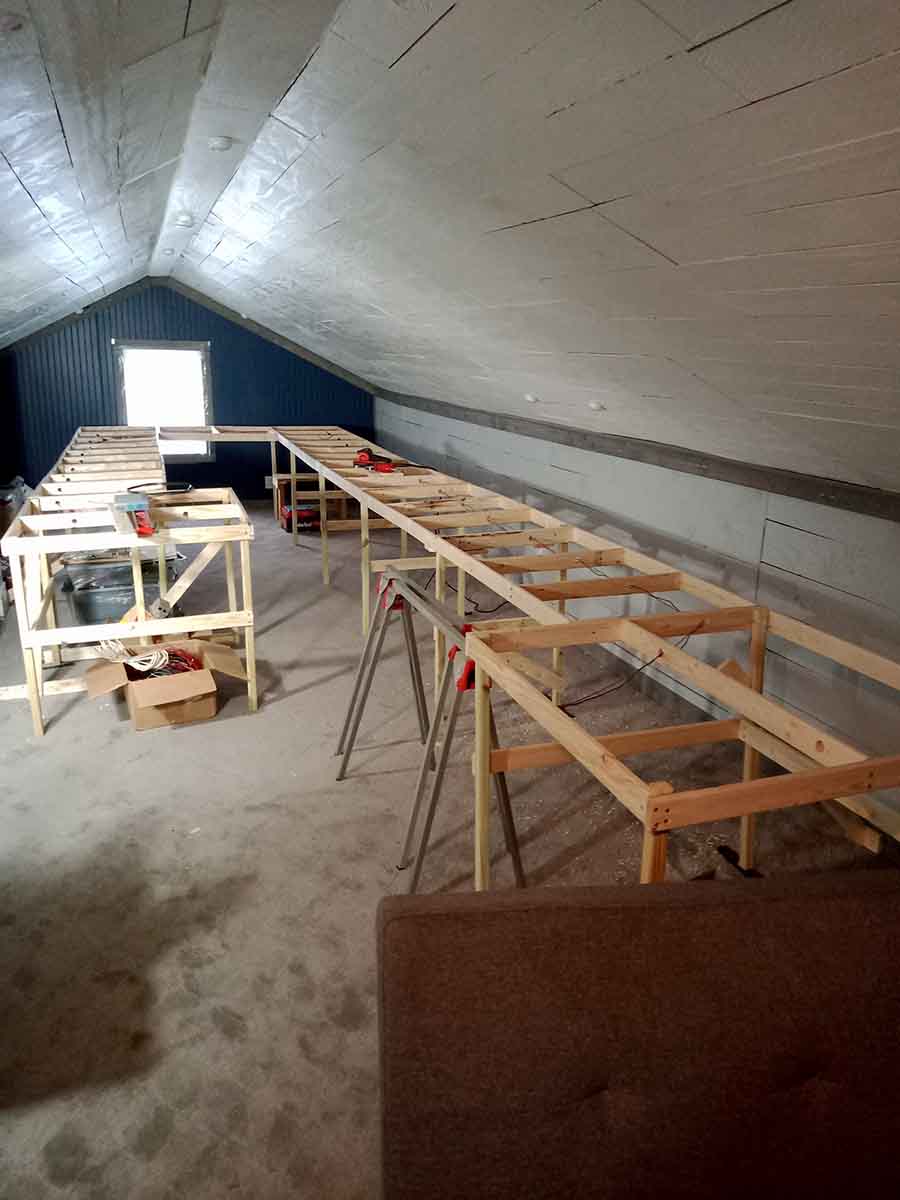
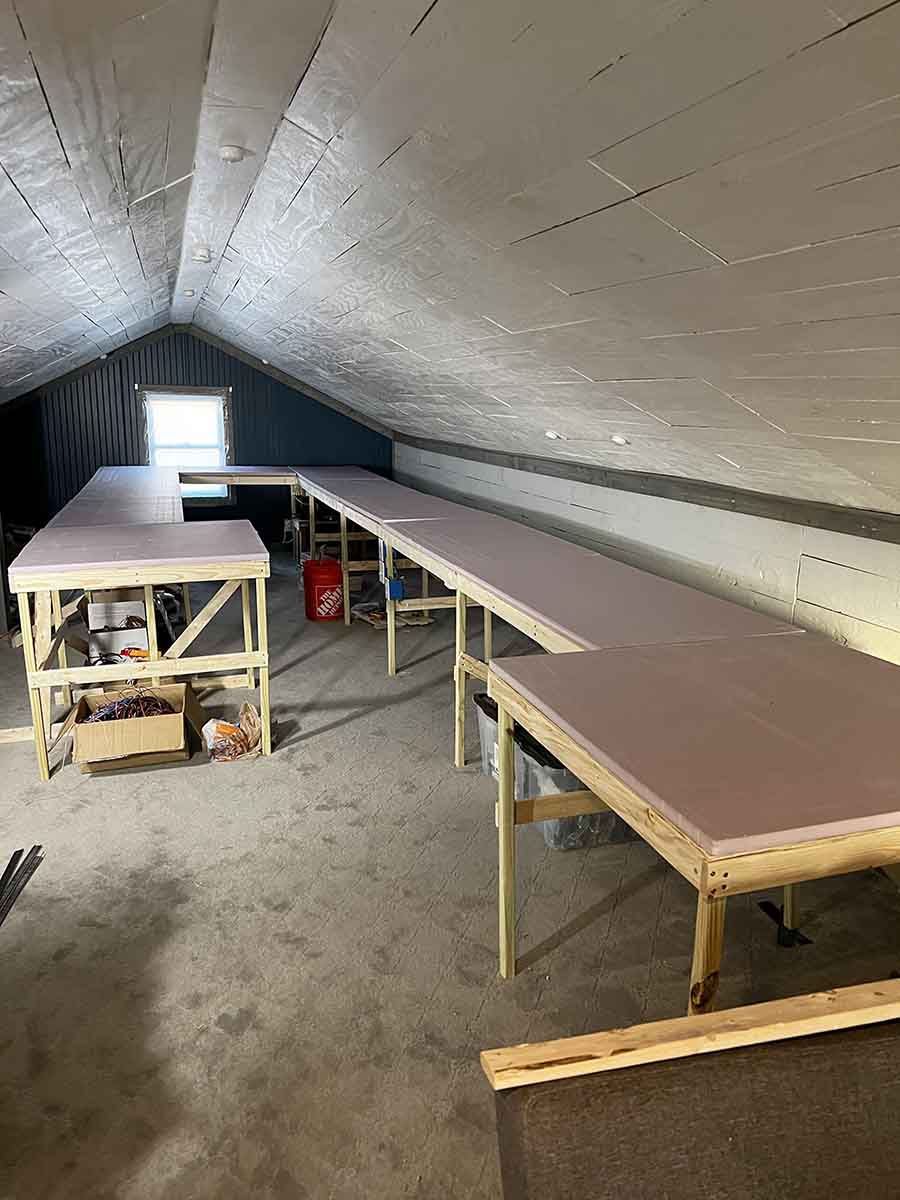
The tables are 2’ x 4’ with 1/4” plywood covered with 1” form board.
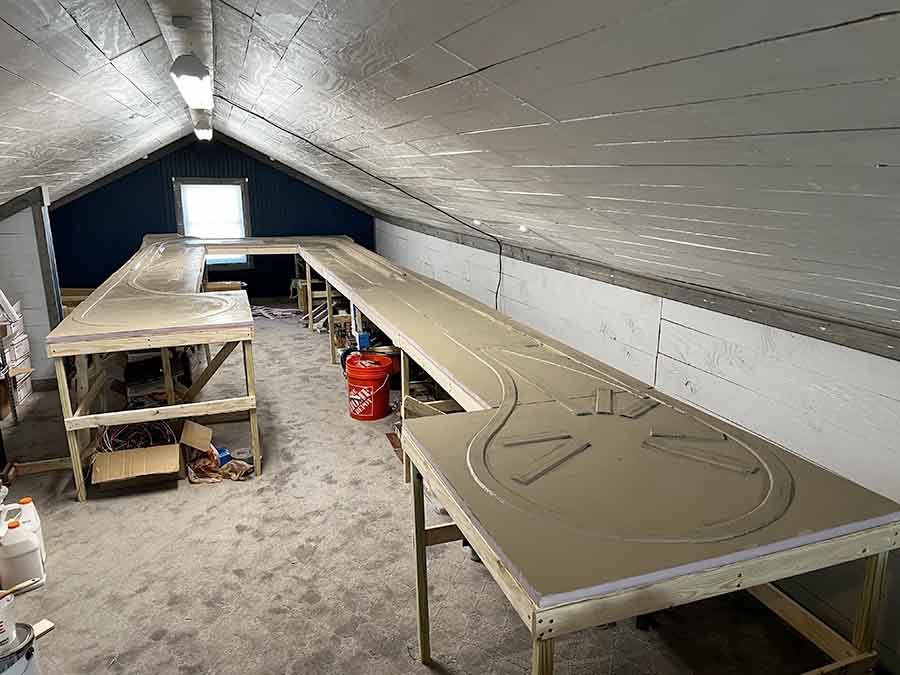
I’ve laid the cork and painted everything with “dirt” colored flat paint. I learned on my last layout that if I cover everything with dirt paint then I don’t have to use as much ground cover.
I have the track laid. I working on getting all the joints smooth. I have DCC connected for testing. So far engines run smooth.
All update as I go along.
I’m sending a picture of the cabin we live in. It was built in 1930.
My layout is in the attic.
If you want to share this it is ok with me.
Thank you,
Jon A”
A big thanks to Jon for sharing his attic layout – can’t wait to see the updates.
Jon’s attic also reminded me of Dave’s loft layout.
Now on to Jim:
“Hello Alastair
It has been a long time since I have posted anything on you web page, however I have some exciting news to share with everyone.
This is Jim Volmer Sr Starrpoint RR from across the big pond in Buffalo NY. It has been nearly two years since I was able to work or run trains on my layout, been very busy with remodeling my house by myself, and now it is almost complete, so it is now time to work on my adventure.
You may remember layout, Starrpoint. Here is a drawing of the old layout.
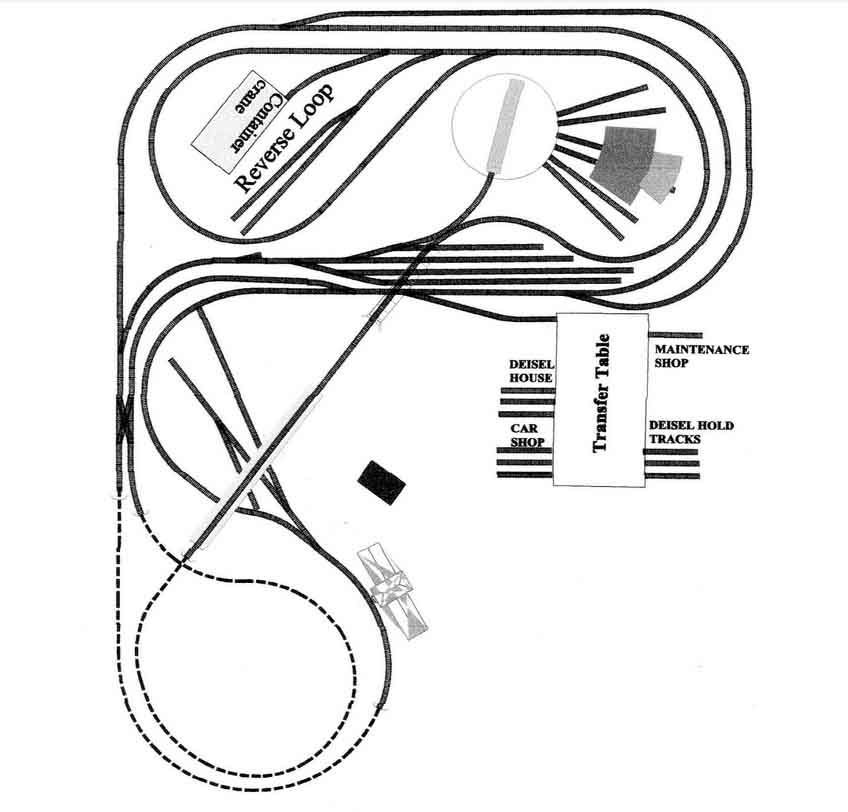
I was having an issue with trains going through the mountain to access the rear of the layout. This was very frustrating. I tried to fix the issue but it never worked.
As I was working on my house remodel job, I was contemplating what to do about the layout. So in my spare time from the house work, I decided to redraw a new layout.
I could not for whatever reason, make CadRail do what I needed. So I went on line and found a new model railroad design software called S C A R M ( Simple Computer Aided Railroad Modeler ). I never heard of this cad program before, but after examining it for a couple of weeks I found it most interesting to work with. So with that in mind I drew what is now going to be the new Starrpoint RR. Here is the drawing of it:
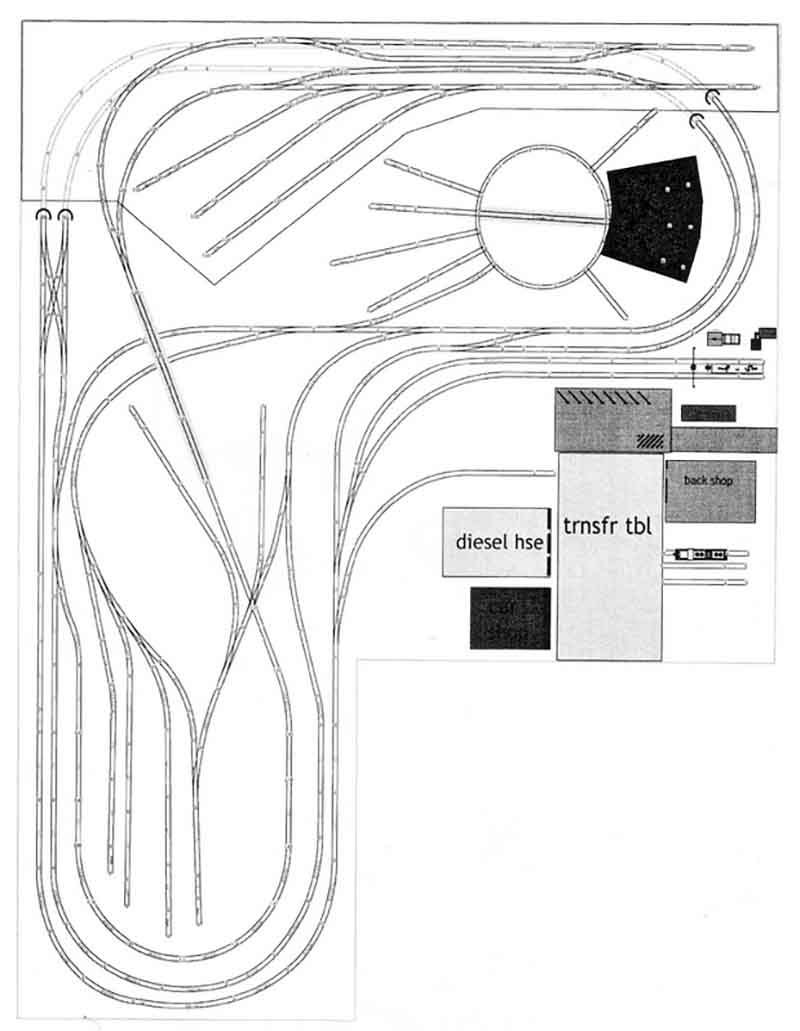
The new layout is the same table footprint as the old layout.
The diesel and turntable facilities are remaining where they are.
The old mountain is gone; a new upper area will be in the rear of the layout.
On the upper level will be a town with a train station, the container terminal and run around tracks to move locomotives to new positions. The upper level will be 3.25 inches above the lower level.
On the lower level there will also be a town with a station, new fiddle yard and delivery tracks to industries.
I estimate it may take two years to complete the entire process, from removing the old layout and constructing the new layout.
As time goes on I will send updates on the progress.
Jim
Starrpoint Railroad
President of TrainMasters Railroad Club”
“Not sure if this is useful, but another source of LED lighting modules could be old used up LED bulbs that have ceased functioning. The mini LED array within is generally in good shape and can be extracted and used in a layout.
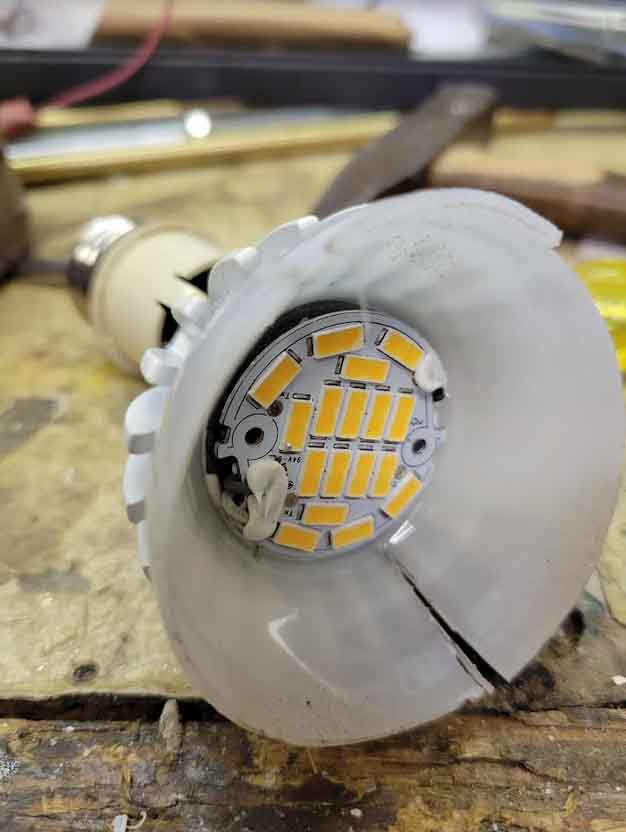
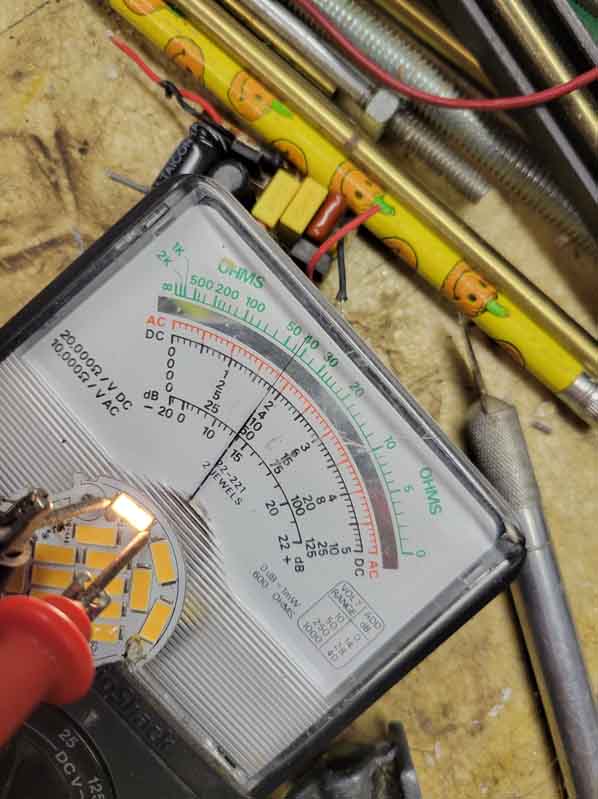
The individual leds on the module have a threshold of 1.9Vdc as the 1st picture below shows one lit up.
The maximum voltage approaches 3Vdc but it is too bright to look at.
I would suggest using a well regulated power supply adjustable between those two voltages to produce a variety of lighting effects, though the higher voltages will reduce the life expectancy of the led.
The removal of the module required a band saw for the housing (watch your fingers) a small screwdriver and a small wire cutter.
I haven’t tried to remove the led from the backing yet.
Hope this helps.
John T.”
Clever stuff from John – but remember don’t do anything with electrics without professional advice first – and clearly this blog is not that…
Now on to Steve:
“Alastair:
I’m a newbie, just retired from a career in TV news in Detroit, Michigan.
I now have time for so many things I enjoy, including model railroading.
I’m excited to start a new layout after a 40 year hiatus.
I’m not great with the intricacies of track laying, wiring, switches, etc… but I love making scenery.
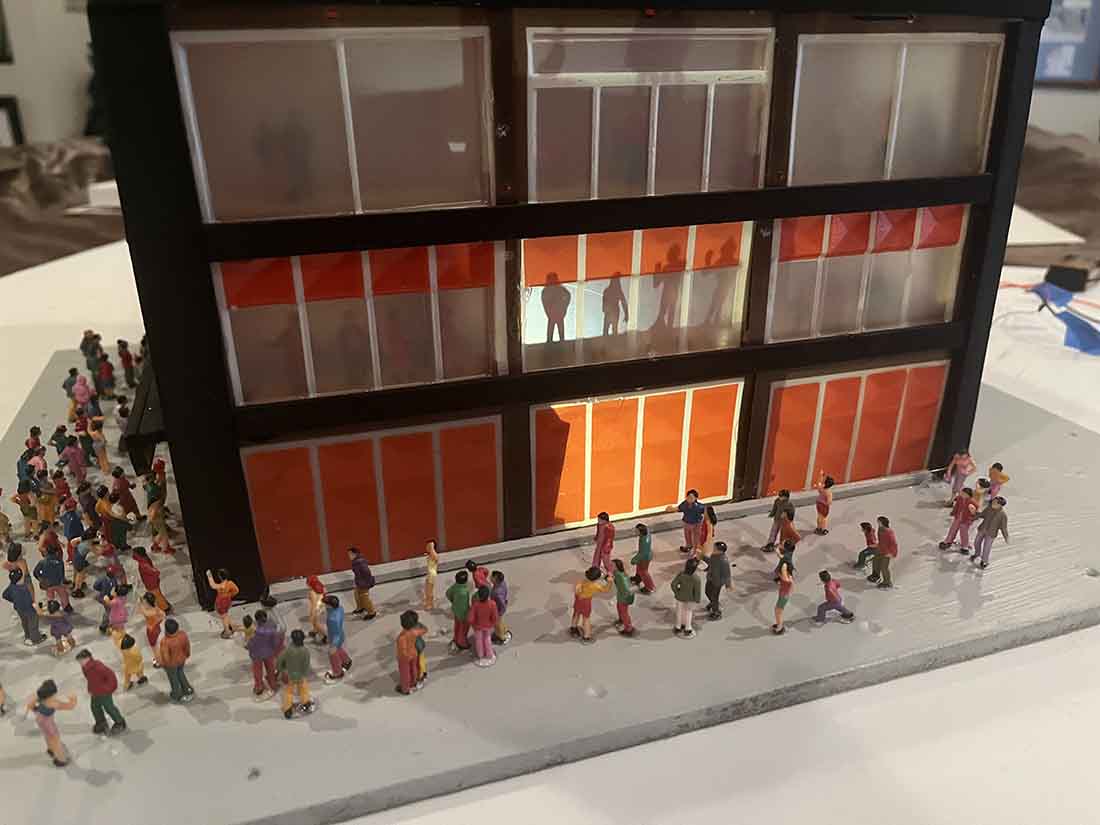
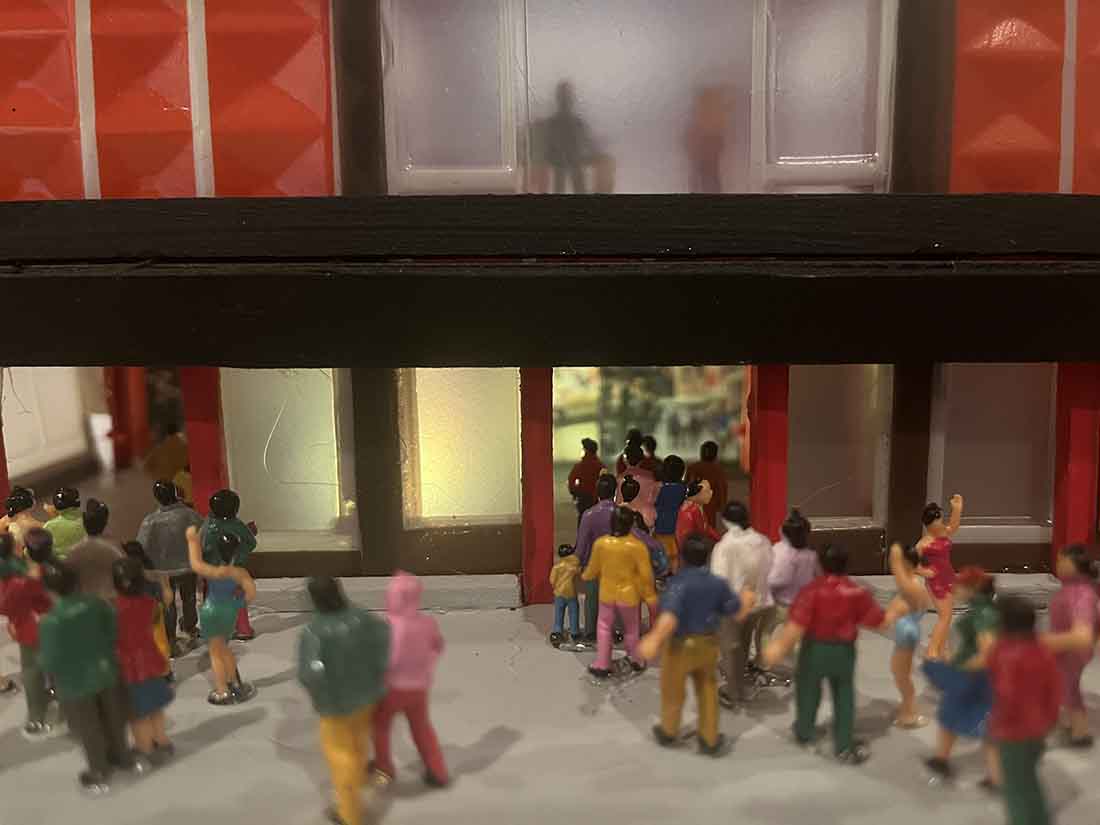
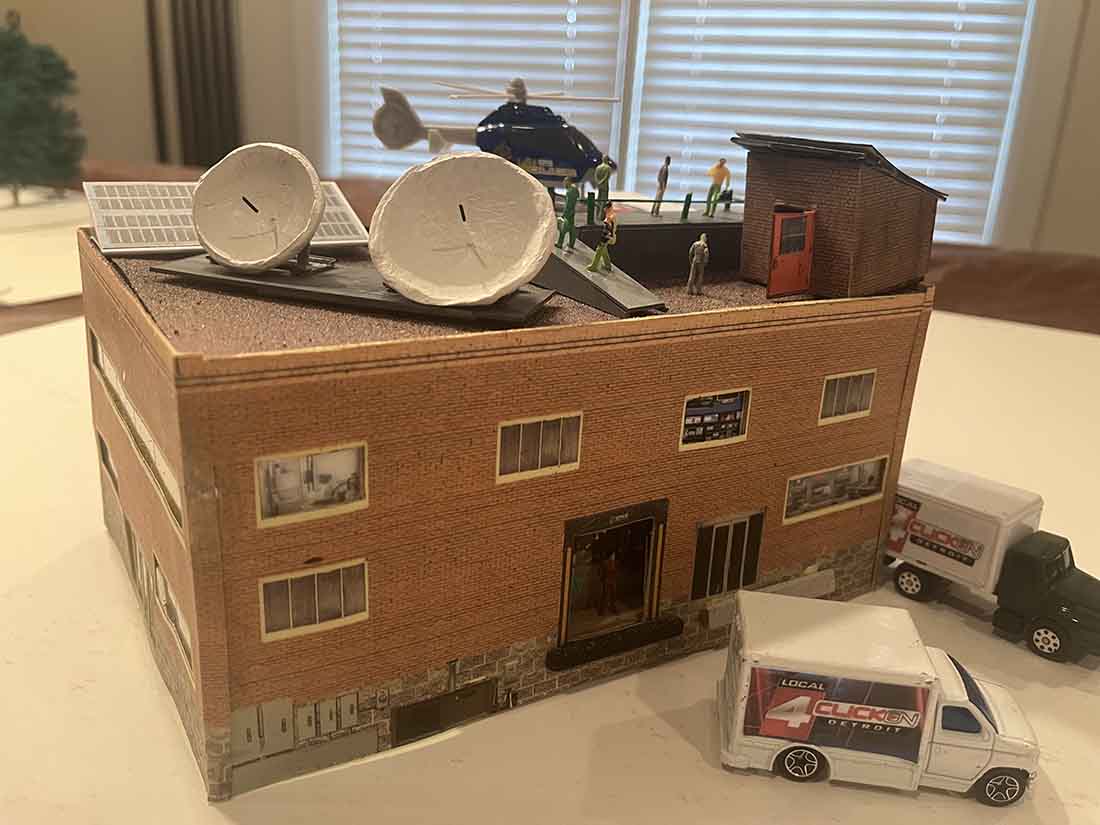
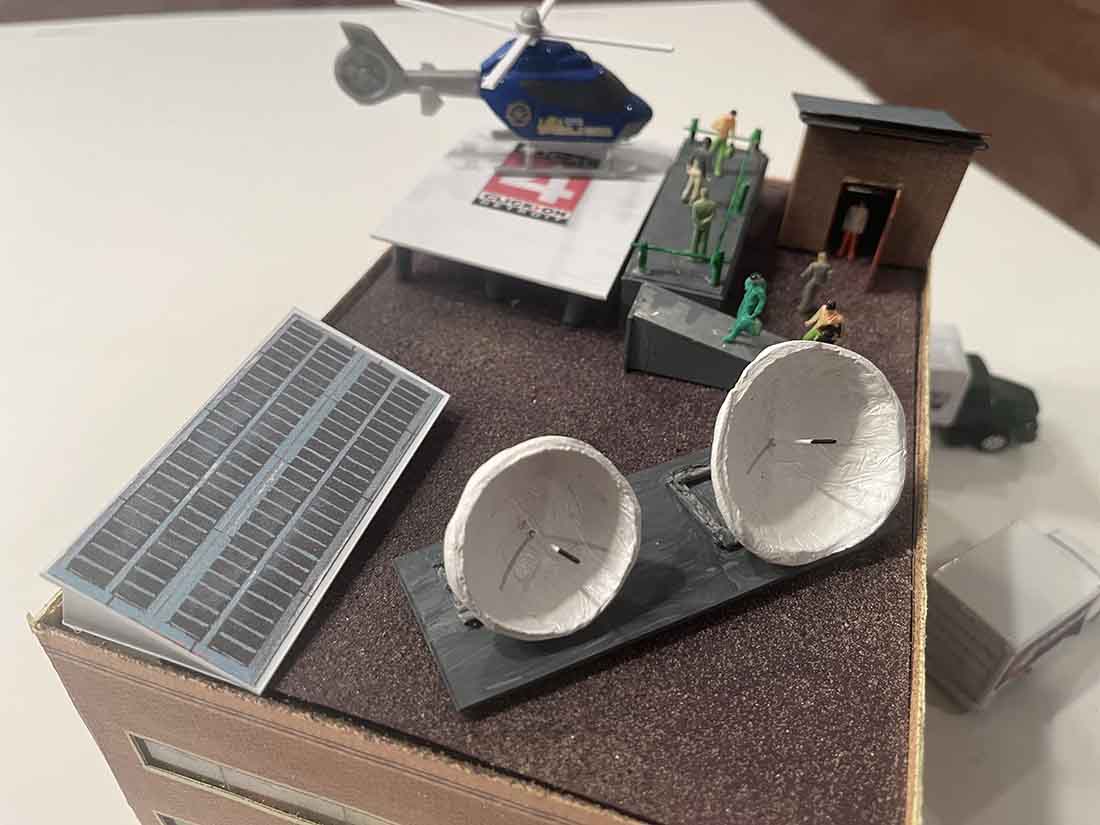
I decided my new “railworld” must have a TV station.
So, here is my first I’m also adding a scratch built Little Caesars Arena so my citizens can go watch the Red Wings play hockey.
My little railroad won’t be much more than two concentric ovals, but I’m already having fun, and as you often point out, that is the whole point.
Thanks to you and all of your members for so many great tips and tricks to get me started.
SteveG”

A huge big thanks to everyone – I love that Jon has made a start with his attic layout.
I’ll carry on posting half built layouts and scratch builds, because this hobby is all about making that start and having fun, as Steve points out.
I couldn’t agree with him more!
That’s all for today folks – please do keep ’em coming.
And if today is the day you decide to get going and want to take those first few steps, the Beginner’s Guide is here.
Best
Al
PS Latest ebay cheat sheet is here.
PPS More HO scale train layouts here if that’s your thing.

The LEDs are operating on AC in this lamp. The characteristic voltage across a white LED is approximately 3.2v
Looks a great plan there Jim and John thats a good looking layout to be ..plenty of room there for your layout to have many scenics on it
SteveG, your buildings look great. What scale are you modeling in?
Jon. That looks like a well thought out layout I particularly like the opportunity to send trains away and then to take some time to return due to the long return on the left hand side. Please keep us posted re development
I hung up my trains, Got boring, no room to expand . I still look at the posts here on Als site.
I’m moving soon maybe with more room I may do the Hudson River Line in New York. Run through Ossining to Croton Harmon shops..
Hay SteveG, loved you on the TV, great looking LCA building, and GO WINGS, & Go Blue!!
Rob Schweitzer, Ann Arbor, MI
Hy, on your starpoint RR, I see numerous reverse loops possible. You might want to address them before laying track. You could consider reversing the main and not the loops. one feature is that you have inherent several mainline runs. That new cad software looks really great.. Good luck with a fun layout.
What happened to the picture of Jon’s cabin?
Thanks Alastair for all you do, you have a wonderful and informative blog.
Looks pretty kool. I hope mine turns out that good.
Boy oh boy love the attic train layout, would like to have room like that. LED lights are a wonderful addition to model railroading. MUCH THANKS AL again for your wonderful site. Read it everyday.
I’m a Marklin train nut and love the European old era (1860 to 1920) trains.
Cairo NY
Jim, like the new track plan, my only concern is access. Is the side with the raised section an open aisle to reach both levels in that area? Otherwise that looks like a very long reach. I like to keep my trackwork within 30″ -36″ max from the bench edge, especially if there is scenery/structures along the edge in front of it. A reach under reduces that reach range quite a bit. I’d move that double crossover further towards the bottom of the drawing, that is also a long reach to a notoriously temperamental track arrangement unless this is an island layout.
Great stuff from everyone. Nice to see start ups for layouts. I remember my last one. Tried to model too much in too small a space. Planning, patience and trial and error worked for me. Just have fun.
Jim AZ
Al Alison. Look at the pictures in reverse. The first foto shows the empty cabin attic and then the progress of his lighting and RR project.
Great new layout from Jon A, He has make me start a new plan after working on a plan for 14 months. A fresh start feels good,. Hope to begin building the base soon. Layout will be HO DC using much material from my previous layout, I like to recycle as much as possible and when I do need extra timber etc, I find almost all I need at recycle (tip) shops, also a great money saver, have fun. John Aus.
Jon and John T – You both have some outstanding RRs going on! Quite awesome for sure.
Steve G – congrats on retirement! I too am from Detroit and now live in Grand Blanc. You have two astounding buildings there with the new LCA and WDIV buildings! I’m sure your RR will be a lot of fun for you as all of us have with ours, I watched you for years on TV, as I lived in the Detroit area from 1946 until 2012! My RR here in MI is in our garage, since we don’t have a basement, but still room for the car!
really nice size layout. like the pizza joint too.
SteveG,
Had to laugh when I saw the miniature version of Little Caesars Arena, being a fellow Red Wings fan. But I’ve only been in the stadium once for a concert, and I’ve not been able to make it to a Red Wings game since the move from Joe Luis Arena (since I live north a couple of hours).