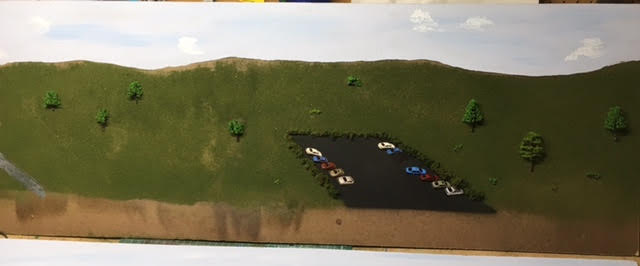
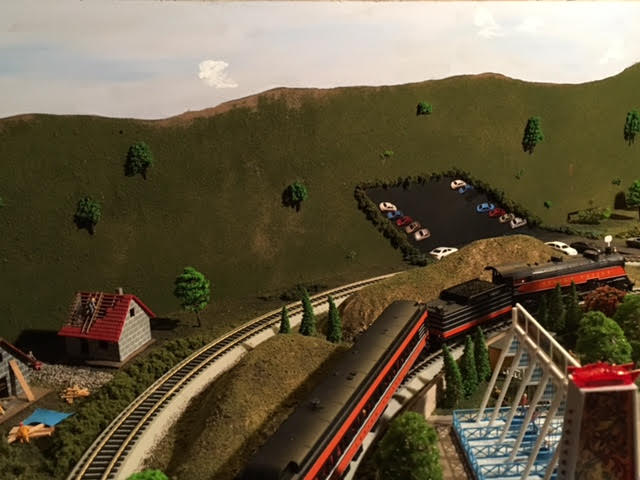
Jack’s been back in touch, with his take on painting model train backdrops – he’s added some perspective.
(His last post is here).
“Hi Al,
Continuing on the preliminary work on my backdrop I found another perspective issue. I have the beginnings of a parking lot at the edge of the layout, so I need to continue the parking lot onto the backdrop. I taped some tablet paper to the layout edge and marked the edges of the parking lot on the paper. From the area where the scene is viewed I approximated the angle needed to continue the edges of the parking lot onto the backdrop.
I then took the paper down and from the point where each lot edge meets the background I drew a number of lines at different angles like spokes. Reattaching the paper, from my viewing area I chose the lines representing the best angle for each side of the lot. I then drew the lot on the paper and quickly sketched in some scenery. The photos show the final sketch and what it looks like from the viewing area.
I transferred the parking lot onto the Masonite and sprayed it to match the blacktop on the existing lot. I photographed cars on the lot from the perspective of the viewing area, printed them out, cut them out and pasted them on the lot. They aren’t perfect, I may redo them, but it gives the impression of cars parked on the lot.
For the grass, I used spray glue and sprinkled Woodland Scenics blended turf on it. I painted the sky blue, added some darker streaks and clouds. My real problem, and I could use some comments on this, is that I wanted to make it look like you were looking off into the distance. It just doesn’t look like I imagined it would. I think maybe my horizon is too high. Maybe I should start it just behind the parking lot. Maybe I should start a hill just beyond the parking lot. Any ideas would be helpful.
Jack”
Jack’s previous post is here: Model train 3D backdrop.
Now on to Barry:
“Hi Alistair,
I have been signed up to you for a while now and have gleaned a lot of information from a lot of your people. My first train set was in the 50’s. My first model railway was in the early 1970’s but did not last that long as my wife and I were not doing too well. Now wife number two and I are very close to our 25th wedding anniversary, my model railway is up and running and failing and being tweaked in many places.
I have joined the throng of camera recorders and have just posted my first and short Video on You Tube. Have a look at it and if you think it is worth it please publish on your site. It is under, Castlebridge. OB owner.
Barry”
Latest ebay cheat sheet is here.
“Hi Al
Best tip I can pass on is one to help with the frustration caused by dropping tiny screws and other parts on the floor.
Buy a white dust sheet from a DIY warehouse – or grab a sheet from the airing cupboard if you like :-). Spread it on the floor below the bench or table where you are working.
Since tiny screws, nuts and bolts are seldom white, when you drop them, as I often do, they stand out much more clearly than they would do on a typical shed/workroom floor or carpet.
Regards
Steve”
A huge thanks to Steve, Barry and to Jack for showing us his take on painting model train backdrops.
That’s all for today folks.
Please do keep ’em coming.
And if today is the day you get started on your layout, the Beginner’s Guide is here.
Best
Al
PS Latest ebay cheat sheet is here.
PPS More HO scale train layouts here if that’s your thing.


Nice beginning Barry , Love the layout name and the video was great.
Cary B
I’d suggest you fade the colors so that the hills look more blue-gray, and the parking lot paler and more washed out. Also have the hills look like a closer one is overlapping paler and paler further ones.
Well you made a start Barry …Dangerous Dave
Very nice start Barry…Looks good Jack….
Further reference to Dangerous Dave and his wagon weights
I think Dave said he had recd 3 packets of weights. I have n ow checked my “box full” and find for my £14 or so I have 100 strips each of 4 larger weights and 4 smaller ones – BARGAIN
Looks like a great project, enjoy👍
Don’t beat yourself up over this Barry. You have the right ideas going for you. Any and all the suggestions you have received so far can be useful.
A problem you will have with creating a perspective painting on a flat surface is that as soon as you move your eyes, it will not be correct. And the farther your eyes are from where you created the drawing the stranger it will seem.
Your eye height is your horizon. If your eyes are below the top of your hill, the hill top is not your horizon. If your eyes are above the hill top as if in an airplane, you will be able to see other landscape beyond the hill top so that landscape becomes your horizon.
The parking lot you have going for you is really quite good. And since it is on a side hill and going upslope, perhaps you can curve the bush outlines so the lot seems to be getting steeper as you drive onto it.
The camera height in your photograph is your eye height for purposes of doing this painting. You can see in your photo the flat part of the lot which is real begins to angle upward where the painting starts. If this line continued straighter, then you might paint a parking lot which has been dug out of the embankment instead of going uphill. Either this or the curved bushes idea may help you a little bit.
Nice one Barry.
Keep the video updates coming.
Hello Al, I thought I would give you an up date on where I am at with the start of mine very first Train room. I have a 10 x 10 room. I am trying to put together, or would like to have a room of all the places that l went to and lived as a child and a young man. My father was in the Air Force so I was able to see the world on his coat tails. But if I did that, I would need a lot bigger room or building. Lol, so I have to be reasonable. With that said, back to reality. So back to Jack’s parking lot, you will have to m+zz zzz, sorry I fail asleep, it is 2:13 am on Florida’s West coast. Jack, you have it, like you said take the hoazonal down and insert your last car at the top of the hoazonal and over lay the cars. Play with it and you will see what I mean. I will send a picture on my junk man cave on what I have to do to get it started. As soon as I figer out on how to send pictures. Thanks again Steve, Barry and Jack.
Thank you again, Stephen G
great start to your train room, it looks great.
Good beginning Barry. The parking lot angle looks good. The issue is the difference of angle of the parked cars. The one in front, white, is sitting at a different angle than the rest, Rob McCrain – Farland Howe