The talanted Eric’s been in touch again (his last post is here).
Remarkably, he’s also mailed me saying the below layout has already been broken up for the next one. Can’t wait to see it.
“Hi Al
I know this is maybe too soon after my other updates but will be the final update from Wensdale in this format.
Why? you ask, well Dangerous Dave summed it up brilliantly with his recent ‘access to layout video’. Crawling under a low board to get to the centre of the layout is a literal pain as you get older, so I have decided that I must agree that more access makes for more enthusiasm so my future layout will follow the walls with access right around the layout. But more of that in the future.
Wensdale New Town by nacht was taken late one evening so there was a bit of low light coming through the windows that allowed me to put on all 169 lights, believe me the wiring would drive you mad. The lights are controled by two old twin track Gaugemaster controls that are at least 30 years old but still do the job. Unable to use the tripod effectively this video is taken hands on, so to speak so expect some jerks along the way, especially when I realised some of the lights weren’t switched on.The trains are running smoothly and quite slowly for those who hate fast trains.
I would also like to thank you for your kind comments for my last two updates on this layout and of course Al for showing them and keeping up this great site. I will see what I can devise for my new layout and keep Al updated with any hints and tips I come across along the way as I will be starting totally from scratch.
Happy Modelling.
Eric (Leeds) UK”
Latest ebay cheat sheet is here.
And Jack’s been in touch too (his last post is here).
“Hi Al,
After spending time under the layout wiring, I started to think about the backdrop.
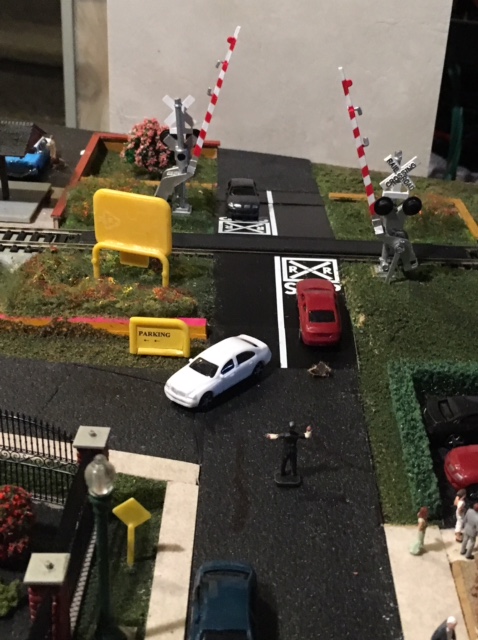
The easiest (I think) is to do mountains. The problem is that I have a street which terminates at the center of the back of the layout (see photo). Where is it going to go?
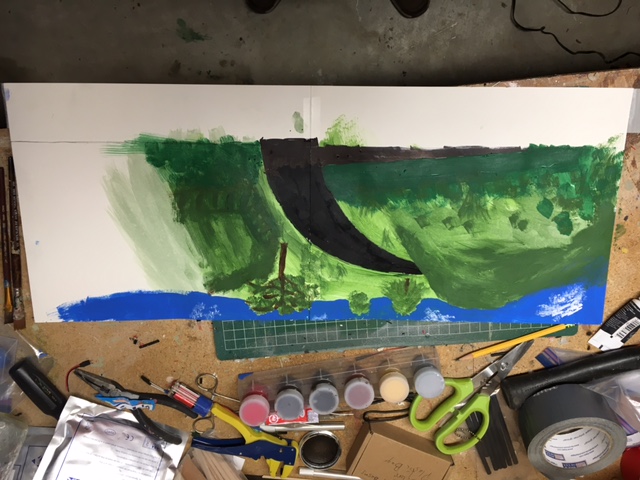
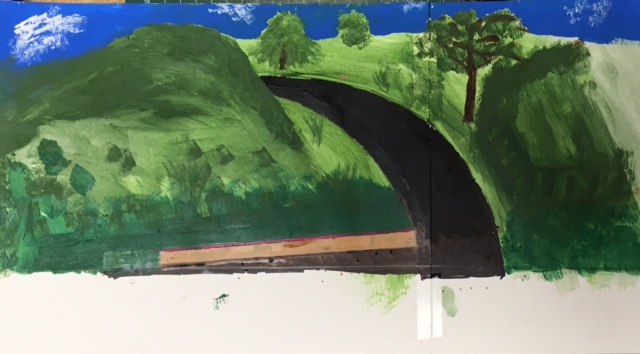
I got some of my granddaughters’ drawing paper and taped it to the back of the layout. I then drew a freehand road continuation, curving it to the left. I then used the edge of my paint palette to draw curved lines. I drew a hill in front of the curve.
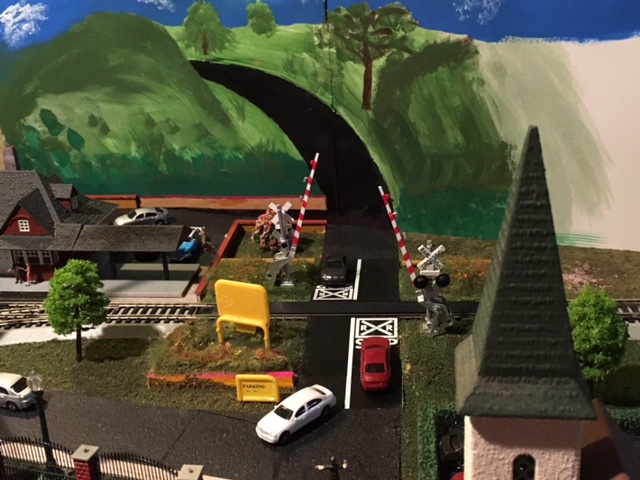
There are two perspective issues. One is the parking lot and wall at the station. The other is the road. Using trial and error I adjusted everything until I got something I could live with.
I’ll have to transfer the scene to the Masonite backdrop. I’m not sure whether to try to paint the entire backdrop or to buy a backdrop and integrate the road into it. Any comments are welcome.
Jack”
A huge thanks to Eric and Jack. Just goes to show a layout is never finished – because when it is, that’s when the new one starts to take shape in the back of your head.
So come and join the fun with the Beginner’s Guide if you’re still sat there on your hands.
That’s all today folks.
Please do keep ’em coming.
Best
Al


Paint Backdrop u made a good job of the road Jimmy edinburgh
The night time video was great. Thanks, Eric. The problem of the road to nowhere was neatly solved with great use of perspective. Thanks, Jack. Cheers! NJ Mark
Nice to see trains running at scale speed.
Also note that the bend radii seem to be much closer to scale than some. Nothing worse than a layout where the bends are so tight that the cars don’t follow naturally. Well done!
Nice job Eric and Jack, Thanks for sharing
Cary B
Love your lighting, Eric. I cannot imagine what the underside must look like. How about a pic or video to show how you’ve managed it? And, thank you, Al, for all you do. I look forward every morning to “checking the blog”.
I don’t know.On the road ending issue I would pull those 2 road sections and the crossing gates and put those elsewhere(if possible) and add another building in it’s place.Hard to know without seeing an overview of the whole layout,but if that(the aforementioned) is possible to do you can add a nicer backdrop which would at least solve one of your problems.Just my personal thoughts
Hey Eric… what an incredible layout & video… nicely done! -Bob W, NH, USA
Wow Jack, the finished product (road going behind the hill) looks fantastic. Well done. Brian (HOF) member – RSA
Eric, your layout is beautiful. My one grandson is watching with me and he thinks that it is really cool too. Paul
Dear Jack.
I’m expanding my layout and I looked up on yahoo for a model railroad layout backgrounds.com and I found several companies that have backgrounds. What I found was that there were more than I had thought of from this one company. I don’t remember the name but if you look up on google search or yahoo you will find what your are looking for. They had ranging in 2 to 3 pieces and up to 8 feet in length long so you might want to keep this in mind. These are companies and that based in the USA. I know that Al might not allow this but I think that if a person is looking for backdrops that you should be allowed to find what you are looking for no matter what site or company you my look at. You may also want to try Walthers.com they have almost everything in there catalogs from scales “Z” to “O” and also to garden. I model in “HO” myself. Best of luck to you and to keep sending in the updates as well. I like to keep to date on what people are sending in to Al as well. Keep up the good work Al and THANK YOU for posting the other model railroads updates and the helpful hints section where people can send in to you to help them out as well THANKS AGAIN AL.
Eric, you need to paint the side of your rails rust brown. No real RR has bright silver rail sides.
Hi Jack, You might consider a tunnel portal at the point where your road ends. Dale
Why not make the road disappear into a tunnel?
For Jack: You might remove the small tree on the left side of the road and replace it with a small tall structure that will cover one lane of the “painted” road . But it does look ok as is.
I like the curved departing road better than a tunnel idea , I have used both on some villages and it is up to the eye and the distance of the viewer ?
Your the boss as far as you are concerned so I think you did a great job !
thank you Al. -this is a tough problem to solve no mater how you try to handle it .
and it helps to see how others handle it !
May all be well and stay safe
George
I liked the set, it seems a little tight, but I do like the lights and it looks well done.
Great lighting job, very nice setup.
Nice video and layout Eric.
Jack, the road curving behind the hill looks great. I am doing a mountainous HO layout and was considering a road going off the scene so I might use that idea as well. Great job to both of you. Al, thanks so much for maintaining this blog. I enjoy it a lot.
Ken from PA USA
Nice job there!!
Lovely lighting set up Eric, it’s nice you left some areas unlit, it’s remarkable how dark it can be out on the railway at night, even when you’re only a matter of yards from ‘civilisation’, but below a cutting slope or bank of trees and undergrowth. Good luck with the next layout.
Rod
Eric, would you be so kind to make another Video, and back away from your lay out so we could see the whole lay out and show more of the right side. Great job on lay out.
Great jod on the night time vedio Eric, yes it does get mighty dark in the country until you get back into the town or city. Nicely done. Jack, nicely done painted backdrop. As you know, coming up to a R & R Crossing, you have a white line up to the crossing but don’t forget to add the white dotted line that get a little smaller as you go away from the crossing. That’s if you decide to add a little more to your backdrop. I seen where people added bushes here there and the bushes get a little smaller to add a little depth to there back drop. Great job. I am starting to get mine together. I have a 10′ x 11′ room and HO gage and O gage is going in and yes I will take pictures and video. Wish me luck.
St.Petrrsburg SDG R & R .
P.S. UNLESS you have a better name for me Al. Lol
Eric,
My 70 year old body isn’t as flexible as it once used to be, so I developed a wall mounted construction technique several years ago. I used a 30″ deep plywood board anchored to the wall and supported by thin wood pieces attached to the baseboard at a 45(?) degree angles. NO vertical supports in the way and I can use an auto mechanics dolly to navigate under the entire layout.
Hi Al,
The various postings and photos of different layouts have stoked my interest in model RR trains and the (often) amazing scenes and backdrops. I’m thinking about “jumping” into the world of model RR’s and the fun part of devising (and showing!) scenery. I’m unsure where to set up a shop- either my one- car garage or perhaps a small section o my 1600 SF workshop. My question for you if you have the time is a referral of possibly different beginners books. Many thanks and my appreciation for your helping bring RR modeling to the front of my often tired brain operating group!
Larry Guess, Nevada City, CA, USA