Seems Barry’s new plans really split the pack -so he’s kindly shared his thoughts:
“Al,
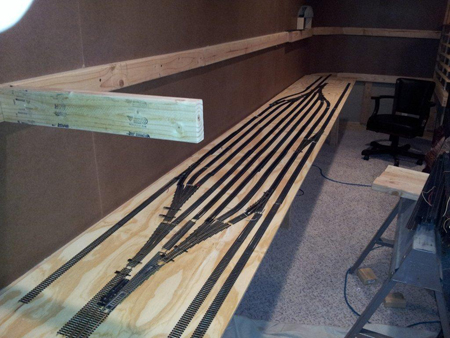
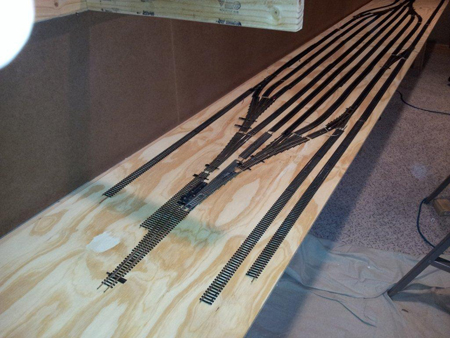
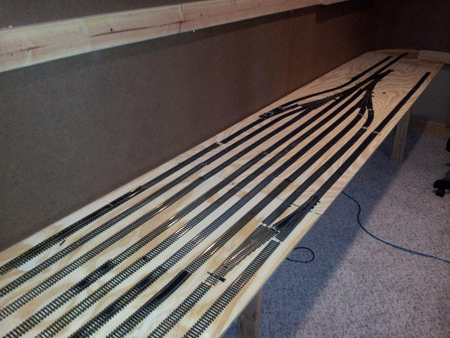
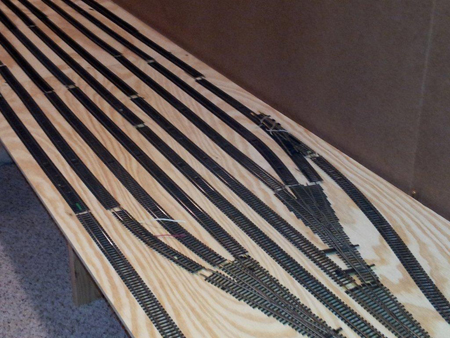
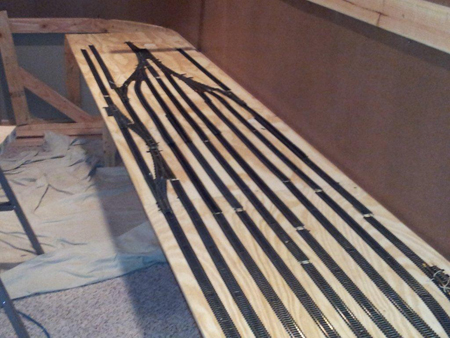
The pics included only represent a potential track layout for the lower level but are not attached as you can see. You requested that I explain my layouts design purpose so I will try to do so below:
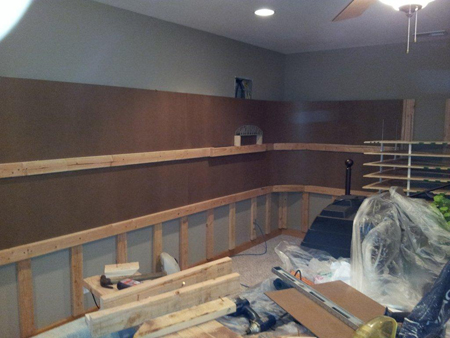
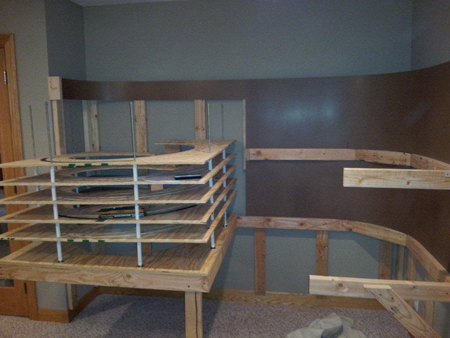
1) It’s being built mounted to wall to still allow space in the room for other purposes.
2) It’s (2) levels to double the amount of layout in the same space.
3) The double track helixes allow the trains access from one level to the other that are vertically 21.75 inches apart. They also allow the trains to disappear for period of time (approx. 70.00 lin. Inches of track) on each end of the layout to add to the realism and also hide from view the turnaround radiuses which visually define the layouts parameters.
The helixes will be scenery covered mountains with visible tunnel entrances and exits.
4) The lower level will be an industrial scene with (2) mainlines and multiple sidings to stage extra complete trains to digitally called to enter or exit the mainlines and there will be several spurs to accommodate buildings.
5) The upper level will be a rural scene with (1) siding on each of the (2) mainlines and probably a couple of spurs.
6) The backdrops will be panoramic high resolution photographs printed to the required lengths. The upper is approx. 41 ft. and the lower is approx.
26 ft.
7) The upper backdrop and the train decks will be removable to access the electrical breaker panel and marked accordingly for safety and code.
8) Note that the backdrop corners are curved to create a more realistic flow of the photo backdrops and to avoid shadows.
9) All turnouts will be controlled by Tortoise under deck mounted switch machines with green or red lights on the layout control panel diagram at each turnout control toggle switch to indicate at a glance which way the switch position is.
10) The lower deck will be lighted by incandescent lights on a dimmer to simulate different sunlight conditions.
11) Stage II will be an additional 4 ft x 8 ft platform extending out from the center of the lower level to accommodate spurs and a (7) bay roundhouse with a powered turntable.
Hope this helps you and the viewers more clearly understand my design
intentions.”
A big thanks to Barry – can’t wait to see his next update.
That’s all for today folks.
Please do keep ’em coming.
And don’t forget the Beginner’s Guide is here if today is the day you start your own layout.
Best
Al
PS Latest ebay cheat sheet is here.



Very impressive. I wish I had the room to something on this scale. If I am correct, I am counting 6 turns in the helix including the base. Can you please let me know what radius or radii the track is and the dimensioins of the helix?
Thank you for your time and consideration.
JB
That is going to be some layout
This looks very nice please keep the pictures and your progress comming.
it great thanks
The track work looks good so far. I do have one question: Is this HO or N scale? Which leads me to ask a second question: If this is N scale where did you find the three way switches (Turnouts)? I’ve seen these in HO scale but not N.
The wiring for this looks as if it’s going to be a bear. If it were mine I would be in 7th heaven! 🙂
Other than those two questions it looks marvelous. I wish I had the space to do something like this. As it stands right now I think I may have an area of roughly 4 feet by 6 feet to eventually work with.
All the best and happy railroading.
Sfc Raymond Mueller
U.S. Army Retired
I appreciate what you are doing, your patience and planning. I eagerly look forward to more pictures as you progress. I have always been intrigued by the idea of using a helix. So this is very interesting to me.
I took up n scale modeling after an accident left me quite immobile in a wheelchair. Railroading improves my finger and joint dexterity. Do you have anything to illustrate how to repair rapido couplers–I’m staying with hem for the moment? Please supply if you possess.
Email me back–admire your contributions!
Regards,
T R Terres
Thank you Barry for taking the time to explain your design and layout. All I wish for you is success. Waiting to see your accomplishments with your next update.
This is what makes model railroading great!
I want to share something with you; Al; and all of you who enter this site. At our local Library my wife brought me a DVD video home to view. “Toy Train” “Christmas Memories” A McComas/Stachler Production. TM has been producing videos since 1974. I sure some or even many have heard
about TM. Well anyway. This video included Christmas train gardens from around 1943 featured Lionel: American Flyer: MTH: LGB:trains. Music by Jim Coffey and Dept…56 villages. The video was full of naritive from the different collecters some of them for over 40 – 50 years. One man talked about children coming to see his trains and seeing their faces light up and a sparkle in their eyes. He broke down and could not continue for a bit … so his wife graciously took over and said the railroad has been a lifes enjoyment with the whole family involved.
What a joy to be involved with model railroading; with special emphasis placed on all the wonderful people one meets.
Al, I can’t say enough about what you have done for all or us: for the time you spend sending forth the information and pictures and videos.
Thank you Al, Thank you … and all that contribute to this site.
Best Regards,
Keep on Training!
Tom N
i am going to add a very to the already very impressive. I think its OO, the helix is 21.75 inches high, roughly 5 inches per turn. You wouldnt need that clearance in N gauge. I think.
Nice! One question: The two layers look difficult to view unless you are sitting down for the lower and standing for the upper. What are your thoughts regarding this issue?
I am turning my layout into a split level.
The top deck will be a British Railway suburban terminal Part LMS and LNER with GWR having running rights into the terminal.
It looks like being a fantastic layout and the pictures highlight the amount of work involved across a load of disciplines,not withstanding the planning,progressing and actually doing the woodwork, the track,the wiring and continuously updating as problems crop up. God and it`s all a labour of love and costs a fortune, but when it all works,the feeling will be worth iit. You have my admiration just for attempting it, the workmanship looks top class, can`t wait to see the finished layout.
Great planning, I would be challenged to explain the thinking behind my layout with such clarity. The helix is a great way to change levels without having to explain the tight corners and steep grades.
What a brilliant setup. I really like the design with the two double helixes at either end to allow constant running of the trains. If you have time to make some more posts as you go I would really appreciate reading them.
Great Stuff!
Looks great so far i wish you would post a ‘How to” for that helix, looks very affordable and well done
I wish I had the space. I know that I will never have the patience to do such careful foundation and planning work. I’m working on a 4′ x 12′ N layout. Visitor think it is huge. But progress is slow because I keep learning and changing my plan. It will end up as a suburban edge. Mostly GG1 era passenger trains.
I have built it on the pink foam boards that I get free or next to free from Home Depot. I have collected oops paint and use the foam on the bottom of containers.
I’m a painter and use that approach……. it grows and changes based on the appearance.
Thank you all for the ideas and videos that entertain. It is great that you all contribute so freely.
Question
What is the best way to get the parking strips to look clean?
Del
That is awesome, love it. That is the kind of rail yard I need. With limited space, I have my rail yard on a 5 foot wide by 12 feet long plywood, most of the yard tracks have curves in them as one of the three main tracks go around it. I use all DCC on EZ track and everything HO scale. Al, I will have to pics soon.
I have a question for anyone but before i ask. that is one very awesome idea that you have with your layout my hat off to you. you are a inspiration to me to do my.so the questionis i have white 2 inch styrofoam that a friend gave to me, i can work around the little white beads of foam. i see woodland scenics uses it but then i hear all the guys that have been modeling for a while say not to. so should i or shouldn’t I use it please anyone. I am a newbe in this feild.so who to ask is the masters at this thank you all for any help oh by the way i will use ho scale. thanks again jim
This will be something well worth seeing when it’s finished, good luck with the build, great idea to gain another level.
Al:
I greatly appreciate your website and all the great tips that are listed there. I would like to know if anyone could provide me with information on how to install a light in a caboose that works off the DC contact from the track.
GROOVY
Love the spiral climb. Can’t wait to see it in action.
Just started researching RR Modling, and have a couple of questions.
What do the track Codes mean: 70 100? Which is best to use?
Does anyone use the snap fit track and why not?
Fantastic. I too will be interested in some stats as to how the spirals work in practice. Rising 22″ in a run of 70″ over 6 levels still sound a fairly steep gradient with fairly tight bends, so I’d love to see the actual dimensions. I’m sure Barry’s worked it all out – he seems like a true technician, so it will be great to see it finished.
This is for Jim, reguarding styrofoam. Home Depot ( in North America ) has insulating foam which is not comprised of countless beads pressed into a board. Here in Canada it is usually pink, and comes in various sizes. My layout is 5 X 8 feet, and two 4X8 sheets of foam covered the table with enough left over for the mountain. I hope this helps.
Information on building a helix was recently published in UK publication ‘Hornby Magazine’ which in humble opinion is a must have for any railway modeller.
This looks to be one heck of a layout, I wish I had the patience and woodworking skills 🙂
Concerning the beaded foam: Either the extruded or expandable bead will work fine. Both should be cut with hot knife (sold at home supply stores) for more efficient lines and mess reduction. Woodland Scenics recommends the white foam since its fumes when cut are not toxic like the pink or blue extruded foam. But the white bead from W.S. is expensive. You can usually purchase all three kinds at the home supply stores and they are much cheaper. About $18-20.00 USD. If using the extruded foam just make sure you ventilate well, have a fan exhausting the fumes out a window or blowing fresh air into the room. The professionals recommend using a respirator. Use foam safe adhesives to join the pieces to the bench work and each other. Either a product like Liquid Nails or Gorilla Glue Urethane glue works well. Latex or water based white glue products will not dry especially between layers, the foam is not permeable and does not allow the water to evaporate. The urethane glue does expand but is solid when dry. Use sparingly. Using a rasp file or hand saw to cut either type of foam is messy but necessary in places. Make sure you have a shop vac handy.
Helixes: I plan to do a bi-level layout too in my basement to double the running distances. With bi-level layouts you have to consider lighting the lower level from under the deck. Incandescent is dimmable but is hot and draws a lot of current. Consider florescent but it is difficult to dim. The other option is LEDs, but they are expensive for a short run of about 6′. Almost too much for the average guy to use. Small fluorescents for under cabinets in the kitchen work. But they are not dimmable. Just a thought. Mounting switch machines is also a challenge, since most will have to be mounted horizontally vs vertical as most people do, unless you have a deep deck and/or the track is elevated. Many Model Railroaders use plywood with the track mounted right to it with just the height of the cork underneath for the roadbed. This gives the most height clearance to the upper deck. The disadvantage is no roadbed relief for embankments. For my layout I am planning for 2″ of embankment. Whether I use it or not in all areas is an option but that plus the 2.5″ deck thickness provides enough room for turnout motors. It does decrease the vertical height to the next level, which winds up being about 18″ in my case between track tops and deck bottom for the upper level. Lower deck will be 36″ (2″ embankment added to the 34″ deck height makes 36″ and the actual start of the bottom of the lower deck is 31.5″). The bottom of the upper level will be 54″+2″ so track height will be starting at 56″. This is a comfortable height for “less” tall people to view. I model S-Scale, so I need all the extra space between decks I can get.
With HO, OO or N, you can reduce the vertical deck separation another 2-4″ or so. Remember though as you reduce deck spacing you limit the visibility to the rear of the lower level as you stand in front. Typically 24″ wide decks are used. Your visibility standing in front becomes limited to the rear. Another method to address that visibility limitation is to design the upper level recessed in about 6″ or so from the edge of the lower deck. This way your line of sight is not interrupted so you do not have to crouch down to see the back of the lower level. If you do not use that approach then you have to consider not placing the track and scenes on the lower level so deep so you can see it, especially for yards and switching. Many layout builders decrease the depth of the decks to 18″ or even less. This eliminates visibility issues but lessens scenery and structure placement. All “givens and druthers” as the late John Armstrong used to say. Just some planning advice and experience I am encountering. Thx for reading…Paul K.
i am looking for help on needing ideas for layout with ez-track please advise me really need help
Thanks very much Barry and to all. The planning, pictures and explanations from both Barry and others are an excellent way for me to participate in the hobby.Also think that Dave is a legend.
GREAT JOB!! But i am unhappy because i’ve not the space to do something like that. A big thanks to Barry and the others for the explanation and ideas.
What an inspiration. Please keep them coming, John
wow Barry are you in my basement thats exact what i want trying to build double helix with staging yard on bottom my helix if it gets built would be 4ft in diameter wich should give me a radius of aprox 28 inches with 6or 7 turns to get up 18 inches double tracked i think please keep posting i like your wood work its going to be an awsome layout mine is in n scale keep keep up the good work Ross
nice work barry may have to change my up and over to helix thanks to all who provide ideas and inspiration through al cheers
this is going to be my kinda track I am in to running the trains , and not the scenry , this looks like one of those lots of running when done , my patience is thin , every time I change apart of my every growning lay out just moved in to double car port in basement building tables ect , but I have two trains on the old lay out running , have a 300 ft of easy track change ect , just my stuff , dan o
nice layout how big will that be ??? how many trains will u run at time can’t wait to see more of this layout
I have actually seen many fantastic layouts, and observed several great ideas, already. I haven’t made any comments, nor any general imput into the site until now. Everything is still fantastic, even when some older tips and ideas are aired! My own layout is based around my original home area of West Yorkshire (England) during the time period 1956-60 (steam/diesel transition era) so that my own birth year (57) is covered (ish). This allows me to run my favourite loco’s with my favourite coach liveries,The first British Railways coach livery, Carmine and cream (or “blood n custard” to those of advanced years, as I am…. but will never accept…. haha), and maroon. Also, it allows use loco’s and rolling stock from my favourite “post grouping” (Big Four) companies, ex L.N.E.R. (London North Eastern Railway) and ex L.M.S. (London Midland and Scottish Railway) To many of you out there, all the above will make sense…. to those of you who haven’t a clue…… just ask! I’m always in the mood for a history lesson on the post 1923 railway’s…… as I should think as are many other enthusiasts who attend this site.
For those not in the Know so to speak, try having a look at two superbly crafted layouts, “Dewsbury Midland” (Manchester Model Railway Society/club, and a private layout that had a profound personal affect on me, “Tetley Mills” by Dave Shakespeare….. I believe he is on MkIII now, Though any each and every one of his layout builds, or rebuilds have been an incredible incentive to me to start back into the hobby. Use that net for what it was made for, and have a look-see.
My own planned layout, “Tykeham Holme Junction”, though paler in significance, to The mighty Mr. Shakespeare’s, will be everything I dream of….. (until larger accommodation comes along or) until the next one, haha.
At the moment, it is constrained to 8′ x 4′ to fit on a queen sized double bed in my only bedroom….. no live in partner, obviously… she is very understandable, (ahem)…. I sleep on a sofa in my living room. It is a double oval, several lay-by’s at the rear and a 3 platform station in front of the scenic break. to the right trains enter or exit through a tunnel, the left though, is where my artistic/hobbyist’s license is given vent…. in full fury!!! Forced perspective is the word. A plate girder road overbridge begins the perspective/scenic break area.this allows for me to create a reasonably sized station on a secondary mainline junction, and permits prototypical sized trains to run (half way realistically in “OO” scale/ gauge. Some may sigh, and mutter, “oh yeah…. how old did he say he was??? 5 or 6???? WOT!!!!! 56?????? Then he’s not a juvenile,,,, he’s a moron… haha.
Like I said, The bridge is the “start” of the scenic section). Bear with me, and I’ll get some photo’s done for you guy’s to peruse….. eventually….. Watch This Space!!!!! Until then, I’m just starting on fixing, and ballasting, the scenic area track…… One last thing, this is to be my fist shot at building a layout, since I was 14. Keep those hints, idea’s and tips coming in…… no matter how skilled, we All thrive on them! Thanks lads… and lasses.
like barrys layout. but I also would like to know about the 3way switches. I also am in “N” scale and cannot find such an item. would appreciate clarification.
Interesting that I have been working on something similar with O gauge. Hard to do but you had certainly helped me resolve some questions that were in my mind. VERY GOOD. BRAVO!
A couple of people asked about 3-way switches in N scale. Kato and Tomix both make them.
Apologies… Kato don’t seem to make them, but Tomix most certainly do, in left-hand and right-hand variants.
Hello,
Wat a great room for a great layout, i hope we mee die de next fase of dis great layout with pictures and many a video.
HC Treintje from Belgium
Herman Crauwels.
Your layout is fabulous beyond words. I could not even dream up such a layout, let alone build it. I admire your dedication and skill in undertaking this endeavor. The only thing that I take exception to is what you have done with your electrical panel. Sadly, having a removable panel is not compliant with the electrical code. The NEC (National Electrial Code) in the United States does not allow an electrical panel to be covered with a removable cover.
1.) NEC 110.26(A)(1) states that there shall be a minimum of 36″ of clearance in front of the panel.
2.) NEC 110.26(A)(2) states working space around electrical equipment must be as wide as the equipment or 30 inches, whichever is greater.
3.) NEC 110.26(A)(3) states for installations built before August 13, 2007, the height of the working space must be 6.25 ft. For installations built on or after August 13, 2007, the height must be at least 6.5 ft. from the floor, grade, or platform. It can’t be lower than the height of the equipment.
I post this to clear up any misconceptions that it OK to cover electical breaker panels with a removable access cover. I am a retired journeyman electrician with 47 years experience and just wanted to pass on this information.
Other than this small oversight your work and layout is brilliant. I really enjoy reading about your progress with this build and eagerly await the next installment.
WOW! That sums my thought!
Robert I used Kato track and it works great and I could give you a address on how to change make your own sizes and I have had NO problems. Ron from sunny Fla
Tom: Re: The library video….. if you subscribe to streaming video services like Netflix, Amazon Prime, or other, look in their catalogs for model train videos. I have several queued up to watch when I need some inspiration. I will search for the video you mention in the catalogs. Thanks for posting!
Barry, That looks lie a great start on what promises to be a fantastic layout. Thanks for sharing the thought process behind the layout’s design. I have a 32 x 48 foot shop building that I hope someday to build a layout in and your thoughts will help me when I get around to planning that new layout. Keep us posted with your progress (and a track plan if you have one to share.)
Jim, In regards to using the white beaded foam: Don’t! I used it on my Christmas layout and the open celled beaded white foam board is a nightmare. It breaks very easily and the little foam balls go everywhere. Also, the hot glue recommended by Woodland Scenics to attach their subterrain foam risers to your baseboard does not hold up well when glued to the white foam base. I am having to re-glue all of my risers. The pink or blue extruded foam board is much stronger and a better base for layouts. The Woodland Scenics white foam subterrain products are closed cell foam and don’t crumble like the open cell stuff used as packing materials and some insulation types.