Multi level n scale railroad

Steve’s created this multi level n scale railroad:

“Hi Al,

My wife and I moved our railway stuff from loft to loft over a period of 40 years.

Finally, and a few years after retiring, I decided to bring it down and take a look.

Some was HO gauge (my wife’s) and the other was n gauge.

In respect for both gauges I started to build two separate layouts.

Not happy with the results, I took over the conservatory and started again.

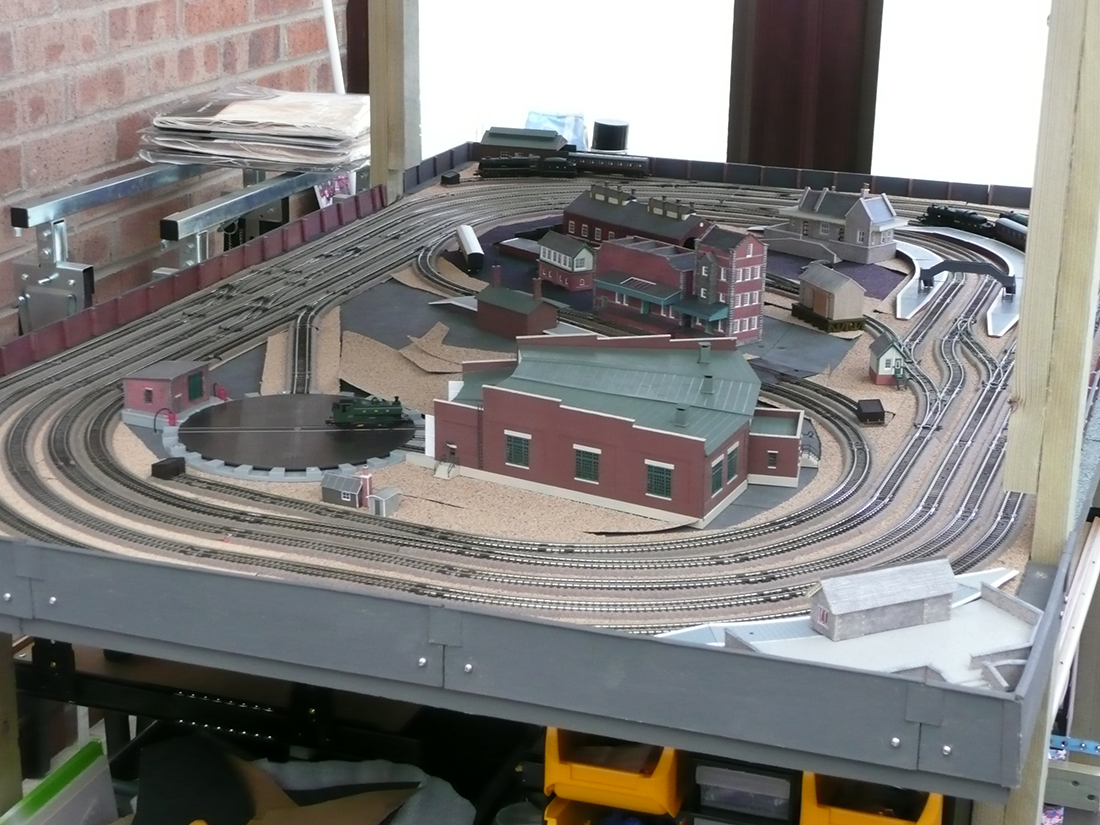
Each layout has two tiers with the intention of going DCC on the second tier.

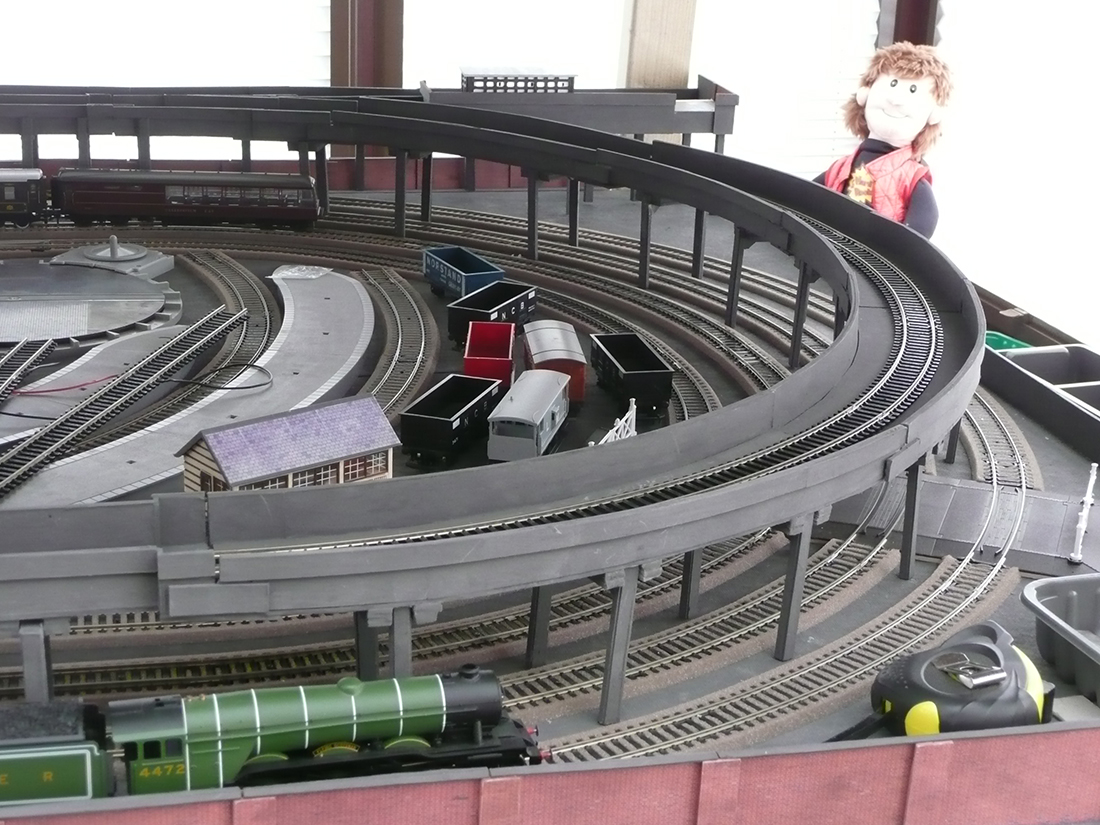
The layouts are ‘flat’ and have as much track as posssible, as my main interest is in running the trains.

Also, we intend to move house/area within the not too distant future and so everything is designed to be taken apart.

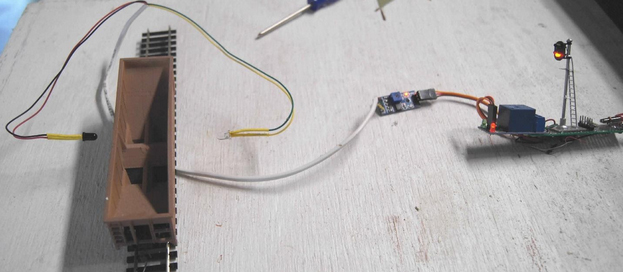
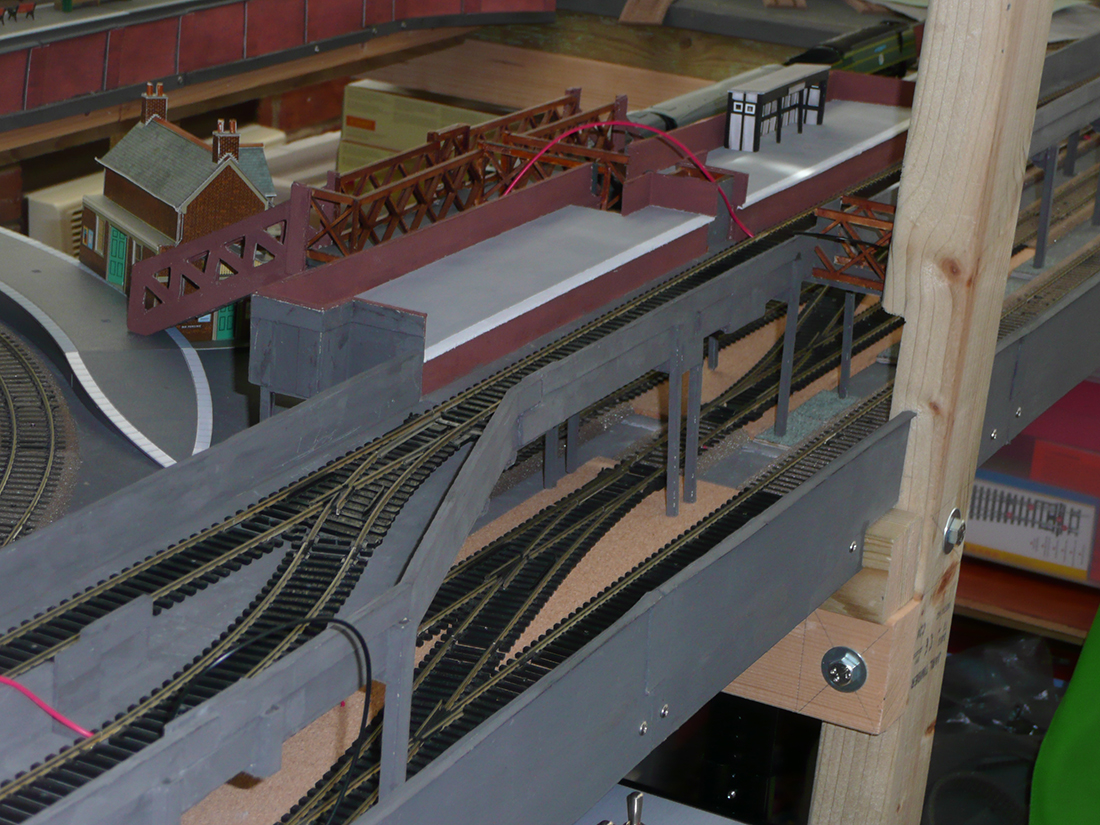
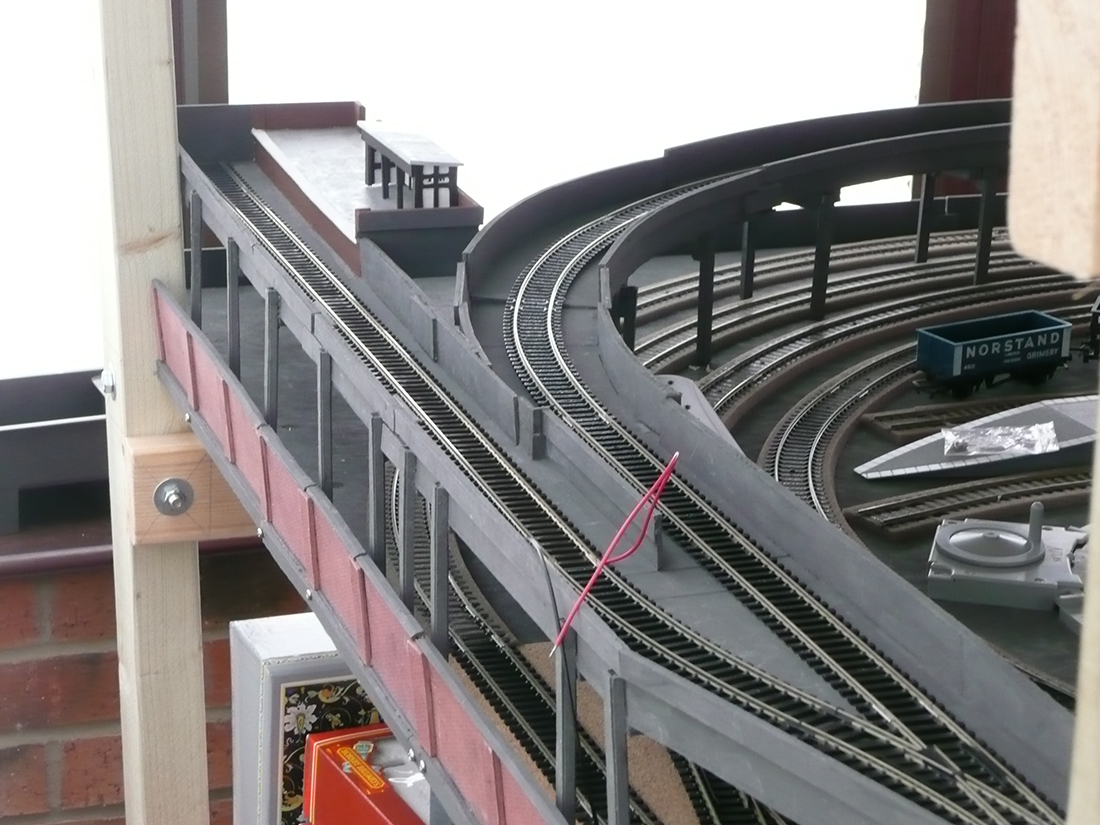
Just this week I have completed a raised oval of track above the 3rd radius already in place. The trackbed and supports are made from 1mm/2mm greyboard with matchsticks running through the centre of the supports to give greater strength.

Eventually I redesigned the supports so that they could be moved laterally and avoid obstucting the trains running below.

I shall run two EMUs on this raised track. This is a single track with two sidings.

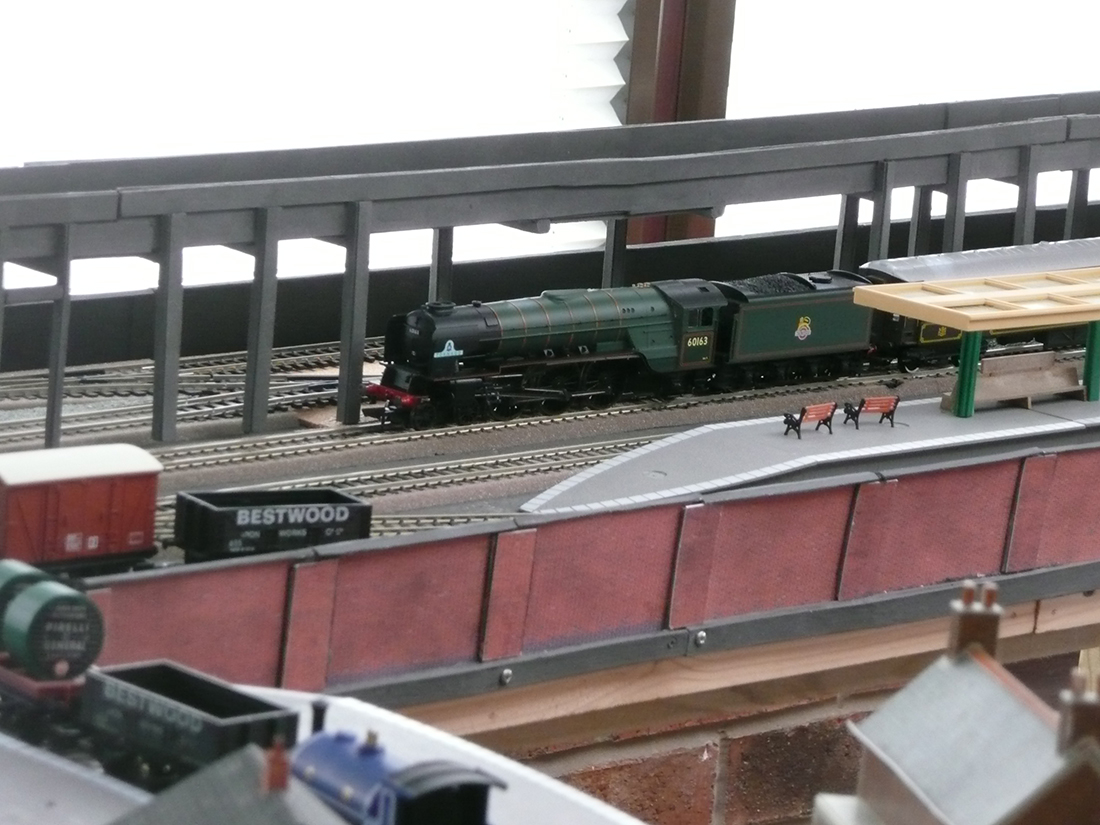
We had to have a ‘Flying Scotsman’ featured on the layout as we were both born in Doncaster.

(My wife’s first full-time job was at British Rail Engineering, Doncaster.)

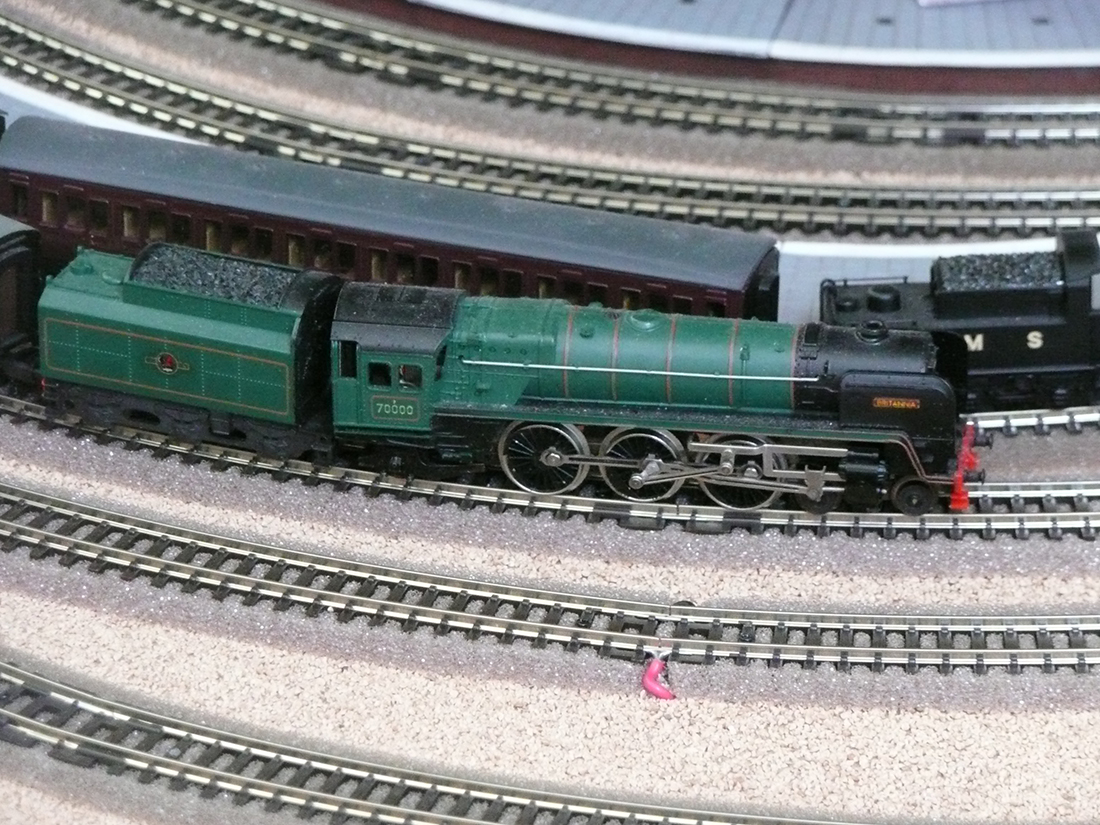
The Minitrix Britannia featured on the n gauge layout was purchased in 1972/3 and it ran perfectly at the start of this venture.

Kind regards

Steve”

multi level n scale railroad

multi level n scale railroad

multi level n scale railroad

multi level n scale railroad

multi level n scale railroad


model railrway

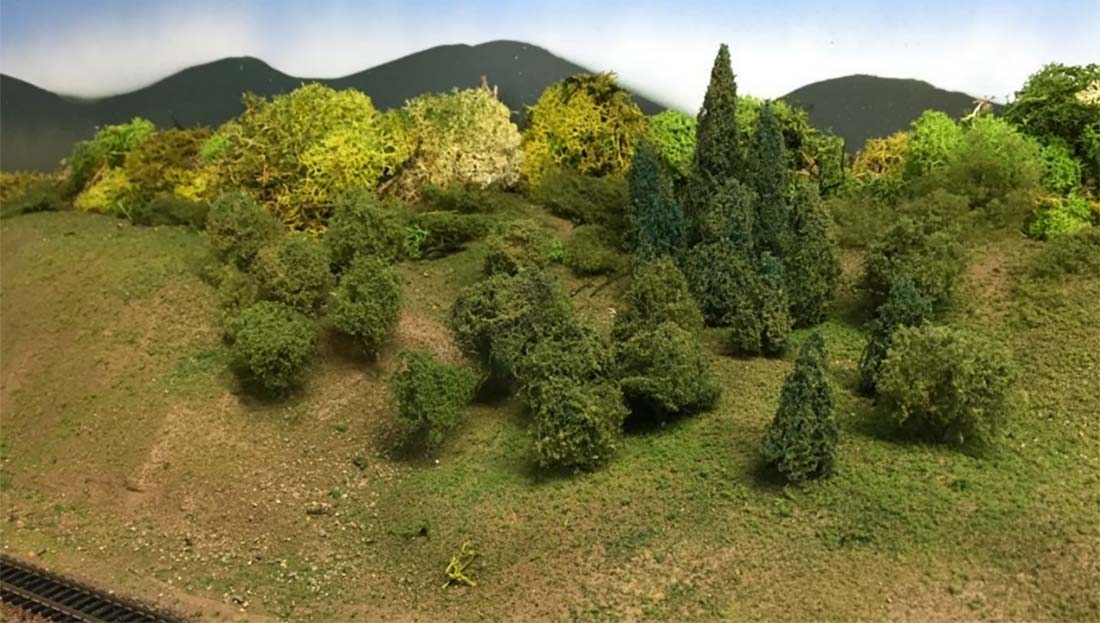
Now on to John, who has sent in this ‘how to’ on making trees:

“On my N scale layout, I have large spaces that have been “Zip Textured” and need to have trees and vegetation to cover the wide spaces, Buying pre-made trees or tree “kits” is not in the budget.
Here is my solution.

n scale trees

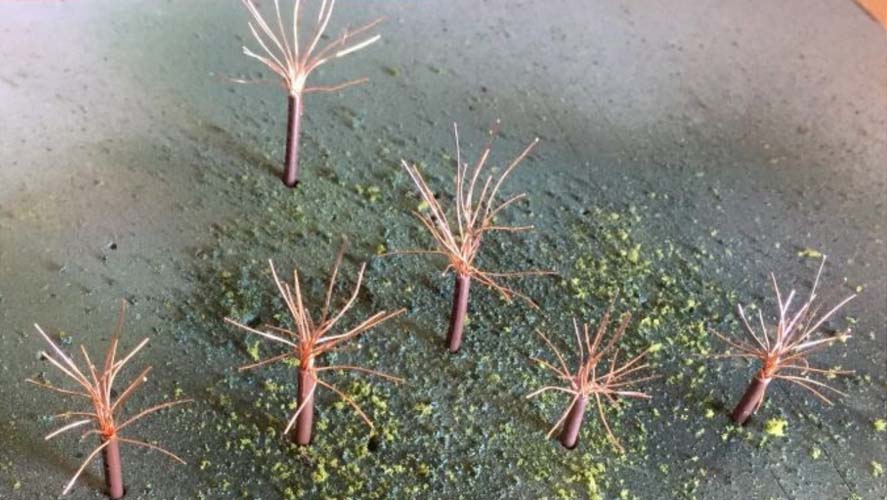
Step 1. Use brown # 12 or 14 stranded wire and cut into “blanks” . Cut the blanks a bit long as they can be trimmed later. The area that is not stripped will serve as the trunk of the tree. Don’t try to strip all the wire area at once. Do it a small section at a time. It will work better.

n scale trees

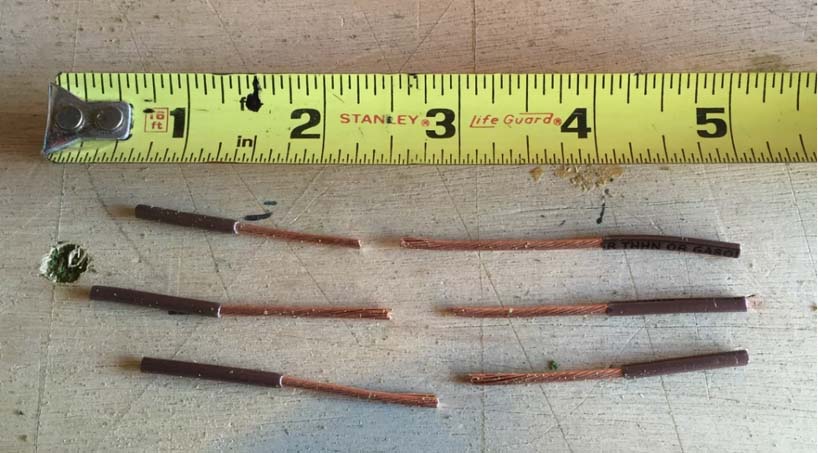
Step 2. Un-twist the strands and fan them out

making trees

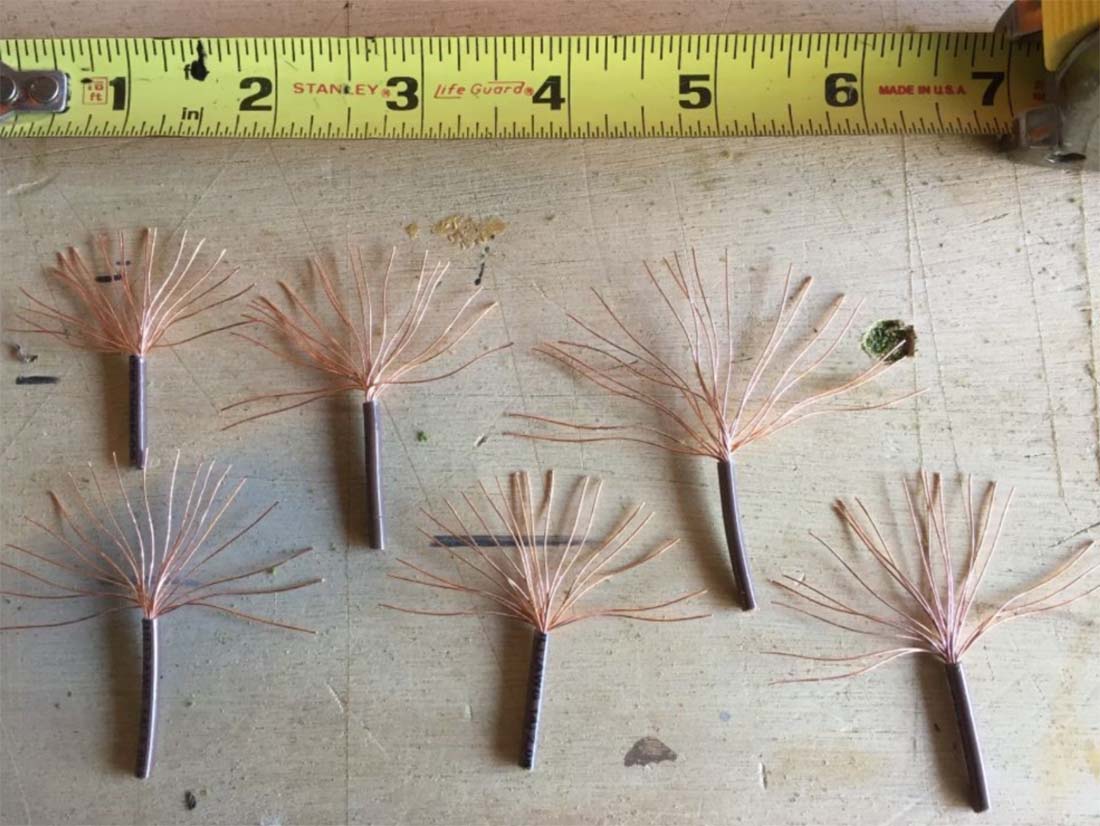
Step 3. Trim the “fans” into a profile of a tree shape

model train trees

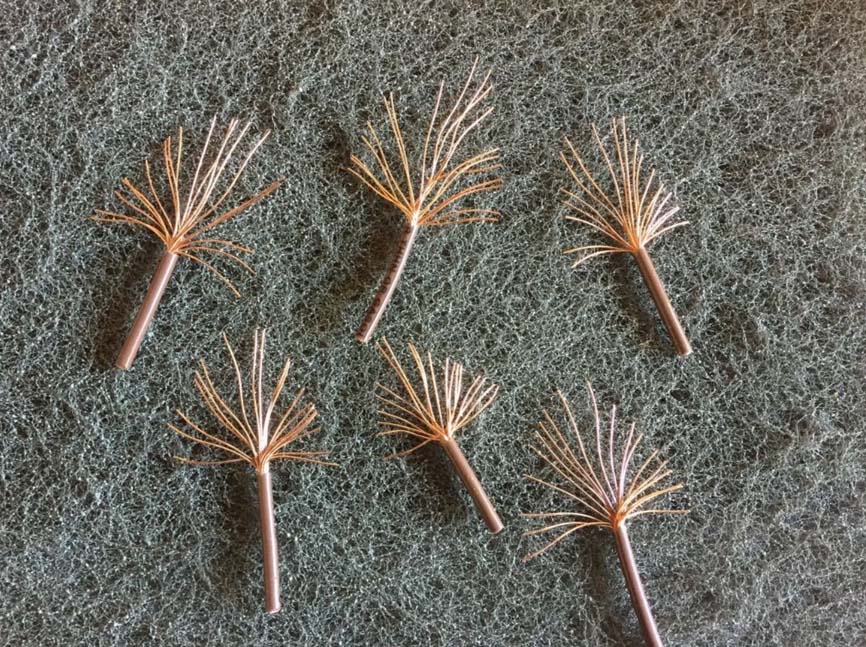
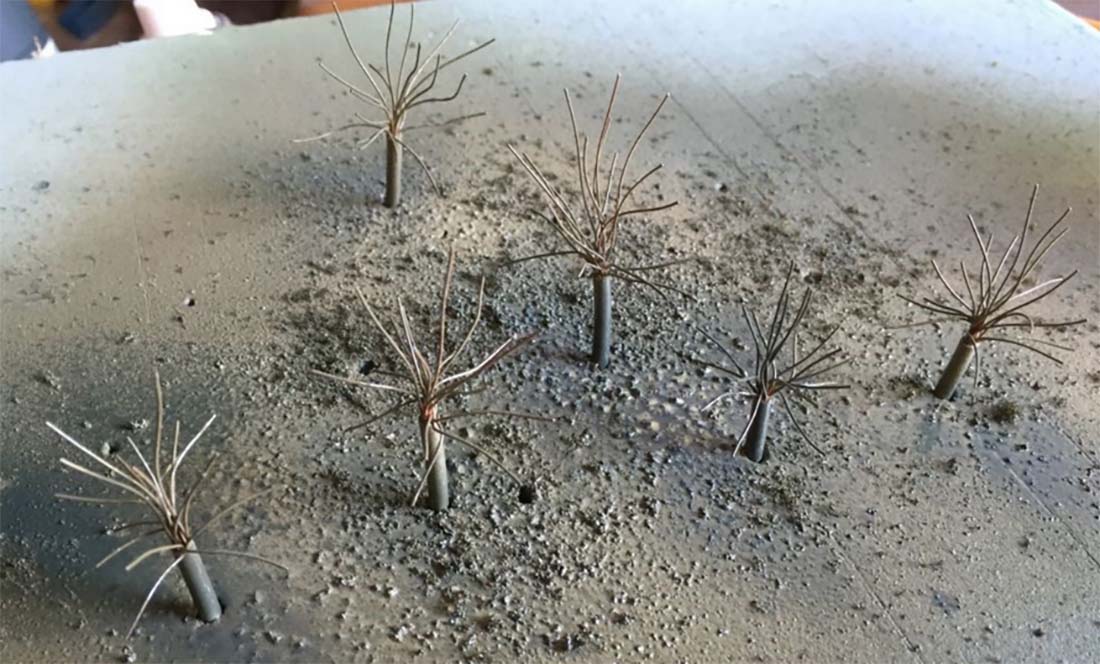
Step 4. Take the trimmed fan shaped strands and bend them into a tree shape. You can use nippers to trim the branches. Place on a foam board that had holes punched with an awl. You will use this panel to use to spray paint the trees.

model train trees

Step 5. Take the shaped wire trees and mount them on a foam board to be sprayed. I use a hunter green or light tan to prep trees for the next step. You can rotate the foam board to get full coverage. Also spray directly from the top.

painting model train trees

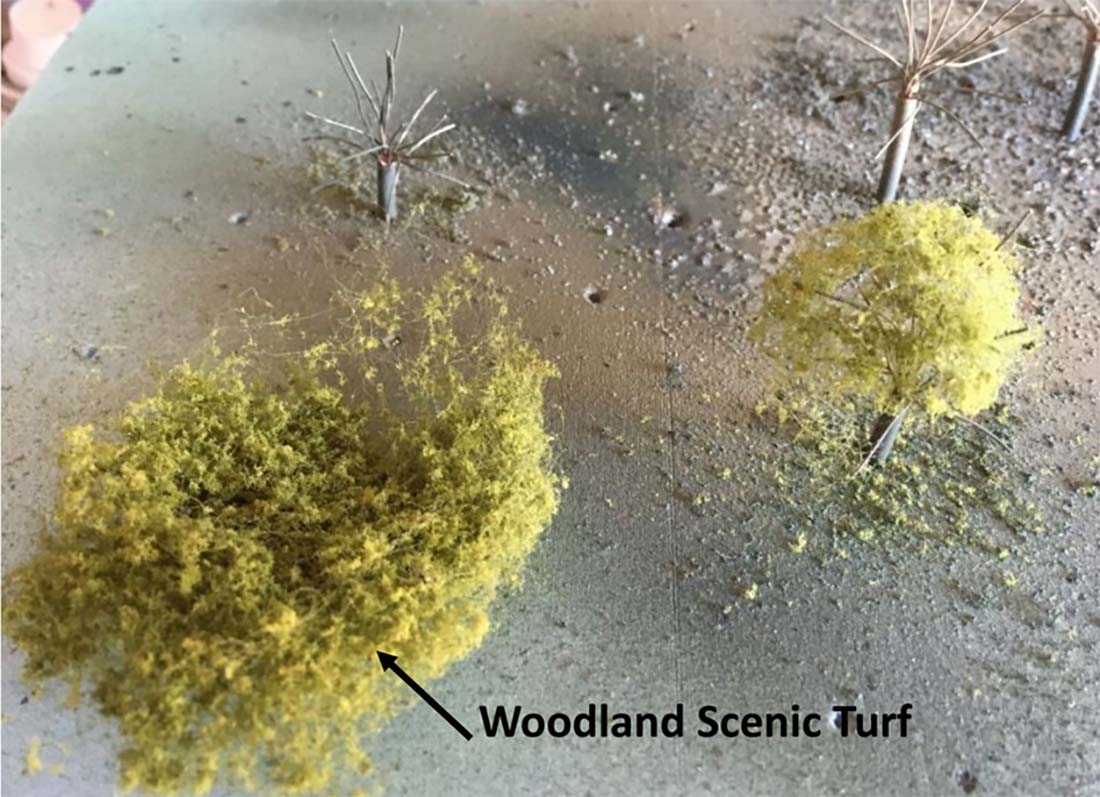
Step 6. After spraying, attach to the “wire branch tree” stretched out Woodland Scenics “Turf” to give some body to the tree.

wire for model train trees

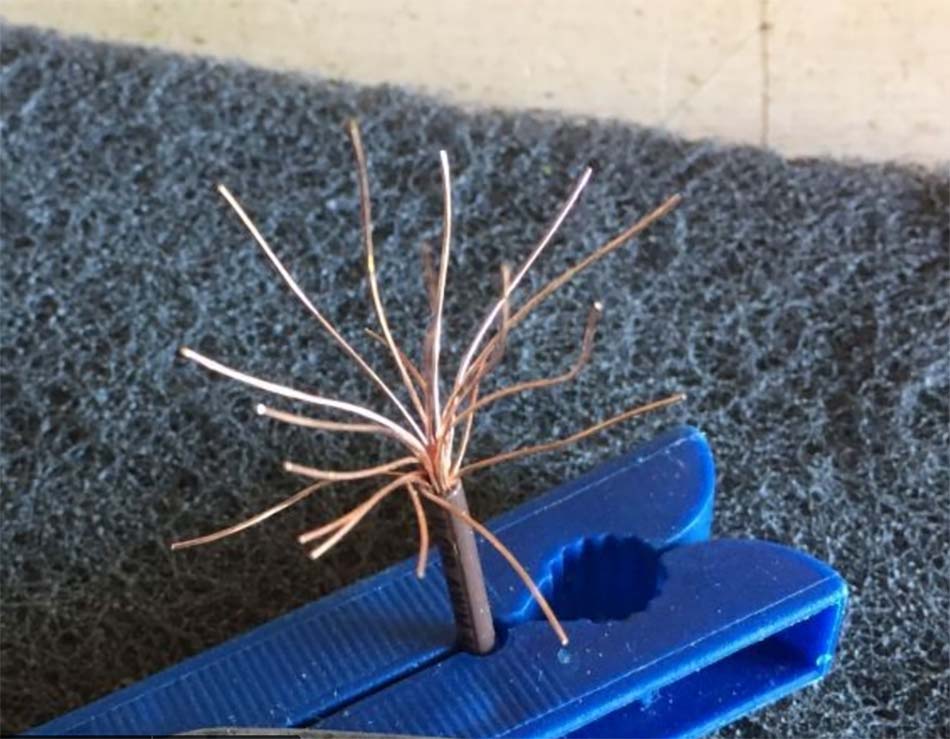
Step 7. Take the tree and hold it in a clothes pin to spray with an inexpen- sive extra hold hair spray . Spray it away from your work area / catch bowl.

model railroad trees

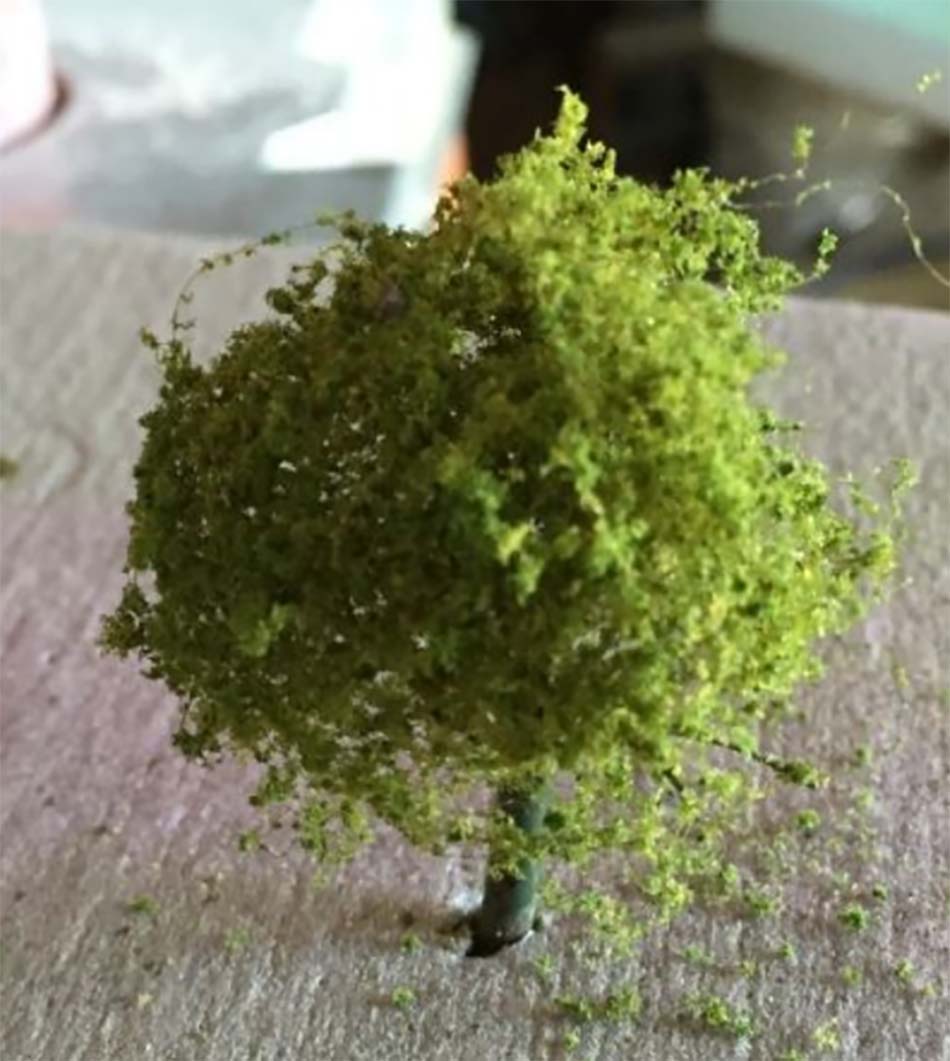
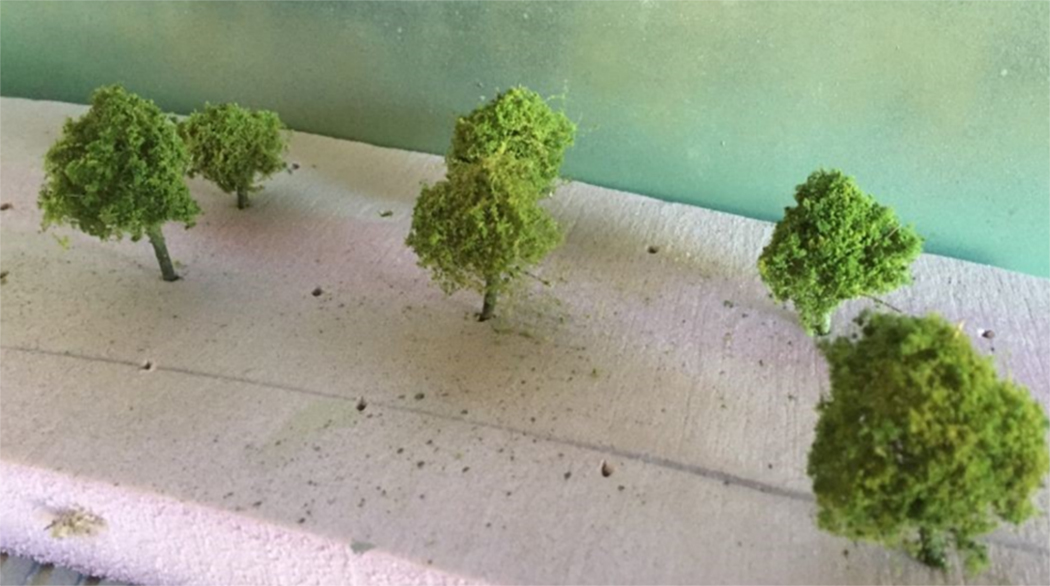
Step 8. Before the hair spray dries, shake blended turf, fine turf and fine ground foam on the still wet tree over a box or bowl. You can push parts of the turf foam into a more realistic shape and trim off any strands hanging off. You can also spray the tree again with a light coating of hair spray to hold the shape.

model train tree

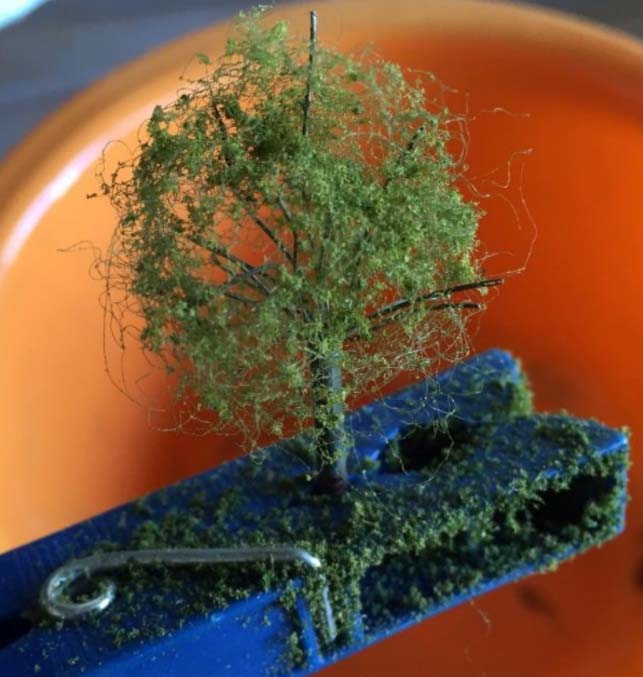
Step 9. Place the completed tree on another foam board prepared with holes to carry your “forest” to the layout.

creating forrest model railroad

creating forrest model railroad

creating forrest model railroad

“Hi Al… Just uploaded this short video, its a poor wet day, so what do we do? …start running a few Trains… no good sitting in the garden getting wet… just a few running mainly with Freight for a change.

Regards

Dave”


That’s all for today folks.

A big thanks to Steve for sharing his multi level n scale railroad, and to John and Dave too.

And if today is the day you take that first step towards your own layout, the the Beginner’s Guide is here.

Best

Al

PS Don’t forget the latest ebay cheat sheet is here. Still going strong.


HO scale water dock

Brian’s been back in touch, he’s been working on his HO scale water dock.

You may remember him from his stunning waterfront scene, his last post is here.

“Hi Al, I have just completed a utility barge for my waterfront harbour.

I saw this photo on a website of a kit that is available and decided that I need one and should scratch build it for my HO scale water dock.

Below is a photo from the website (Fos Scale Models) which I used for for inspiration.

barge for water dock

I cut the top layer (card stock to represent a metal top) to size and scored the metal plates. I sprayed it with grey primer. I had the wheelhouse in one of my many bits boxes that I could use.

making barge

Added some detail to it and placed it in position to see if it would look okay. I was not quite happy with the look and decided to remove the metal supports on both sides of the wheelhouse.

making barge

The “hull” was cut a fraction smaller than the top deck. I laminated two pieces of 0.125 inch Masonite (hardboard) to make the hull and then tapered the front of it down to the waterline. Here it is on my worktop figuring out where to place all the details – also from my many bits boxes.

making kit

kit bashing

I am always on the lookout for scale vehicle tires to use especially in my harbours. When glued onto the sides as buffers, i slice them level with the hull in order for it to sit flat on the water.

After temporary placement of the details, I gave it the once (many times) over to make sure that it looked workable before gluing it all in place. Here it is on my hand to show the small size – 3.75 X 2.75 X 0.375 inches.

HO scale water dock


Again, a different view to check placement of the details.

HO scale water dock

Same again.

HO scale water dock

While waiting for the window glue to dry I placed it in the harbour as a test. After looking closely at it in place I realized that it needed more weathering. It was not dirty enough to be a working barge in the harbour.

It pays to take a break, sit back and view your model. I did this and realized that I left off the kleets which are used to tie it up to the keyside or other boats.

HO scale water dock

HO scale water dock

HO scale water dock

Did not take long for the seagull to find somewhere to perch in the hope of finding a tiny morsel.

HO scale barge

HO scale water dock

Final weathering and all details glued in place and in the harbour to begin working.

HO scale water dock

Thanks for all that you do for this hobby and keep up the good work.

Brian

The HOn3 guy – Knysna RSA

All the best Al, and thanks as always for your blog.

Brian”

Now on to another Brian, who has also featured on the site before:

“Hi Al

Further to my previous Poirot video I thought I would make a fun video featuring my Changing of the Guard scene on the OO loft layout with Airfix Guards and Band.

It includes footage from the actual Changing of the Guard at Windsor Castle, my son is the Bandmaster of the Irish Guards. Here’s the story to back up the video:

“I have several ‘hobbies’ that keep me busy in retirement – railway and military modelling, walking football (to keep fit), and playing trumpet in a concert band. My enjoyment of playing music has ‘rubbed off’ on my elder son who took up a career as a musician in the British Army and is now the Bandmaster of the Band of the Irish Guards of the Queen’s Household Division.

On both my N and OO gauge layouts I have tried to include scenes where various members of the family are involved, so modelling the Changing of the Guard at Windsor Castle, a regular activity for the Queen’s Guards and Bands was a challenge that had to be undertaken.

The Airfix 1:76 Guards Band and Colour Party were the only models in OO gauge that I was aware of, but being produced way back in the 60’s meant that I would have to find them on a popular auction website.

Fortunately, I did, but at a considerably higher price that the two shillings I would have paid for them when I was buying them as a boy all those years ago!!

With all the research needed to paint them from my son, I commenced the painstaking task of painting both the band and the colour party. There was one very important piece of surgery that had to be carried out – converting a side drummer to my son, the Bandmaster who marches in the band towards the back (you’ll see him in the video) with his conducting baton tucked up his sleeve. Many hours later, about 40, both Guards and Band were fully painted, and were passed inspection by the Bandmaster!

The Windsor Castle, named Wenham Castle (my Grandmother’s maiden name) on my layout is a 1:72 kit from Miniart which after a lot of filling and painting came out reasonably well.

The march into Wenham Castle is via Station Approach passing the public entrance to West Hoe railway station and the police have the ‘crowd’ and ‘traffic’ fully under control, except of course for the passing goods trains that like to make their presence heard!!!

I hope you enjoy the video. My apologies to those who were hoping to see more train action, but I think many will agree that without scenery and interesting things going on in any layout, just trains, I hesitate to say, could get a bit boring? Each to his own though eh?

All the best to railway modellers everywhere.

Brian
Wokingham, UK.”


I am getting more and more submissions from folk who are combining their hobbies – and why not? A good back story always makes a layout.

What’s more, I’m getting more and more folk sending me stuff of their other hobbies, which I do really enjoy seeing too. I haven’t ever posted any, but I think I will soon. I do enjoy seeing what everyone gets up to in their spare time.

A big thanks to Poitrot Brian, and an even bigger thanks to Hall of Fame member Brian for sharing his HO scale water dock.

Really enjoyed today’s posts, hope you did too.

That’s all for today folks.

Please do keep ’em coming.

And don’t forget, the Beginner’s Guide is here if you want to get going on your own layout.

Best

Al

PS Don’t forget the latest ebay cheat sheet is here. Still updated daily.


Infrared detectors for model trains

John has been in touch with how to put together the infrared detectors for model trains.

“Hi Al,

It’s been awhile, been busy working on some real railroads since many of the folks who normally do the work are locked down and can’t travel, but I’ve been reading the posts every day.

Your website and the products you offer are great for any level of model railroading.

Now to my latest project. I’ve been trying to get some way to detect trains as they pass, and drop signals to red when they go by.

There are some good detectors out there, but I wanted to see what I could figure out on my own.

I’ve been fooling around with the little sensors used in manufacturing mostly made to send a signal for something, like light being on, or to turn on lights when dark, or objects passing by on an assembly line.

How about people sensors? Both types had some utility, but the turn on the lights did just that, but not when I wanted to run trains.

The people sensors… well… sensed people, not HO trains, and when I adjusted the sensitivity they detected everything but trains.

Back to research, and success!

I found little IR detectors on eBay for less than $2.00 each. A lot less than that from China (just ordered 20 more for a total of $10.33!) but it takes a few months mail, and customs, and red tape to get here from there.

They are called Arduino PIC AVR IR Infrared Obstacle Avoidance Sensor Module Object Detector.

infrared detectors for model trains

Size is about 16 mm by 50mm with a plug attached. They run on 3.3 to 5 volts DC, and will detect anything directly in front of the sensor diodes.

Out of the package, they will detect from a little as 8 mm and, with playing with the potentiometer, out to about 40 mm.

They react fast, and in a few tests actually picked up the space between the cars. Not good. So I decided I would modify the detector, but quickly determined that connecting everything with jumpers and alligator clips was tedious and confusing.

So I made a little test board. It has a place to connect my power supply, a common cathode type “D” 2 color signal, and a relay to get the trigger from the detector and change the signal. I use a relay, also from eBay, 1 Channel Relay Module 5V Optocoupler LED for Arduino Pic ARM AVR note that it has the same plug as the detectors. This is a single pole – double throw relay that would work with the same voltage as the little detectors.

Since I’m planning on having a dozen or so of these detector/relay/signal sets, I also bought some 3 conductor connector sets that plug into the board and relay.

The circuit design is:

infrared detectors for model trains

I found that the relay below is just what I needed to make a tester, but decided for the layout I’d get a bunch on one board, they come up to 16 relays on a board but I ordered a few with 8 relays.

infrared detectors for model trains

1 Channel Relay Module 5V Optocoupler LED for Arduino Pic ARM AVR

infrared detectors for model trains

As I got into the detectors, I realized that not only the range was a problem, but putting them in some kind of structure so they could “see” a train going by would also be difficult.

infrared detectors for model trains


Here is my little test board with a detector not detecting anything.

I wondered if I could remove the IR LED and Detector LED, and if they needed to have a specific wire lead length. I decided to try to un-solder the IR-LED and Detector LED and extend them on longer wires, this allows for them to be hidden in most anything on the railroad, like in cars waiting at a grade crossing, or in a little signal box next to a switch.

Some care needs to be taken as the little IR Led and Detector are unsoldered, wires extended, and shrink tubing applied. Be careful not the lose the polarity. I added about a foot of wire, and 6” to each LED, like below.

model train detector

Since they face each other now, their mode switched and they send a detect signal until the space between them is blocked, out of the box and mounted side-by-side, they look for reflected IR so they are normally not detecting.

So, how to detect the trains without blinking as the detector “sees” the spaces between the cars? Decided to shoot the beam on an angle like below:

model train detector

My signals, most from China, are LED common cathode, so the schematic shown above is how to wire them with that configuration. If common anode, reverse the + common to the relay and connect the negative to the LED’s. What I found is that when the IR and Detector are facing each other, the range is reallly increased. I easily detected a card blocking the beam from more than 6”

model train detector

When my test railcar even gets close, the detector hits it and the detector will report “track occupied” to the relay, which turns the signal red. I’m planning on also having a parallel LED on my control board to also see where my trains are, and what tracks are occupied.

Next project is rebuilding a roundhouse turn-table! Everyone be safe, and happy modeling!

John from Baltimore.”

Lastly for today, Cassio has sent this video in.

He’s never a man of many words – or any come to think of it – but I enjoy his videos:

A big thanks to John for sharing his infrared detectors for model trains ‘how to’. Thanks to Cassio also.

(John’s post reminded me of Mark’s: Model train block dectectors.)

That’s all for today folks.

Please do keep ’em coming.

And if you’d like to make that start on your layout, the Beginner’s Guide is here.

Best

Al

PS Don’t forget the latest ebay cheat sheet is here. Still updated daily.

PPS More HO scale train layouts here if that’s your thing.