Model railroad harbor layouts

Brian’s been back in touch. There are some fab model railroad harbor layouts on the blog, but Brian’s really does stand out:

“I thought that I would send an update of the progress of my layout. I hope you can use it.

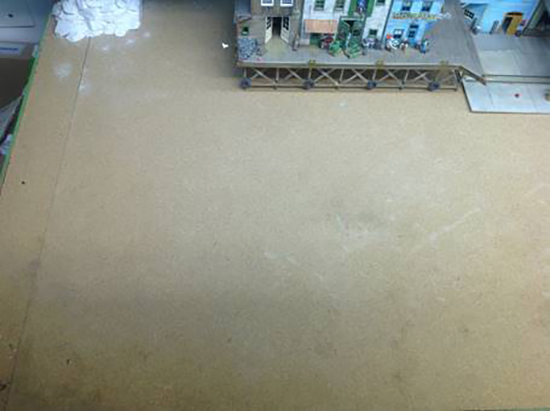
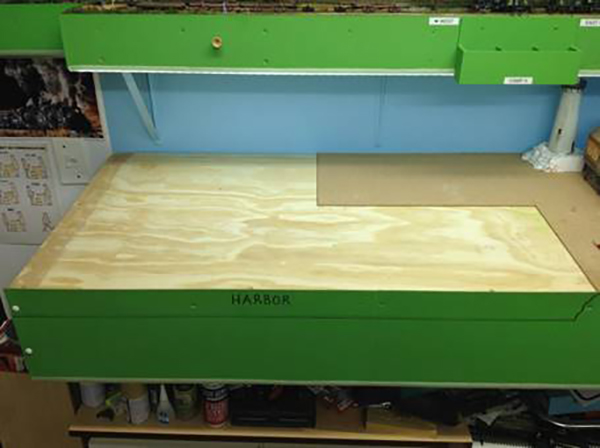
I have started on the lower level at the end where my harbour will be situated.

It has to be a well thought out process as once the water (Woodland Scenics realistic water) has been poured, it will be too late to add any submerged debris that would be found in and around harbours.

The only things left to do after the ‘water’ has been poured is to place the boats that have lights on them, the marker buoy as well as the barge in place to determine where I have to drill holes through the ‘water’ for the wires to go underneath to the buss wires below the layout.

Remembering that the holes cannot be drilled before the water has been poured as you would have a huge mess on the floor under the layout. The harbour area has to be well sealed beforehand.

Once I have everything in its correct place and happy with the layout of the harbour, they will be all removed, a thin layer of very watery plaster will be poured to ensure the base of the harbour will be level. I will then paint the plaster to the correct colour, add the debris and then only can I pour the ‘water’.

The attached photos show the progress to date.

Below is the base of the harbour area with the cork overlay.

model train bench

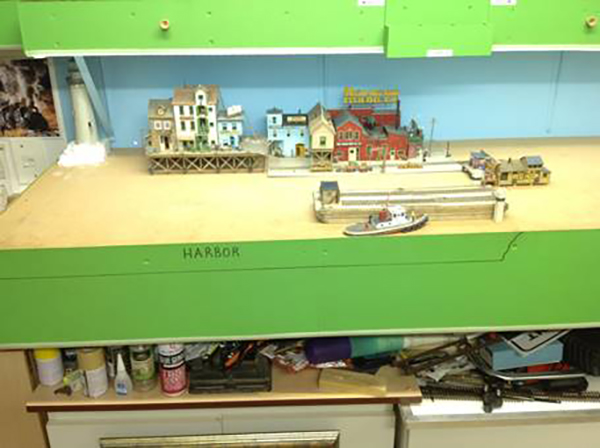
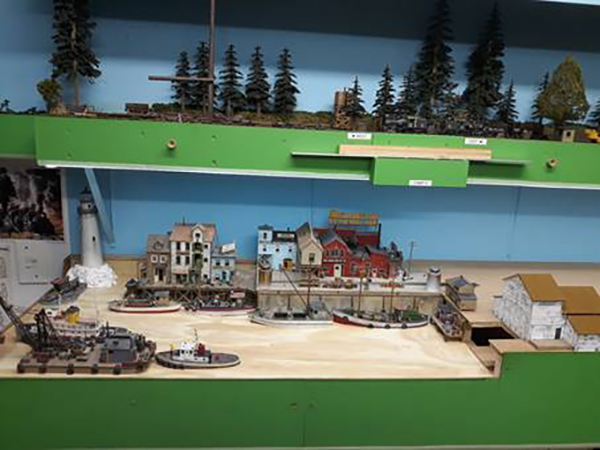
Basic layout of what I would like in the harbour.

model railroad shelf

By removing the cork here, I was able to mark out the cutting area.

model railroad shelf

Made a few changes – the cardboard mock-up of a building (boat repair shop) on the right hand side below was changed to a scratch built one which is about 75% complete. See photos of it a bit lower down.

model railroad shelf

This is the ’new boat repair shop at the top of the ramp.

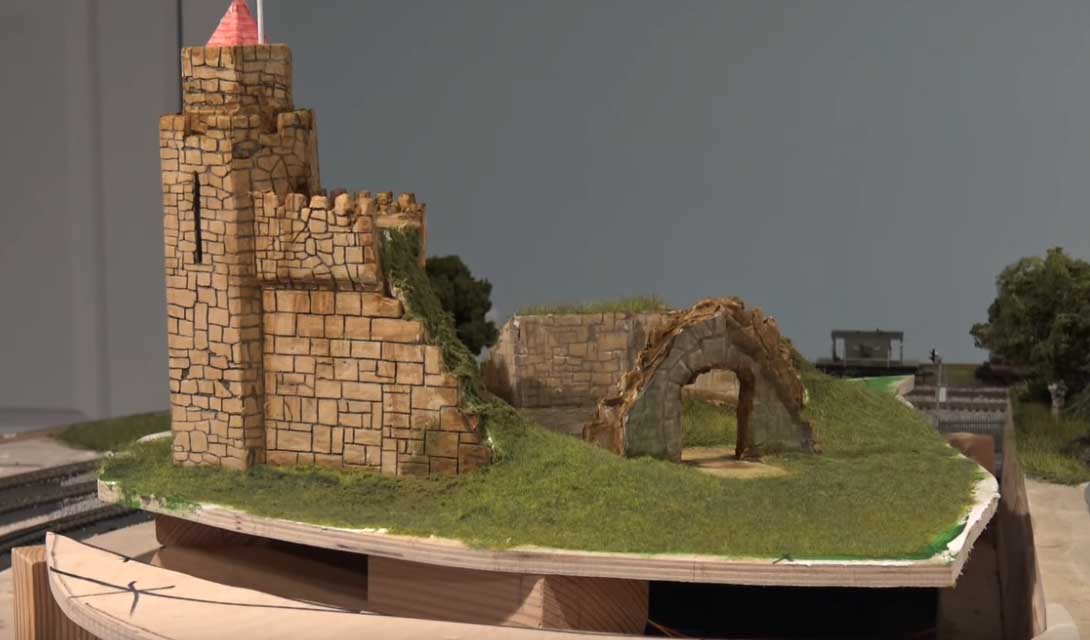
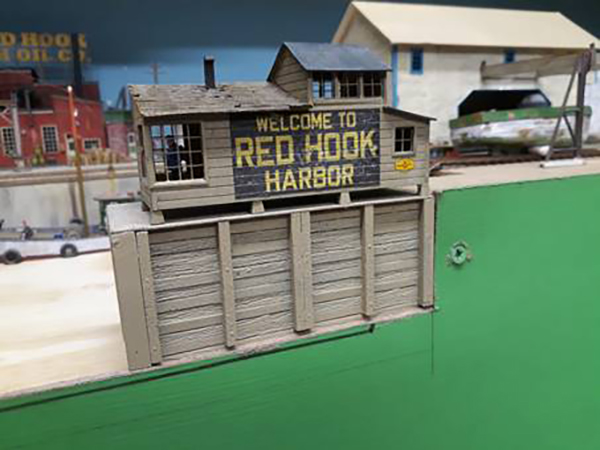
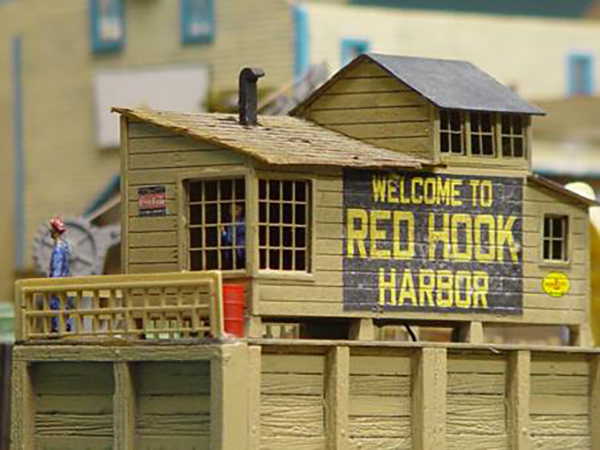
This is Red Hook harbour masters office where he has a full view of his harbour.


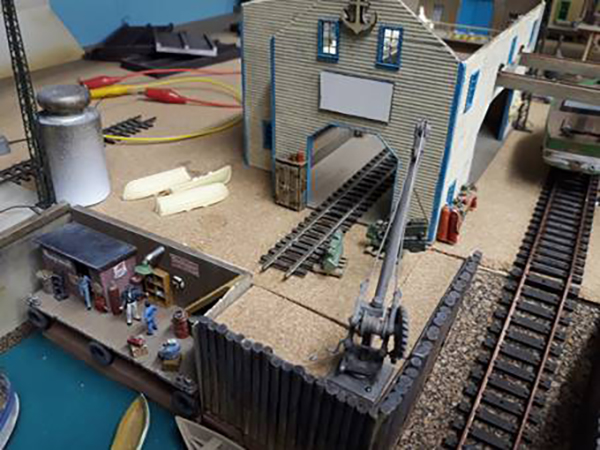
A view of the harbour.

model railroad harbor layouts

The interior of the boat repair shop with a few castings still to be painted and weathered.

model railroad harbor layouts

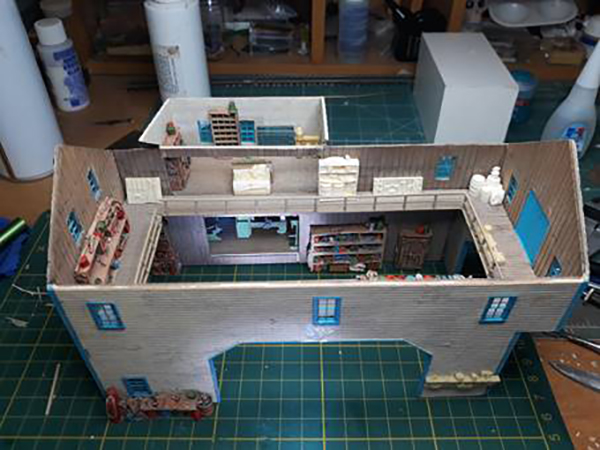
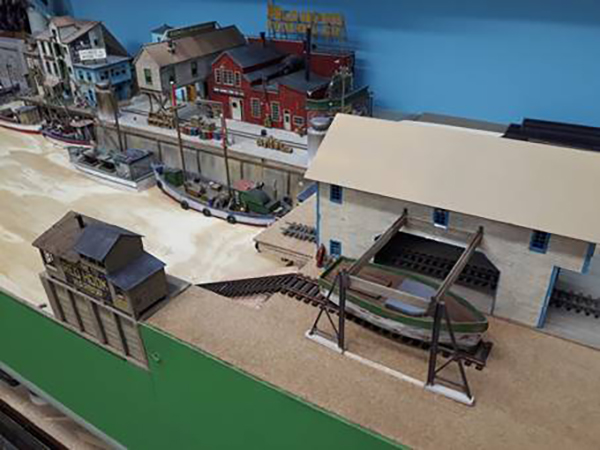
A fully equipped workshop inside to enable all sorts of repairs to the boats brought in.

model train workshop

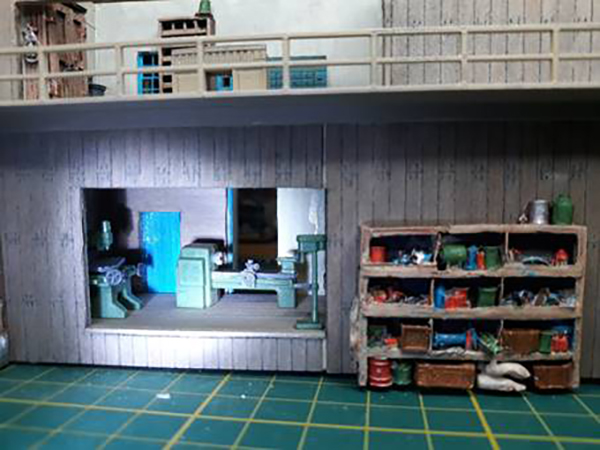
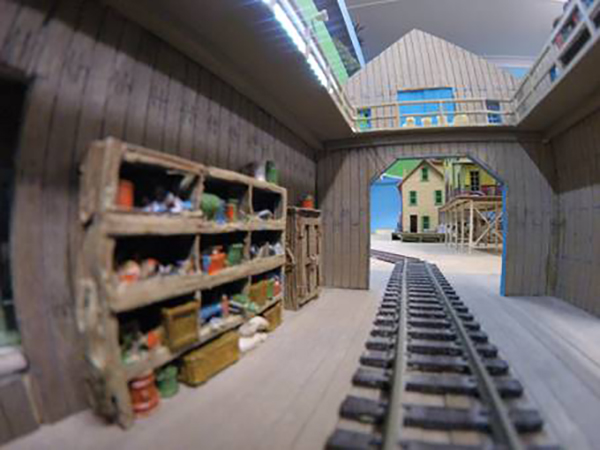
Here is another inside view of the repair shop. The rail line brings in all types of equipment needed for the boat repairs as well as bringing in small boats for repairs.

model train engine shed interior

An overall view of the harbour with the buildings correctly placed. The green base coat is just for effect. It will be covered with plaster and then painted the correct colour and the realistic water will be poured last.

model railroad harbor layouts

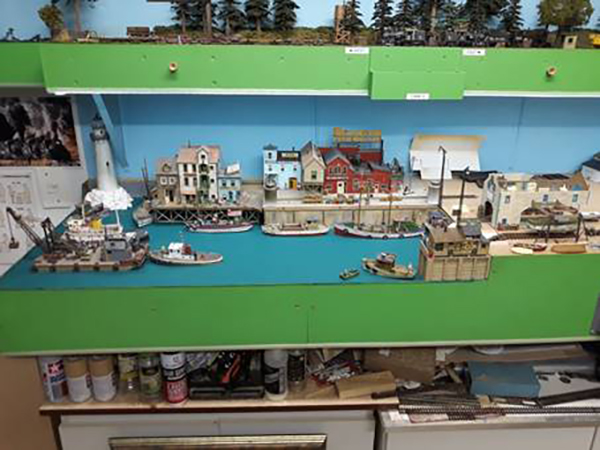
There is a working marker buoy with a flashing red light at the entrance to the harbour.

model railroad harbor layouts

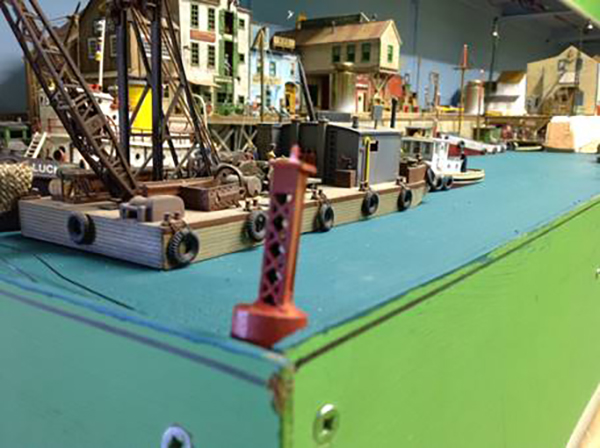
The boat ramp with a boat dolly.

model railroad harbor layouts

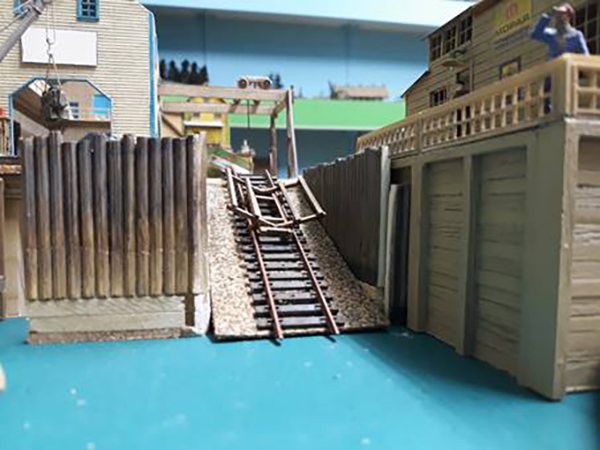
The parts below the pilings will be hidden once the plaster and water is in place.

A dockside crane used to load equipment from the dockside.

model railroad harbor layouts

A close up view of the harbour masters office with him inside looking out across his harbour.

model railroad harbor layouts

The street lamp was repaired outside the bar and now patrons are waiting for it to open.

model train LED light

After eight hours of electrical work on the lighting, all the buildings with full interior detail and lighting all done.

model railroad harbor layouts

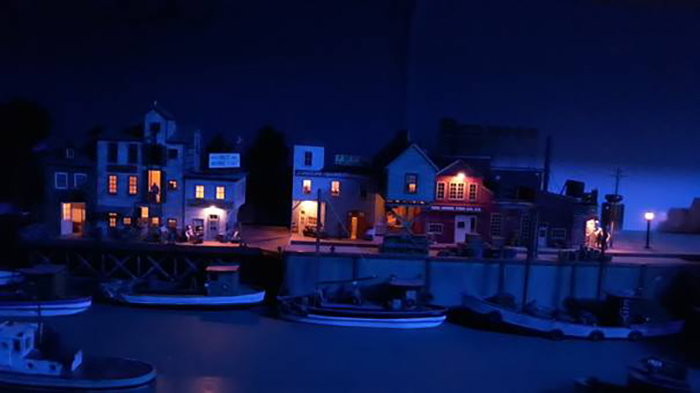
The photo above was taken with only a blue ceiling light and a timed exposure. It gives the effect of a full moon night.

There is still a lot of work to be done here. I have to sort out wiring circuits for the different buildings, boats and boat repair shop which will have seven lights inside and outside of it.

The lighthouse works but I need to find a circuit that imitates a revolving light. At the moment, it just comes on and off at short intervals.

Then I will connect the harbour to the rest of the trackwork on the lower level of my double deck layout.

Brian”

A huge thanks to Brian for adding to the model railroad harbor layouts – a wonderful update. I do love seeing how your layouts progress. Stunning stuff.

You can see more of Brian in the Hall of Fame.

That’s all for today folks.

Please do keep ’em coming.

And if today is the day you get started on your layout, the Beginner’s Guide is here.

Best

Al

PS Latest ebay cheat sheet is here.

PPS More HO scale train layouts here if that’s your thing.


Model railroad castles

Rob’s been in touch with something that’s always fun: model railroad castles!

“Hi Al,

I have said from the beginning as I built this new Farland layout I wanted a ruined castle on it. I will also be starting on a ship for my harbour next month.

The castle was built from Elmer’s foam board with pieces cut with a craft knife in to the basic shapes, then covered with drywall compound about 2-3 mm thick. When this very soft plaster set up or dried, I carved the stone shapes with an old dental tool purchased on eBay. After scoring the grout lines and vacuuming off all the dust, I painted the lines with a very small brush using a black wash watered down.

When that dried, I sanded it lightly leaving fairly crisp edges. When it was thoroughly cleaned again I gave it a wash in a watered down sepia color to represent weathered lime stone. All in all I am very pleased with the result and once bedded into my layout with access stairways and small platforms, I think when done I may add a couple knights in armor with their horses demonstrating to a small crowd.

Thank you so much for all you do.

Rob”

model railroad castles

model railroad castles

model railroad castles

model railroad castles

model railroad castles


Latest ebay cheat sheet here.

Thanks to Hall of Fame member, Rob. Stunning stuff:


Now on to Yale:

“Al:

As John’s Gardenton Model Railroad shows, the devil is in the details. When folks come to visit our railroad they always comment on the details we’ve added in these little scenes.

Yale”

n scale scene

n scael scene

n scael scene

n scael scene

n scale

A huge thanks to Yale and to Rob for showing us some more model railroad castles.

Just loved Rob’s video – watching him build the castle was a real joy.
That’s all for today folks.

Please do keep ’em coming.

And if today is the day you get started on your layout, the Beginner’s Guide is here.

Best

Al

PS Latest ebay cheat sheet is here.

PPS More HO scale train layouts here if that’s your thing.


HO shelf layout – Peter’s

Peter’s been in touch again with his HO shelf layout.

(Last time, he showed us how to add loco liveries.)

This time he talks us through his layout:

“1. Thought you might be interested in the following….

This is the smaller of two layouts I have… the other in an attached double garage…mainly German..

———————————

Notes:

Bedroom layout…

What one can ‘cram’ into a 11’ x 15’ ex. bedroom..

The layout has two layers… and three tracks…

The inner track runs only on top level

The two outer tracks run on both layers…[with a double gradient at one end]

This makes them approx… 104’ long each]

Why ?….One can easily run 2 trains on the same track, with a good interval between trains..[about 80 seconds]

At a push 3 trains..

The trains approximately 9’ long [loco + 8 carriages or equivalent trucks]

The layout is Swiss/Austrian….H/O….digital sound..[in most cases]

And not reprehensive of anything special ‘location wise’..

The lighting bought on E-Bay [China] at a fraction of the cost from the UK..

The catenary is home made [Very low cost]…The posts and ‘cross wires’… just for looks..

longitudinal wiring was not done…gets in the way of cleaning the tracks..

and I have 2 cats… not a good combination..

2. Just an interesting point on model railway insurance…

I am currently with the ‘Halifax’…

Who have done in the past an ‘unlimited’ insurance on the house and contents… [including the model railways…]

But the attached garage was limited to £2000…

Even though 11 inch cavity walls [no windows] and concrete roof [no roof lights] and electrically operated main door with it’s own alarm system… and PIR’s connected to the house alarm system inside..

All the other companies I contacted, did not want to know [insure] the railways at all..

So I had to take out a separate insurance for the garage [Magnet]… who specialize in model railways..

This year however….The ‘Halifax’ changed it’s policies….now the attached garage contents are ‘unlimited’ and the policy was £100 cheaper…

Regards

Peter”

HO shelf layout track plan

HO shelf layout

HO shelf layout

HO loco


HO shelf layout

HO shelf layout

HO shelf layout

HO shelf layout

HO shelf layout

HO shelf layout

HO shelf layout

HO turntable

HO shelf layout

HO shelf layout

HO shelf layout

A huge thanks to Peter for sharing his HO shelf layout.

I get quite a few mails pointing out cats and railways don’t mix.

But sadly, I get a lot more mails from folk who have lost their layouts, mainly due to flooding. So I thought Peter’s commments on insurance were worth talking about.

If anyone has had any good or bad experiences about insuring their layouts, please do leave a comment below. I’d love to hear from you.

(Or if you just want to comment on the layout, that’s fine too.)

That’s all this time folks.

Please do keep ’em coming.

And don’t forget the Beginner’s Guide if you want to take those first steps for your own stunning layout.

Best

Al

PS More HO shelf layouts here.


Latest ebay cheat sheet here.