Jim’s HO layout video update

Jim’s been in touch again – his last post is here.

“Hi Al.

Jim from Cape Breton, Canada again.

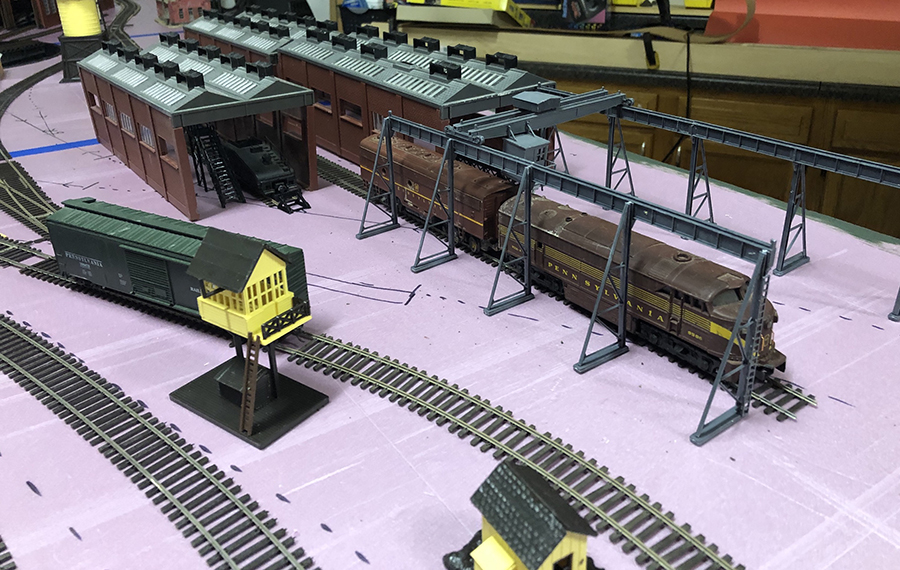
Here’s Part #3 of my model train layout. Using a Canon PowerShot SD960 IS Digital Elph camera in video mode, I originally recorded,about 4 years ago, a DVD of approximately 1 hour in length for my 2 grand sons (one then 8 & the other then 12) who live in Ontario, a province in Canada, which is about 1700 km from where I live.

I have since divided the video into 10 parts to keep them “short & sweet.” In your last posting of Part #2 of my layout, there were 2 questions regarding the layout & I will answer them here.

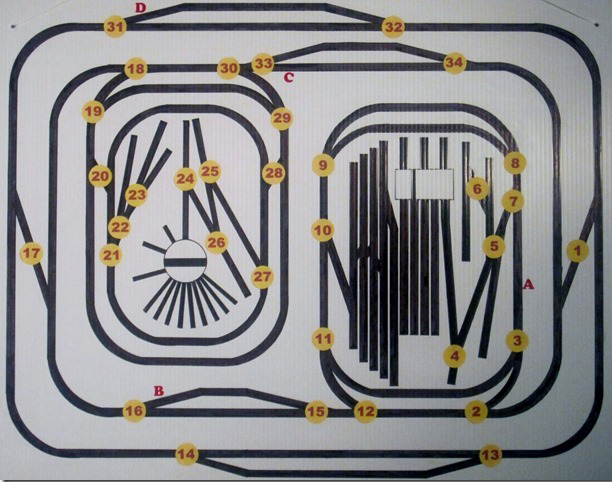
Question #1: Do I have a copy of the track plan? Answer: Yes,there is a track plan picture at the end of this posting. The red numbers are turnouts & the red letters are magnetic uncouplers.

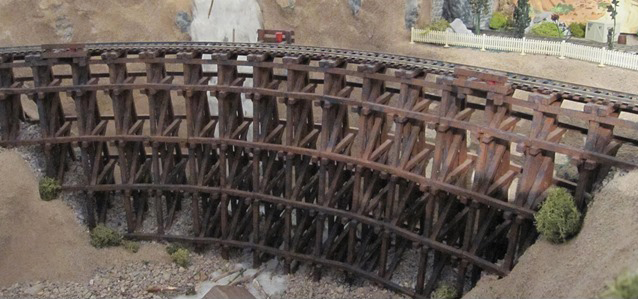
Question #2: Is the curved wooden trestle made from a kit? Answer: No, I made it by first cutting, with a band saw, short pine boards into ¼” x ¼” strips to use for the supports & cross members of various lengths which numbered over 500 individual pieces that were then painted flat brown.

I assembled the trestle upside down on my work table, which enabled me to sit down during assembly & it took approximately 3 weeks of evenings, because of the tedious job of gluing, clamping & drying all these pieces together.

The final assembly was surprisingly strong & was then placed in the finished & waiting quarry & gorge (just like in the real world) in front of the also finished waterfall.

The actual dimensions are 28” long by 9” high & the HO scale measurements are: 204’ (63m) long, 63’ (19m) high, 12’ (4m) wide at the top, 29’ (9m) wide at the bottom. This is by far the largest scratch-built object (other than the mountains) on the layout.

I invite any questions regarding the layout & would like to thank both you, Al, for your postings which I always find very interesting & informative & to all your viewers for their support & interest.

Keep up the great work all you model railroaders!

Jim.”

HO treack plan

HO trestle bridge


Latest ebay cheat sheet is here – still updated everyday.

A huge thanks to Jim for the next video installment and kindly answering our questions.

Hope you enjoyed the video as much as I did.

That’s all this time folks.

Please do keep ’em coming – and don’t forget the Beginner’s Guide is you want to get going on your layout. Why let everyone else have the fun?

Best

Al

HO switching layout track plans

Bill’s been back in touch – he’s added to the HO switching layout track plans on the blog.

If you missed his last post, it’s here.

What’s clever about Bill’s module, is that he’s designed the second module so it can plug in at either end, for maximun switching fun.

If he get’s bored, he can unplug it, swap it round, and play with the different switching combinations. Genius!

“Hi Al,

I continue to be in your debt. Having come across your site months back and seeing everyone’s work really motivated me to get started again.

You don’t need the dream layout room to build and have fun in our modeling hobby. You just need to start.

It’s the day after Christmas as I write this and my work has slowed down a little so I took over the dinning room table and started to build a number of kits I had for my engine yard, shops and yard.

Some of the kits are almost as old as I am and have been in storage far too long.

I now have all major structures positioned where I want them. All need painting and weathering but that can come later.

I also have all track located and cut and fitted. I’ve run rolling stick over every track to ensure I had no derailments. The track is code 70 so I’m going to use semi-Scale wheels.

Next step is to mark our locations for everything using a red marker and then start to glue the cork down. Once that is done I’ll start on the track.

I have some old track and switch’s I’m going to practice my very rusty soldering skills on. I will add feeders near rail joiners in most cases and once all is set and tested I’ll solder the joiners as well.

I’ve plenty to do for a while!!

Bill in Virginia”

modular train track

ho switching layout track plans

ho switching layout track plans

ho switching layout track plans

ho switching layout track plans


A huge thanks to Bill for adding to the HO switching layout track plans – there are quite a few on the blog now.

Here’s one of Bill’s earlier posts if you want to see the progress: 4×8 layouts for model trains.

It’s wonderful to see his layout coming along. He’s right about one thing too: making a start is what this hobby is all about.

That’s all for today folks.

Please do keep ’em coming.

And if today is the day you get started on your layout, the Beginner’s Guide is here.

Best

Al

PS Latest ebay cheat sheet is here.

PPS More HO scale train layouts here if that’s your thing.


Peter gives his engine a paint job

Peter’s been in touch again. His last post is here.

“Just thought about how much I got done this past year.. If you could post these it would be most appreciated.

pic 1- loco I started with

pic 2- got it down to brass bones and added WP standard freight things; new pilot, hand rails, horn arrangement, radio antenna, etc.

pic 3- final

video of it moving..

Thanks, Al

Peter”


Latest ebay cheat sheet is here – goes silly at this time of year.

A huge thanks Peter. Amazing stuff – always love seeing his updates – there’s been quite a few now. It’s a joy to see his layout come together.

And if Peter inspires you, don’t forget, the Beginner’s Guide is here.

Best

Al