HO scale shelf layout construction – Brian’s

Brian’s been in touch again with an update on his HO scale shelf layout construction:

“Hi Al, thought I would send a few photos of my layout taken from different ends of the layout room.

The layout is coming along nicely and must just continue with the ground cover on the rest of it (new section) Bottom level will be done at a later stage when the top level is complete. (In case of dropping things onto it while working on the top level.

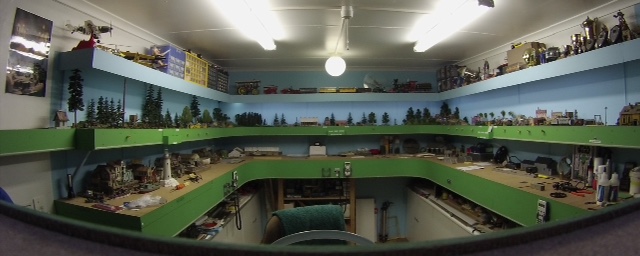
First photo is looking at the layout from the new section with the sawmill in the middle back.

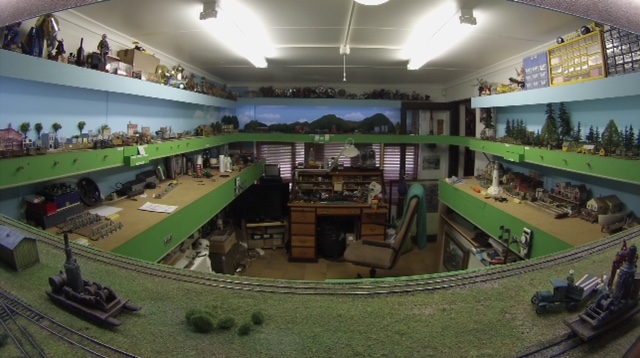
Second photo is taken from the roof of the sawmill looking towards the new section (Hillside).

Size of the room is 14 foot by 10 foot 6 inches. Layout is all HOn3. Top level is a logging operation. It will not join up with the lower level.

As seen in these photos, the top level now continues around the room. The lift out section can be seen in front of the glass door in the bottom photo on the right hand side.

Gone is the ‘U’ shaped point to point layout on the top level.

Cheers for now

Brian”

Shelf layout

HO Shelf layout

(Brian’s last post is here.)

You can see all of Brian’s HO scale shelf layout construction progress pics and narratives here:

Hall of Fame – Brian.

“Hi Al,

just uploaded my latest Work in Progress video, shows the shed I have built, the Fordhampton Loco Depot, or as we call them a TMD shed, from that kit I showed last week, also the main thing I have named the stations, picked from the many suggestions, think they fit well… Stig Halt, as my wife`s reputation at driving, she got nicknamed the Stig on Youtube , and of course Rippingdale Juction ..refers to me, always ripping up the layout at starting with changes on a regular basis…

Regards

Dave”


Latest ebay cheat sheet is here. Had a look yet?

A big thanks to Brian for sharing his HO scale shelf layout construction pics, and to Dave – both Hall of Fame members.

That’s all for today folks.

Please do keep ’em coming.

And if today is the day you stop dreaming and start doing, the Beginner’s Guide is here.

Best

Al

PS Latest ebay cheat sheet is here.

PPS More HO scale train layouts here if that’s your thing.


Dominic’s 12×24 HO scale

Dominic’s been in touch with his 12×24 HO scale layout:

“I started this project 4 1/2 years ago when I relocated to Michigan and bought a home with a basement and much more room than I originally had.

So I had a 12×24 HO scale area in the basement to do something with, as long as I didn’t take away from my wife’s storage area. A much larger area than my original 4×6 layout.

So with some planning, but with no particular track plans in mind, and wanting a little bit of everything, it was a plan as you go project in the making.

And this is what I’ve come up with so far.

It was suppose to be my winter project, but with the winters being so long in Michigan, it turned out to be my project 8 months out of the year.

The trestle bridges were all scratch built which was a challenge but the mission was accomplished.

Dominic”


Latest ebay cheat sheet is here. Still updated every day.


“Al,

I’m not what you would call an out and out cheapskate but I do look for value and I always look for another way to do things and usually come up with an acceptable solution.

Can’t say as I am doing so well with my waterfall and stream.

Nothing against Woodland Scenics as they do have some great things. However, I am committed to doing water scenes without their help. Should I surrender or are there some really great ideas out there?

Russ
Maine, USA”


A huge thanks to Dominic. An absolute monster of a layout – I loved it. It really looks like 4 1/2 years of work too. And who can help Russ?

That’s all for today, folks. If Dominic’s got you champing at the bit to get started, the Beginner’s Guide is here

Best

Al

HO scale printable scenery

Joe’s 27×10 HO scale

Joe’s been in touch again with his 27×10 HO scale layout. (If I’m not mistake, his last post is here).

“Hello,

I have been looking at all the layouts you’ve been sending, and they all feature something that is interesting.

I am sending a video of my layout which I have been building for about 3 1/2 years. It is about 90% complete. It is a 27×10 HO scale.

It features a single track main line that doubles back on itself several times to simulate a double track main line.

The passenger line features a commuter service that shares a single track in both directions.

All the landscaping was done from scratch. Much of the track is under the bench work and is accessed through three tunnel portals, giving the illusion that the trains enter the tunnels and go off to some distant point.

The below-bench track work also hides two passing sidings each for both the freight and passenger lines. These are used to alternate trains at random so that the sequence of trains differs. There is also a passing siding that is exposed to allow faster passenger trains or priority freight trains to overtake slower or non-priority freights.

There are several sections of the DCC layout that are operated manually, such as engine services, industrial sidings, and freight and passenger car yards.

But the main feature of the layout is that the freight and passenger main lines are computer controlled. I use a software application from CTI known as Train Control Language (TCL). For you programmers, it is based upon the C language.

All engine movements, sounds, signals, lighting, auto traffic lights, etc. are controlled by TCL. At any given time, up to 7 trains can run in automatic mode, and with the addition of engines being operated manually in the other sections I mentioned, the layout offers a lot of action when four operators and the yardmaster are present.

The layout was designed and built so that it could be disassembled into 13 sections. All wiring at section boundaries has Hitachi type connectors. Photos demonstrate a portion of the circuitry associated with the CTI system, which is essentially a local area network. It shows how I dealt with the varying voltage requirements of my accessories, which draw 3 volts, 4.5 volts, and 12-14 volts. Instead of installing a huge number of resistors, I simply stepped the voltage down from 12 volts for each application. This saved huge amounts of time when wiring accessories.

You will notice an open rectangle in the center of the layout. This is where the town, with automated streetcar service, is planned to be. I have not yet decided if I am going to complete this section.

Joe”

27x10 HO scale control board

27x10 HO scale controller board


PS Latest ebay cheat sheet is here. Had a look yet?

A big thanks to Joe – a huge layout!

That’s all for today folks.

Please do keep ’em coming.

And if Joe’s inspired you, don’t forget the Beginner’s Guide is here

Best

Al