HO scale single hopper coal gondola

Hemi’s been in touch with his HO scale single hopper coal gondola:

“Loading Coal Cars?

I had mentioned once I’d do this so here I am…

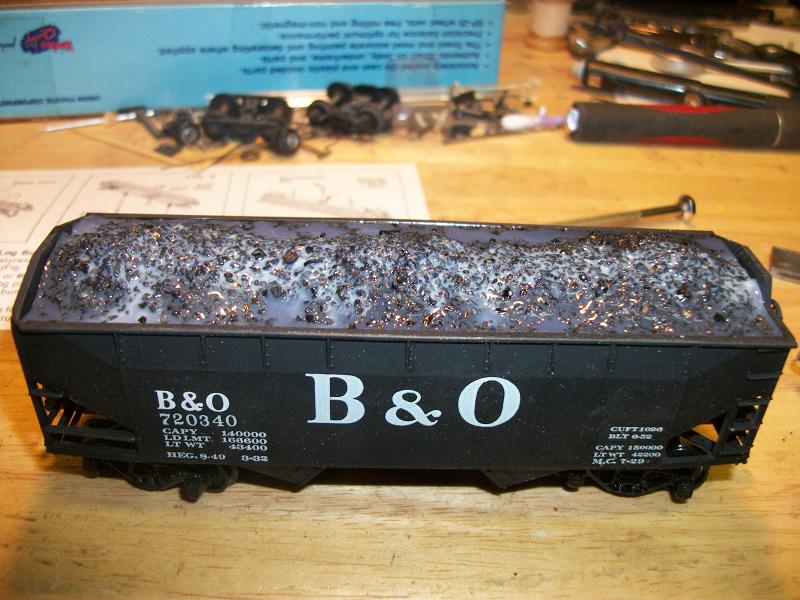
I took a Athearn 55 ton 2 bay hopper car, undecorated, and custom painted it to be a B&O hopper to match those I already have in the number series.

Then I said, I’d do a “loading” post…..

So here goes!

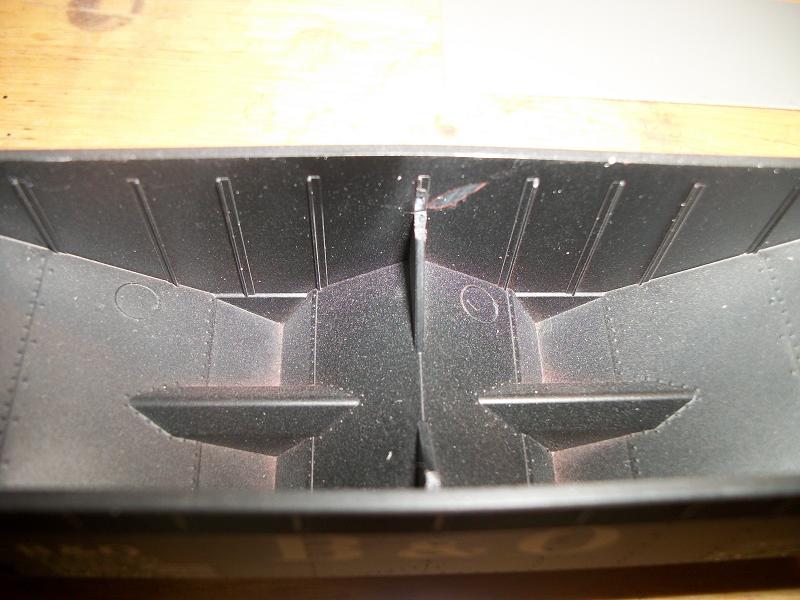
This is what the inside of the hopper looks like:

ho scale single hopper coal gondola

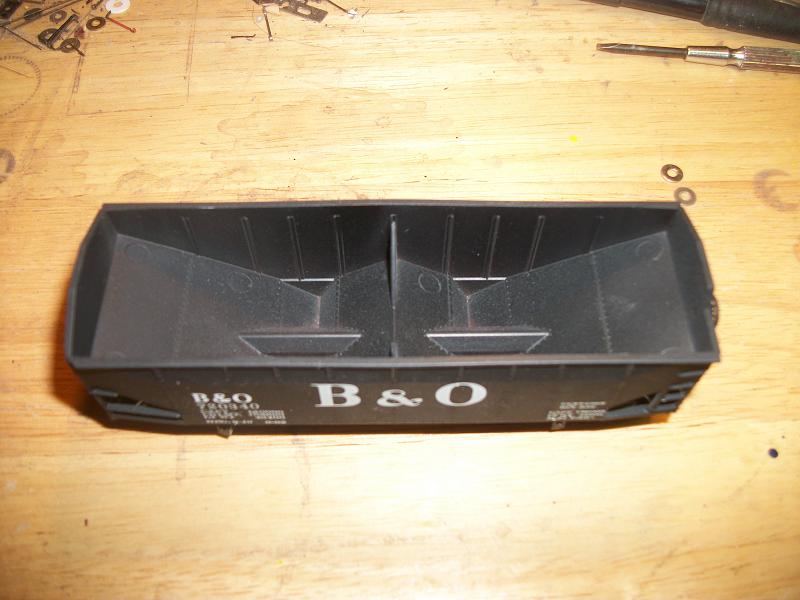
In order to follow through with what I did, you will need to cut ANY and ALL of the inner bracing thats molded into the cars body, seen here:

ho scale single hopper coal gondola

This makes it possible to add this section into the car:

ho scale single hopper coal gondola

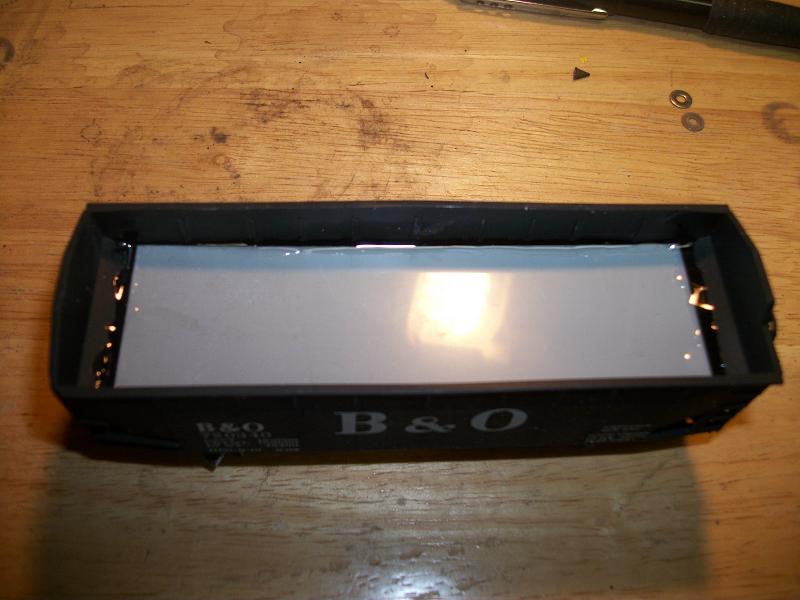
The above section MUST BE water proof around the edges of the gray plastic, so that when the “coal” is added not so much but when the “wet water” is added to keep it from going under this plastic as it will take forever and a day to dry, even with the 50% alcohol.

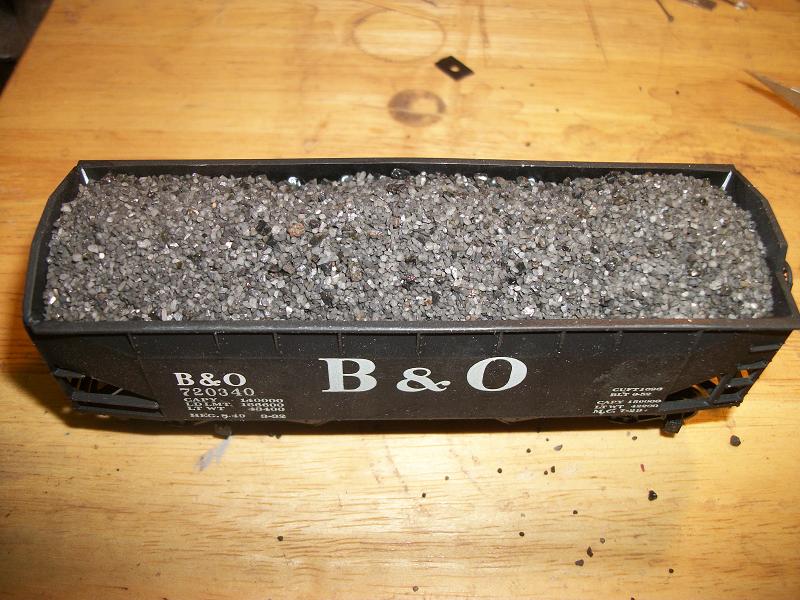
Then you will need to add the coal to the gray plastic, piled as it would look being loaded by a coal tipple. That depends on each persons taste of “looks” of the load going into the car, mine looks like this:

model railroad coal truck

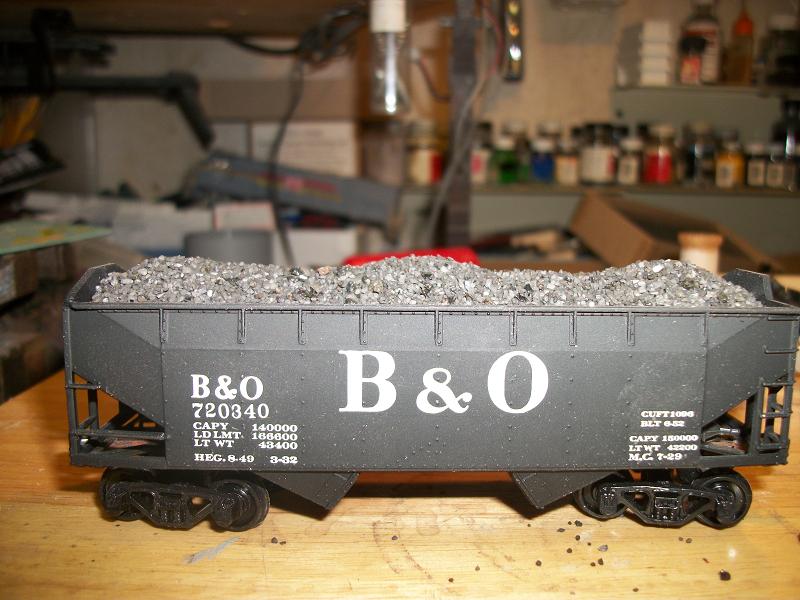
A “profile” view of the load:

model railroad coal truck

Now being “happy” with the profile of the coal load, you need to soak the “coal” load with wet water solution, 50% alcohol, 50% water. NOT to allow it to puddle, but to be seen “wet”.

Once it is wet, add in your “ballast” glue solution, mine is 1/3 glue, to 2/3’s water. I use this also on ballast work on track!

This would look like this:

This is the first “coat” of glue…..


Allow to settle or “evaporate” the alcohol, and water to leave the glue to dry a while, then BEFORE its dry completely, add another “coat” of glue…. As that first application is/has settled in the lowest part of the load. BUT, is not dry completely, thats when the next, (second) application of glue will adhere to the first…..

This second application would look like this:

ho scale single hopper coal gondola

Then just like the first application of glue, you will need to do this again! I have done 3 applications in the past and it seems to have been all that was needed to not be able to see the glue when dry! You want the coal to look as real as possible!

This project, is not done, I’m waiting for the second application of glue to dry some to add another before I hit the bed for work tomorrow This will be the last application….

Once that application is dry, I’ll get pictures of the final product!

And YES, this is the SAME “coal” that was bought from Jo-Anne Fabric, OR Micheals Craft Store, for 32 ounces, for around $3.00! Decorative Black Sand…..

I have done ALL my HO scale single hopper coal gondola loads like this! (Except of course the empty ones!)

Enjoy!

Hemi”

Now on to Art who has a small problem:

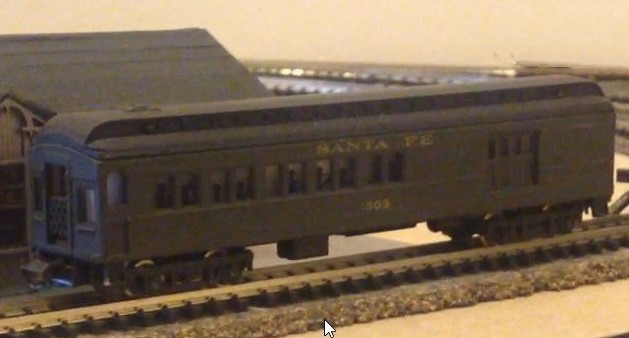
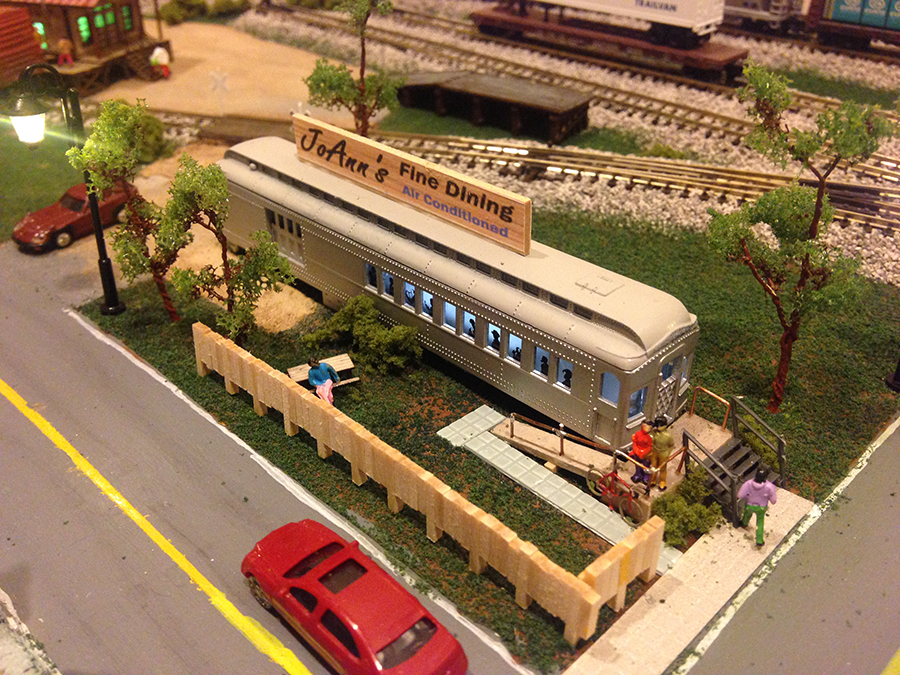
“Here are some of the pics of my layout and the one at Hobby town.

I feel the polarity is the problem at the crossing. I feel I need to insulate part of one of the legs on the crossing. Thanks for your advice.

Art”

A big thanks to Hemi for sharing his HO scale single hopper coal gondola. And who can help Art?

Or would it be quicker just to take the plunge with the Beginner’s Guide?

That’s all for today folks.

Please do keep ’em coming.

And if today is the day you get started on your layout, the Beginner’s Guide is here.

Best

Al

PS Latest ebay cheat sheet is here.

PPS More HO scale train layouts here if that’s your thing.


Model train incline construction

Here’s a thorny issue that comes up quite a lot in my inbox – model train incline construction.

A big thanks to Bruce for the below. (His last post is here.)

“Al,

Some time ago, I sent a graphic with explanation on selecting the minimum radius for two parallel sets of rails. Some appreciative comments were added.

I have noted that in several viewer responses that there may be some difficulty determining rail length for various %slopes.

I thought perhaps that some users might have an easier solution by using a graph. Therefore, I am providing the following with example of usage.

Rise and Run

%slope (percent slope) is determined by using the formula

RISE X 100 = %slope

RUN

The graph is graduated in UNITs. One unit may be any length measure base.

This would be determined by the measure the user decides to use; mm (millimeters), cm (centimeters) or inches.

Of course one could use Yards, Miles, Light Years or any other.

On the graph are lines representing typical %slopes plotted for determining either RISE or RUN.

Or, knowing the RISE and RUN, the %slope may be found.

Assume the user is into HO scale. Then on both the vertical (RISE) and horizontal (RUN), the Unit 1, 2, 50, 100, etc, might be labeled as cm (centimeters).

First one must determine the minimum height to be used for clearances of one track over or under another.

Select the tallest Locomotive or Car and measure its height in the cm.

Add additional measure for assurance of clearance.

I.e., tallest item might be 5.0 cm.

Then add to this using this measure, the height of roadbed and rails; 0.5 cm is assumed for example.

Then 5.5 cm would represent the minimum amount of RISE to be used with the desired %slope to determine the amount of RUN required.

Now one can determine whether he has enough real estate to accomplish the desired percentage slope.

Example referring to the accompanying graph for model train incline construction:

Note that the RISE graph values range from 0 – 2.0 and the RUN values range from 0 – 100 UNITs.

Note also that the graph is linear for both RISE and RUN.

Minimum clearance height of 5.5 cm. This value is then equal to 1 UNIT on both RISE and RUN.

Example #1: Determine amount of RISE for given RUN and any %slope.

Select the desired RUN based of available real estate.

Assume RUN available to be 440 cm.

440 cm divided by 5.5 cm equals 80 UNITs.

Assume maximum clearance RISE allowed to be 11 cm or 2 UNITs.

Then search RISE value for each crossing value on the %slope values vertical to the 80 cm RUN value.

For this example, the 1.5 %slope provides a 1.2 UNIT RISE for the 80 UNIT RUN., or 5.5 X 1.2 = 6.6 cm minimum.

Also, using the 80 UNITs RUN, find the %slope value using the 11 cm RISE line. The crossing is found to be the 2.5 %slope line. One might consider this to be the steepest grade for his train to successfully climb with a desired number of cars coupled.

Example #2, the 3 %slope is desired for the 80 UNIT RUN. Find the required RISE (height) for this %slope.

The graph is linear; thus, the 3 %slope RISE would equal 2 X 1.5% RISE = 2.4 UNIT RISE or 2.4 UNITs X 5.5 cm = 13.2 cm.

Example #2: Determine amount of RUN for given RISE and SLOPE.

Assume RISE = 1.2 UNITs and SLOPE = 2%.

Search the 1.2 UNIT RISE value horizontal to the intersection of the 2% SLOPE line.

The RUN would be down from this intersect to the value of 60 UNITs.

The amount real estate required would be 60 UNIT RUN X 5.5 cm = 330 cm.

In like manner, one could determine %sLOPE by locating the intersect of the given RISE versus the given RUN.

Of course not all measurements will coincide with any graph interest, but the use can then eyeball the desired value between any two intersects.

Al, I certainly hope this is of value to your viewers. I certainly, enjoy all the posts and comments. I also have gained some insight from many of the posts as I continue my future layout. I have a lot of work ahead. Many comments have assisted to reduce some of the work load.

Bruce”

model train incline construction

(Image is clickable)

A huge thanks to Bruce for sharing his model train incline construction. What a clever lot you all are.

That’s all for today folks.

Please do keep ’em coming.

And if today is the day you get started on your layout, the Beginner’s Guide is here.

Best

Al

PS Latest ebay cheat sheet is here.

PPS More HO scale train layouts here if that’s your thing.


HO scale diner

Dale has been in touch with his HO scale diner that looks fantastic:

“When I first started my layout, before I had made my design decisions, I saw this combination passenger/baggage car at a train show. For the exorbitant price of $5.00US I thought it might be useful.

model train passenger car

When I got it home and put it on my layout, a few problems came evident.

First off, it had a tendency to derail on anything that wasn’t straight track.

Second, it had a light inside that was so bright it made the top and sides of the car glow. The pickups for the light were putting enough drag on the wheelsets that the car barely rolled if I pushed it down the track.

Fixing it wasn’t hard. First, I took out the light and the pickup wipers entirely.

Then I removed, disassembled and cleaned the trucks.

Finally, I readjusted the wheelsets so they were in scale. Now the car rolled properly and I was left to decide what to do with it. Since by this time I had determined that I wasn’t going to be running passenger service, the car sat on my bookshelf.

Now skip ahead about 4 months and I needed a restaurant for the town. None of the kits I saw were quite right for what I wanted for the locale I was modeling. Then my eye caught the combine on the shelf and I thought it might make a fine diner. So, I pulled it apart again, painted it, installed a couple of low power LEDs in the roof (with enough resistance in the line to make them pretty dim), and reassembled it leaving off the trucks and couplers.

Addition of steps and a handicap ramp, some ground cover, bushes, trees, a picnic bench, a sign on top (it’s named for a very special lady in my life) and we have a diner in town.

ho scale diner

There are other pieces of rolling stock that can easily be repurposed: cabooses make good yard boss offices, old box cars make industrial storage sheds, a flat car makes a stage for performances in a park. The only limit is your imagination. Go wild and have fun.

Dale”

A huge thanks to Dale for sharing his HO scale diner – a wonderful example of being creative and using what you already have.

You can do the same with box cars too: Model train box cars.

Hope you can see why I love seeing what’s in my inbox each morning.

That’s all this time folks.

Please do keep ’em coming. There wouldn’t be a blog without you lovely lot.

And if today is the day you start laying track, the Beginner’s Guide is here.

Best

Al

PS Latest ebay cheat sheet is here.

PPS More HO scale train layouts here if that’s your thing.