Here’s a thorny issue that comes up quite a lot in my inbox – model train incline construction.
A big thanks to Bruce for the below. (His last post is here.)
“Al,
Some time ago, I sent a graphic with explanation on selecting the minimum radius for two parallel sets of rails. Some appreciative comments were added.
I have noted that in several viewer responses that there may be some difficulty determining rail length for various %slopes.
I thought perhaps that some users might have an easier solution by using a graph. Therefore, I am providing the following with example of usage.
Rise and Run
%slope (percent slope) is determined by using the formula
RISE X 100 = %slope
RUN
The graph is graduated in UNITs. One unit may be any length measure base.
This would be determined by the measure the user decides to use; mm (millimeters), cm (centimeters) or inches.
Of course one could use Yards, Miles, Light Years or any other.
On the graph are lines representing typical %slopes plotted for determining either RISE or RUN.
Or, knowing the RISE and RUN, the %slope may be found.
Assume the user is into HO scale. Then on both the vertical (RISE) and horizontal (RUN), the Unit 1, 2, 50, 100, etc, might be labeled as cm (centimeters).
First one must determine the minimum height to be used for clearances of one track over or under another.
Select the tallest Locomotive or Car and measure its height in the cm.
Add additional measure for assurance of clearance.
I.e., tallest item might be 5.0 cm.
Then add to this using this measure, the height of roadbed and rails; 0.5 cm is assumed for example.
Then 5.5 cm would represent the minimum amount of RISE to be used with the desired %slope to determine the amount of RUN required.
Now one can determine whether he has enough real estate to accomplish the desired percentage slope.
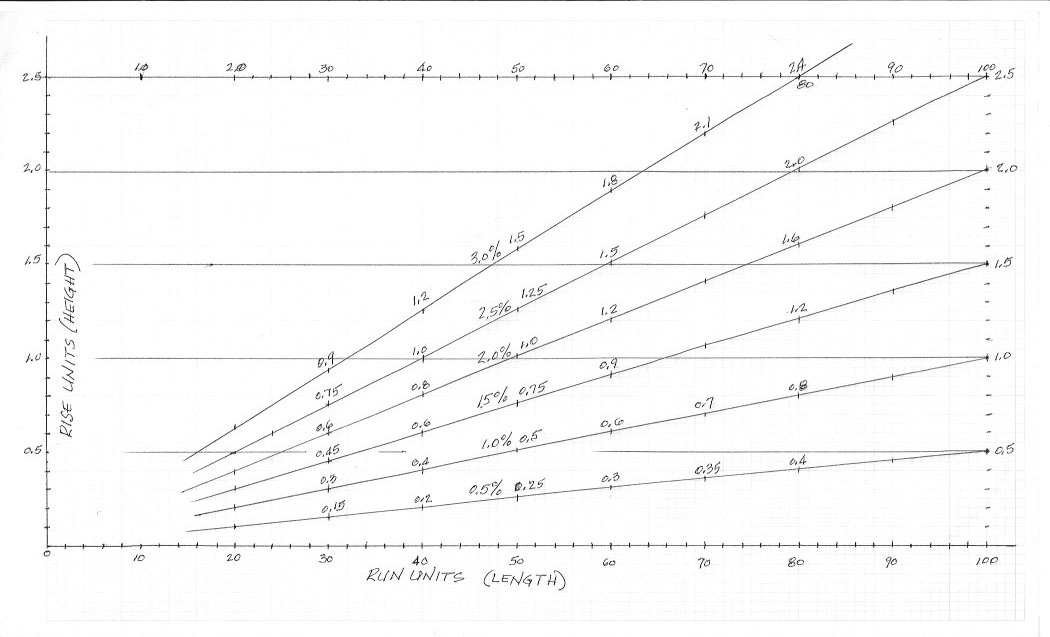
Example referring to the accompanying graph for model train incline construction:
Note that the RISE graph values range from 0 – 2.0 and the RUN values range from 0 – 100 UNITs.
Note also that the graph is linear for both RISE and RUN.
Minimum clearance height of 5.5 cm. This value is then equal to 1 UNIT on both RISE and RUN.
Example #1: Determine amount of RISE for given RUN and any %slope.
Select the desired RUN based of available real estate.
Assume RUN available to be 440 cm.
440 cm divided by 5.5 cm equals 80 UNITs.
Assume maximum clearance RISE allowed to be 11 cm or 2 UNITs.
Then search RISE value for each crossing value on the %slope values vertical to the 80 cm RUN value.
For this example, the 1.5 %slope provides a 1.2 UNIT RISE for the 80 UNIT RUN., or 5.5 X 1.2 = 6.6 cm minimum.
Also, using the 80 UNITs RUN, find the %slope value using the 11 cm RISE line. The crossing is found to be the 2.5 %slope line. One might consider this to be the steepest grade for his train to successfully climb with a desired number of cars coupled.
Example #2, the 3 %slope is desired for the 80 UNIT RUN. Find the required RISE (height) for this %slope.
The graph is linear; thus, the 3 %slope RISE would equal 2 X 1.5% RISE = 2.4 UNIT RISE or 2.4 UNITs X 5.5 cm = 13.2 cm.
Example #2: Determine amount of RUN for given RISE and SLOPE.
Assume RISE = 1.2 UNITs and SLOPE = 2%.
Search the 1.2 UNIT RISE value horizontal to the intersection of the 2% SLOPE line.
The RUN would be down from this intersect to the value of 60 UNITs.
The amount real estate required would be 60 UNIT RUN X 5.5 cm = 330 cm.
In like manner, one could determine %sLOPE by locating the intersect of the given RISE versus the given RUN.
Of course not all measurements will coincide with any graph interest, but the use can then eyeball the desired value between any two intersects.
Al, I certainly hope this is of value to your viewers. I certainly, enjoy all the posts and comments. I also have gained some insight from many of the posts as I continue my future layout. I have a lot of work ahead. Many comments have assisted to reduce some of the work load.
Bruce”
(Image is clickable)
A huge thanks to Bruce for sharing his model train incline construction. What a clever lot you all are.
That’s all for today folks.
Please do keep ’em coming.
And if today is the day you get started on your layout, the Beginner’s Guide is here.
Best
Al
PS Latest ebay cheat sheet is here.
PPS More HO scale train layouts here if that’s your thing.


Just as important as the percentage slope is the transition curve at top and bottom of the rise. This needs to be as smooth as possible else you risk lifting a wheel set as you enter or crest the gradient.
Gosh! That looks complicated. Does it have to be?
Thanks Bruce, I am still in the planning stage and wonder what is the optimal %slope that trains will operate smoothly? I will be modelling in HO and plan on a early 50s era. (Mostly steam)
Also don’t forget the thickness of the overhead bridge/structure when calculating rise.
Bob in BC
No it doesn’t have to be. Use one of the track design packages. I use SCARM which constantly calculates the rise as you lay the track on your screen.
That’s a brilliant system for incline calculation, mine was a little more basic, I used the really old Triang incline piers and doubled the distance, adding extra piers with a shim underneath to give me a more gradual slope, as I have an outdoor line this is fairly critical as the slightest damp and loco’s will slip (inclines are supposed to be a no! no! in the garden)
I do have a couple of quick videos if they’re of interest.
the question on inclines was not fully answered … the maximum incline should not exceed 4% … and ideally a 2% incline would be best if you adequate space for the longer run required …
HO may do a little better than N, and locos with traction tires do better than those without. Generally speaking, you want to model in the same grades as occur in real life. On U.S. Mainlines, Sherman Hill is recognized as the steepest at around 1.7%, letting you push to 2.
On my first layout, I did a bit of research and found there were 5% grades on some mountain railroads and assumed my equipment could handle 3%. Not with any cars attached!
Also, if you’re running vintage equipment, some doesn’t have traction tires and some locomotives (Atlas in N Scale is poorest in my experience) have few driving wheels. The Atlas equipment I’ve acquired struggles with anything over 0%.
I apologize for not having included a caution concerning the gradual change in rail slope at the beginning and end of the transitions. That, as noted by the first comment, is of upmost importance and MUST be taken into account.
Also, Bob mentioned that the overhead bed and rail thickness should also be included.
Also, my computer uses spell check and I had to edit this a couple of times. One error is still visible. About 2/3 way down the following:
“Then search RISE value for each crossing value on the %slope values vertical to the 80 cm RUN value.” This should have been 80 units RUN value.
Thank you for the kind comments
Bruce SC USA
Gosh that seems a lot of calculation, Sure, start by seeing what’s the tallest thing you’ve got to get over, and see how long you have to make the climb in, but then you can just set up some plain track propped on a bit of timber raised to the same height one end over the same length and see what your engines will pull up the slope. Revise the plan or the train lengths until happy. Bingo! More fun anyway.
Don’t forget, if you haven’t got room to climb high enough, maybe you could lower the track under the bridge a smidge. The poster at 12:00 is absolutely right about needing a bit of transition top and bottom, we had one loco on my son’s railway where the pony truck shorted out under the cab floor when coming onto the grade, sorted out with milling a little floor away and lining the recesses with thin plasticard. Also, remember it’s harder to pull a train round a curve, don’t assume your loco will pull as much on a curve as on a straight.
Rod
I would generally think in N scale that to elevate by 1 inch would take 1 foot although the curve at the bottom & top would of this elevation would be very gradual, perhaps the 1st & last foot would only elevate half an inch !
Some additional points from hard experience: you can get more “run” by curving the track, but the curve adds more friction so the beneficial effect is pretty much lost. If you put a magnet on the bottom of your loco, and lay the track on a steel plate, the increased adhesion will help it haul more up the hill. But it will also pick up all the lost screws and track pins and anthing else magnetic!
A little 0-6-0 tank loco can pull one or maybe two coaches up a 4% grade. The little Adams Radial can only manage one.
You better figure on only pulling the fancy brass track cleaner down the grade! To get it up takes two heavy little American style tanks. Two 0-6-0 PT locos won’t do it.
But it gives you a reason to use a banker engine to help get trains up the hill, which is fun once or twice, if not much fun on a continuous basis!
Hey guys another way to measure incline is to take 100 inches – which is just over eight feet – ((12 times 8 equals 96 )) and go up one inch ==is a one percent rise.
In fifty inches you rise up two inches, you have a two percent grade
In fifty inches (just over four feet) you go up three inches = you would have a six percent grade ( or rise) = ((that is getting real steep )) and you probably do not need that incline. No HO or N scale Locomotive will ride that STEEP unless it is a cog railway.
To shorten one measure, you double the other measure
Another way of thinking is to have you pull an empty wagon up a hill. Usually there is no problem.
Now at the bottom of the hill again, place a load of cinder blocks in the wagon, and go up the same hill. Either you need help pulling the load (I.E. a friend to help you or another locomotive to pull the cars) OR YOU CAN LESSEN THE LOAD UNTIL YOU CAN GO UP THE HILL. That is called doubling the hill with half the load first and then getting the remainder and going up the hill again.
This made something I previously understood very confusing.
If you want to run just about anything up your grades, stick to 2%. If you are willing to reduce the length of your trains go 3%, but in the end you’ll probably regret it. Model trains especially steam locomotives cannot climb 3% with much load at all. I use the foam inclines for perfect climbs, but even then, it must be perfectly flat when you lay your foam inclines because irregularities will be telegraphed up through the foam to the track bed. The bump created could be a 5% incline and your trains will stall. Rob McCrain Farland Howe
Great info for everyone!!
keep em runnin fellas
stjohn in long beach calif
I don’t mean to be picky, but if 1″ rise in 100″ = 1 %, 2″ rise in 50″ does not equal 2%” rather it equals 4%. The real slope for 2% would be 2″ rise in 100″ of run. The constant is 100″. In 50″ to rise 2 % would be 1/2″. David
Brilliant work. Just one major discovery I made on inclines – The maximum incline your loco’s will pull is considerably less if the track is not completely straight. I had a slow S bend on one of my inclines and the wheels slipped on just about every loco when pulling several carriages. After much deliberation, I realised that it was due to the fact that as the driving wheels are on a solid axle, when they go around a curve one wheel (or both) has to slip so reducing the grip. As soon as I changed my layout and straightened the track on the incline the loco’s all went up with no problems.
Bruce, your graph as the simplest way to illustrate per cent grade. However, check your graph. The 3% line is slightly higher than it should be. At 50 units run it should intersect the 1,5 inch rise line. As shown it intersects the 1.6 rise line.
Great discussion, I have been struggling with my steam locos making a 2.5-3% grade on my layout. Needed to double head to pull a string of cars.
Now I know that this is not unusual. from now on I will leave one of two cars back at the yard. Thanks for the discussion, Phil G.
Hi guys, I love to read about what you are doing. Thanks a bunch. For me , i run my rails flat. All my stuff is currently in boxes , but if i ever resurrect it. It will be two tiers, each one running flat. I have some beautiful o guage stock. generally ,the biggest, heaviest , most elaborate and longest unit ( like an ALCO PA with 2 power units and 4 Sreamliner cars run on a large oval/ rectangle (or such ), out or around the perimeter. . i set it to run continuously and about at one speed. The other units 2 or 3, run on the second tier platform of some irregular shape. These intertwine , in and out avoiding scenes of interest. That’s where the ACTION is. ie Passenger stations road crossings, signals ,sidings, etc. Can’t you just imagine the layout?
OH what fun IT is. Enjoy with me. Regards to U all, Bill
Re 6:29 PM. You are correct about the 3% line. The line is incorrect, but I believe the noted rise values on that line are correct.
One can easily Copt the graph and print for filing.
Thank you for you correction.
Bruce
I put in the gravel track bed for my outdoor G scale layout last summer. I took my 4 foot level and added a 1.2″ spacer block to one end (48″ X .025 = 1.2″). This is for a 2.5% grade. For my 2 foot level it was 0.6″ (24 X .025 = 0.6″). As long as the level showed the bubble in the center then I was holding a 2.5% grade. I suppose you can be more exact on an indoor layout but this seemed to work well outdoors. I plan to use this same method when I start putting down track this summer.
Cary in KY
I just keep the angle under 2% for short trains on mains Only mining, logging or coal yard dumping get steep. Radius change, is not my preferred choice at incline point changes.
All the talk is about climbing a vertical grade. What about the decent down? How do you handle the clank-clank of run-in of the cars coming down grade?
The person that referred to the curves leading into and out of a grade. It is not a transition curve it is a vertical curve. I guess you can use the term transition in model railroading same as easement is used instead of spiral for leading into and out of horizontal circular curves. My father first ran into the vertical curve problem building my first Lionel layout in ‘50-1. He was an excellent electrician, but not a civil engineer. One thing he did develop was the electronics to run two Lionel trains on the same track at different speeds. Today I believe it is called DCC. The problem he had was size. Back then the transistor was not available and vacuum tubes were far too big. He could not fit the system into my dummy F3 A&B units.
I would like to hear some input on the run-in.
Question: If I rise at 2:30 am and I have a 32′ run to the bathroom, will my old engine be strong enough to make the trip successfully?
Carl in Kansas
I’ve just added a quick clip of test run onto YouTube of the incline I have, as you can see I like Triang quite a bit, loads of work to be done on the railway in general once the weather gets better!
How steep is too steep? I think that was the question.
Lovely graph. Great because it works both in metric and imperial units or as pointed out SI units or banana lengths if you want.
The answer to the question “what is the ideal slope?” is of course 0% but even then as pointed out the wheels slip on tight curves with heavy trains or longer train lengths. So even 0% doesn’t allow infinitely long trains. Everything has it’s limit. (even my wife’s patience……apparently!)
Decide what your maximum train length is going to be. Get some track on a plank and try getting it to run up ever increasing slopes till it stalls or slips. That is now your maximum RUN and RISE.
You must of course bear in mind that your bearings in your stock will age and create more friction and your track will get dirtier with time and so if you conduct the same experiment with the same track and stock 12 months later you may find that it will not achieve the present maximum.
So to avoid disappointment, play it conservatively, maybe half the maximum to allow for degradation over time. If you are struggling with the problem of how to get over track B with track A in a short distance whilst hauling up 20 wagons and feel that luck and finger crossing has become part of the equation, it is probably not your best idea to date. Have a go at going back to the drawing board for another idea.
Carl in Kansas, you nailed it, everything wears out, including us, get over it and have fun, hell you will properly change it anyway .
NV BOB
the simplest why I seen is in degrees 1 ‘ of incline = 1″ rise every 12″ so for every foot of track run it 1″ rise 24″ =2’ rise 36″= 3’rise etc
Well done Bruce, I prefer the simpler things in life and work in ratios, ie 1:4
in whatever unit of measure I choose (feet/inches/cm/mm/mr) which ever, they are all the same value 1 inch in 4, 1 inch up in 4 inches run
Wayne down under in the antipodes
Further to Wayne’s comment (7:21am), here in the UK we tend to use “1 in 100” rather than “1%” and so on. This reflects what was/is inscribed on railway gradient posts, at least in the past. I have noticed percentages have crept into UK road signs over the last couple of decades; maybe this is happening on what’s left of our rail network too – I don’t know.
So Wayne’s example of “1:4” would be “1 in 4”. Don’t try a 1 in 4 railway incline though 🙂
It might just depend on what you are used to, but I find it easier to visualise 1 in 50 than 2%, as 1 in 50 does what it says on the tin (for me) – i.e. in 50 units you go up, or down, 1 unit.
As far as the maximum useable grade, experiment and see. I try to keep it gentler than 1 in 30 (3.33 recurring%?????) and choose locos and train weights to suit what works. Presumably they had/have to do that over Lickey, Shap, The Rockies etc!
Don Jennings is absolutely correct. The question has to do not only with grade but what your intention is going to be. If you’re pulling 50 to 70 cars behind four locomotives in tandem, you’re very likely not going to be going up any incline at all. Under the circumstances, you also have to be concerned about the quality of the wheels. Are they highly engineered or are they old plastic wheels from vintage cars. If you’re running long freight trains, drag and friction become a major issue. If you are still insisting on curves, inclines and long trains, be prepared for derailments!
Math, we have to do math NOW…..I thought his was s hobby. Work work…….
To Carl in Kansas, That was great. I laughed for five minutes.
My N scale railroad modeled on typical Arizona landscape (where I live) and combination deserts and soaring mountains and pine forests is modeled with realistic 5% grades which all my diesels and steam engines includind mikados and lumber hauling Shays pullung NRA weighted average 5 car consists for my shorter switch sidings without any difficulty. For longer consists I emmulate railroad reality by double heading frequently with steam assisting diesel again mimicking reality during the “transition era” between 1945 to roughly 1957. My layout includes a mountain logging operation using logging Shays and although my ideal real logging still operational railroad is the famous Cass railroad in West Viginia with 11.1% grades. I modeled roughly 5% on mine at 1 inch rise for enery 12 inches of linear run because it’s easy to remember and execute not using a helix but modeling a continuous railroad that looks, drives and feels so much like reality that people have actually asked if I had to carve out the sides of my mountains for the road bed where the rails come out of mountainous tunnel elevations to run along rim beds? WHAT a compliment!!! If you model for extreme reality and shoot more for famous Don Allens’ iconic “Gorre & Dephetid” railroad scenery it creates infinite operating joy you will never get tired of.
or you could just download a chart giving the % by just put in the run and the rise hit return or enter and your % shows up in the chart all done. the good is it’s free, very easy to do fast. no thinking on your part also the computer is incapable of making a math error
Just a quick thought. Has anyone ever built a layout with cogwheel locomotives like those used in the Swiss Alps to tackle really steep inclines? I don’t even know if this is a possibility in model railroading, but it would be fun to do if the track and locos are available. It might even make the calculations a little easier, or even outright unnecessary.
Great information and discussion. This will help me a lot with my first build.
Thanks for posting this piece. I’ve seen a couple of first-timer layouts featured on this website, which were well into construction with absurd grades. I’m sure neither of those layouts was ever completed, despite the 6-months-to-a-year of full-time work that had already been poured into them by modelers with too much enthusiasm for getting it done. They had passed over the necessary research time needed to determine if their plans were actually possible.
4% model railroad grades are the maximum allowable for powerful, well-weighted locos with tight wheelbases pulling very short trains. This is further complicated by the track they are expected to level off on. Given a locomotive’s wheelbase, even a 4% rise merging with level-grade can be asking for bottoming-out issues.
If you are in love with an extreme mountain layout concept (in HO or N scale), and the trains you will run are of less importance, then look into the (very limited prototype) Fleischmann rack-and-pinion track solution, to greatly increase the possibility for rising vertically in gaining more levels from a restricted layout space. However, don’t plan on the 23% grades that the two available loco-types can move four short cars (28-footers) directly up-and-down in a straight run.
In leveling off at the top and bottom (especially into a minimum-radius curve) your ascent rate needs to be much more conservative. I’d suggest no more than 10% on a climb to a straight-away track or a minimum-radius curve (215mm/8.5 inch in N scale). In either case, a transitional grade change of no more than 4% is recommended. You have to ease in and ease out. Overall, you should be able to climb more than twice as high (over a given length of roadbed) than with conventional track. This can translate into double the vertical-space potential of your layout.
As someone else noted, this seems to have taken something I understood fairly well and made it almost incomprehensible. I just use Woodland Scenics foam risers in 1%, 2%, or 4% grades and don’t have to do any calculations. If the 2% grade doesn’t clear the lower track in the given distance, I change it to 3% or 4%. So far no problem running 2 to 4 car trains up the inclines. which is all I plan to use on my early 1900’s era Christmas layout. Of course, I might need my Tenshodo Big Boy 4-8-8-4 to get 4 cars up up that 4% grade. 🙂
Even in real life they make mistakes. Generally 1′ in 50′ or 2% was considered the steepest for main line running, with the exceptions like Shap and the Lickey Bank often requiring pilot or bank engines.
Here in Australia, our main line over the Blue Mountains has a ruling grade of 1 in 37 or just under 3% and eight car passenger trains manage that without assistance, although the Indian Pacific, which can be 22 cars long, needs a pilot engine on the front through to Lithgow. When the Camden line was open, the tank engines hauling the mixed trains to Camden would struggle up the 1 in 27 climb to Narrellan, but prior to Easter when the monastery would hold its “Stations of the Cross”, seven coaches would be too many for the single tank engine and they used to use another engine as a banker at the rear.
I might add, that even though Australia has gone metric in regard to distance, they still use the old measurements to describe the grade on the railways, some habits die hard!
Gradients, on model and in real life, follow the same rules, keep your grade to about 2% (or 1 in 50) and you should not run into any problems. Any steeper than that and you will have to do your homework, those incline sets from Woodland Scenics cannot be beaten for building your grade. If you do not have enough real estate for the grade, maybe the line you are climbing over can be lowered as well and this could potentially save you 50% of your real estate.
Peter from Crookwell
I see lots of mistakes and complexities that are not needed for inclines. Just use the same dimensions for rise and run and divide, then move the decimal point over 2 places. Now trains are very affected by incline percentages. Rough rules, of thumb in any gauge, 1.5-1.9% desirable goal, 2-2.5% shorter trains with more pull, 3% maximum, over 3% you need help. Use a caliper to measure rise for accuracy and use a long bubble level to check layout tilt. Any train engine that just pulls a train on level will not pull any grade. Curves reduce capabilities. I use thin material for upper section base like 1/8″ plywood. Lubricate your wheels (try wd40 with silicon on cars, don’t get it on engine wheels). Remember, Train operations are very sensitive to grade both in real and in our layouts.
In real life, even wheel chair inclines are set at 1to 12 ratio. That is what I use, even when I build a house.
reply to Roger @ 5:01 pm: Yes! There are rack line models in both HO and N scale. They are made by Fleischmann who also make the rack track to go with them. They are somewhat freelanced European prototypes. They can work on some fairly steep grades – look them up to find the numbers.
I had some of the N scale ones some years ago, and they operated very reliably!