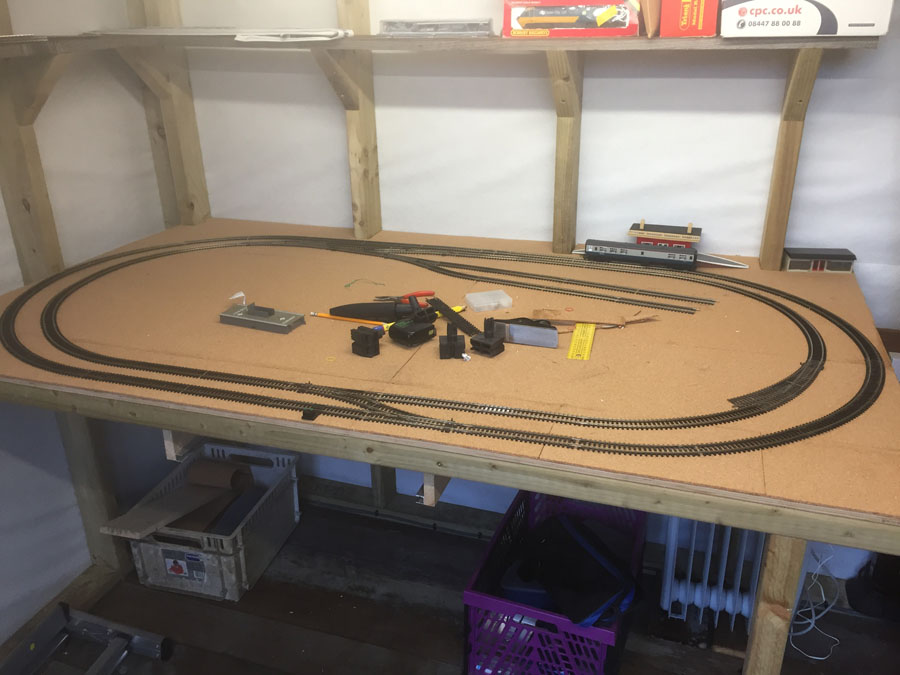
OO scale shelf layout

Ian’s been in touch with his OO scale shelf layout:

“Dear Al

As it was getting rather cold operating the layout in the garage I decided to build a shelf layout in the office.

The size is 7’ 6” by 1’ 6” and is set up over two cupboards. The layout has come after I have studied a number of layouts in the Railway Modeller magazines.

The backdrop is in Cumbria but the layout is not really based on any particular place. And yes the bus is from Glasgow. I have fond memories of going up there to see my Scottish grand parents and have always liked the trams and buses from that time.

There are seven points on the layout and have taken Dave’s advice in having surface mounted points, however I needed another transformer to operate them.

The tunnel could be considered as a fiddle area but I cannot get behind the cupboards to take full advantage. Hope you like the pictures and all the best to you and your readers of your great site.

Regards

Ian”

oo scale shelf layout

oo scale shelf layout

oo scale shelf layout

oo scale shelf layout

“Hi Al,

I have had very good progress building out the new Farland Layout. I finished the farm, I got Far Moor Village built, Far Cliff Beach with it’s Caravan Park, Car Park and camping coach are now installed. So, I am turning my attention to the completely unfinished side, the Howe Street side.

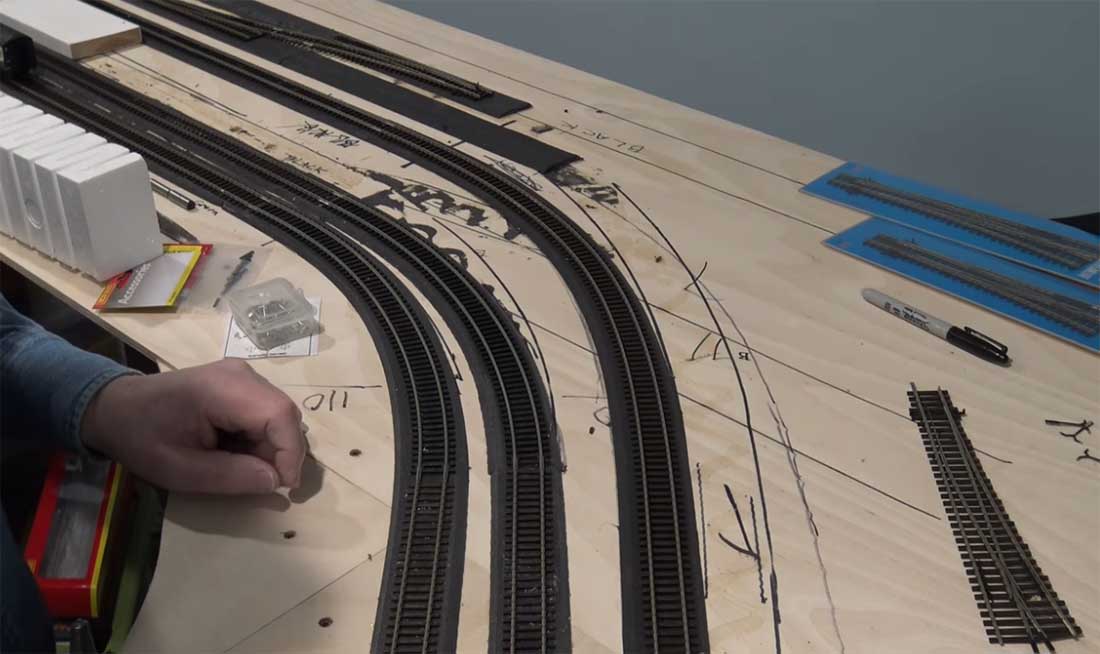
The first thing I decided needed to be done was to clean up the track going through the station. When I originally put this track in, it was a bit haphazard.

I didn’t know yet what I would be doing on this side of the layout, so the track was just laid in to get the trains through and make continuous loops. One loop each going both ways for the passenger trains. Which I am most interested in and one loop going both ways for freight. My intent has been to run the freight as a single line.

More recently I have added a crossover from the freight to the down main and another back again to the freight line in Far Moor. There are also crossovers going both ways on the passenger lines just outside of what will be the Howe Street Station (HSS).

I have installed a run around in Far Moor so that a locomotive can come around to the other end of the rake and pull it back to HSS going in reverse. By adding one conventional crossover in the Howe Street Station and using one of the others just outside of (HSS), service to and from Far Moor from HSS can be continuous. Therefore, I am removing the X crossovers in HSS.


The distance between the passenger tracks was dictated by the X overs in the beginning and now they can move closer together. That will free up more space for the freight yard and the steam shed and diesel maintenance area.

Here is a link to a short video as the process begins and I fill in the first passenger loop after ripping out virtually all the track in the HSS area.

One question that is always asked is why, as a North American, am I modeling British outline trains and scenery. The answer is that as a very young and impressionable boy, I lived in London for a time. We as a family spent a great deal of time traveling the UK by rail and it just stuck. The more I have learned, the more interested I have become.

Thank you, Al, for all you do for us in the modeling community. I think I can safely say, we all appreciate it greatly.

Rob – Farland Howe”


Latest ebay cheat sheet here.

A huge thanks to Ian for sharing his OO scale shelf layout, and to Rob too.

Hope you enjoyed Rob’s video as much as I did. He really does pack a whole load of tips in to his vids (his last post is here).

That’s all for today folks.

Please do keep ’em coming.

And if today is the day you get started on your layout, the Beginner’s Guide is here.

Best

Al

PS Latest ebay cheat sheet is here.

PPS More HO scale train layouts here if that’s your thing.


Peter’s layout update

“Wondering if you can post the progress of my O scale layout so far?

There will be an aisle behind this eventually with the back wall painted sky blue and the narrow gauge along the wall with mountains, trestles etc.

I made the control panel with led’s for the switches and painted most of the cars and built the buildings.Track work is mostly Micro engineering flex with reliable roco switches and four hand laid ones. This is standard 1/48.

Thank you,

Peter”

.


(Pete’s last post is here.)


“Hi Al,

My work in Georgia, USA is done and I’m back home after 5 months, so It’s been awhile since I sent an update on my bridge module, my attempt at back-drop painting, and an update on what I think may be the final track plan.

The good news was that I was able to bring the module in from my wood-shop, but did have to remove a door (too darned close for comfort!), and when staged in place, I found all my measurements for the rest of the plan wayyyy off, so they went in the bin.

The backdrop was painted on ½” sheetrock, primed on both sides, and then painted a nearly white flat yellow. This gave me a cheap canvas to work on. Scenic painting was done in Acrylic artist paint, dries fast and water cleanup, base colors – black, white, brown and a few greens were bought in big jars, rest in smaller tubes. Backdrops are a challenge because stuff in the foreground casts shadows on the “mountains” supposedly 20 miles away! Anyway, moving lighting around gave me some shots that are not too bad.

Over the past months I have been buying various types of conifer trees off eBay vendors. This gave me a variety of detail and sizes. I think most came out pretty well, and I think the buying of some in “O” scale gave me some dramatic pines. A vendor or 2 will get repeat business. The details on the bridges are not quite done, I added the “tell-tails” and some stuff on the decks, missing ties and all filled in. still trying to figure out telephone and electric lines.

Most of the coal hoppers on the bridge have my ¼” foam with coal glued on it as coal loads, as I mentioned a few weeks ago in a reply to another method you posted, I make about 20 loads at a time.

I enjoy the scenery, and the art stuff, so, even though it may be quite awhile until I run trains, the hobby is still fun and rewarding.

John

Baltimore MD. USA”

A huge thank you to John (his last post is here). Just a stunning scene – absolutely love it!

And it just goes to show, you can work on your layout anytime you like, it doesn’t matter how many months off you take…

That’s all today, folks. Please don’t forget the Beginner’s Guide if you want to join in on the fun.

Keep ’em coming.

Best

Al

PS Latest ebay cheat sheet here – still going strong and bagging deals.

Shelf layout HO scale

Brian’s been in touch with his shelf layout HO scale – I do enjoy seeing your layout from the very start:

“I model in HO scale but based on 3 foot gauge, hence HOn3.

Below is the garage in the process of being converted into my train room. I put up a drywall 6 foot in from the garage door (behind me in this photo) as a storeroom for my wife’s household equipment.

Access to it is through the door at the back right. This left me with a 14ft X 10ft area for my layout.

Below is progress with the upper level still to be erected. A must have, are cupboards below for storage of model train “stuff”

room for model railroad

My layout is not so much about long runs (but will have a double loop and involved operation around logging shown in photos at the end) on the upper level.

Left photo below shows the start of the logging area. Right photo shows all the lighting under the valances installed. Rear upper storage shelf in the middle has not been installed yet. It will have the strip lighting under it to light up the area where the sawmill will be situated.

room for shelf layout

Photos below show the top deck of my two level layout is more advanced than the bottom with track laid and operational. Scenery in certain sections is complete. Photos taken from left to right as you enter the room, first the top deck.

shelf layout ho scale

A busy logging scene. The knobs for operating switches on the fascia board are part of the Blue Point switch machines all around the layout. The Log skidder is one of many resin kits by Rusty Rails. Log loads are cast in resin by me before painting and weathering. The Vehicles are modified kits.

shelf layout ho scale

The loco in the photo above is a brass Westside Heisler (one of two that I have) painted and weathered by me as is the case with nearly all the locos except the two Blackstone locos. They still need to be weathered and a train crew added.

The photo below identifies what CCL stands for – Cascade Creek Logging. The Mallet is a very old PFM model.

shelf layout ho scale


Photo below is a 3 truck Shay (one of two that I have) by Westside models.

Below is the other Heisler, also a Westside model. Kadee couplers are used throughout on all locos and rolling stock.

shelf layout ho scale

shelf layout ho scale

A company Coach (CCLco) built from a (long gone) E&B Valley kit I have about eight of these.
Below, a billboard and truck with figures is by Woodlands Scenics. Big Mcgiffert log loader is a Rio Grande Model and the truck mounted log loader by Walthers.

model railroad shelf layout

Below is a Woodlands Scenics Tie and Plank mill. Disconnects log trucks are by Rio Grande Models.

logging shelf layout

shelf layout saw mill

Flat car with water tank in above right photo (both) are cast from resin. Lead strips fitted between the beams of the car (shown below) to add weight before adding the bolsters and trucks, painting, staining and weathering.

shelf layout ho scale

Photos below are: Tepee sawdust burner by JV Models. Caboose a Durango Press kit; Donkey log skidder on another cast flat car is a Scale Structures kit. Cast logs on HO Rivarossi log cars converted to Hon3: A Woodlands Scenics vehicle loading cut wood.

model tream logging steamer

model railroad town

Above is mixture of Campbell and Woodlands Scenics kits all fitted with interior detail and lights

Below is a Woodlands Scenics Tucker Bros machine shop with lights and arc welding unit inside.

model railroad work shed

Below is a Rio Grande Models Rotary snowplow kit OM.

shelf layout ho scale

model train locomotive

Above is another 3 truck Shay with mostly Woodland Scenics buildings in the background awaiting painting.

Below is a Woodlands Scenics gas station kit converted to small line side station with a working street light.

model railroad sidings

Below is a Design Preservation Models “practice” kit. Full interior detail and lights added from my “bits box”

shelf layout ho scale

model railroad buildings

Top level terminus (Cascade Creek below). The tank car is by Narrow Gauge Car Shops.

shelf layout ho scale

A Blackstone K27 (one of two that I have) on a modified HO (to HOn3) Atlas turntable with a Tamiya
gearbox mounted underneath.

The lower deck:

Lots of work to do but at least most of the structures are built and painted. Some photos to show the extent of the detail. I make sure that all my buildings have interior detail and lights.

The Lenz LH100 throttle (have 3) right rear is the DCC system I use to operate the layout. All locos are DCC with sound from tsunami and Blackstone.

model railroad harbor

model train factory

The harbour buildings are a 9 building limited edition set (only 350 made) by Foss Scale Models. All buildings have full interior detail with lights which were not supplied as original equipment.
An American Model Builders barge kit below, converted to be a car ferry.

Some of the boats are modified resin kits by Rusty Rails.

model train pier

model train store

Above, two Woodlands Scenics station kits made into a larger one!

The contractor’s barge is mostly scratch built but the hull and cabin supplied by Kibri.

model train barge

A few scratch built piers with a Campbell scale sheriff’s office modified into a lobster supplier.

model railroad pier

Shelf layout HO scale Conclusion:

I have stated at the outset that this layout is a work in progress. Since the above photos were taken I have turned the top shelf layout into a continuous run by adding a joining section on the right, in front of the window as you enter the room. There will be a lift out section at the door shown in the right hand side photo. This shelf will have more industry on it. In the photos below, is the new section.

shelf layout ho scale

To get this far from the start of the build to the above has taken 14 months (started Nov 2016). This excludes 90% of the buildings which were salvaged from my previous layout in Cape Town.

Photos below are of my old layout, 22 foot x 11 foot layout in Cape Town. (Lots of mistakes on it).

shelf layout ho scale

Brian”

A huge thanks to Brian for taking the time to share his shelf layout HO scale. I don’t know about you, but I loved it.

Can’t wait to see the updates too.

That’s all for today folks. Hope you enjoyed it as much as me.

And if you want to get going on your layout, the Beginner’s Guide is here.

Best

Al

PS The comments are still rolling in on the new ebay cheat sheet. Glad it’s working for you!