Geoff’s stunning layout

“Hello;

I came upon a product some years back that might interest our fellow modelers. My ex-wife and I had ceramic shop.

Duncan, the ceramic paint maker has this product called mask-and-peel. It is a liquid rubber that can be brushed on. Do not use your good brushes!!

Take for an example, a tank car model. Brush the mask-and peel on both sides of the model, let dry, then apply tube glue, and press parts together.

After the glue dries peel off the rubber, and using a sharp blade carefully cut off the excess glue.

You now have a perfect joint, no filling or sanding needed.

TC”


“Al

I have found that some sprues from plastic frets holding say gutters etc are ideal for downpipes from a reasonable distance and the small tags look like fixing plates for the wall.

When you vacuum up ( through a net like stocking material) keep it as it is ideal for scrub land and barren ground often found near the line side

Regards

Steve M”


“Alastair,

Cleaning Lionel tubular track: Simple and cheap and easy, and you get to run the train to do it.

I think many of you guys make this problem way too hard.

First, there are two types of things you want to remove from your track. One is oil and grease. The other is corrosion.

Alcohol will not remove corrosion, but it will remove oil and grease.

I use about 3 folded paper towels attached to a car like a gondola and towed behind a loco like a 2353 to remove grease. It takes a little while, but I am running the train to do this.

To remove corrosion, I put the train on the track and run it.

After a few joyful hours of running the train, the track has a bright, shiny, very narrow stripe on the very top of the rails.

Why would I want to clean all the corrosion off of the rails? The real trains have corroded rails which have a shiny stripe on top.

This cleaning process has worked well for me for the last several years.

No longer am I trying to clean rusty track with a wire wheel. A lot of my track is old and somewhat corroded.

I have 125 pieces of 072 that is about 80 years old, and surprise, surprise, it is not shiny. It is corroded, but still works well.”

God Bless

Bruce”


“Hi Al,

I’ve been watching your stuff for a while now and thought maybe you’d like to see some of my videos made over the past few years of my layout.

It’s a composite representation of the Short North between Sydney and Newcastle in New South Wales Australia using locomotives and rolling stock common on that 110 mile stretch between 1910-69.

In particular, I have re-created all the trains faithful to their consists at the time I was traveling as a kid up to see my grandparents on a variety of passenger trains during the 1950-65 period.

The attachment is actually of an early 4-4-0 12 class pulling end platform cars passing a TF class standard Consolidation class locomotive – the year would have been around 1915. If you’d like me to send more I have lots!

Best wishes and keep up the good work – I love English railways and used to have a layout earlier modelled on the LMS/GWR

Kind regards

Geoff”


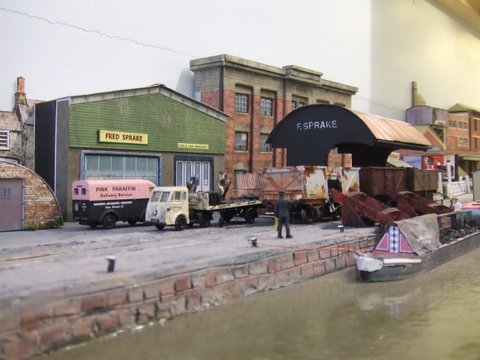
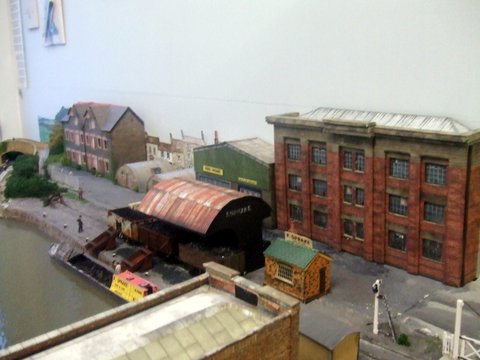
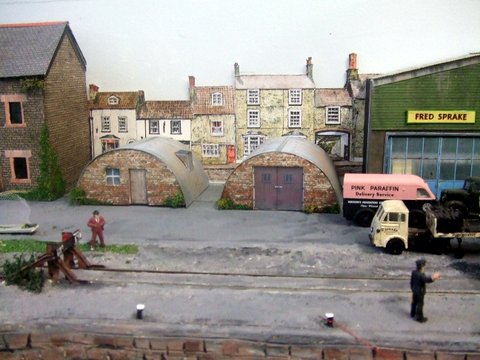
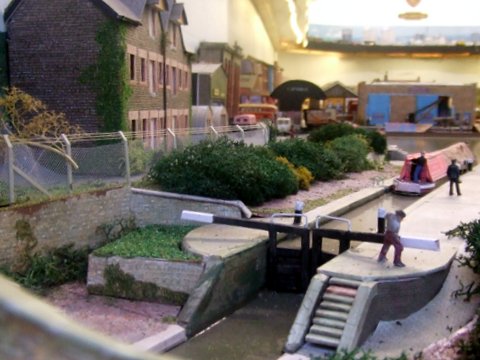
Stunning work from Geoff. Big thanks to him for sharing.

That’s all for today folks.

Please do keep ’em coming.

And if today is the day you get started on your layout, the Beginner’s Guide is here.

Best

Al

PS Latest ebay cheat sheet is here.

PPS More HO scale train layouts here if that’s your thing.


More from Brian

Here’s a reply from Lou on his last post (which is here).

“As far as the mold release, I had the very same issue when originally painting the gesso onto the resin. After my second attempt, I called Joel Bragdon. Here are the steps.

#1 Do not use vaseline. I originally used magic bullet mold release.

#2 From 2 years ago when I used the mold release, this time I used none, which means chances are there was more than enough on the molds from 2 years ago.

#3 I did not use the recommended spraying of Laquer in to molds. I went directly into the mold with resin. Once the resin was somewhat ready to remove, I remove it and never backed it with the foam product only because I already had a very good substrate. I hot glue them directly to the mountain and feathered the edges.

Here’s the trick. Go to the hardware store and pick up TSP (tri-sodium phosphate). It’s a powder for prepping walls. Mix with warm water and scrub the resin. Wait to dry and scrub it again. Make sure you allow to dry and rinse between phases. Once completely dry, mix 1/2 part gesso and 1/2 part Kilz2 latex primer. Paint the mountain.

Once the mountain is completely painted, wait about 20 minutes and go back with a dry brush to eliminate some of the buildup of gesso in the crevices while its still wet. This will keep the crevices real sharp and eliminate buildup. WAIT UNTIL COMPLETELY DRY UNTIL YOU ATTEMPT TO MOVE ON. Have other projects going at the same time as to get your impatience back to the mountain too early Hope this helps.

Lou”


“Hi Al

A few photos of the weathering progress on the 2 stall HO scale engine house.

A little more dirt and grime to be added and finally the interior and exterior lighting.

Brian”

(Brian’s last post is here)

IMG_2484

IMG_2486

IMG_2488

More great advice from Lou. And I love seeing any progress pics – but Brian’s make me particularly envious.

That’s all this time. Please do keep ’em coming.

Heading off to ebay? Latest ebay cheat sheet is here.

Best

Al

Model railway – Alan’s

Alan’s been back in touch with his stunning model railway:

“Hello Al,

a lot has happened since my last message. New track layout and the canal basin has been transformed.

The first picture is how it used to look, but I wasn’t entirely satisfied with the high street shops right at the end of the ‘town’, there is usually housing or industrial sites at the edge of towns, so I replaced the shops, removed the security fence and built a larger coal yard with shutes for loading the barges.

All scratchbuilt so far including a run-down old warehouse – a couple of warehouse kits, nissen huts and some corrugated iron rusty fencing. I used the latter for the roof of the coal yard building. At right anges to the coal yard is a timber warehouse, again I wasn’t really satisfied with that so again I scratch-built another one using the corrugated iron for the roof.

The track now has a crossover between the two lines so that goods trains coming out of the tunnel from the lower fiddle yard can now enter the goods yard without having to enter the station first and then backing into the yard.

Where the old coal yard was now has a point (switch) to an extra siding which runs behind the station thus giving me more storage space.

Well thats all for now, I hope your followers approve of the changes, I certainly enjoyed building the new structures and the track changes make for a more interesting running experience.

bye for now

Alan, Dorset UK”

model railway warehouse

model railway loading dock

model railway warehouse

model railway buildings

model railway buffers

model railway canal


model train coal bunker

model train coal bunker

model train canal

model railway freight

model railway points turnouts

model railway embankment wall

model railway waiting passengers

model railway sidings

model train steam engine

model train turnouts points

A big thanks to Alan for sharing his model railway – I really do enjoy his work, especially the canal part. Keep ’em coming folks.

And if today is the big day when you spring into action on your layout, the Beginner’s Guide is here.

Best

Al

PS Latest ebay cheat sheet is here.

PPS HO scale train layouts more your thing?