Alan’s been in touch with his tips on How to build a model train mountain:
“Hi Alastair.
Suggestions: ( mistakes made and techniques refined )
1) Mountains:
a) Foamboard
-Use 1” thick segments carved to profile of mountain; placed vertically.
-Cover with nylon netting…hot glued
-Use either thin paper towel material or ( even better) old rags material cut into 1’ squares soaked in dilute plaster — to apply over netting ( cost effective vis-a-vis orthopedic plaster roll materials ) …creates a shell of the mountain.
-Hot glue smaller pieces of pink foam board to the shell just created —for outcroppings, ledges, waterfalls, etc
-Sculptomold:
-Buy in bulk…25# or more….
-When mixing sculptomold, use at least 50% cheap gray paint…with the water ( you’ll appreciate the gray paint when drilling holes in the plaster cast to plant trees. )
-After Scupltomold dries, “dry brush” or “wash” various colors ( burnt ochre, sienna, etc )
-Dry Brush acrylic white paint over Sculptomold to bring out the texture of the material….makes the scene “pop”!
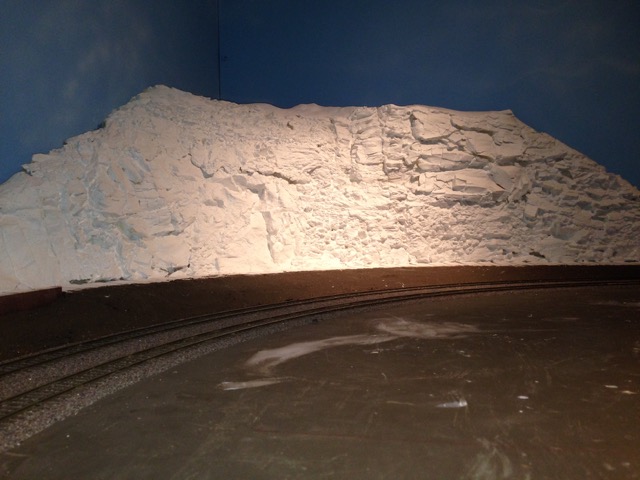
-Add snow…commercial or sifted plaster material.
-If prefer greenery, mist matte medium over dried Sculptomold and “blow” fine greenery over the vertical faces of the mountain…
b) Wood Frame:
-Basically same concepts but more amenable approach to cover staging yards, helices, etc. ( see my pix)
-( I have never used the cardboard strip approach….I guess I’m too lazy to cut all those strips )
2) Tunnels:
-Various materials available…plaster casts, etc
-Don’t forget to paint interior of tunnel with black paint “deeply” into tunnel past tunnel entrance.( amazing how far a visitor can see deeply past the tunnel entrance! )
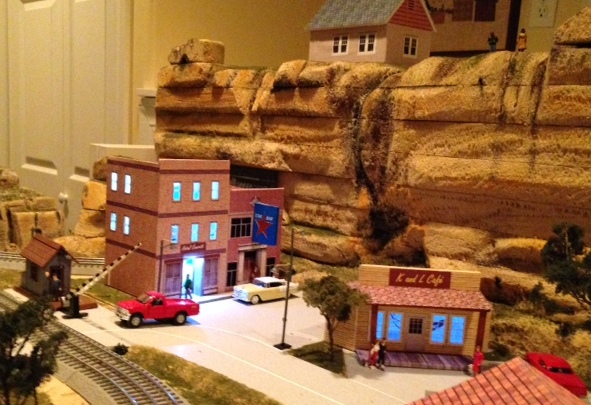
3) Mountain “Relief” against a wall:
-Hot glue a thin ( 1”) segment of foam board against the wall adjacent to the track “scene”.
-Carve / round off – the top edge.
-Apply a thin coat of sculptomold to the face of the foam board and “scenic” as above.
-Amazing how much depth this adds to a narrow scene….( see my pic of the Bietschtal Bridge—just behind the bridge is this technique )
That’s all for now…thanks for the opportunity to share…
Alan”
Next on to Lou, who also has some good advice on how to build a model train mountain.
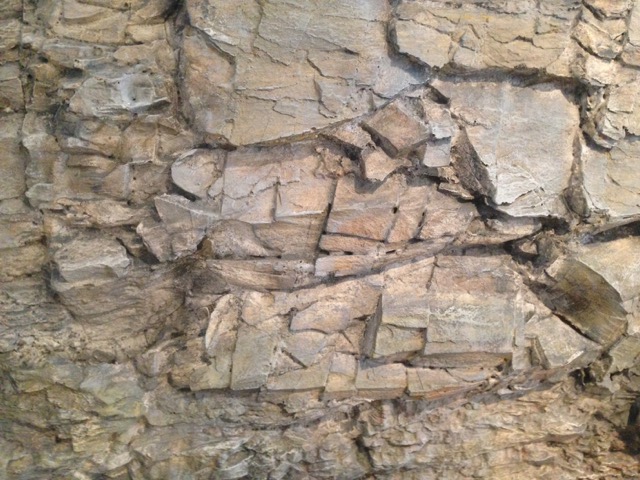
“Depending on the type of mountains you are trying to model, there are different techniques. This is also the case for color.
I have played with numerous ways and my best technique was to use the styrofoam for the base and shape only.
Once the shape was maintained, I casted molds using very large molds from Bragdon enterprises and used a resin for the castings instead of plaster. The resin will give you much sharper edges and detail.
If you choose to use a plaster, make sure you use the same material for the fills from one cast to another, otherwise your color will not match based on the material you are painting.
Once this is done, I painted the whole mountain using white gesso paint mixed with latex Kilz2 primer. At this point, you are now painting on gesso like a normal artist does.
Everything from here started with a black powder that was sponged into the crevices. Once dry, I started with a diluted layer of yellow ocre. EVERY coat must be dry before continuing. After 3 coats of yellow ocre, your mountain is still no darker than a manilla folder.
After the yellow ocre, continue DRY BRUSHING with raw sienna, then a mix of titanium white and paynes grey….again light coats and never covering completely over what you did. Continue with your dry brushing moving toward your darkest color.
A final slight dry brush stroke of titanium white is then placed on the edges to enhance contrast and highlights. This sounds tedious but the result is astonishing..like real rock and not painted styrofoam.
Lou”

“Al …. I have an O gauge Lionel Fastrack layout. I use battery operated LED Christmas lights for interior lighting in my buildings. A string of 20 lights costs less than $10 and runs on three AA batteries. I cut the string in pieces and add wire as needed to place inside of buildings. Attached is a photo of a couple of lighted buildings.
Enjoy your emails.. Bill”
Lastly, I had one or two encouraging comments on the ‘ai’ video I made of Don’s HO scale steel mill.
So I thought I’d have a go at Fred’s stunning layout too. I thought the running water worked really well:
Thanks to Alan, Lou, Bill and Tony. Please do keep ’em coming.
That’s all for today folks.
Please do keep ’em coming.
And if today is the day you get started on your layout, the Beginner’s Guide is here.
Best
Al
PS More HO scale train layouts here if that’s your thing.
Need buildings for your layout? Have a look at the Silly Discount bundle.

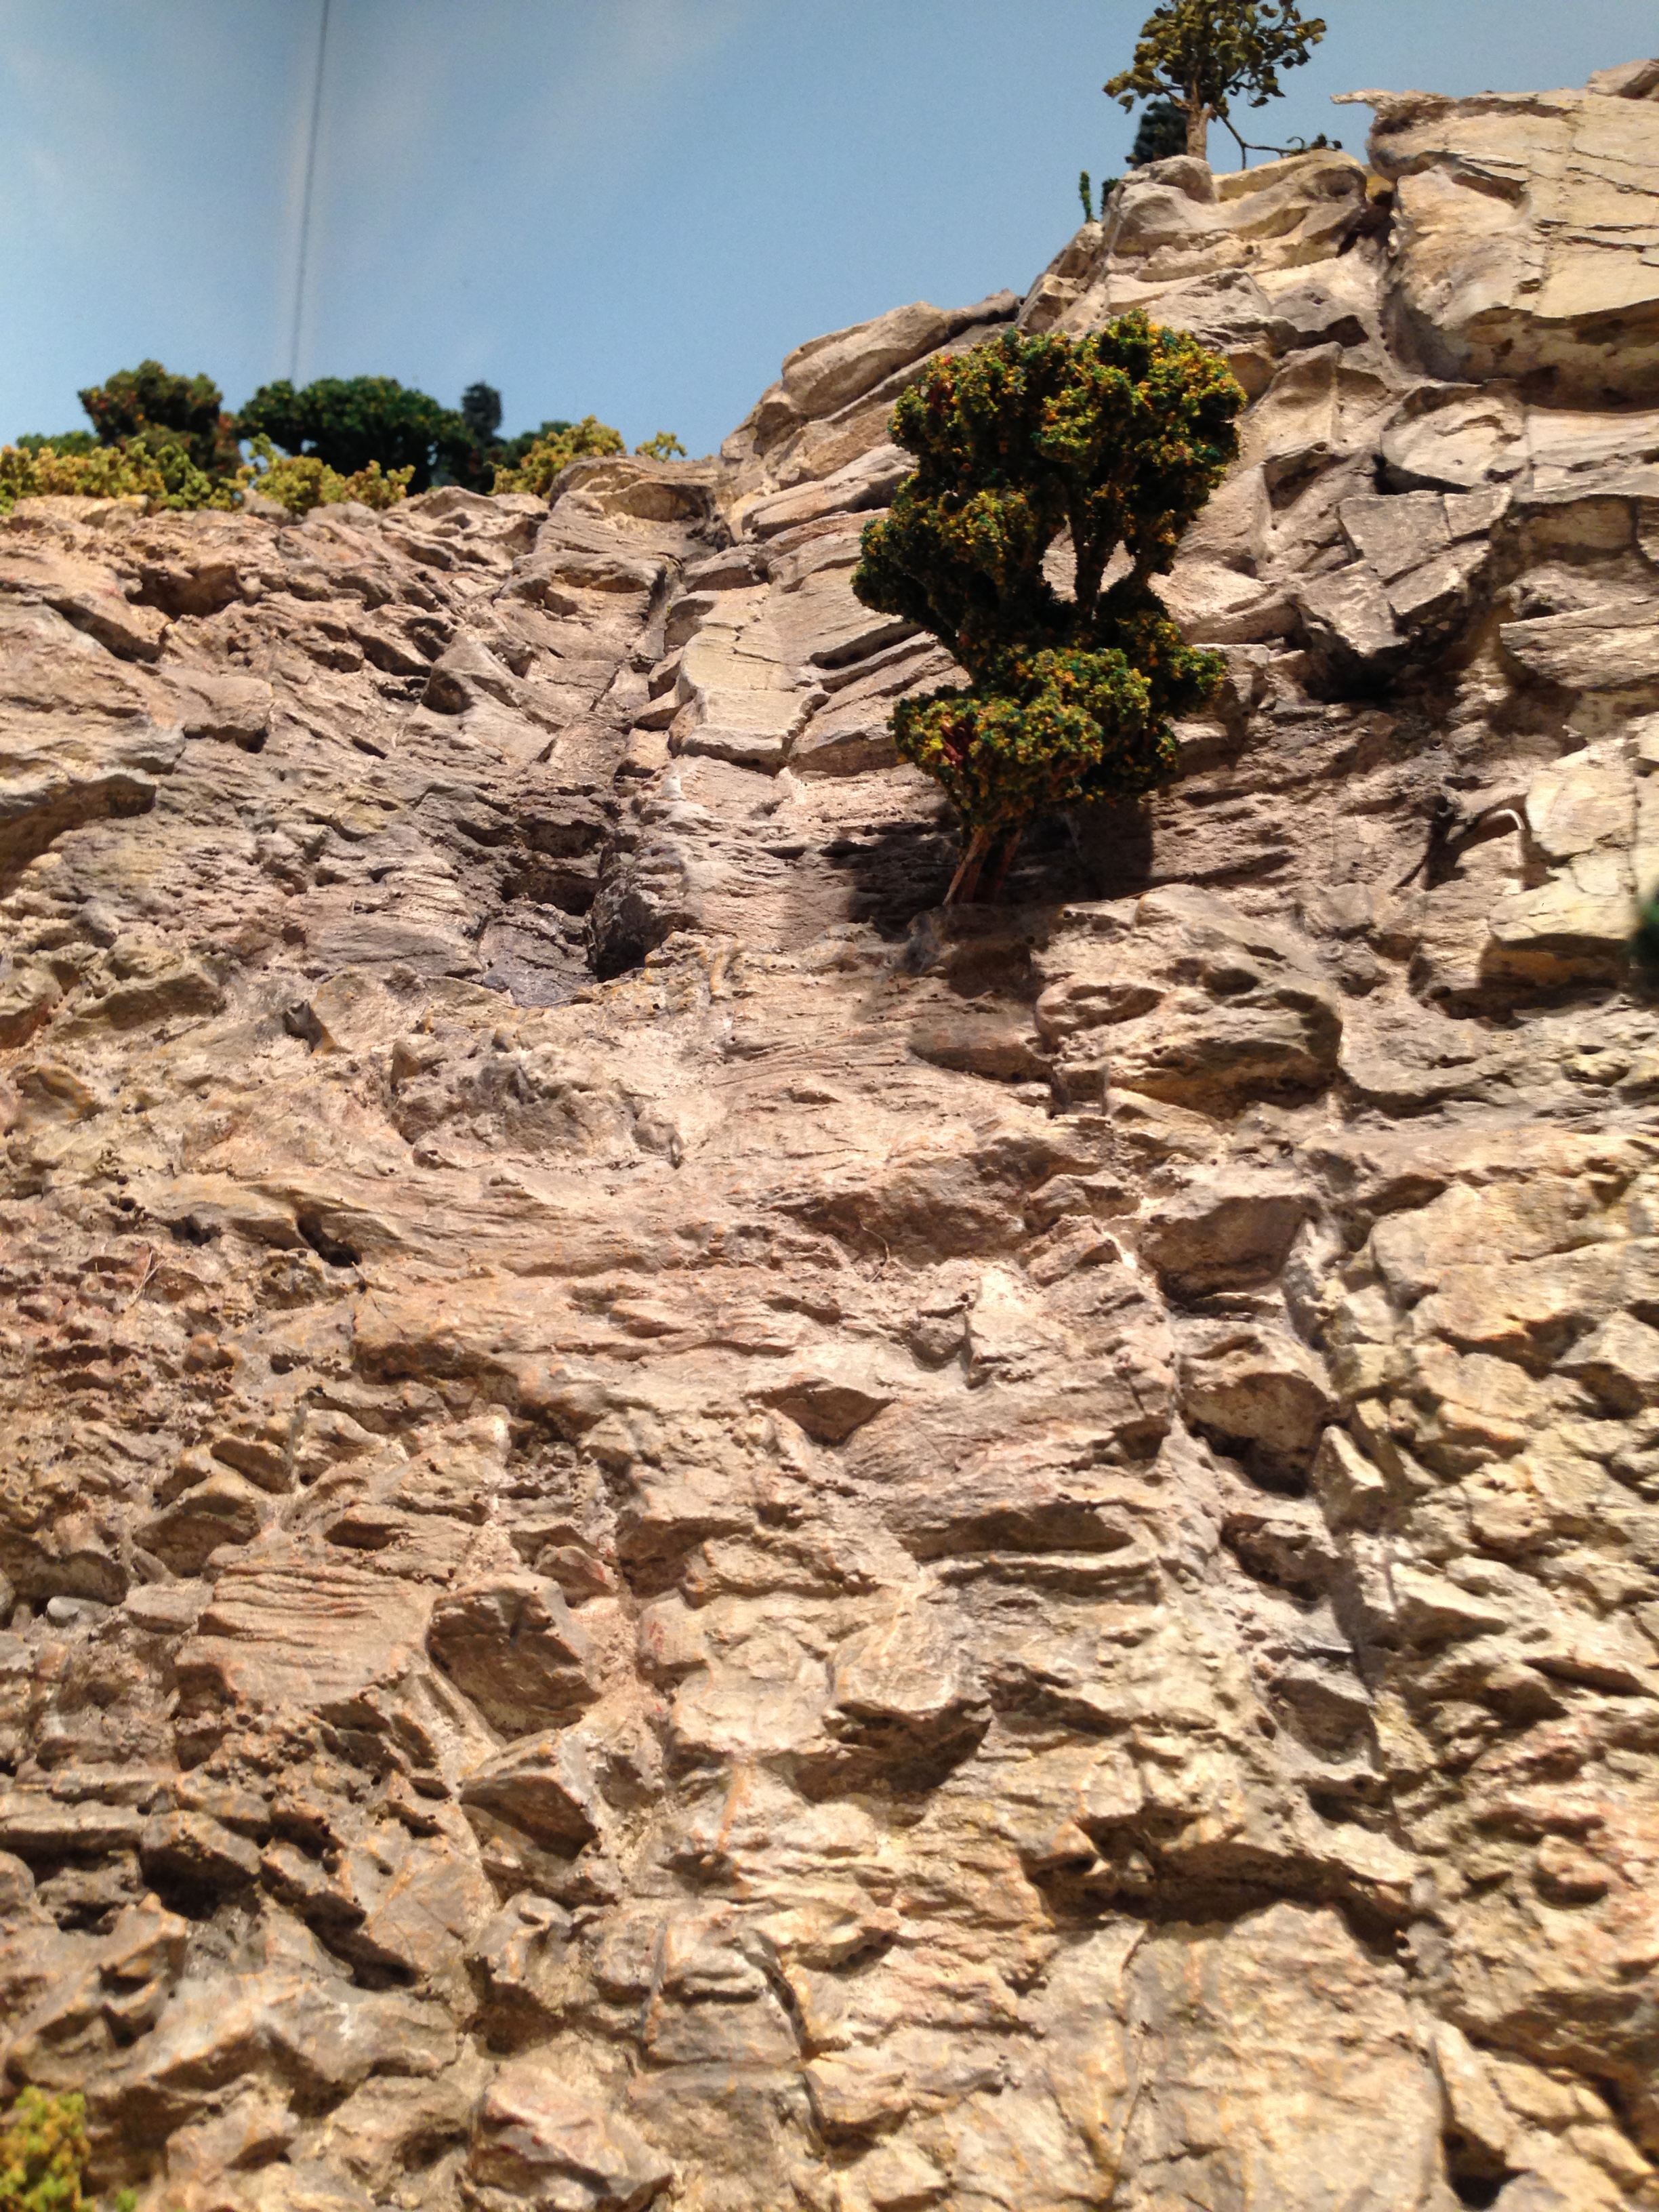
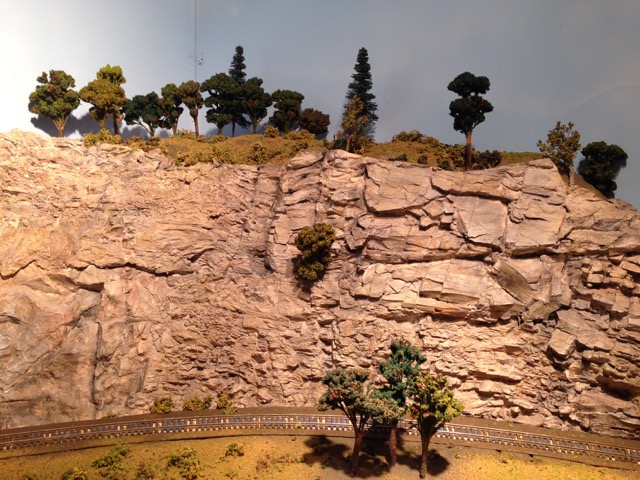
That is some more beautiful work. I have traveled all over the US. and it looks just like some of the mountains Ihave seen out wast, Colorado, Idaho, and Grand Cannion. Wow, what a nice job. Will Siscel.
Lou, all I can say is WOW. Thanks for sharing.
Great job. Much work went into this project. as an artist, i enjoy your technique.
FABULOUS MOUNTAINS/ROCKS AND GREAT IDEA FOR THE INTERIOR LIGHTS!
Lovely rock work, very realistic. Extrememly glad I don’t live in that place right under the cliff!
Rod
Brilliant. Very realistic. Thanks for sharing. BobT
Stunning!! That is so believable, If the pictures were cropped, I wouldn’t be able to tell if it is pictures of actual places or a model.
Another good idea for fence is always a plus. Transforming junk and stuff into good things needed on our layouts.
Buildings can now be lighted on an inexpensive level and be safe also with these ideas.
Thank you guys for taking the time and effort to share with all of us.
Great looking mountains. One problem I had using Bragdon molds and his two part resin was the release agent he recommended was Vasoline (petroleum jelly). It worked great as a release, HOWEVER, when I tried to do the Gesso or any other pre-paint mix, I found that the base mix (gesso) would not stick very well. I tried rubbing all the petroleum jelly off, at least as much as possible, but try as I might, there was always that residue.
Lou, have you come across anything else that worked better for a release agent in the molds? His molds I found are some of the best and can be used quite effectively. I just dont care for the mold release stuff.
That said, your mountains look fantastic! Wonderful job.
terrific ‘rock’ work
and nice idea for lighting
keep it runnin guys!!
The mountains are amazing Thanx Lou for sharing. Thanx to Bill and Tony for your tips Fence lighting.
Thanx Al
best regards,
tom
nice work Lou.
these are great tips i keep them all and when i go to do something like it i can go back and reread the colouring you use on the mountains is so important. my wife picked up the lights from our spot light store so easy to work with. thanks to everyone for their in put keep them coming.
I have heard of using talcum powder or baby powder as a release agent. I haven’t tried it, so can not vouch for its effectiveness, but you should be able to paint over it.
Good idea on lighting w/Xmas tree lights. However if you have the one goes out they all do you gonna have issues. Another trick is to try them one at a time usually on a single battery 1.5 volts and wire them in parallel solving the shell game hunt problem. An old transformer works too where you can vary the voltage, longer life, heat and illumination.
That is not model rocks it is a work of art. Fantastic Work Indeed. I bet you are a bit of an artist as well as railway modeller. Would love to see and watch you do it, it would be better than the written word.
Fantastic work.
Like all the others said : WOW such talent didn’t go to waste. Just BEAUTIFUL, jOHN
Great rocks. I especially like the sloped area. I may try it that way. I am using Christmas tree LED lights from China to light a “staging” area under my main line. In a few weeks I will send pictures to show why I highlighted the “staging” area.
Guys:
From my experience especially as a first time construction “foreman”, the Bragdon Enterprises resin compound is the only way to go! If you want instantaneous drying time and adhesion. Trust me!
Astonishing rock walls and great instructions!
Lou,
Your rock work is astonishing! Thanks for sharing with us.
Bill from Dover, DE
Outstanding!
Stunning achievement!
Time and attention are evident.
Thank you for sharing.
Lou. Thanks for the tips. I have to say your rock faces are the most realistic I think we have had on the forum. The first 2 photos could be of real rock cliffs. Thanks again for sharing the technique.
A good idea for a release agent is just that ! You can drop by a building supply store and buy just a gallon of the same stuff we use on the big jobs on the reusable forms (bring you own container) it’s sold by the drum full when you tell them what your doing they just might give it to you . And it has a pleasing cherry smell .
Hi Al
I’m not an inputter in to the site, just an idealist and over the year have picked some wonderful idea’s and info that is much appreciated.
Hopefully next year I shall be putting a outside garden railway together for 00, including the live steam series from Hornby.
Can I say, many thanks to your inputters who share their ideas and thanks to you for having a central site to share them.
Regards.
Wow! Fantastic!
What type of paint do you use? Acrylic? Water color?
A comment I would like to add is if you use plaster, I add the rough splinters of saw dust to give the plaster more texture.
Al, THANK YOU for these wonderful emails!
Don from Philadelphia
As an artist and a model railroader, they teach in art you to work from dark to light colors, just as Lou said. Great looking mountains. Thank for the information.
The petroleum jelly is an old technique. Bragdon has a product called magic bullet that you treat the mold first. Then you spray the mold with a white lacquer which is the release agent. Do not use enamel paint. When you purchase his resin product it is in the instructions.
Lou, those are some realistic looking mountains but they sound like a lot of work and cost to achieve that look. Bill in Virginia’s method seems a lot quicker and easier and he gets very good results too.
Tony, What exactly is “ribbon lace”? I’ve used something called “tulle” or netting that is good for simulating chain link fencing. What kinf of fence are you creating with the ribbon lace? Some photos would help us understand the idea better.
Good day. I have used Spray n Cook as a releasing agent and it worked very well. I assume that some other baking spray like Spray and Bake will also work.
Pretty neat.!!
The mountains look very good but it doesn’t mean anything if you don’t know how to get there, it would help to see the process cause I believe that once you have an idea of how to, then you can move forward with more or less of what you want thank you for sharing they do look good, Benny
What a great job on those mountains, what a skill you have I am impressed.
The most realistic rock work I’ve ever seen!
Jeff
Lou – Absolutely stunning. Very impressive – the best I’ve seen. If you have a video of your entire technique & process, it would be great to see. Keep ’em coming!!
Lou. That is magnificent scenery. Thank you for sharing such a picturesgue layout.
love the snow, the train station & well everything. awesome work
Some very useful tips.
Do anyone have a picture of coal shed or construction Ideas for o gauge lay out
The rock formations of Lou’s are phenomenal the detail is so ilfelike you feel like you can climb up them. fantastic job Lou
terrific work. i alway like the mountain scenes. good tips.
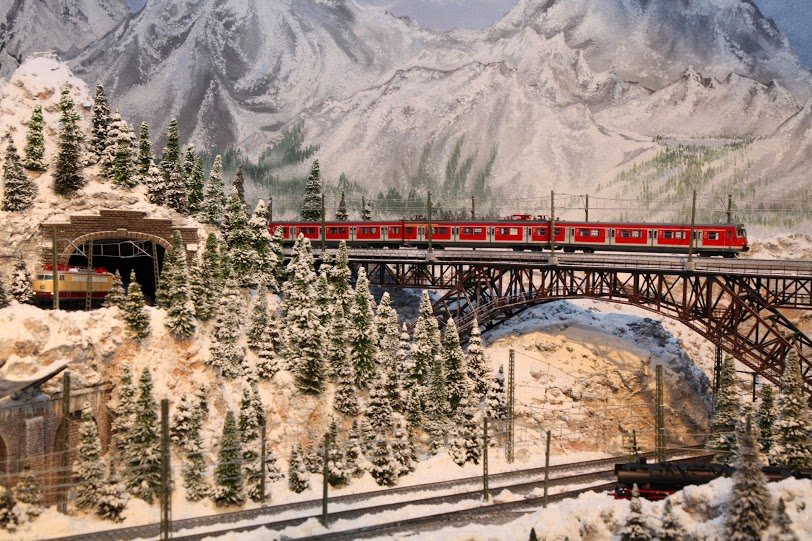
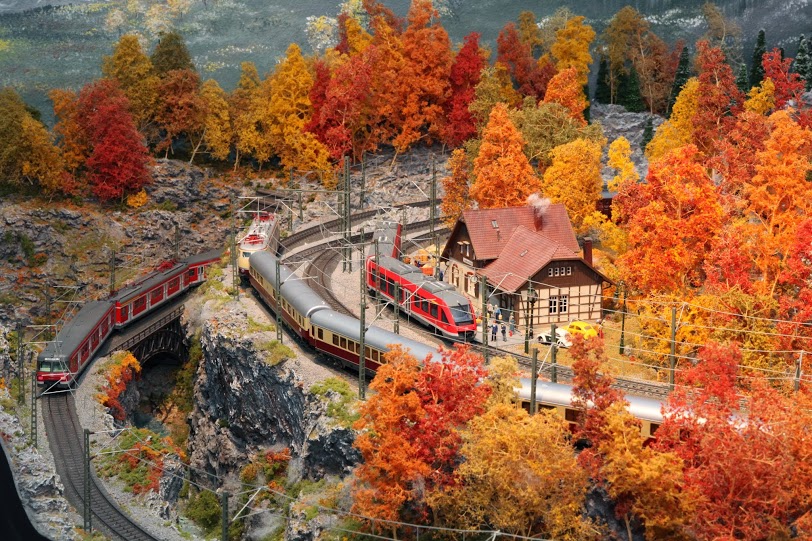
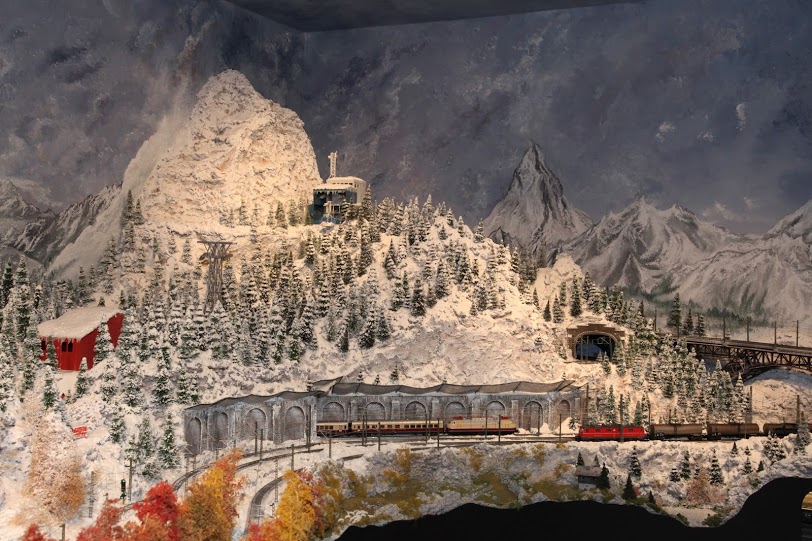
Very nice work on the Marklin mountain layout Alan and the bridges look great. Lou your mountains are outstanding with very crisp detail and coloring. I haven’t used the Bragdon molds although have been strongly tempted. I use 1-2” pink construction foam for the basic shape then add rock work using Woodland Scenics plaster casts made with inexpensive joint compound which comes in 20lb bags from big box stores. You can make hundreds of rocks cheaply and as long as you clean the molds well between castings the edges are crisp enough. I use latex acrylic paints and leopard spot with black or Paynes gray, burnt umber and yellow ochre. Dilution is with white acrylic and I always dry brush with white to provide highlights to the rock contours which make them pop 3-dimensionally. The color combinations depend on what region you are trying to mimic; my mountains are for a Swiss- German Marklin layout so darker grays are my choice but I love Lou’s choice of color for his layout. Great work guys!
When I was researching ways of making mountains for my layout, I came across the Bragdon molds and technique…..and said to myself “you can immediately stop your research because this is BY FAR the most realistic method ever”. Yes, it is time consuming, but the instructions are clear, and if you follow them carefully (be sure to use magic bullet release, not vaseline) you will have the most realistic looking mountains available. Mr Bragdon has also put instructional videos on his website which I found to be helpful.
Thanks for the tips Alan. Awesome rock design Lou, thanks for the tips. Awesome lighting idea Bill, I’ve been thinking of the same idea on my layout.
Al,
I’ve noticed a common question in the comments is “what scale?!?” May I suggest you just add the scale right at the beginning so we don’t have to wonder?
Thanks!
Lee (in Sweden)
Amazing work and great detail. Outstanding stuff!
The scenic snow covered mountains are terrific!
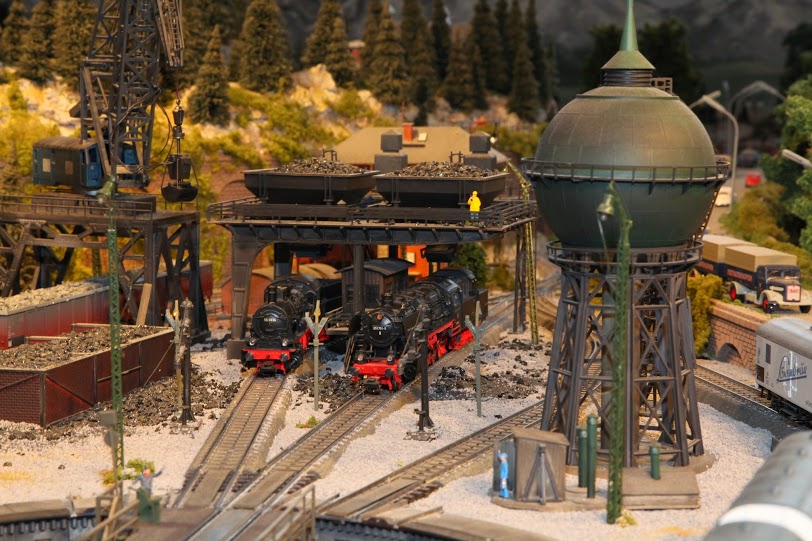
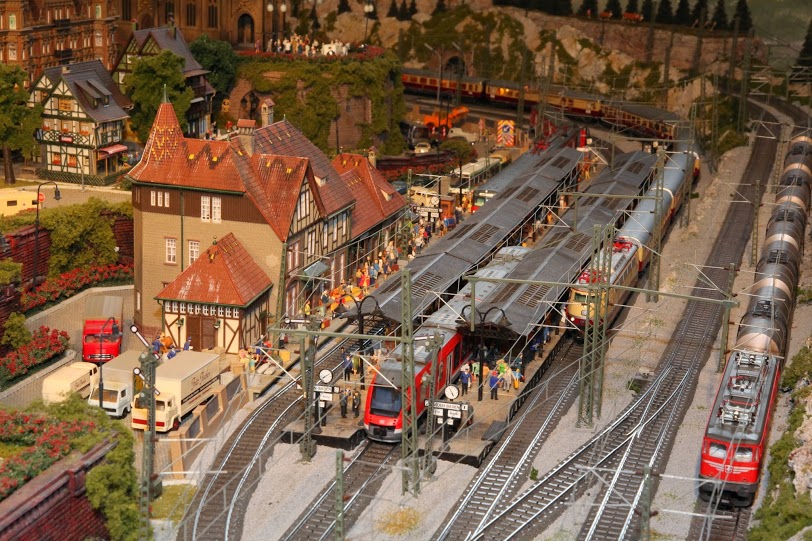
Alan, That’s a very nice tutorial on mountain building. Your snowy mountain scenes are fantastic! Very realistic looking! I admire your skill in stringing all that overhead electric wires.
Stunning indeed , those are so real looking . Thank you for insight on techniques. I’m about to embark on a mountain layout , tips will be applied however I’m sure the finished look will pale in comparison to yours . Just amazing , the whole layout . Both submitted are stunning and Fred’s N scale is just amazing, beyond anything imaginable. I can’t even imagine planning all of that out ahead of time . Fabulous talent and craftsmanship. A tip of the hat to you folks .
WOW what amazing craftsmanship. I had to look twice to realize that some of the pictures weren’t real landscapes. Simply beautiful work. As always I will address the fascia on these RR’s and, lo and behold, there’s fascia on both models that blend right into the scenery behind! Way to go guys it’s an added touch that makes the scene look even more real.
Thanks Alan for the wonderful layout. Great water and the Marklin locomotives always look good. Being a Marklin railroader it’s great to see other Marklin layouts.
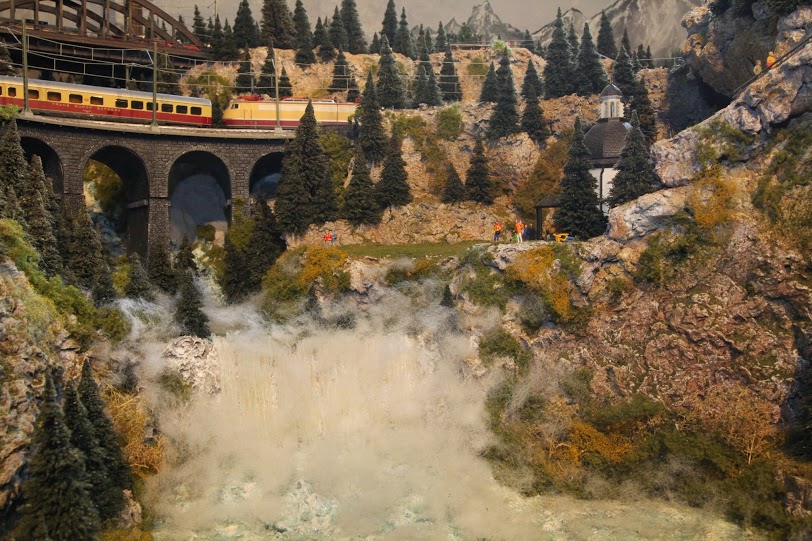
Not often you see “real water” in a layout. This looks fantastic. You must have used an aerator or something similar as the water coming out of the power house looks scale life-like. FANTASTIC!
Great information from Alan. Thanks. Sculptamold is great product. I’ve used it exclusively on my layout.
Lou’s mountain facing scenery is truly a work of art. Can’t imagine how much time it took you to create this effect. Great bit of modeling.
Jim AZ
One of the best designed and CRAFTED I’ve seen. Great job.
Nice closeups showing some fine detail work, and I loved the “street level” video. I would love to see the layout in some future post.
Alan, while I like everything I see, I’m especially intrigued by the way you suspend water spray and vapors over your waterfall. Can you share your secret?
Some very interesting tips on mountain building.
I read your blog every day and I have to say this is one of the best, if not the best layout I’ve seen in a long time!! Congratulations on outstanding work!!
Just one comment on the mountains: dry brushing begins with the DARKEST color and ends with the LIGHTEST color (up to white for top highlights.) The text mistakenly says that you end with the darkest color.
HI AL hear very very nice mountains I like it but how do you make the water look like it’s moving like in your video?
One of the best and eye pleasing layouts I’ve seen and you mountain scenery is exceptional.