More modelling tips

Got this in from Ron, which I quite liked:

“1. When laying ballast between ties. It helps if you lightly pre-dampen the area between the ties with a spray mist of water One squirt ought to do it – enough to keep the dry ballast from blowing a way.

Then apply a 50/50 of Elmers glue – usually a single drop in the center of the ties. the water will eventually dry leaving enough stickiness for the ballast to set.

2. Through the years… block, sheet or scrap foam is the material of choice for creating mountains and terrain. Its much easier to handle. I also use Plaster gauze for wrapping broken arms to cover the foam. Cut into strips and they lay and conform to all sorts of shapes and crevices. I later will “paint” on a water plaster solution to add other layers to strengthen and contour the surface.

3. If a difficult access (say in a tunnel or hidden passage) is needed, then just “saw” through the hardened area to create a cap or cover that will retain the original look. Some detailing will have to be done to conceal the cut. Almost mistake free because any error or mistake can be made into something else.

4. There is rarely a “new shiny look” with trains especially a full load. Dust and dirt is all over the place. Engines and rolling stock need to have a dull dirty look, especially along the trucks and wheel areas of the cars, etc. There are many ways to accomplish this.

Ron”

And this in from Dennis:

“I get branches from an artificial christmas tree to make trees for my layout. I cut them to length and mount them tip down so the branches droop downward.

I take some of my Plasticville buildings for the back wall of my layout and cut them in half. I mount the two halfs with the cut end facing toward the back to double my buildings. You can cut out cardboard and install it behind them or mount them against a bluff.

Dennis”

That’s all for today, folks.

Please keep ’em coming.

And don’t forget the Beginner’s guide

Scratch build correction!

Well, I have to start with a correction today.

Yesterday’s post – Ray’s station – was indeed a kit, and not scratch built.

But that opens a can of worms. Have a look below, is Clark’s building a kit or scratch built?

“Hi Al,

I built a 3D printer to expand what I could do at home, and wound up printing this small building.

The first two pics are as it came off the printer.

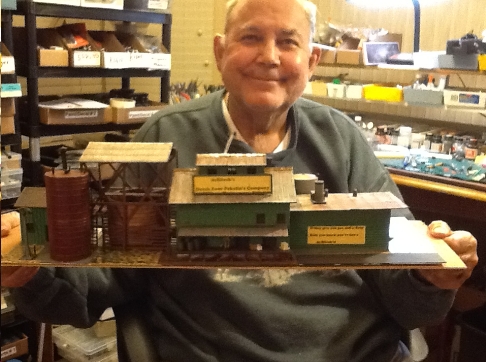
My best friend’s father Philip Koehler is also into N-scale trains; he was visiting and obviously liked it, so I was pleased to give it to him. I got the pic of it in his layout a month later. He did far more justice to it than I would have been able to, it looks great in his layout!

For the curious, the building is printed in ABS plastic (same stuff that Lego bricks are made from), one tiny layer at a time (about 0.2mm in this case).

The top of the roof and top of the smokestack looking a bit squirrelly is due to the hot print head spending too much time near that section of plastic and that keeps it from properly hardening in shape. I have since learned that if I print 3 or 4 objects at a time, it looks much better!

The original file for the building is not of my creation, it was posted by Thingiverse user, Stevemedmin.

Cheers!

Clark”

Printed building1

Printed building2

Printed building3


What do you think? Kit or scratch built? Anyhow, here’s some old school scratch building:

“Hi Alastair

I send you my fuel station for 1:120 gauge. I’m would like to built TT diorama with polish rolling stock era III.

Everyhin’ the best

Greg”

oil

That’s all for today folks.

Please do keep ’em coming, even if it’s a kit, a scratch build, a kit bash, a layout, a start… just hit reply to any of my mails.

And if today is the big day when you get going on your layout, the Beginner’s Guide is here.

Best

Al

PS Latest ebay cheat sheet is here.


Ray’s kit build

“Hi Al,

I found your site about 4 months ago and have thoroughly enjoyed your posts, pictures, videos, and modeling tips. I have since paid for the golden ticket and found it to be a great investment. I consider myself an amateur compared to most of the people who are sending in pictures and videos.

I used to have an n scale train set when I was a kid and really enjoyed it. About 14 months ago I found a box in my attic with some of my old n scale trains, track, etc. There was not much left but it got me thinking about researching what it would take to start up again. A little over a year later I am totally hooked
.
Being from Worcester, Ma. I have always been interested in Worcester Union Station which was restored a few years back. I have attached a few pictures of the actual station. I then found a model of the station (a laser cut wood model) that I had to have. I was warned that this would not be a good project if I have not built a laser cut model yet, but I ignored the advise, purchased the model on line, and went to work. 100 hours later, here is how it came out.

It is the centerpiece of my layout and the first thing people notice when the see my layout. I have attached some pictures for you.

Best,

Ray”

us 1

us 1-16-15 (2)

us 1-16-15

us 2

us 3

us 4


us 5

us 6

us 7

us 8

us complete


A stunning piece of scratch building – big thanks to Ray for sharing.

That’s all for today folks – please do keep ’em coming.

And if today is the day when decide to join in the fun, the Beginner’s Guide is here.

Best

Al

PS Latest ebay cheat sheet is here.