13×14 HO scale layout – Part two

Ken’s been back in touch with his 13×14 HO scale layout.

Well, it’s a fair few months ago now, and Ken has been kind enough to post the below update on his layout.

He’s been busy – if you want to get up to speed, his first is here.

“Hi Al,

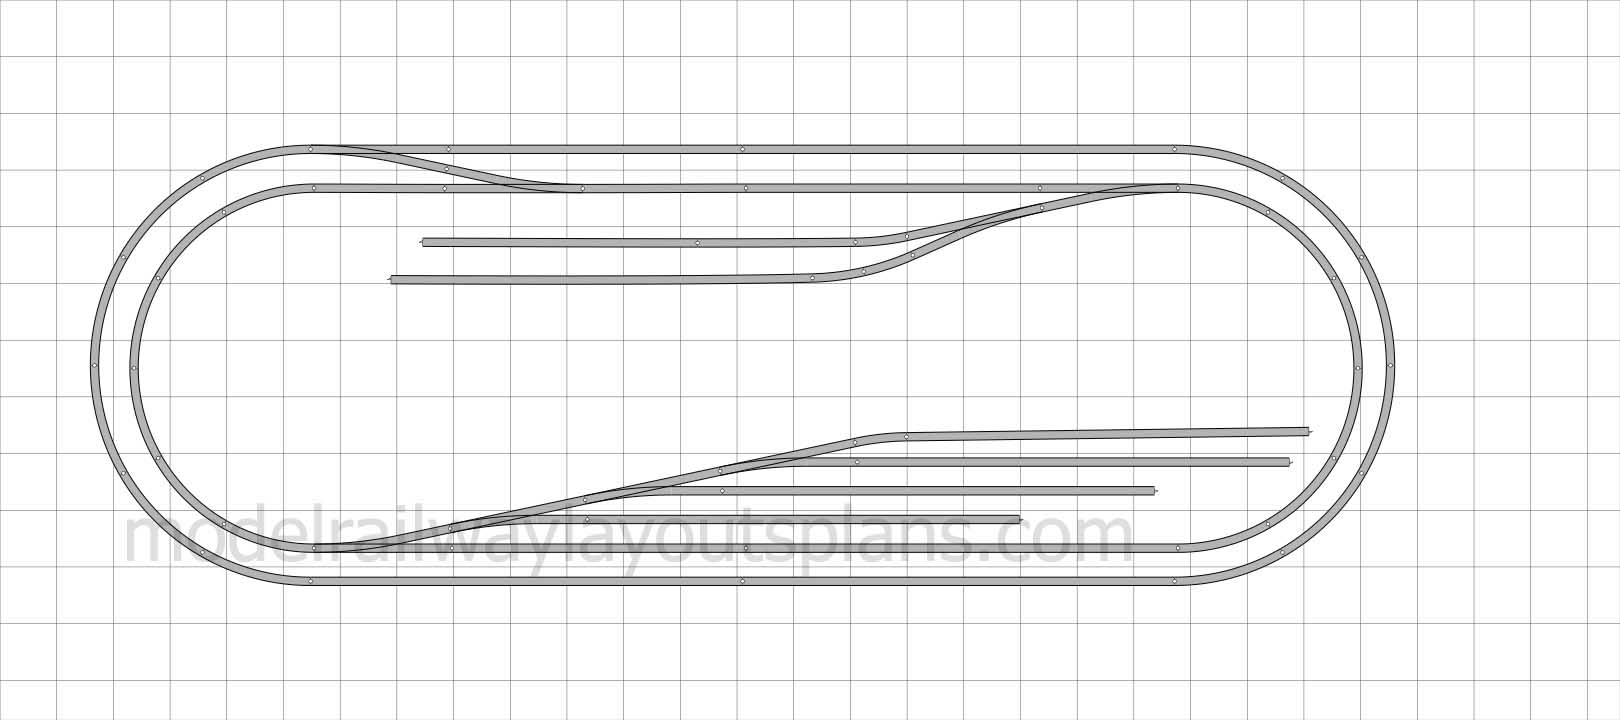
My 13×14 HO scale layout part 2.

When I last wrote I left off at this point and was preparing to move. The move happened.

First the house hold items, then locating and renting a place for the layout.

Took 2 months and then another 2 weeks of dismantling, moving and reassembling.

HO scale tunnel and track laying

So from here till now I have been hard at work.

Here you see the beginning of the road at the mine, tunnel portals, and the beginning of the turntable.

The red push buttons are for controlling the turnouts.

Also learned another lesson, paint the interior of the tunnels before you finish the out side, or in my case put them together.

Also here is the plastering technique I came up with, drywall compound and clothes dryer sheets, first step.

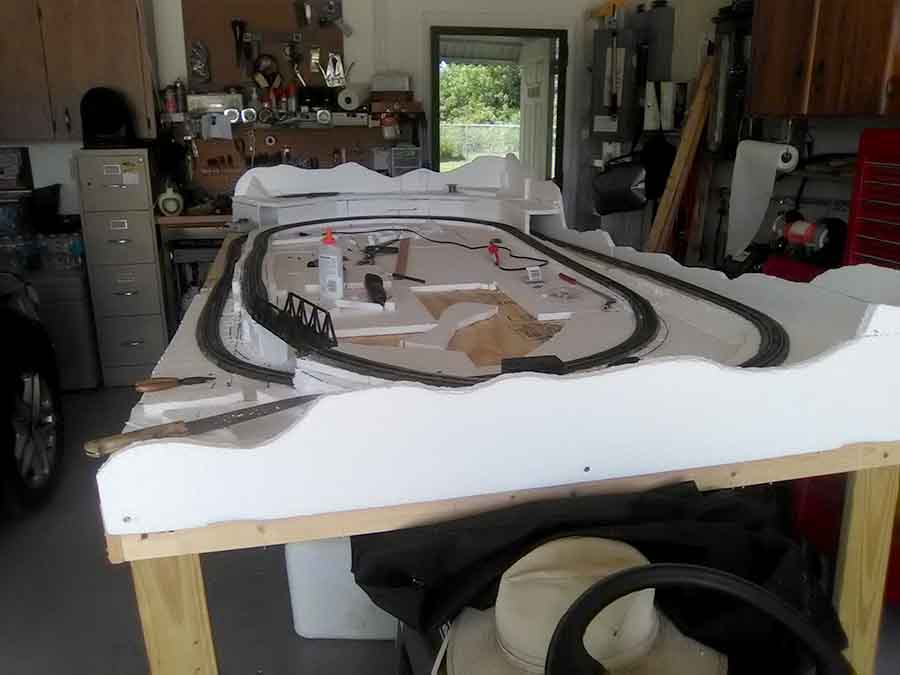
In the next picture you see the upper level that runs completely around the layout, and the ascending and descending tracks, to and from the main lower level and the upper main line level.

The layout measures 13 feet by 14 feet , the upper tack is 8 inches above the bench, so a good climb both ways. Here still working out the rest of the layout track plan.

raised track 13x14 HO scale

raised track curve

This is the view looking at the other corner, also showing the main 3 levels of track, the uppermost level, 8 inches above the deck, at this point double track, the next level down , 4 inches above the deck, is the track coming from the mine, through a tunnel at the mine then over a trestle and then through another tunnel, then the lower level can be seen, on the deck.

benchwork

Here you see the mine track as it will cross the main line and enter the yard where the cars will be left for delivery by other crews from the interchange. Also the beginning of laying out the main yard track. The diamond crossing was tricky, especially since it is located directly over a separation line and the layout has yet to be moved to new location.


laying track 13x14 HO scale

Another lesson learned, got the mine train here and then thought, how do I turn the loco around for the return trip, I thought I have all this area under the upper tracks why not do a reversing loop, sure why not. A 13×14 HO scale layout gives you the room you need.

It took many try’s to get this far, including laying it out full size on the floor.

Finally, end result, and works as planned, or thought or something.

laying track 13x14 HO scale

Would have been much easier to have done the loop first, but at least I thought of it before the scenery went in.

Ken”

A big thanks to Ken! A 13×14 HO scale is quite a size – and it made me think just how long good layouts really take…

Ken’s post reminded me of Lou’s HO scale – another post which highlights the most important part of this hobby: making a start.

Here’s one of Lou’s HO layout pics – which also links to it:

HO scale polystyrene track riser

You can see Lou’s post here.

That’s all for today folks.

Please do keep ’em coming.

Don’t forget the Beginner’s Guide is here, if you want to start your own railway adventure.

Best

Al

PS Latest ebay cheat sheet is here.


N gauge railway layout – Peters

N gauge? N Scale? You decide:

“Hi Al

Though you might like a few pics of my N gauge layout that i am still building.

Best Regards.

Peter.”

N gauge

N gauge

N scale

N hauge model railway

N guage

model train track plan

A big thanks to Peter – it’s always fun to see what you are all up to whether it’s an N Gauge or any gauge and scale.

“Alistair,

I am not sure if you can get these items over there but here we have what is called pringles they are like a chip but better and they come in a round can and my young son and I came up with the idea of using the can as our tunnel they are just the perfect size for the H O scale train to fit through.

Hope you like this one.

Bill”


“Spent winter tearing out my years old HO layout. Had found plans for one in Model Railroader and i built it 2 levels with a 6 turn helix to get up and down .

it wasnt easy to operate as I was climbing up and down on a 2 step stool to reach the top and bending over under the top when doing something on the lower level.

So last winter I tore it all out and rebuilt a better more fun layout . My advice is dont be afraid to redue what you dont like .enjoyment is the name of the game in model railroading .

Ron”


And lastly, Dave’s been on the sherry again – and playing with his new Ipad too. But as always, I loved it!


New and updated ‘ebay cheat sheet’ is here.

Best

Al

(Really – there are hundreds and hundreds of posts to enjoy and learn from. But the only way you can see them all is to be on the newsletter)

Brian talks us through his layout

Brian’s been back in touch.

I really enjoy watching the ‘walk throughs’:

“Hi Al

This layout was started about four years ago on a wood framework covered with two inch thick Styrofoam and painted an earth colour.

Using this thickness foam allows me to cut down to water level as well as ditches, rivers and culverts without having to cut into the bench work.

The harbour areas water was painted with a green colour for effect until the whole area is complete and then will pour Woodland Scenics realistic water product into it.

As can be seen from the photos / videos, the layout is far from finished. The detailed buildings take up a lot of time BUT the layout is operational using DCC controls.

I have three controllers with access points around the layout and I am using the Lenz DCC system with full sound.

There are 2 Shays (3 truck), 2 Heislers, a C 16, a C 19, 2 Galloping Geese, a K 37, a 2-8-8-2 logging locomotive, all brass and painted and weathered by myself.

I also have 2 Blackstone K 27 locomotives painted but not weathered yet.

I have a lot of scratch built rolling stock, kit built stock and some coaches bought as is (Blackstone and PFM). A lot of the stock has self-made and self-designed decals for my logging road name (Cascade Creek)

Not all of it is on the layout at the moment as it is still under construction for scenery and buildings.

I will send more photos of the layout as it progresses.

At the time of writing this, I have written an article with construction photos (pdf format) on building the 2 stall engine house kit (Fine Scale Miniatures kit – 1974 era) from start to where it is at present.

All that has to be done to it, is wire up the lights under the layout, add the dirt around it and then put the final details on the outside of it. Then the article will be complete.

Btw, D & RGW (Denver & Rio Grande Western) on my layout stands for Dangerous & Rapidly Growing Worse.

I hope that the above information will help with what my layout is all about.

Al, use whatever what you want/can of the info sent for your website.

As always, keep up the excellent work so far.

Brian”


New and updated ‘ebay cheat sheet’ is here.

A big thanks to Brian.

That’s your lot for today.

Please do keep ’em coming.

And if today is the day you leap out of your arm chair, the Beginner’s Guide is here.

Best

Al

PS Latest ebay cheat sheet is here.