When it comes to small N scale layouts, Bob’s always springs to mind – his layout goes up in three levels, instead of out.
If you want to get up to speed on his stunning N scale, his first post is here.
He’s been kind enough to talk us through how it came about:
“Al,
I mentioned in my original post, my challenge with this new project was transitioning from an HO scale layout that filled most of a 400 square foot room to an N scale layout that could be no larger than about five by ten feet.
I made some preliminary drawings and quickly realized that to accommodate the number of trains I wanted to run I would need a terraced layout.
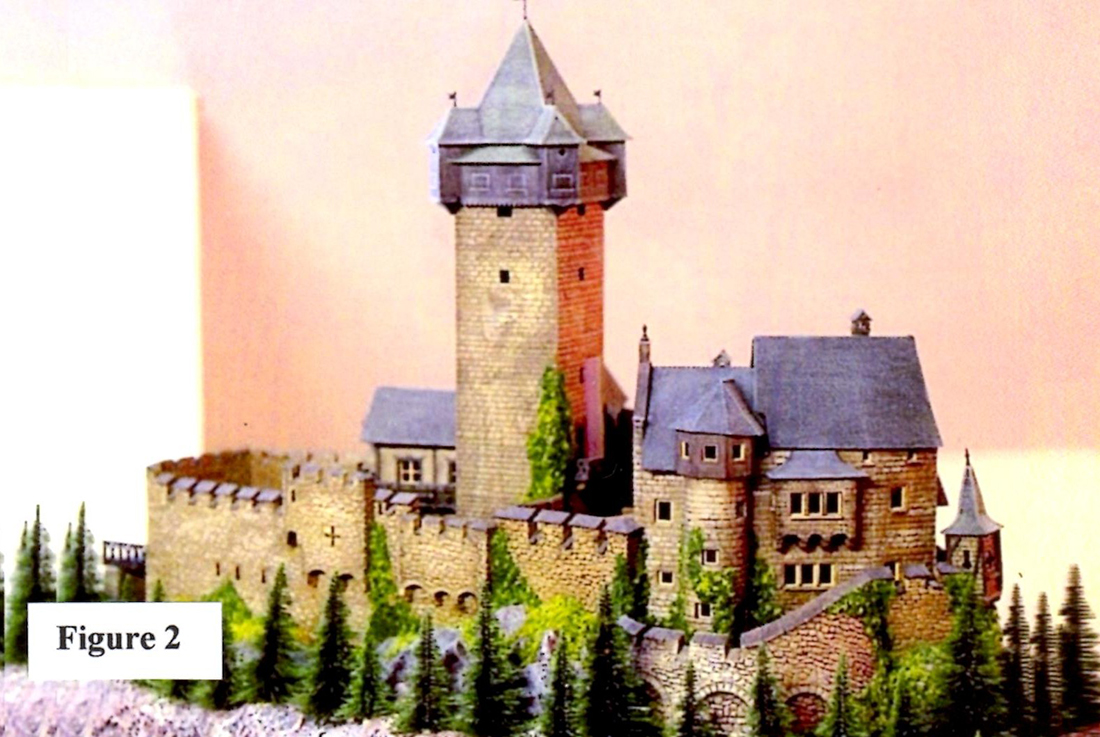
One of my favorite parts of my previous HO scale layout was a mountain that incorporated a trestle bridge at its base (Figure 1) and a castle on its top Figure 2). I wanted both in my new layout.

I made several scale drawings and finally decided on a terraced layout with three levels (Figure 3).
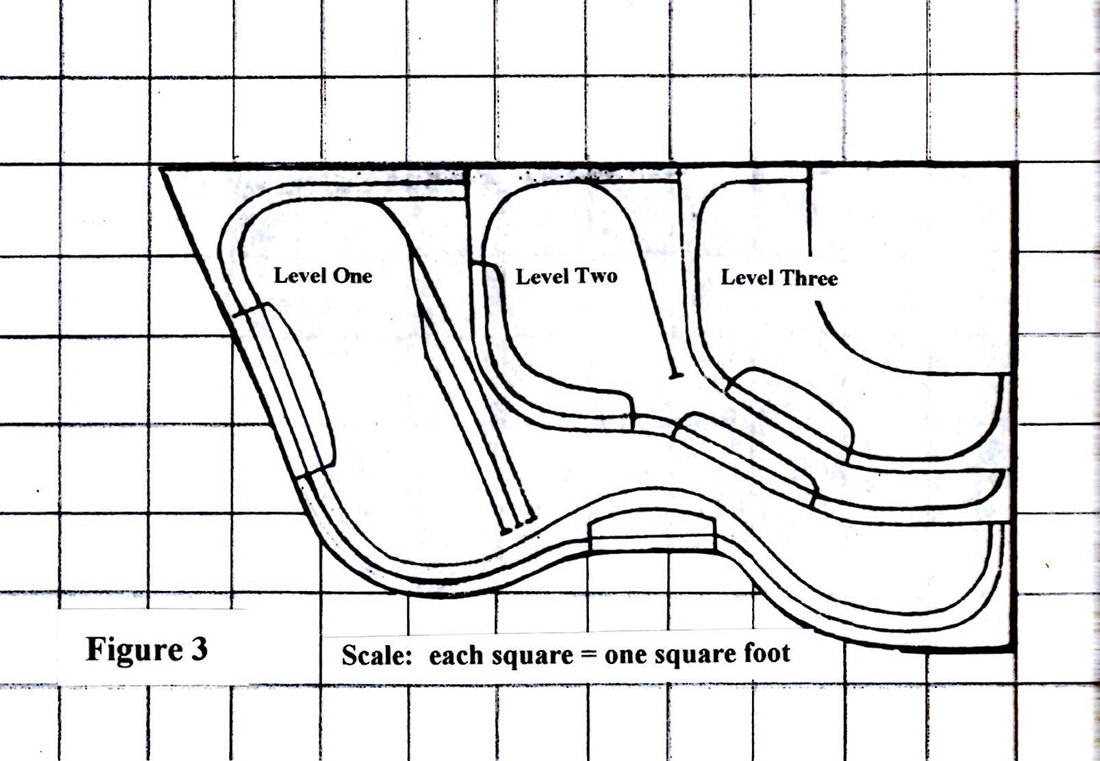
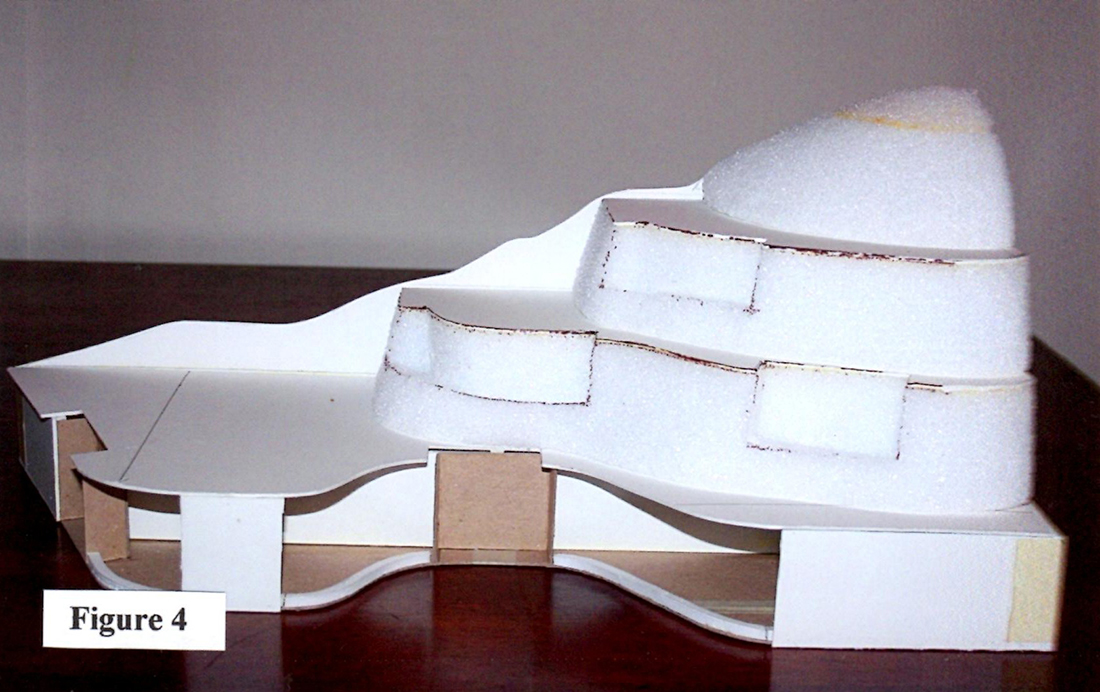
Level one would have two tracks and levels two and three would have one track each. In order to better evaluate perspective, I constructed a one-tenth scale model of the layout using foam core, Styrofoam, cardboard, and balsa wood (Figure 4).
In the completed layout, both level two and level three would be removable.
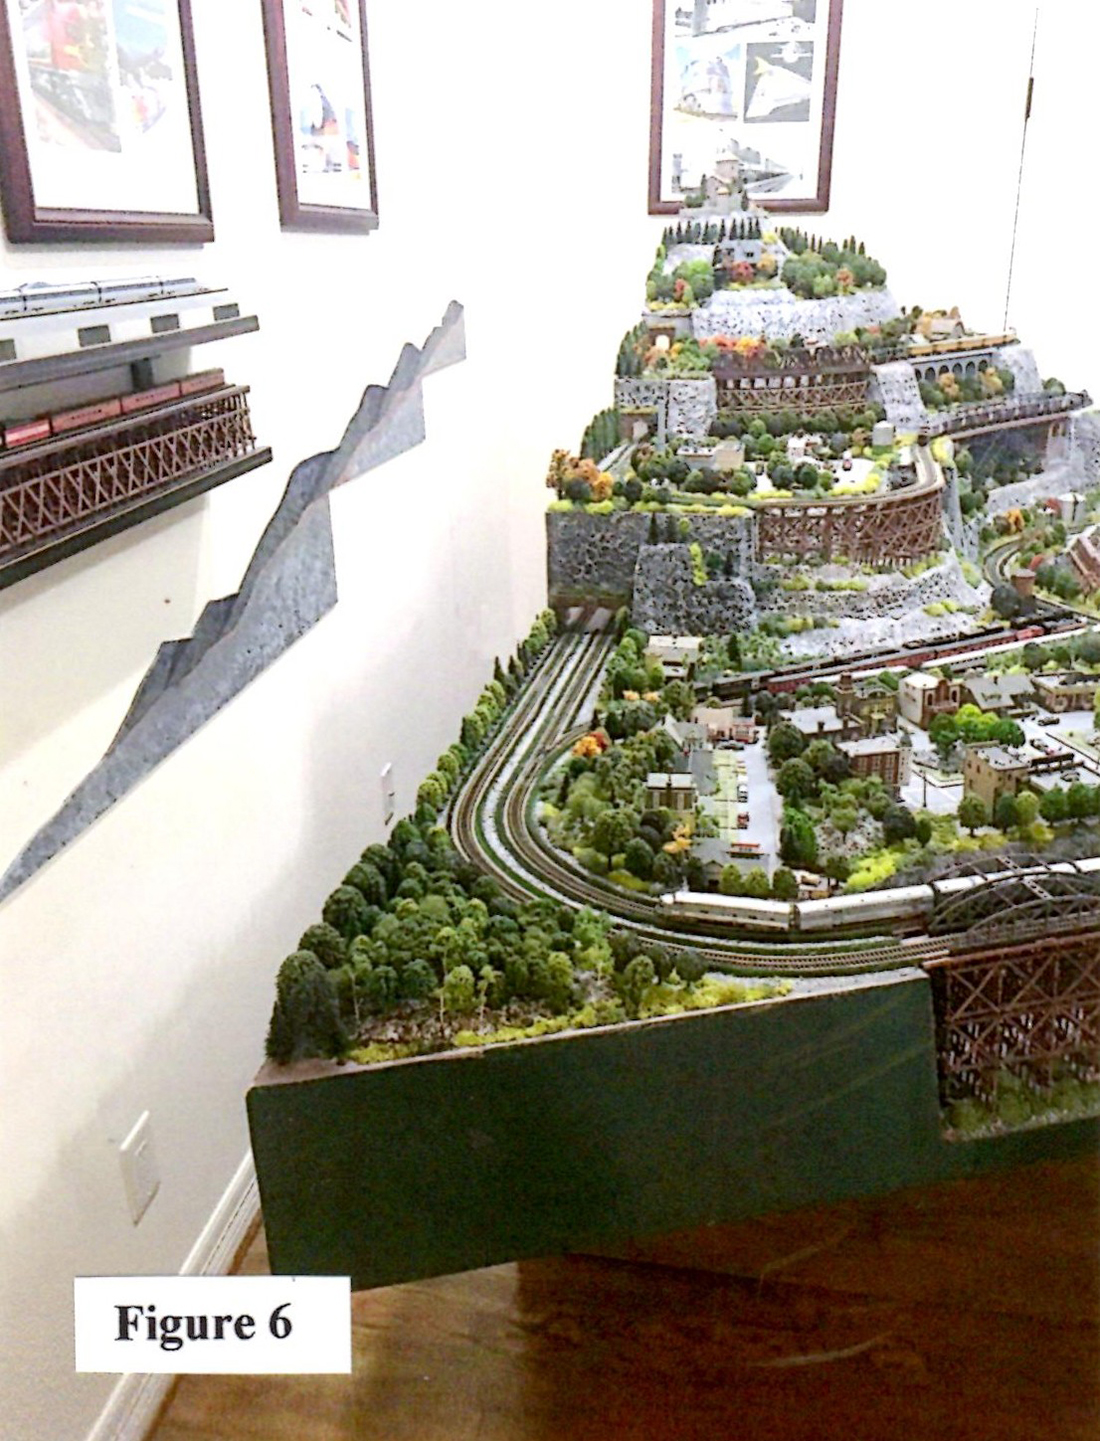
The layout is built on a custom-made platform supported by two wooden pedestals (Figure 5).

Since levels two and three are removable, there should be easy access to construct a helix.
As you can see in the schematic (Figure 3), the inner loop on level one has a turnout leading to a three-track siding and the loop on level two has a turnout leading to a single track siding. There are a total of four right-hand turnouts on the layout.
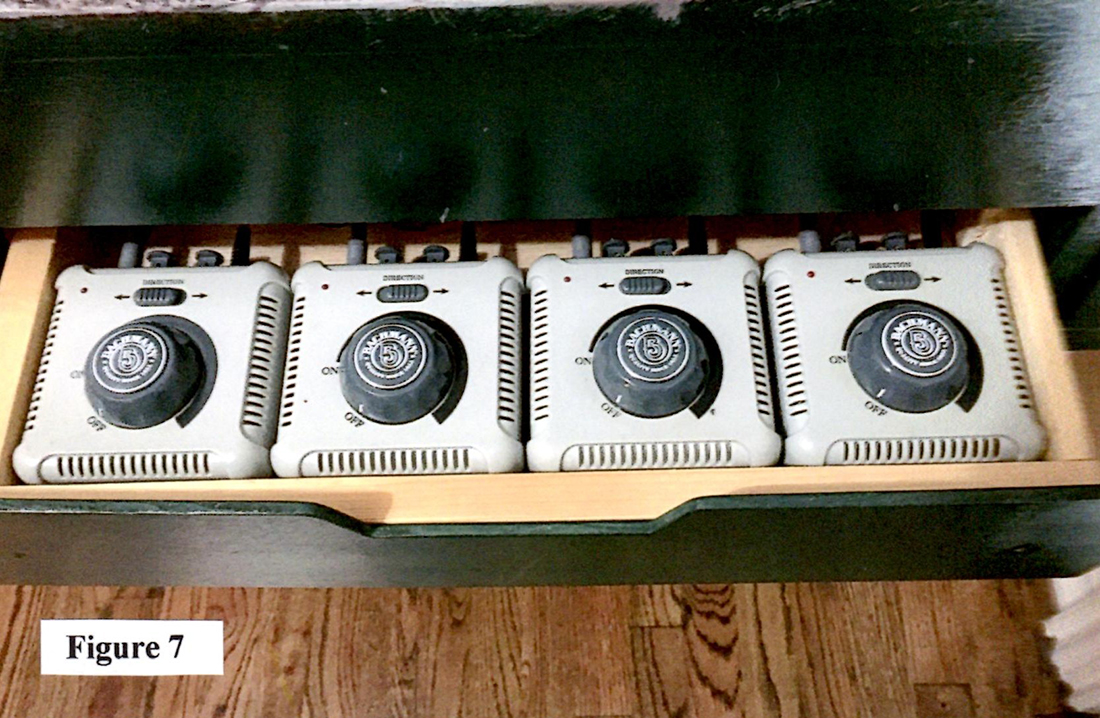
All the track (code 83 flex track) and turnouts are Peco products. I still need to ballast the track (my least favorite part of the whole process. I use four Bachmann Power Packs which are located in a small drawer at one end of the platform (Figure 7).
I used Mold-A-Scene plaster on a foam core base to build the mountain. I am really partial to trestle bridges and there are four on the layout (Figure 8).
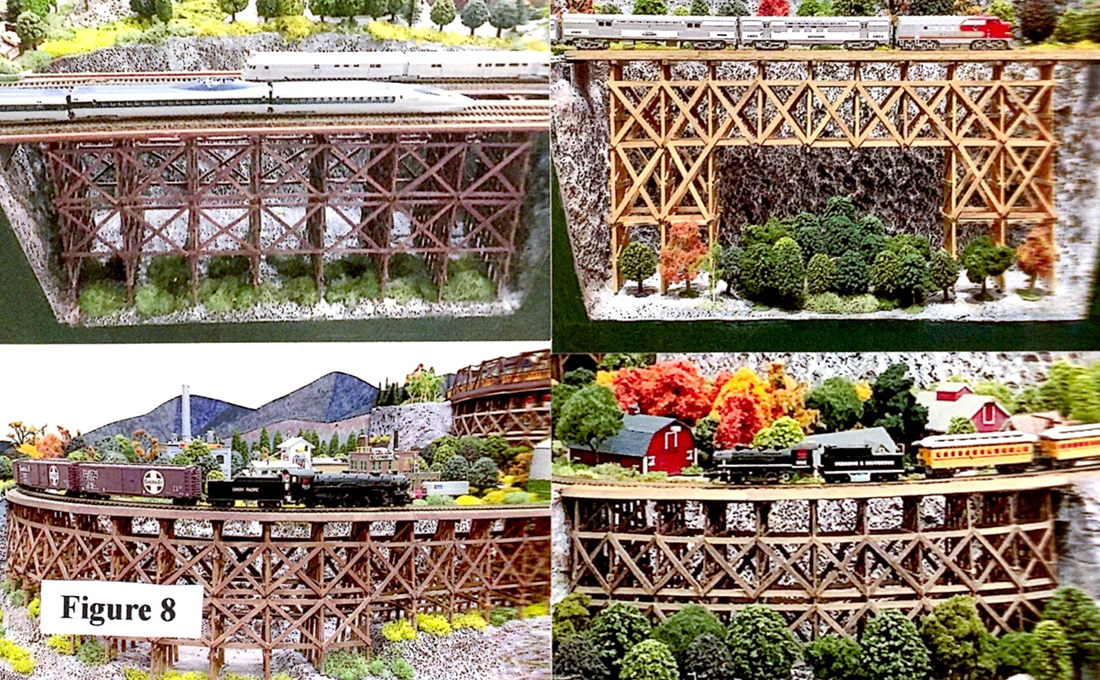
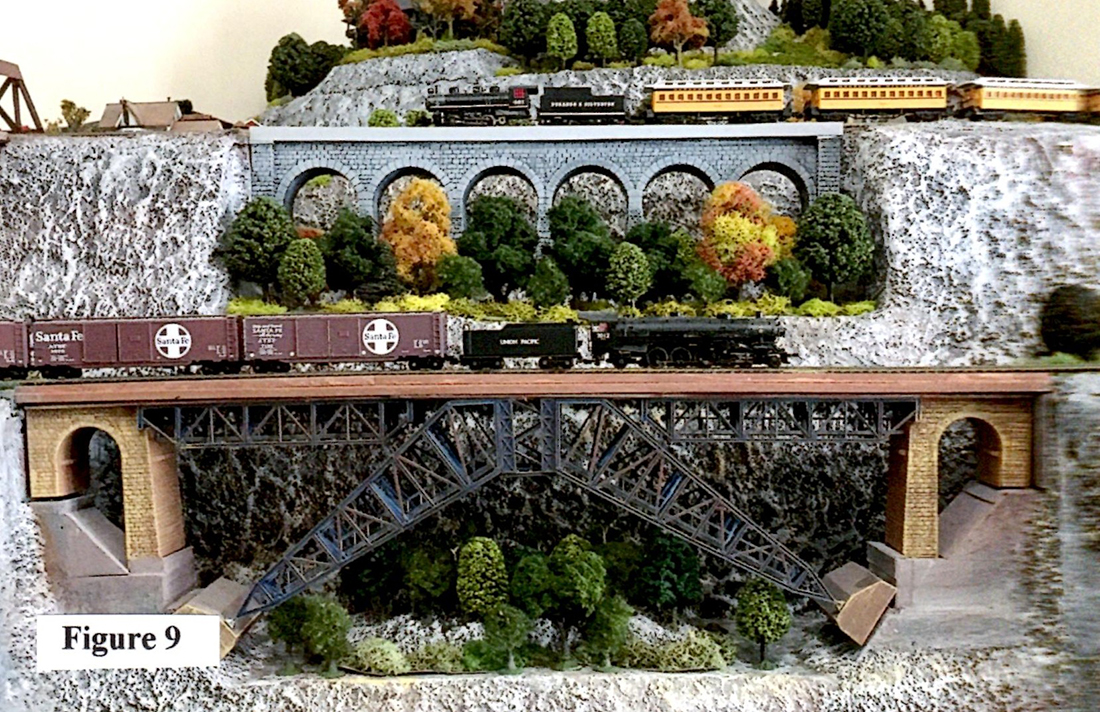
All four were scratch-built. At the end of the post I will share with you how I made the bents for the trestles. I also kit-bashed a viaduct model and a model of the Bietschtal Valley Bridge (Figure 9) to fit the available space. I incorporated a mix of kit and built-up structures on the layout.
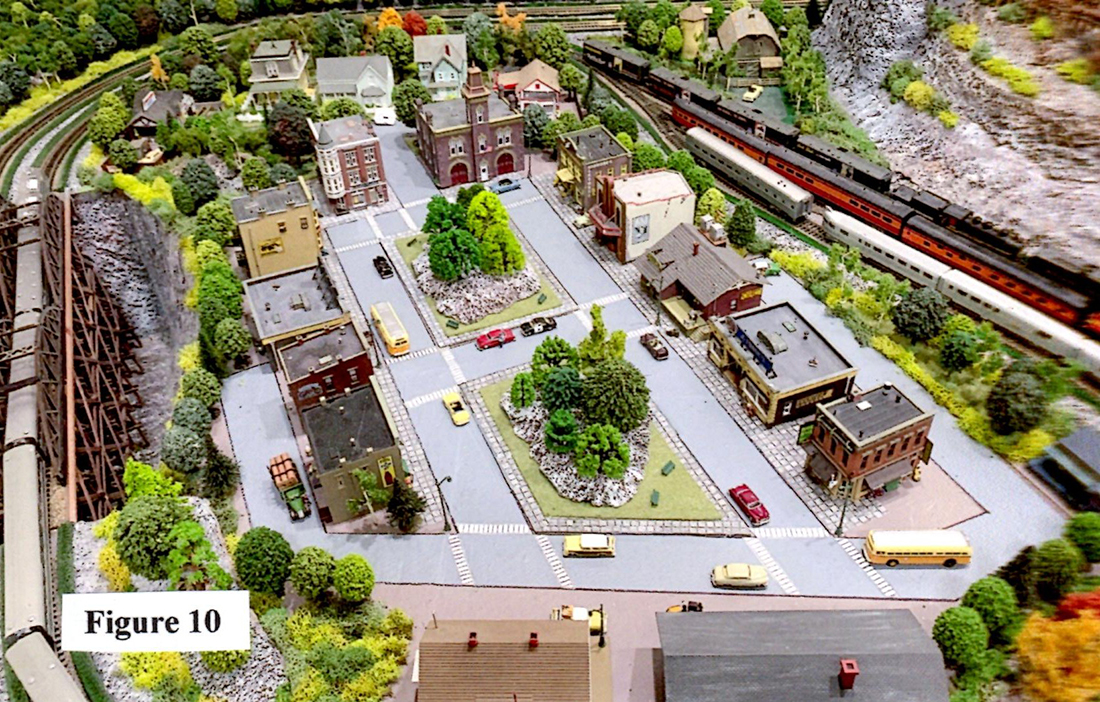
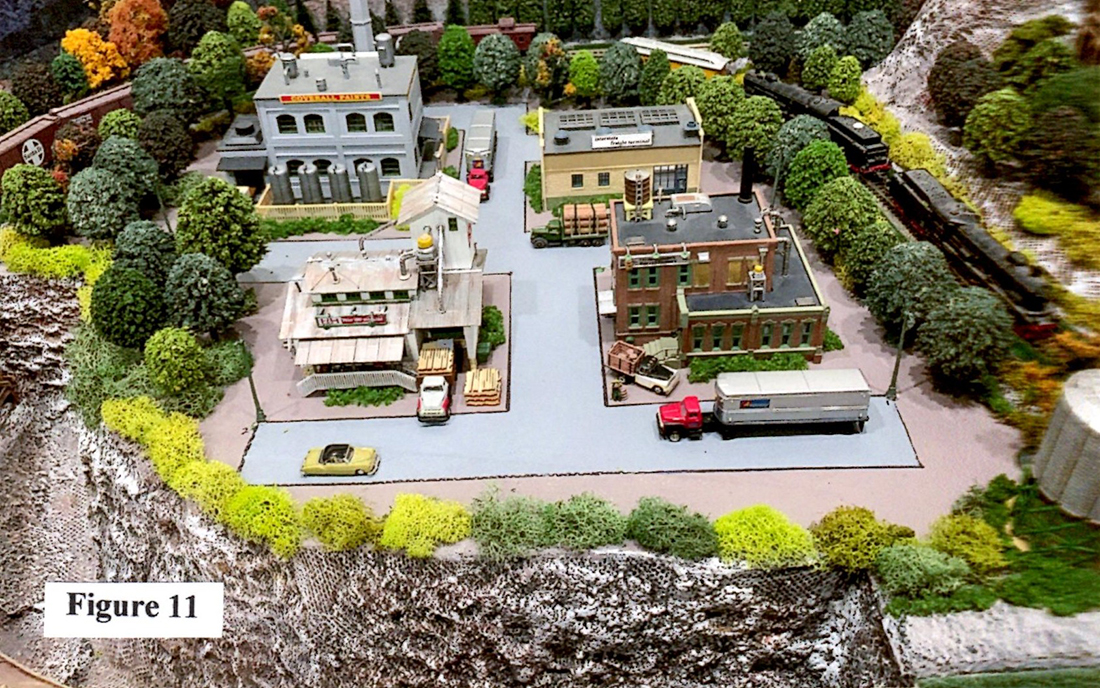
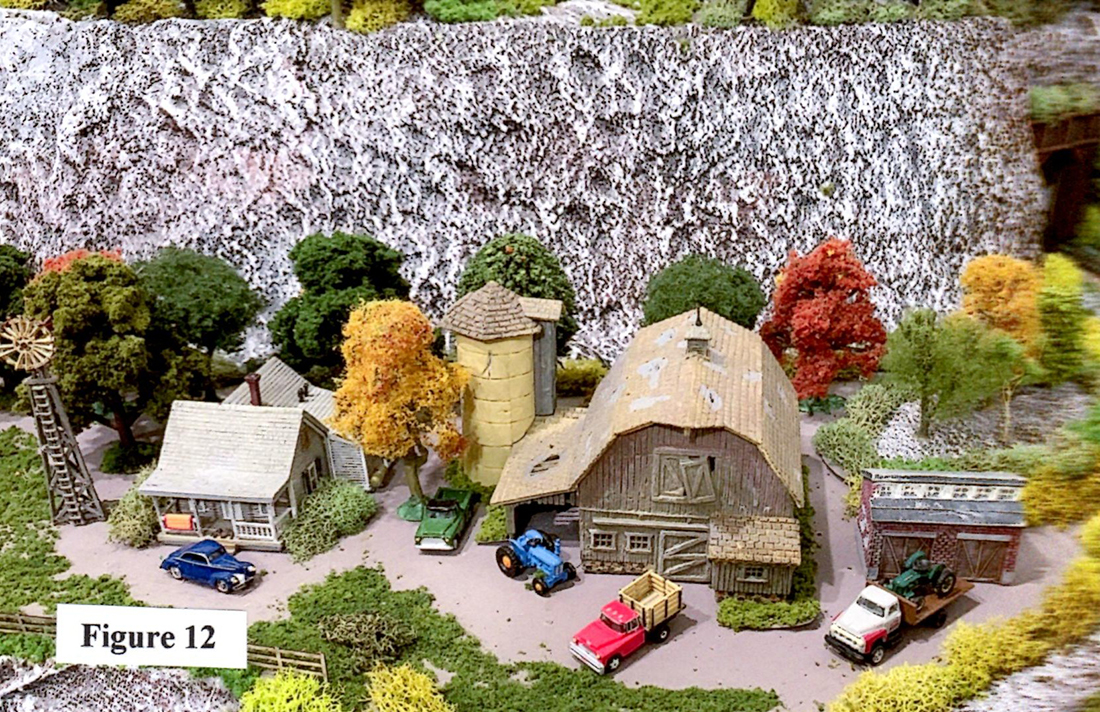
Level one is a small town (Figure 10), level two is an industrial complex (Figure 11), and level three is a rural area (Figure 12).
Most of the structures are lighted and there are street lamps in the town and the industrial complex. All the lights are Just Plug LED units, which I highly recommend. I scratch built a few of the trees (very tedious), but most are ready-made.
I typically operate a mix of trains including steam and early diesel-electric.
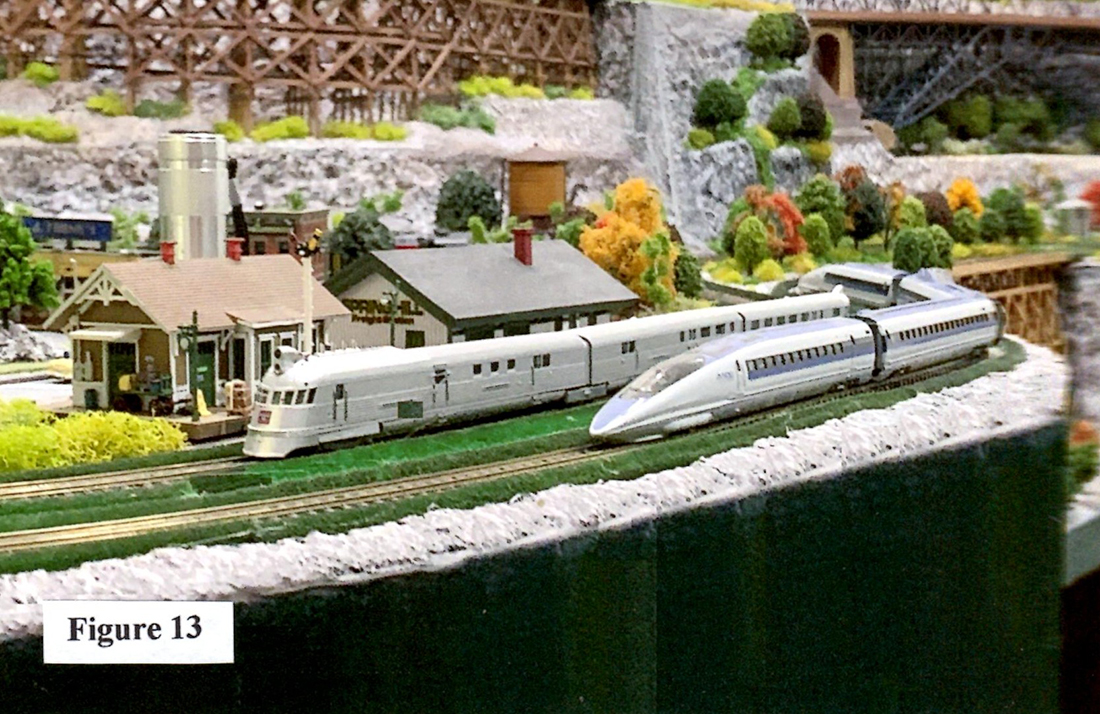
My favorites are a model of the Durango & Silverton Railroad and a model of the Burlington Pioneer Zephyr. Just for fun, I recently added a model of the JR 500 bullet train.
I occasionally run the Pioneer Zephyr on one tract and the bullet train on the other (Figure 13). It’s all about having fun.
The remaining photographs show how I constructed the bents for my trestle bridges (Figure 14).
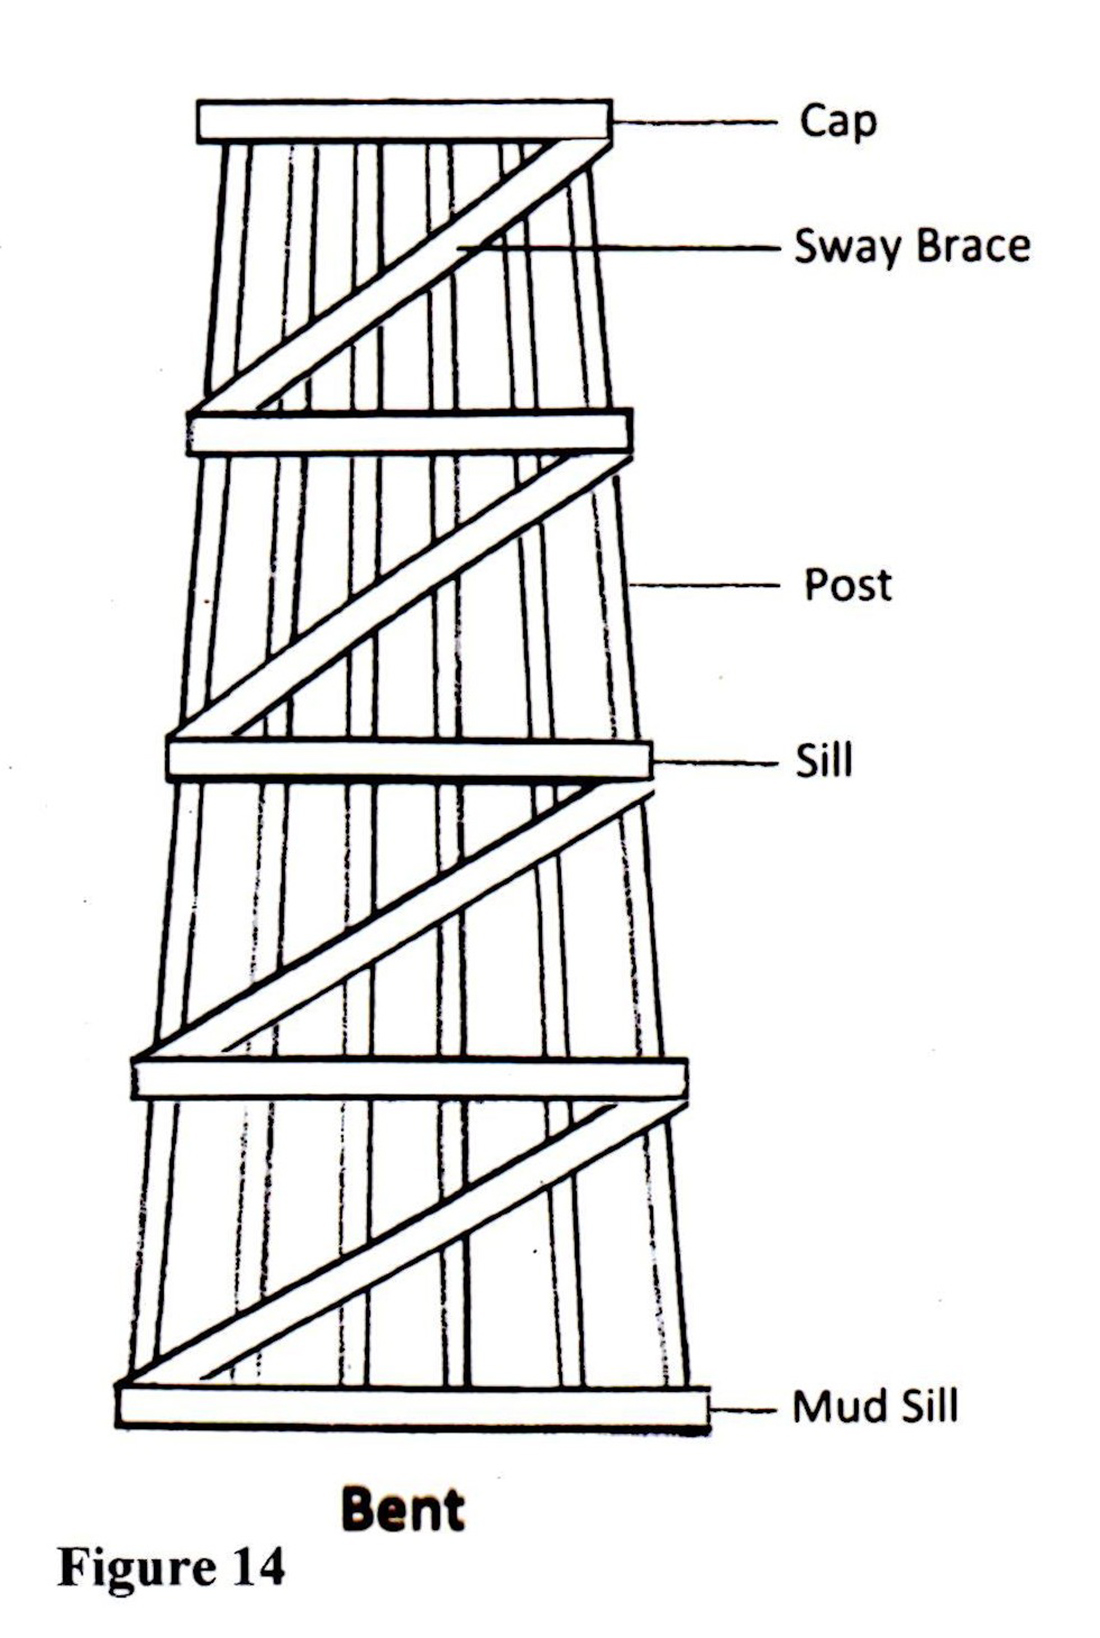
The first task was to decide the size and shape of each trestle bridge so I could design the individual trestles and determine how many I would need for each span.
Next, I fabricated a simple jig made from balsa wood attached to a foam core base to align the posts (Figure 15).
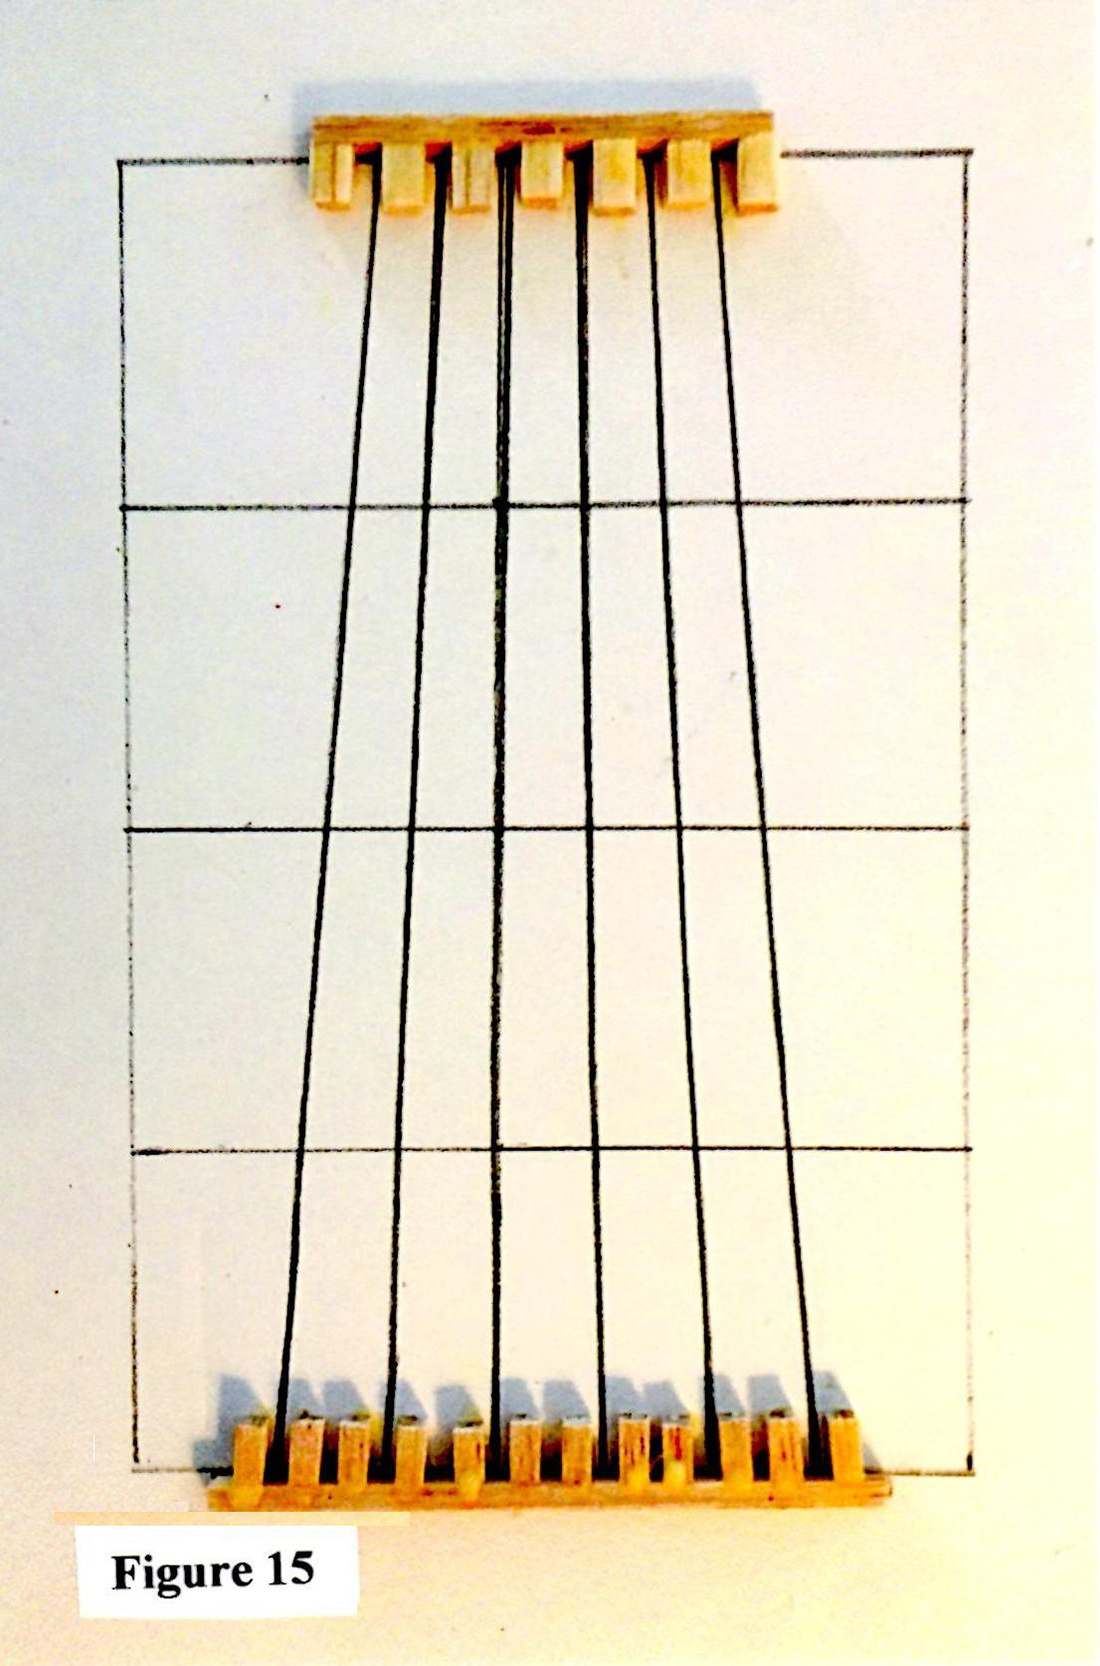
I used bamboo skewers for the posts and balsa wood strips for the cap, sills, and sway braces. I cut the bamboo skewers to length, inserted them into the jig, and attached the sills (except for the mud sill at the bottom of the bent and the cap on the top) with wood glue, and secured them with pins (Figure 16).

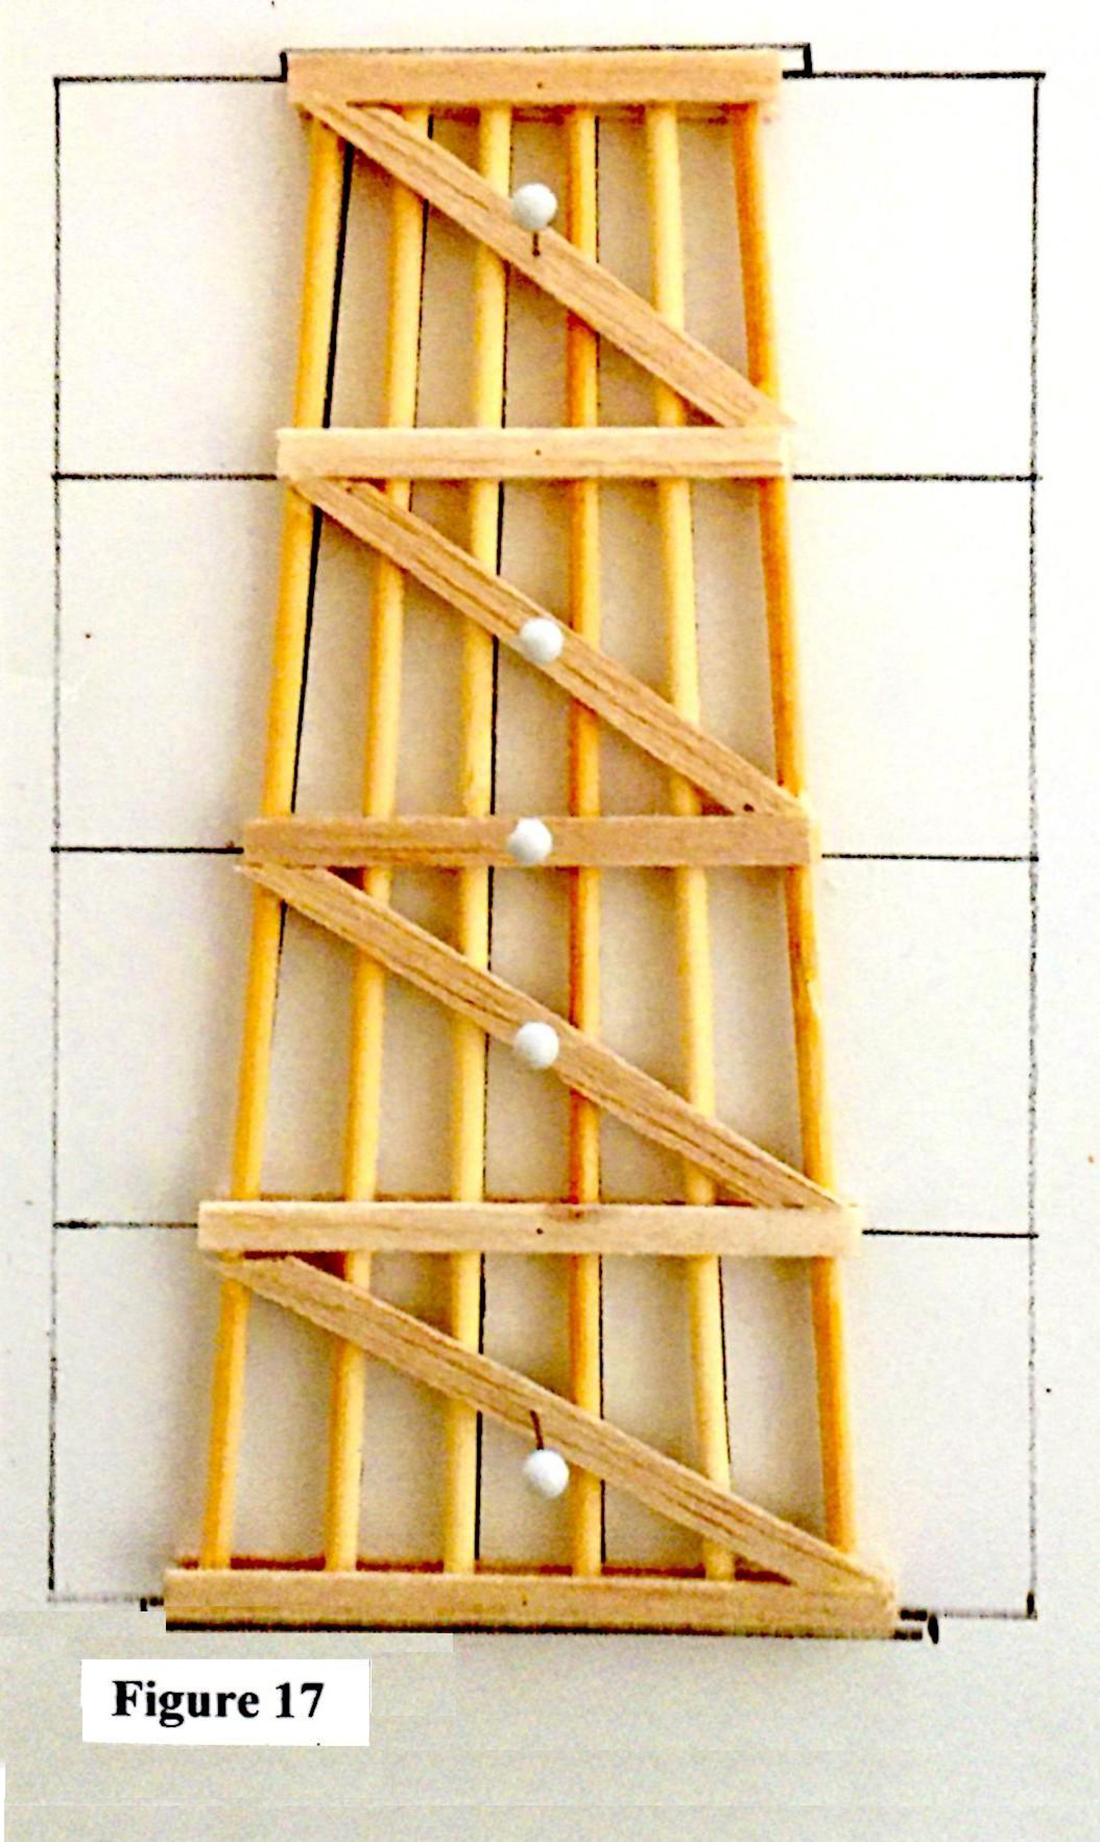
I removed the bent from the jig, placed it on a guide attached to a foam core base, and glued on on the cap, mud sill, and sway braces (Figure 17).
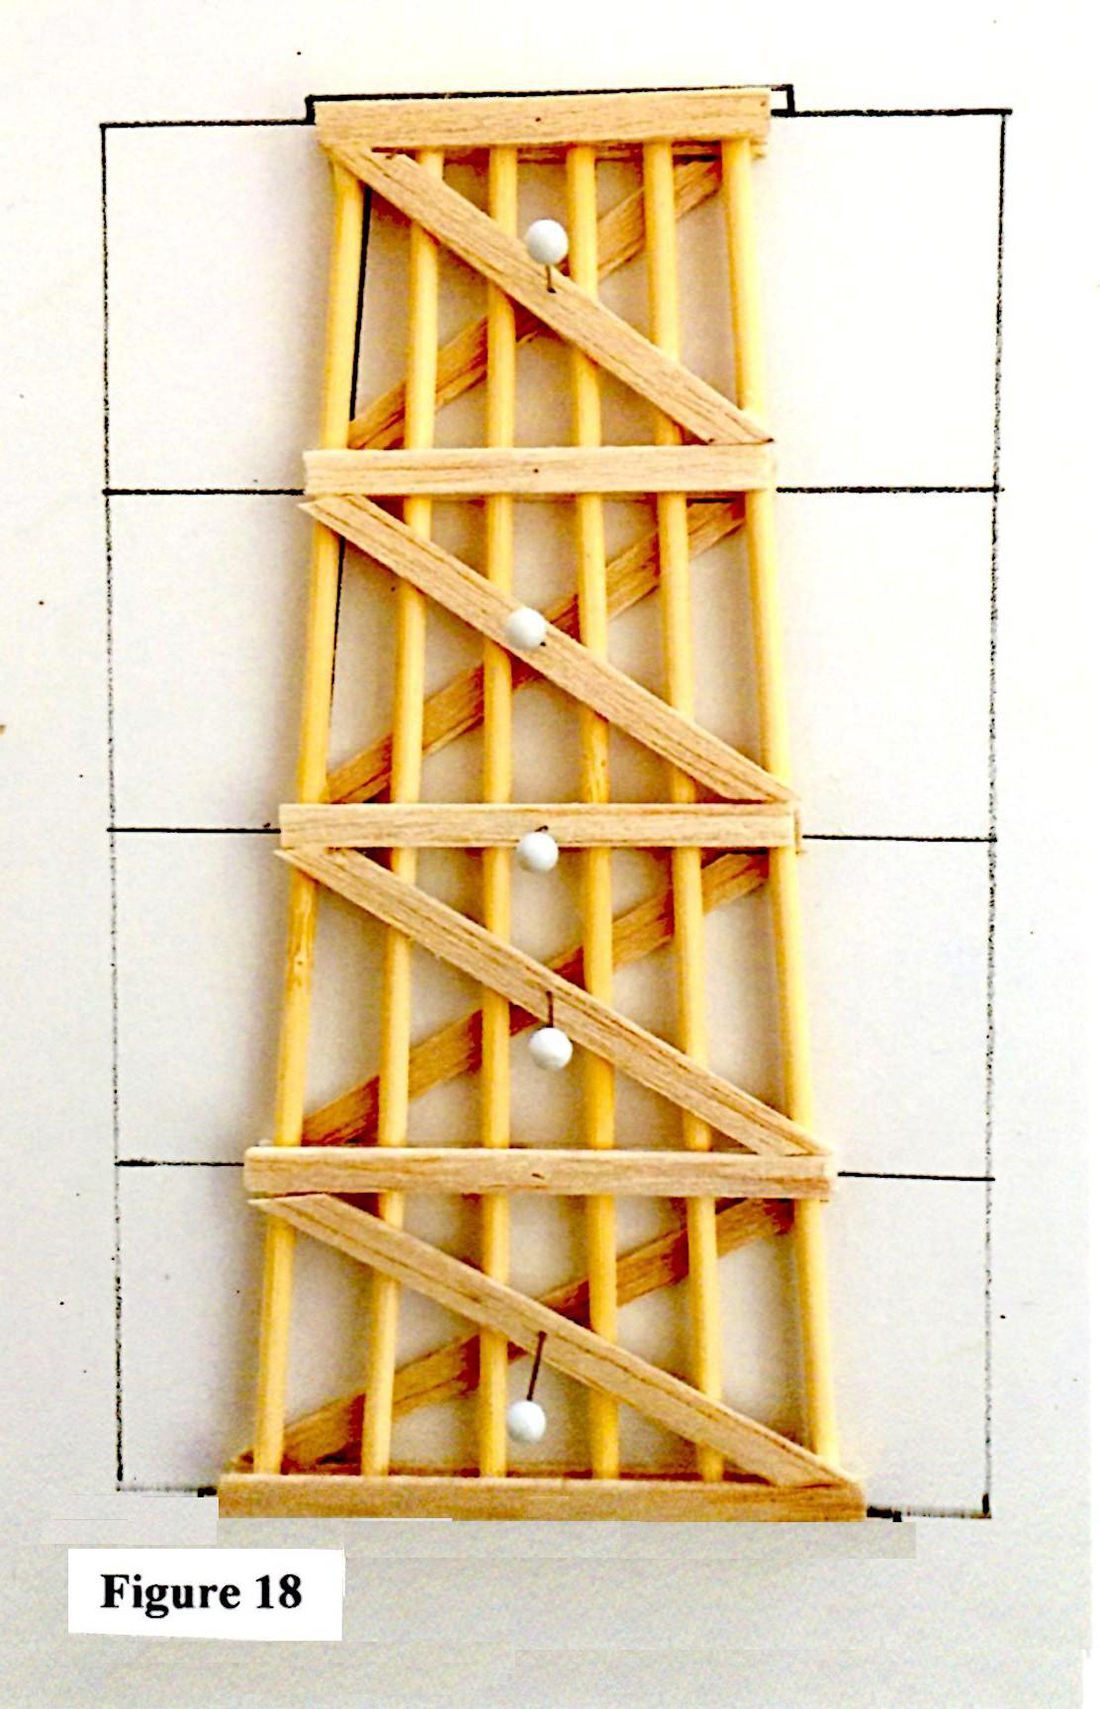
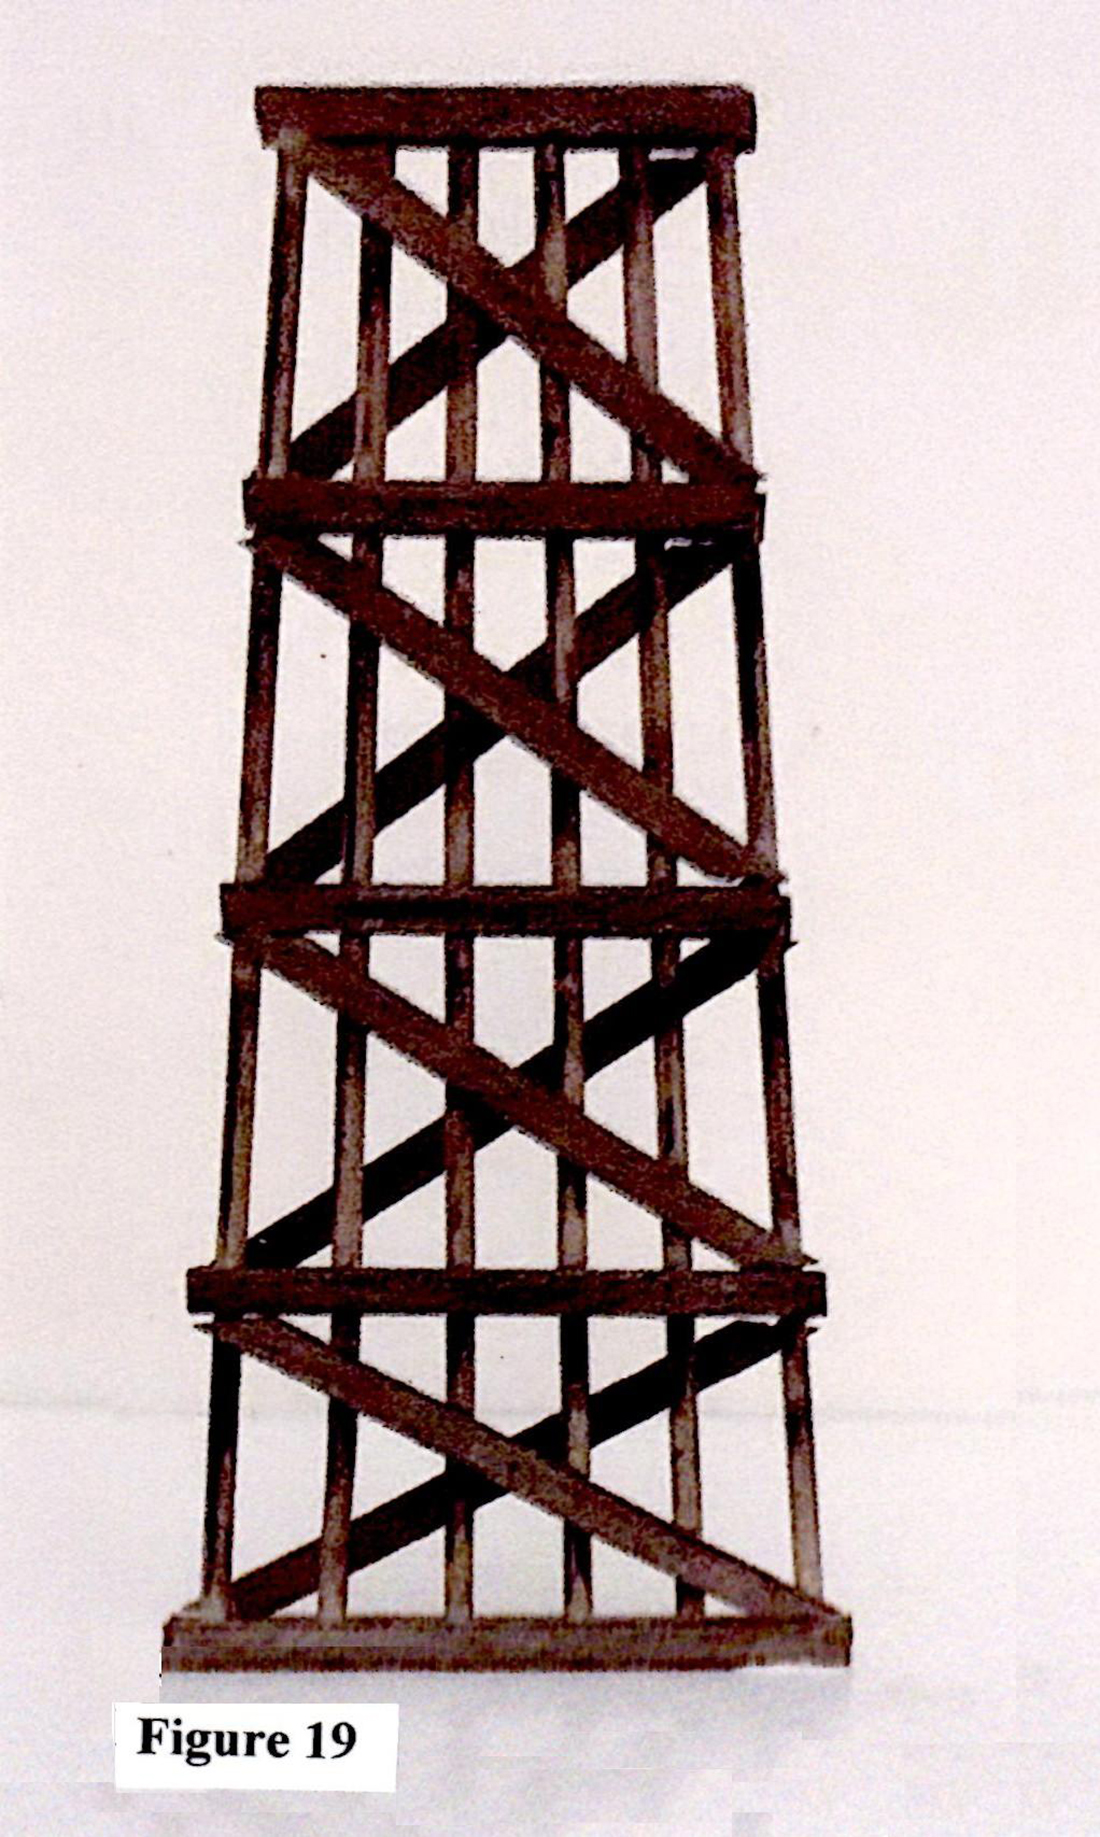
Once the glue was dry, I turned the bent over and attached the cap, sills, and sway braces to that side (Figure 18).
I painted and weathered the completed bent (Figure 19), and moved on to the next one. I hope you found this post helpful.
I’m still working on a video.
Thanks,
Bob”
A huge thank you to Bob for such a detailed walk through of his small N scale layout.
Hope you enjoyed it as much as I did.
That’s all for today folks.
Please do keep ’em coming – it’s all getting a little thin on the ground this end.
And if today is the day you want to start on your own layout, the the Beginner’s Guide is here.
Best
Al

Bob. Clever use of space. Goes to show where there is a will there is a way. Never ceases to amaze how ingenious some modellers are.. Tree density really adds to the layout. Do you have a picture of your helix ?.
Fantastic layout in such a small space , all with so much detail , well done Bob …Dangerous dave
ur obsessed with wooden trestles I see? Who would have known?
Don’t have the time or patience,Although great job.Were you an Architect?
The Critic
Bob you leave me breathless at what you have achieved on such a small scale, l have HO/00 and l with my big mitts find it difficult to work with tiny items (have to use tweezers) so l do appreciate the time consuming work you did on your N scale layout, job well done, should enter it into competitions for best layout,.
I love the pictures and tips I read here. Makes me wish I had room for even an N scale set up (I live in an apartment).
Wow, beautifully engineered layout. The concept of tiered layout worked out great. I’m in the process of an n scale layout. This will be my first n scale project. It will be small and simple for mainly the grandkids to run.
Thanks so much for sharing your awesome layout
Cary from Maryland
Bob
A million thanks for your input.
Your planning, artistry, and craftsmanship are at the top.
Great job
George from NY
Send Bob to Atlanta GA…..Beautiful work!!! I am trying to do the same, but just cant get it right…
Looks great but I don’t understand something. Does level one connect to level two and two connect to level three? You mentioned a helix but where does it go and how does it work? Is there a switch in the helix that allows the train to get off at level two or continue to climb to level three or is the helix only for level 2 to 3?
Thanks
Terry/USA
Very nice…
Layout is really well done…
The bridge pier “How-To” should help a lot of people.
Great idea for the bridge piers. I’m gonna try it for both my HO and O27 this winter.
your layout is beautiful, I have a HO Scale model of the PIONNER ZEPHYR, she is beautiful.
Bob thanks for the wonderful layout and all the information on your planning and ideas. It is sure a great layout for a small space. THANKS AGAIN.
Beautiful layout and I love the trestle bridges. I have designed and made several with my 3D printer and I use the wood filament to get an authentic look. I am still experimenting with different materials to see which I like the best.
WOW is all I can say….. unbelievable…….. impressive….. I have only one question…HOW LONG DID IT TAKE YOU TO DO THAT?
Bob,
Kincade, eat your heart out. A wonderful useful how-to on the trestle. While I am not sure what scale would work best, those very useful coffee stirrers we get with our morning or afternoon caffeine boost might make very useful sway braces. A little stronger than balsa methinks. The rounded ones are useful, and the squared-off ones have a great corner for cleaning out stuff, and they are cut like beams would be.
Kudos!
MN Dan
Lovely modeling!
Nice work! Figure 3 (the schematic) was not there, did it get left on the drawing floor or what?
Great layout bob
Love the bullet train
I love the jig he used to construct the Bents. For those that build period bridges it simplifies the process without changing the look. Think I’ll try that on my layout if I can find a deep canyon somewhere. 😉
Bob, Once again I’m gobsmacked by your incredible N scale layer cake layout. I really appreciate the narrative on how you came up with the design. I’m really impressed by the fact you didn’t just start with a 5 x 10 foot rectangle: your curved freeform edges make the layout all the more interesting. I never would have thought of doing that. Thanks also for the nice trestle building class. I have a couple nice trestles I hope someday to incorporate into a layout. You mentioned that levels 2 and 3 are removable. Could you elaborate more on how that is accomplished and how you would create the helix you mentioned?
Daniel b Hulitt;
You can buy those coffee stirs by the hundreds at walmart or any hobby store.
The Critic
I like the Trestle Bridges the best they have a lot of class. I have built a few. the last one was made of Epey or iron wood not sure if I got that right. It was for a GARDEN RAILROAD. I cut all the wood on a table saw. Glued the whole thing with Epoxy for weather resistance. That wood is tough to work with. It came undone because the wood does not glue well. It is very strong wood. I did pushups on the bridge.Ha! I enjoyed that RR.
I haven’t built my first layout yet. I still learning. With my space I think I’m going N scale. Yours was an inspiration. Any help or advice is appreciated.
Your patience paid off.Great planning and build.Two thumbs way up!👍👍
Always admire modelers who build trestle bridges!
Nice, so all trains are confined to a particular level ?
Nice workmanship? I hope mine comes out that good.
Your layout looks awesome. It looks like it should be in a museum.
Question: If the king buys something on the lower level, and wants it shipped to his castle by the greatest transportation method known to exist, would it be possible?
matiSon: yes it is! He’s hire a helicopter to lift it to the castle… LOL!
A true work of art. Beautiful modeling, and well thought out. Thank you.
All I can say is outstanding. Well done!
What are the measurements of your Bent? Looks like perfect for N scale. I’m working in HO so I’d increase the measurements accordingly
I LOVE LOVE LOVE your layout!! My only suggestion would be to stagger the trees on the edge of your layout to make them look a little more natural. Thanks for your instructions on the trestles.
My N scale is in a large low coffee table — even smaller than your layout!! But then, I am in a small condo since I downsized.
Keep up the good work.
Nancy
Really appreciated the Bent build education. THANK YOU