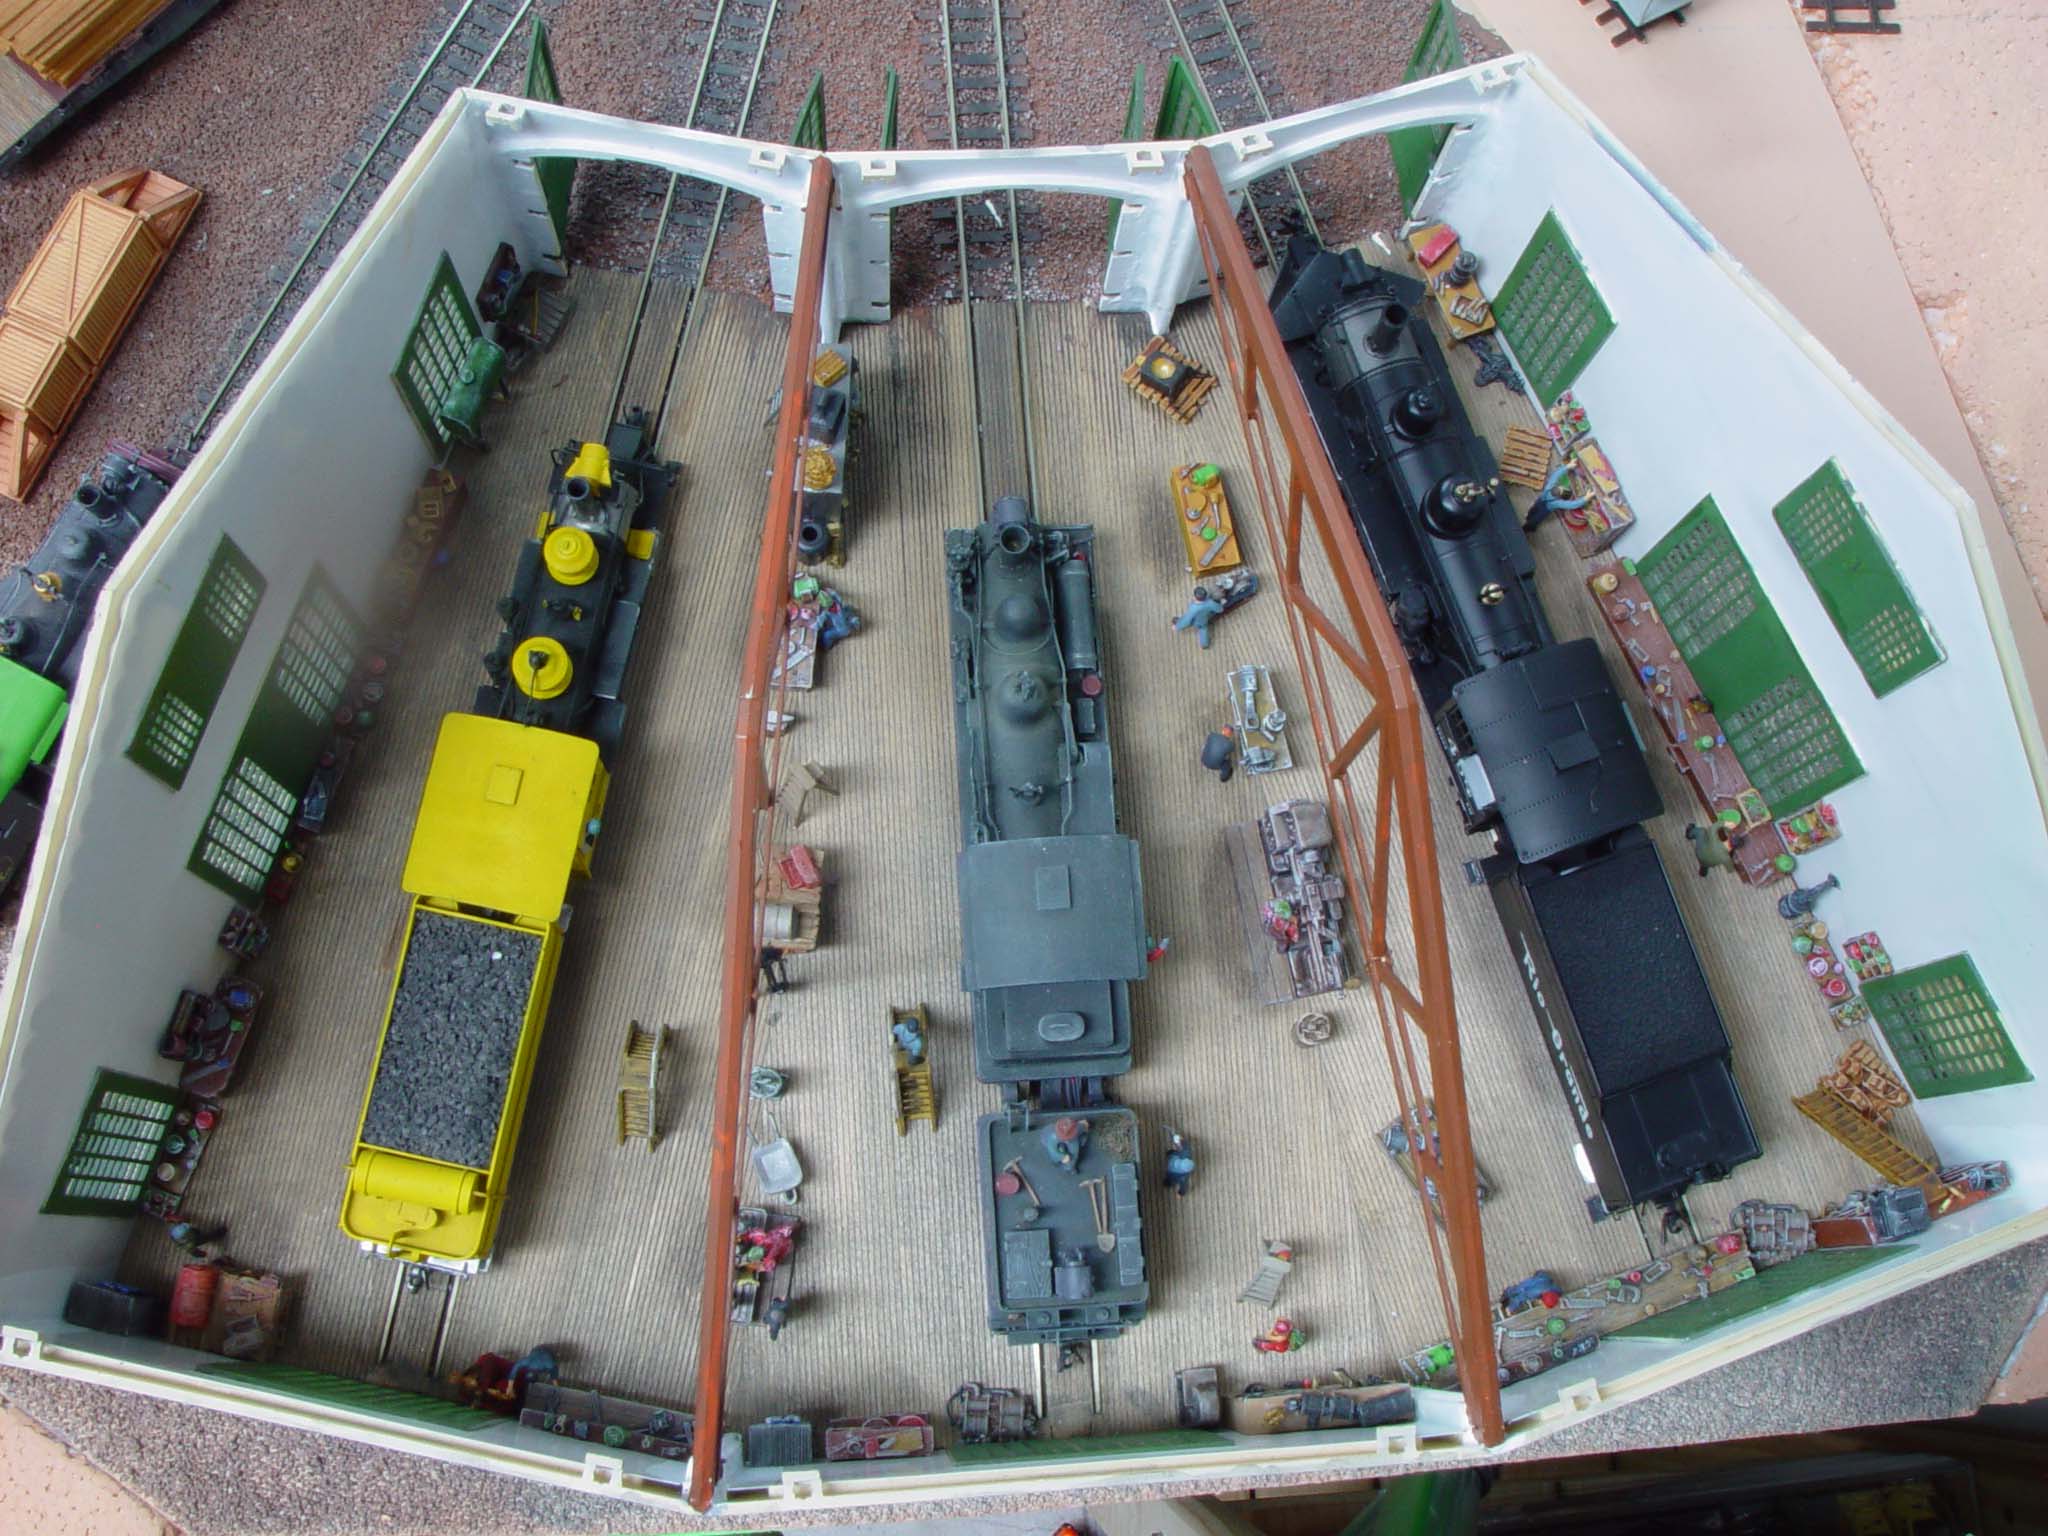
Brian has been in touch with his HO scale vintage engine house:
He’s sent in more pics of his stunning engine house.
I don’t know what it is about his layout, but it just seems to have been from charm and character…
“The double sided tape (the type that I use is literally twice the thickness of normal sticky tape) is available in any art supply store, craft shop, hardware store, office supply store and is not thick at all. Best thing since sliced bread for model building.
Time taken to build the engine house above from start (opening the box, reading the instructions 4 times) to mounting on the layout and operational was about 150 hours (in approximately 4 months) which included taking photographs and writing about the construction.
The yellow color of the engine house was dictated by the logging company Chiefs of Cascade Creek Logging Co. This was a standardized color for all the company’s buildings with one exception, the sawmill as this was always a temporary structure and when the area was deforested, it was torn down and moved to a new wooded area.
I will have a look through my photo collection and see if I have a few photos of my other logging buildings.
Cheers Brian”

Stunning pics – that’s why he’s in the hall of fame.
And now on to something completely different.
I’ve posted a similar video to the one below before.
But seeing as I watched this one from start to finish – I thought you’d enjoy it too (thank you to whoever mailed it me).
Post a comment below if you also enjoyed it!
Latest ebay cheat sheet is here.
That’s all for today folks.
A big thanks to Brian for sharing his HO scale vintage engine house.
Please do keep ’em coming.
And if today is the day you get started on your layout, the Beginner’s Guide is here.
Best
Al
PS Latest ebay cheat sheet is here.
PPS More HO scale train layouts here if that’s your thing.


Having been in real engine houses, I look at this one and say… WOW!
I can almost hear machine shop equipment running in there. And see the sparks from a welder at work making a repair. Excellent job!
brians engine house superb, but I have never seen one so clean in real life there is no black oil grease and coal dust on the track !
Very very nice !!!
What can one say, just stunning detail.
Cheers David
Stunning and beautifully detailed, but the big but is that engine sheds aren’t hospitals and they were (or are) this clean. In fact they were quite filthy places…
So a great deal of smudging and weathering is called for.
Stunning is right!!
Great job on the engine house. It makes a train yard look very authentic.
Very nice!!
Beautiful detailing, just great stuff in this engine house. After a few weeks on the layout, it is going to have to get DIRTY in there!
Looks great, only thing I see missing is inspection pits. Most engine or roundhouses have them. Other wise great details.
The best job
I have 5 engine sheds in my layout and they are not as detail as yours you have given me some good idea’s
wonder full job
Thank you
Maurizio
Unbelievable, Fantastic, not enough words…
However, as an N-Scaler, such a project would require a microscope
WOW!!! Great engine house.
WOW, I love the detail. This is one of those projects that can be done sitting at ones desk inside the house and then added to the layout.
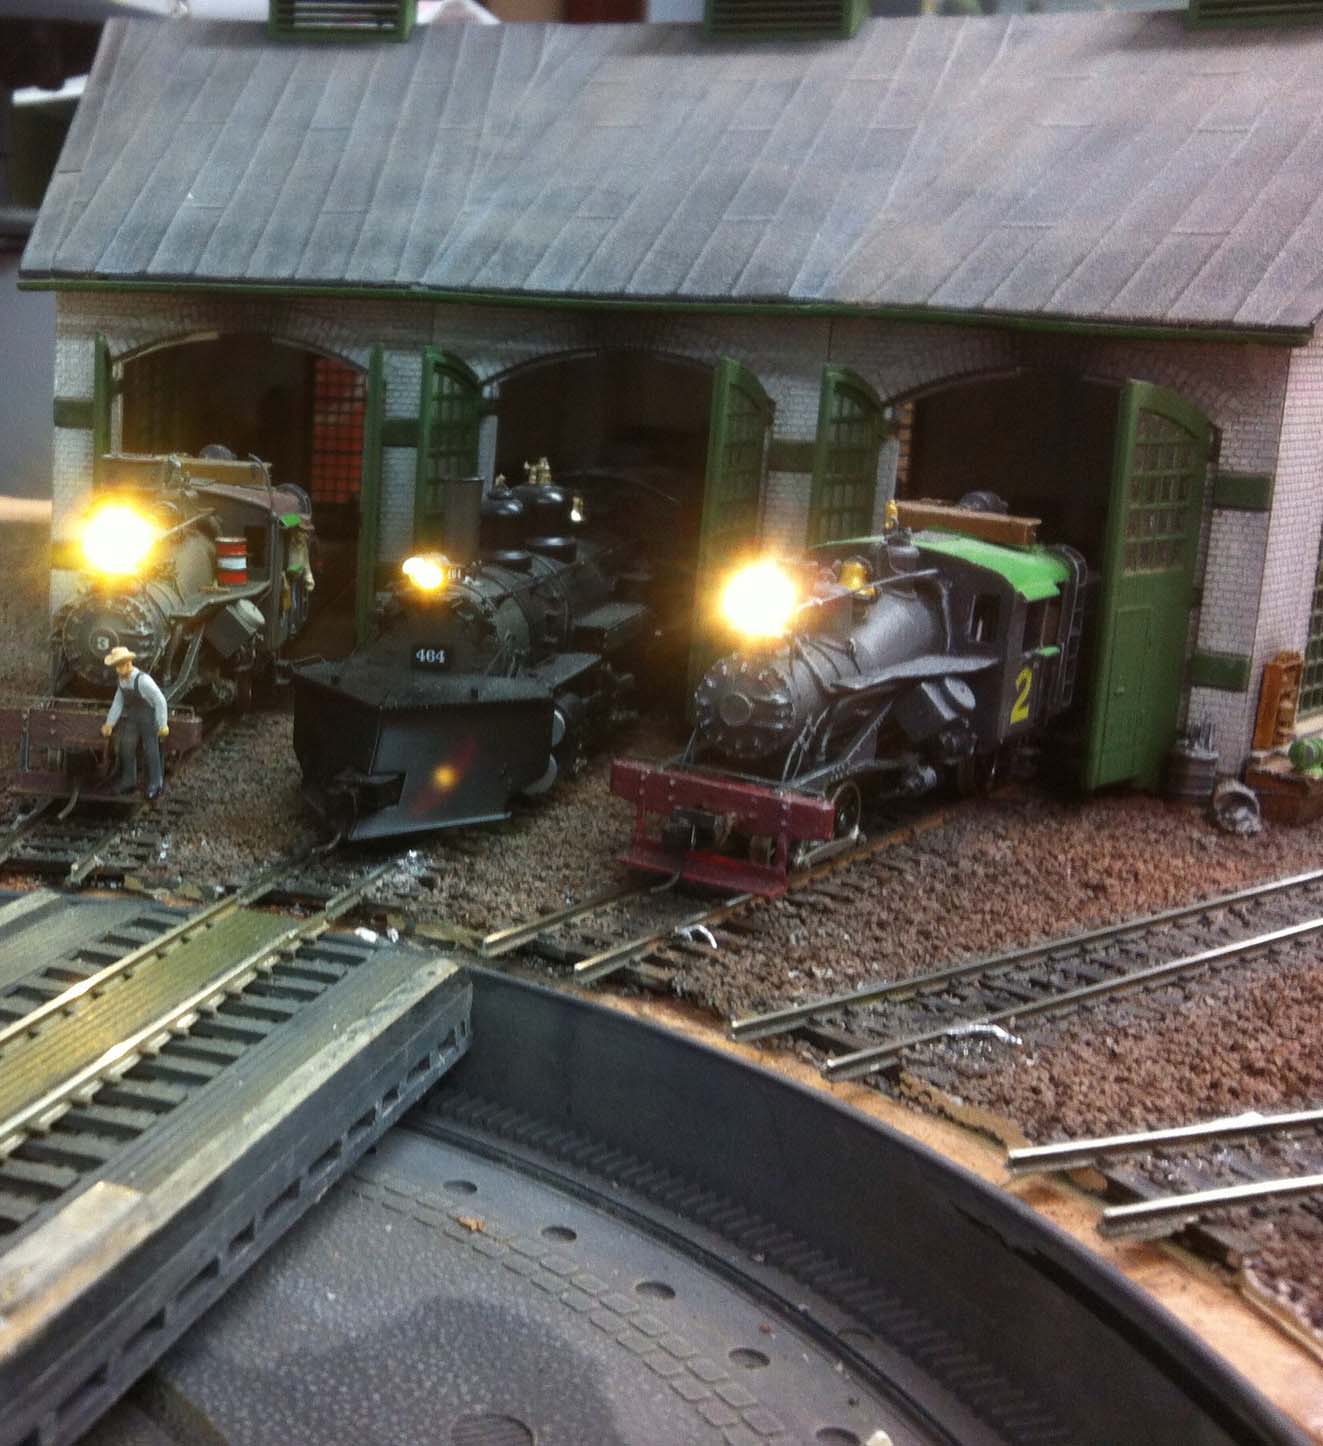
The Roundhouse (engine shed) is not quite finished yet as I have to put in the lighting and an Arc Welding module and smoke deflectors under the roof over the tracks. Once this is done, the final dirt, grease, oil and clutter will be added. Brian
VERY GOOD
fantastic
Superb!!
BEAUTIFUL job Brian !!!! It could be titled “New Roundhouse, Day One”
It would be a shame to smudge it up and hide your fine detail work. I say leave it as is.
. Fitz (from too near to Philly)
Only one word ..SUPERB…well done Brian …..Dave
Really loved the video. Thanks.
super detail on the engine house Brian
stunning and artful
keep em runnin fellas
That is amazing. I love it. I have two 2 bay vintage engine houses and two 1 bay engine houses and that is all they are. Nothing at all from what I see here. Truly amazingly awesome.
nice one
I am really impressed with Brian’s engine house, especially the design. I have a question for Brian…where did you get the flat yellow you used for one of your locos in the picture. I have been looking for a good yellow, like yours, for a project locomotive I’m working on.
Thank you for any assistance you can give me,
Wally
WOW excellent work and a keen eye…
Nice Job with the detailing. I has given me some ideas for my ongoing project.
Very cool!!!!!!!!!
On a previous listing, one guy asked about how he wanted to create his layout to fit a particular time period – 40’s & 50’s as I recall. He wants to know if he is being too fussy. Well, sir, you are the owner of your railroad, and what you say is the final word. Be as fussy as you want, and you will be happy.
I am trying to restrain myself to WWII as the upper limit date. I wanted to try to keep it to 1910 or earlier, but found it difficult to find rolling stock I liked, so I expanded my time line. However, by keeping my buildings and scenery confined to 1910, the railroad is now dated by which trains I am running. A 4-4-0 steam engine, a box car, and a string of 3 passenger cars and I am in the 1900’s. A bigger 2-8-2 and a string of heavyweight passenger cars, and I am transporting soldiers to war.
Still in training,
Carl in Kansas
Well Brian, read the comments from every one yes they do have there views, inspection pits, dirty oily thrown in but end of the day it’s what you like that counts. I always looking for ideas for mine and they were good ones said as for yours, so keep these photos coming they great Brian. Roy
where did you get scenery inside ?
Love this site, I can see why the majority of users are are older gentelmen ( not that that is a problem ) I have a desire ( and have had for many a year ) to build on one N gauge set I picked up in Winchester ’87, but children an everything else comes first. This is fantastic work, I should very much like to see those who have knocked it for being so clinical do a finer job, I am sure if they have they would be on here too.
I’m flabbergasted! I had to look at that first photo a bit to figure out if it was the layout or Brian’s workroom! The lack of “grime” was what made me initially think it was Brian’s shop. 😀
GREAT VIDEO really enjoyed.!!!! The engine shed it is like being in the real thing. Did I recognise the old Airfix windows ??? That’s 2 out of 2 I’d forgotten how much I used to enjoy. got a bit of time now recovering. kind regards
Forgot to mention about the video you put on too Brian, those steam engines were a size to drive, L1s biggest one ever built where only room for driver but the fireman other one who was at rear end of tender shovelling the coal. Great pictures Brian. Roy
Pride in workmanship … shows in the detailing and the detailing sets the tone for a great model railroad … this is awesome!
regards,
Tom, Maryland, USA
To answer the question from Wally, I used a flat yellow acrylic made by Tamiya, thinned it with Tamiya’s acrylic thinner and used my airbrush to spray it on the locomotive. (One could also use Sunburst yellow from the Citadel range) of flat acrylic thinned with the Tamiya thinner.
The second comment about where I get the scenery items in the roundhouse from, I make masters of what I need and then make rubber moulds and cast as many as I need out of resin or plaster of Paris depending what I want to use them for.
I have sent in a how to article on how I make the rubber moulds with photos.
Cheers Brian
Lovely detailed interior!
I understand what everyone is saying about the neatness…….I know, you make a fantastic scratch build model and scene and you know you have to weather it up because railroad yards and engine houses are dirty places . Great job….. its a fantastic model.
Brian…… You have to make a change in your scene…….. In your third picture you have a figure standing on the running board on the front of the locomotive on the left…….THAT IS A MORTAL SIN FOR ANYONE WORKING WITH, IN OR AROUND A LOCOMOTIVE. The reason is…. if you fall off, you know what will happen.
Brian, my grandfather worked in a machine shop for NYC in Albany NY a hundred years ago. His proudest job was repairing #999, which was the first loco to break 100mph and is now at the Chicago Museum of Science and Industry. I believe he would be quite impressed with your model. Thanks for a wonderful memory of my grandfather.
Well done, I can only say “it’s inspirational “. I understand the process for the details but is the building proprietary or scratch built?
only one word amazing
This is quite amazing. Well done
Beautiful work Brian. I love all the details in your engine house but I doubt I’d have the skill or patience to make them the way you do. As to the cleanliness of your engine house, I watched a video a few months ago of steam-powered rotary snow plow in the Swiss Alps and the car shop / engine house where they worked on it was immaculately clean — not a drop of grease anywhere to be seen. Everything was painted in bright primary colors, so any dirt and grime would be pretty obvious.
As to inspection pits, I have been trying to find out if all roundhouses have inspection pits or not. The Walthers and Classic Model Railroads modern roundhouses have inspection pits in every stall but the Heljan roundhouse kits have no inspection pits — just openings in the floor where you can lay the track. It wouldn’t be too hard to scratch build inspection pits from styrene sheet with maybe some steps from the scrap box. I’ve looked at photos of prototype roundhouses but it’s often hard to see if there are inspection pits since they are under the locomotives. Discussions on the web seem to agree that every engine house or repair shop would probably have at least one inspection pit and often more than one. I would be interested in others thoughts on this subject.
Very Kool.!!!!!
Beautiful work!
An engine house is perhaps one of the dirtiest places in the Yard except perhaps the cinder pit.
Obviously, hours upon hours have been spent here.
Bless You!
Loved your feature about oddball locomotives. Enjoyed reading this. Would like to see more of these educational features. Thanks for sharing
butiful great job best wishes and great work
Brian,
Beautiful workmanship on the enginehouse/roundhouse, but I have a question: I have seen in multiple places that the locomotives are placed in the stalls in the opposite direction. If the front of the loco goes in first, it gives workers more room to service the cylinders, which apparently needed more attention than apparatus at the rear.
Tom in Mississippi
great job.