Cary has been back in touch with his garden railroad.
Perhaps one of the things I enjoy most about my little blog is seeing a layout come to life over many months.
But some, take years.
Cary has been kind enough to post updates of his huge G scale project – he is in to year 6 now.
And I have to say, I’ve enjoyed every one of his updates (his last one is here), but this one is a real mile stone – his trains are running!
“Hello Al and All,
I/m six years into my Garden Railroad and finally got the main loop of track installed and trains running this summer.
My layout is approximately 60X20 feet and the main loop is about 130 feet of track.
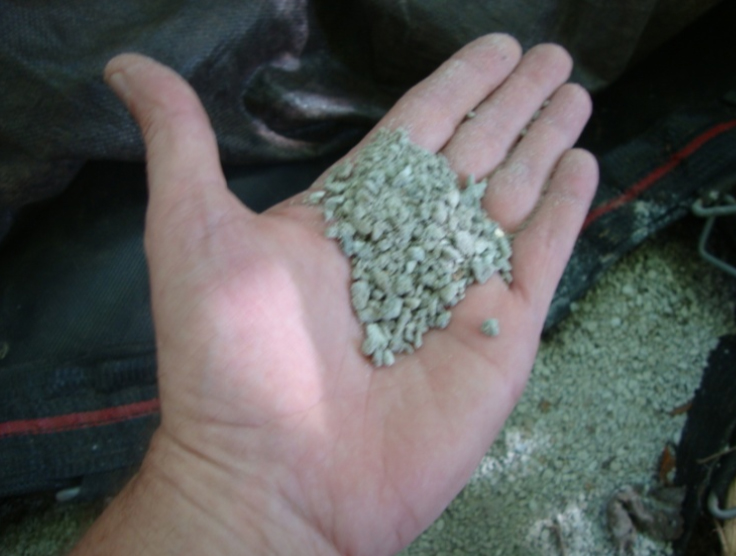
Track Bed: Last summer I used a trenching shovel to dig a trench 4 inches wide and 6 inches deep.
I lined it with landscaping fabric, filled with ballast and let it pack over the winter.
For ballast, I’m using something my local quarry calls “Manufactured Sand” I’m happy with this material, it packs well and does a great job holding the track in place. It’s also easy to adjust the track if needed.
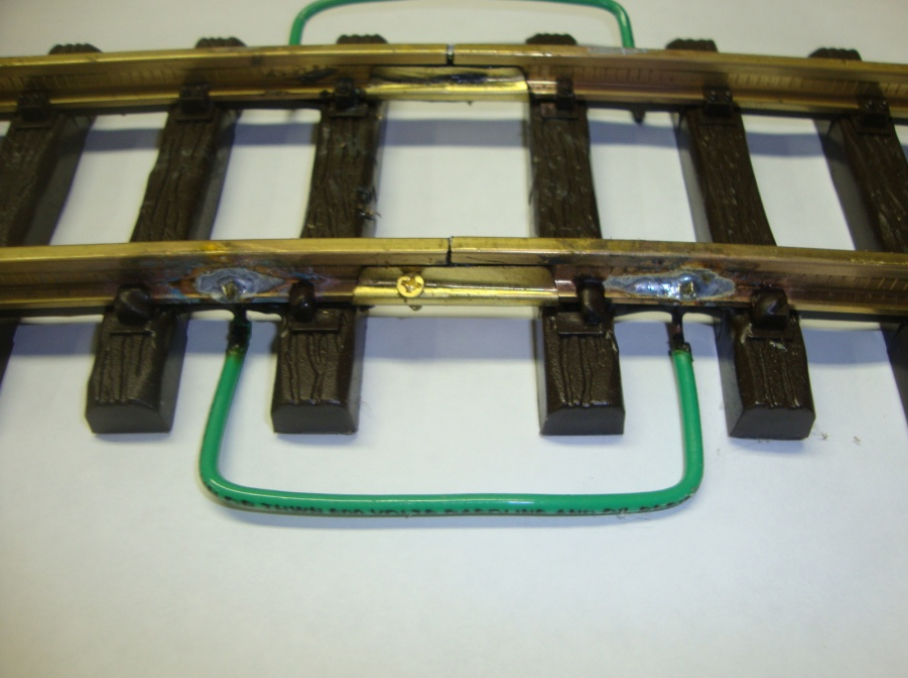
I spent a lot of time this summer joining track sections. I assembled the pieces into 8-10 foot lengths in my garage leaving jumpers wires extended on both ends. I then carried them out to the site and used water proof wire nuts to connect the wires.
I soldered jumper wires across each small section by drilling a 5/64″ hole and inserting a 14 gauge wire. I used my propane torch to solder the connections (after careful cleaning and applying flux).
I also used a #2 brass screw to hold the sections together. Yes the torch did some damage to my track ties but with some practice, damage was minimal. I’m also squirting some conductive grease into each joint prior to assembly. During my initial road trials this summer, I had no issues maintaining continuity through the track.
The main loop of my garden railroad track rises about 12 inches from the low point (operator's station) to the high point (just behind the pond). I used a level with a carefully sized wood block spacer on one end to maintain a maximum 3.5% grade although I think it's a little steeper in some areas. My Locos are doing OK pulling the hills but I I'll be making some adjustments Spring to at least improve the appearance.

I’m using an MRC 10 amp/ 24Volt DC power supply with only one track connection so far. It seems to be working fine with no voltage drops at the far end of the layout. At 50% throttle the track is 12 volts on level grade, but drops to 8V when pulling those hills. I’ve considered running a feeder wire to the far end but at this point don’t see the need.

Garden railroad track Cleaning: I know most garden railroaders eventually go to battery power, but I'm going to try my best to stick with track power.
I can have trains running great one day and the next morning I have to clean the track.
I don’t think it’s oxidation on the track, just the morning dew with dust, pollen etc.. from the trees.
I first use a broom to sweep debris off the track and then use a fiber mesh drywall sanding pad which leaves no scratches on the track.
I can clean the 130 feet of track in about 20 minutes. I think a scratch built track cleaning car is something I’ll be investigating further .
First I want to try some different manual methods to see what works best. I hear that swiffer brooms work well but have not yet tried it.
Well it’s time to hang up my shovel for the summer and turn my attention to some indoor projects like making more buildings and planning the train yard.
Once again, thanks for all that you do to promote the hobby.
I love seeing everyone’s projects and being able to share mine with people who have the same passion is something I really look forward to.
I had a lot of fun putting this video together, I hope everyone enjoys it.
Happy Modeling!
Cary”
I can’t thank Cary enough for sharing his garden railroad progress. Hope you enjoyed it as much I did.
Now on to other stuff.
Yesterday I posted about a backdrop download, and Andy weighed in with this fine tip:
“Al, short suggestion. Your info on printing backdrop banners was missing one important instruction. Office supply printers print banners in both high-gloss and matte finishes. You need to specify matte for the backdrop to look realistic.
Andy”
Thats all for today, folks. Please do keep ’em coming. And if any of you see some HO chaps, please do wake them up. It’s all gone very quiet on that front.
I’ll finish with this thought. Cary is 6 years in to his layout – so if you’ve ever mulled over starting a layout, take a page out of Cary’s book and start!
Course, I’m biased, but the Beginner’s Guide is an excellent first step.
Best
Al


Fun layout.
I’ll bet you’ll make a grand Christmas scene.Me and my two grand children will look forward to seeing it!
Regards:
Robert
Great layout and wonderful music! Looks like you have a smart plan in place. Cheers! NJ Mark
Fantastic, great job.
Cary, awesome job!! Love everything about it. I have kept up with your post, I am also from Kentucky. Look forward to seeing the buildings and landscape in place, Gary Somerset,Ky
Cary, congratulations on trains running. You garden railway is awesome. I really like the track jumpers you have done. Look forward to next years progress.
Cary B
Great job look forward to more in years to come.
Wow, Great Job…
What a great layout, very nice. Could watch for hours.
JOB WELL DONE I like the work train & all the buildings you showed. They will look nice on your layout
Wonderful work Cary…..Can’t wait to what’s coming next. My cousin lives in Williamstown Ky. Just visited them a week ago. Would love to see your layout. Great Job !!!! Paul in Ohio
Wonderful work Cary…..Can’t wait to see what’s coming next. My cousin lives in Williamstown Ky. Just visited them a week ago. Would love to see your layout. Great Job !!!! Paul in Ohio
ShaZam, Andy, that was a real toe tappin video. Wonderful video work and track work besides. Loved to see the the MOW equipment doing their thing. Can’t wait for next years work to unfold, but I see cues on the workbench!
Great job getting your trains running, Cary! I’m looking forward to seeing updates as you complete sections of it. Warren, AL, USA
Fantastic start but why did it take 6 years? I am asking as mine are still in storage but you have truly inspired me to get started with some track bed yet this year ! Thanks for revealing cures to my secret fears with outdoors– a stable trackbed and non corrosive circuitry….thank you
Track installation looks really smooth. Ever the lighter trains were as steady as a rock. Some very tight curves especially for the larger trains it will be interesting to see more of the scenery as it is installed as no doubt there is a plan of what Cary is depicting in his layout. Looking forward to next instalment.
Very nice layout Cary! So the 24v ps seems to meet your needs over such a long stretch. Maybe I need a large ps for my 10×16 overhead as it loses power at the far end.
Al,
I’ve been working on my portable 9’x5’ ‘O’ scale, three rail, layout for 1 1/2 years now. It’s basically all track, no scenery, but I’m getting ready to put the switch controls and power controller in place. I’m planning on using DCS as most of the trains I have operate on that system. The plan, eventually, is to take it to my club, Military Society of Model RailRoad Engineers (MSMRRE (you can find us on FaceBook) so we can take it around for display purposes to different venues. Our club runs Z, N, HoN3, HO and O scales.
You need to build some sidings so that you can run more than one train at a time.
What this knock off because summer is over, I would think Fall and Spring would be a good time to get some out door work in.
One of the things you need is a siding or two so you can run more than one train at a time.
Why are you knocking off just because summer is over you have early fall and late spring to work outside when it is cool.
I like this layout. Thank You for everything.
Hi there, I know it “goes against the grain” but why not use a little CRC-56 or WD40 on the wheels of your locos, you’ll be very surprised at the results, like all of us I was VERY sceptical about this but it really does work, not too much or you may end up in slippage country. Lindsay in NZ
very nice, next will be a camera ride along .
Cary—great garden layout with beautiful scenery!
Jerry
WD40 on the wheels, have not heard that one but for sure going to give it try. Thanks for the tip Lindsay! Cary in KY
yes will try the wd40, thanks for the tip Lindsay!
Cary in KY
Wonderful, a great piece of model engineering. One query, with your rail connections do you get any distortion of the track with changes in temperature?
I just put down my track this summer so don’t know yet about temp changes. Guess I’ll find out next spring if the track has moved. As mentioned, the shorter sections are secured with a screw, the 8-10 foot sections are not. i did it this way to provide for a little movement. Also the track so far appears to be easily adjustable. Just how much adjustment I need to make in the spring remains to be determined. Cary in KY
That’s the best G scale layout I have ever seen!!!! Lot of planning had to go into it.
Being in 7-1/2″ gauge, I sympathize with you in battling Mother Nature. Unlike table top layouts, the maintenance just goes on & on & on. Bud
A good friend had a bit of trackage laid down in the woods behind his house. He had built a live steam engine from scratch that burned oil for steam creation. I was, as best I can remember, a 14-inch gage and was a freaking blast to run. Cars were set-up to handle riders so it was alot of fun. I did ‘Gandy Dancing’ for him for several years (track maintenance) He used captured rainwater to feed his boiler. It took us aboyt 1 year to build the trackage, engine, and structures. He has long since gone to his final reward but I hope he has a rail line to run where he is. Nice thing about outdoors set-ups is the REAL water features and the scenery as you go around the track. This brought back some fond memories1 Thanks!
Nice work!! You have a beautiful natural setting for your railroad too! Aristo’s Rogers and U24’s are good runners, I have had several of them. And of course the LGB Stainz are so good, I have one Stainz running daily on a overhead railroad in a local business that is now over 50 years old and runs like a champ.
For easy track cleaning I built a simple block wrapped with drywall sanding material, the block has two nails in it that are long enough to go up through the floor of a box car. All that is needed is to drill two small holes in the floor of the car for the nails to go through and the block floats on the track. I added a little bit of weight so the drag is minimal and easily pulled. It works great, doesn’t scratch up the track, and the drywall sanding material lasts a long time and is easy to change out. It also rides over my turnouts without a problem.
There are tons of different thoughts using oils, and wd-40, and etc. What has worked for me now for nearly 20 years without a problem is automatic transmission fluid for rail cleaning. I just wipe the rail heads with a cloth and auto-trans fluid. I also clean my loco wheels with the fluid. I also sometimes have put just a couple drops on the rail and let the train spread it. small drops, too much and you have wheel slippage.
Very nice and exciting to see and watch.
Richard from Hardin Montana USA
Thanks to you and this layout I have to switch from HO gauge to G gauge…… why BECAUSE YOUR LAYOUT IS FAAANTASTIC……and I have a huge backyard….so thanks for posting. I have to take out a second mortgage to pay for it but I’m sure it’ll be well worth the price. All the best to you and you project
Paul
Well done Cary! I think your track will do ok with the roadbed that yo put down. You may see some movement of the trestles due to ground heave. Sounds like a plan not to invest too much before you see what Mother Nature has in store for you! I laid down a Christmas layout for 35 years in a rock garden. I ran in all kinds of weather. I had snowplows with multiple mashups. The 2 killers were wind and freezing rain. I would spray alcohol on the tracks to keep running. They ran from Noon till about 11PM. As far as running from one day to the next; I found that some cars didn’t track well together. Sometimes it was as simple as the position of the hook. If the following cars hook was on the right it would cause a derailment if it was put on the left it ran very happy. It’s all down to the plastic coupler spring. Of course if you have knuckles instead of hooks you wouldn’t see that. With knuckles I found that trying to couple a Lionel to an REA was a problem. Happy railroading!
Bob in NJ
What happened to the movie. Sounds like it was a good one
I agree with Old Taz; the video on my feed is unavailable.