Tony’s been back in touch – this time with his church kit build, well it’s more of a kit bash as you’ll see:
“Hi Alastair-
Thank you for recently re-posting my “Riverside Local” diorama. It was fun reading it again- especially all the kind comments.
Here’s one final photo- I completed the far side bank since the posting. I have also added a partial backdrop. It is only temporary, but it gives some depth. It is just an enlarged photo, but I took a lot of time looking for the right one. I found it is best to be a faraway view and in soft colors.

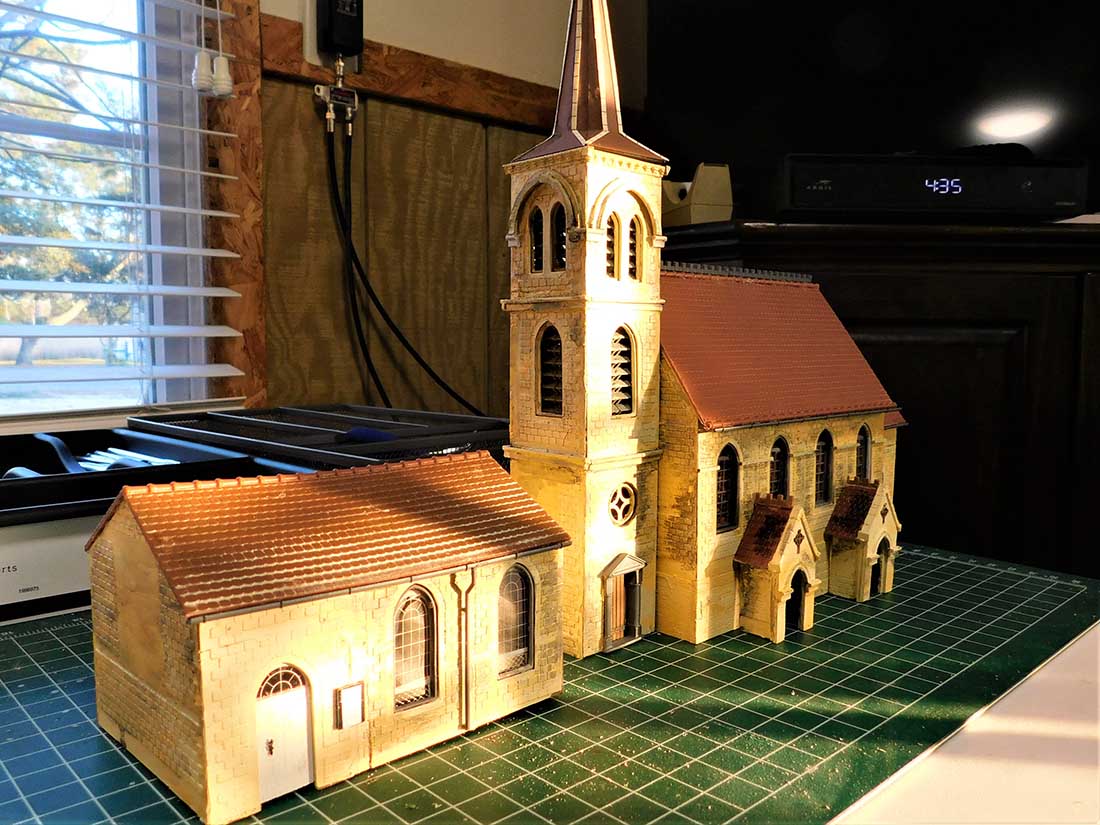
The post reminded me that I haven;t sent anything in lately, so here is a kit bash that I recently completed. This is a model of Christ Church, Chalford – in the Cotswolds.
The actual church-

You can see that I reduced the size by 1 window in each part, but otherwise stuck to the basic design of the church. It will become part of the layout I am planning which will be centered around Chalford on the line from Swindon to Gloucester.
I plan to model the section between Brimscombe and the Sapperton tunnel- circa 1956. I chose this area for a few reasons.
First, because my mother was from nearby Nailsworth and, having spent much of my youth in London, I often rode the train (usually headed by a Castle) from Paddington to Stroud to visit my cousins and grandparents.
The section from Kemble to Stroud really puts you in the Cotswolds and it is very scenic. Many great memories!
Although the Chalford Station did not survive, there is a very nice card kit available. For many years, an autotrain ran between Chalford and Gloucester- which will be interesting to model and operate.
The Stroud Valley had been a center of industry since the 1700s. The Stroudwater Canal was opened in 1779 and the railway (GWR) opened in 1845, although Chalford station didn’t open until 1897. If I am not mistaken, there were 13 stations and halts on the 12 or so miles from Chalford to Gloucester.
There were numerous mills along the canal and the autotrain was very much a workingman’s railway. They were originally woolen mills and many were still in use in the 1950s for a variety of industries- and many are still open today. So, lots of operational and scenic potential.

The autotrain was so-named because the driver could drive the train from the engine or the carriage- saving the trouble of running the engine around in Chalford. In the photo the train has crossed over to the down line and the driver is in the carriage, ready for the trip back to Gloucester. The fireman, of course, stayed in the engine.
The train consisted of an engine and 1 or 2 carriages. Throughout its life, a variety of rail cars were also used, but I plan to model the steam engine workings.

As you can see, the kit also has the shed that’s in the foreground of the above photo. The building in the kit is the one on the up platform. The down platform has a similar, but smaller building. A second kit will be the basis of that.

This undated photo is probably from the 1920s. You can see the church is on the left and the railway line in the foreground. Chalford station is about ¼ mile to the right. The buildings in the photo are pretty much still the same today as in the photo.
I am going to model the mill in front of the church as well as the famous round house- to the right of the mill- which is next to the canal. The canal is still there but numerous attempts over the years to restore it have mostly been thwarted by nature.
You can’t duplicate this photo today because the area between the road and the tracks is totally filled with trees. The road still looks the same. It’s not really visible, but the road goes under the tracks on the far right of the photo.
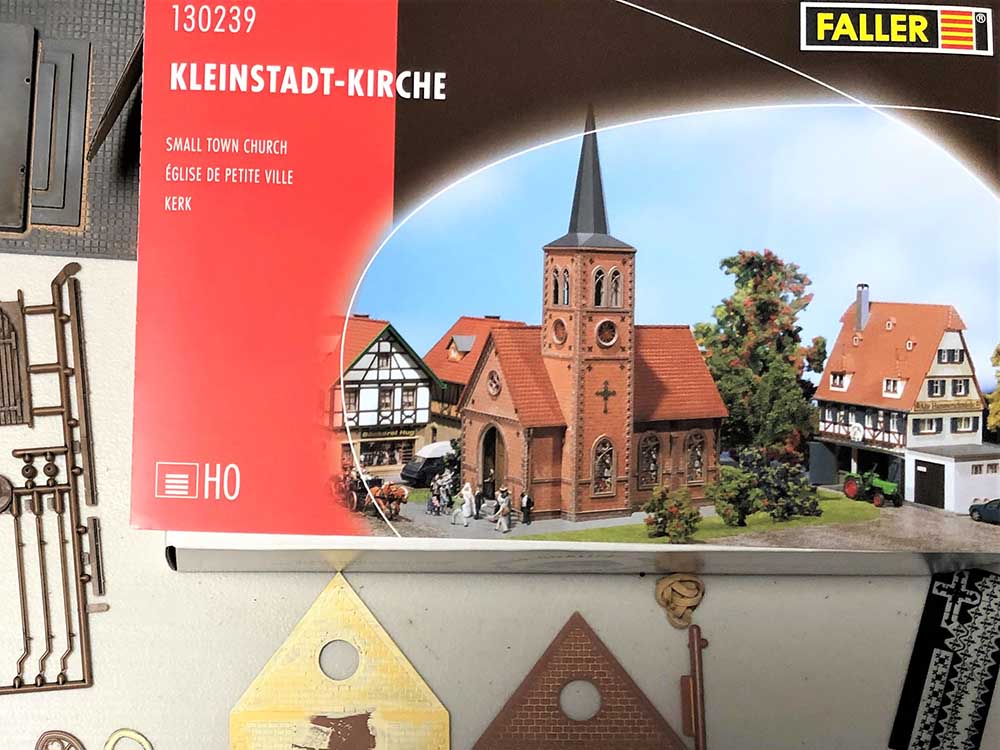
I won’t spend a lot of time describing the building of the church- suffice to say it was complicated and took a long time. I started with a Faller “Small town church” kit. I quickly realized that, due to the fact that the tower of the kit was on the side rather than the end, I would need 2 kits to get enough parts- and eBay again obliged.
There are many HO and OO church kits on the market and I chose this one because the roof line of the tower in the kit matched the prototype – I had no interest in trying to scratch build those angles!

The complicated part was that- although the tower of the kit looks similar, all of the elements are in different places. And there are many parts (such as doors) that had to be added. Each new side is made up of 3 re-located parts and a variety of trim parts- lots of fiddly bits. The main entryways are scratch built and the interiors are partially modeled, although they don’t really show.
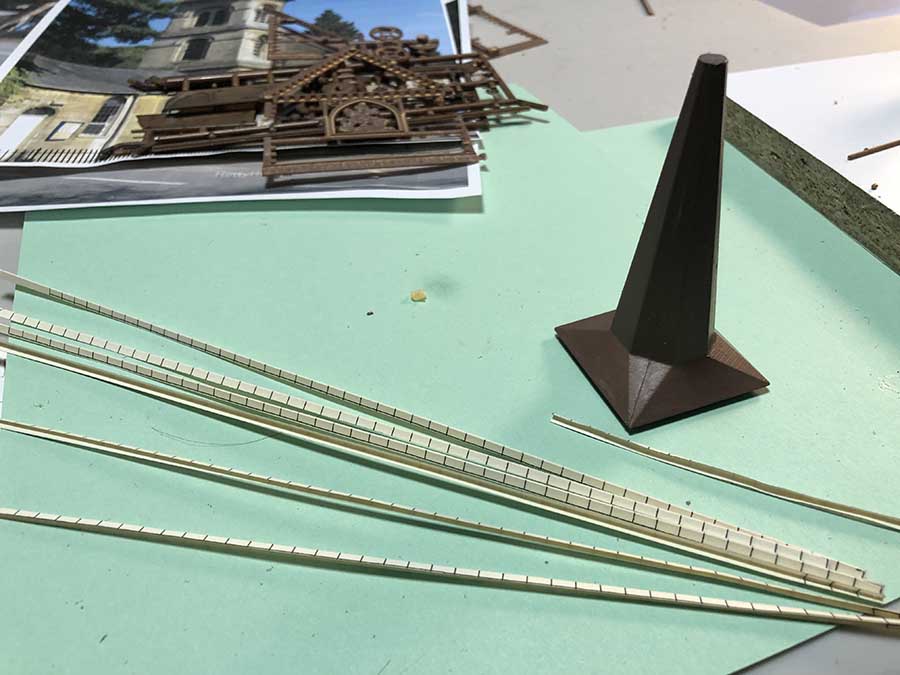
A feature that is on the prototype, but not on the kit, is tiles that follow the ridges of the tower roof.
After a variety of different attempts, I settled on simply making the additional tiles out of heavy paper.

A little bit about modelling Cotswold stone. The beautiful stone is one of the things that makes the Cotswolds so popular- but it presents a real modelling challenge.
There are 2 challenges- color and texture. Anyone who knows the Cotswolds knows that the stone buildings and walls constantly change color- depending on the sun and the dampness. Any given building can be golden yellow in the sun or gloomy grey in the rain.
I picture my railway being on a sunny Saturday in May, 1956, so I am leaning toward gold coloring. You can see though, that the second photo of the model has a different look than the first- in different lighting.
I am keeping my fingers crossed that I will be able achieve a reasonable look of Cotswold stone throughout the finished layout.
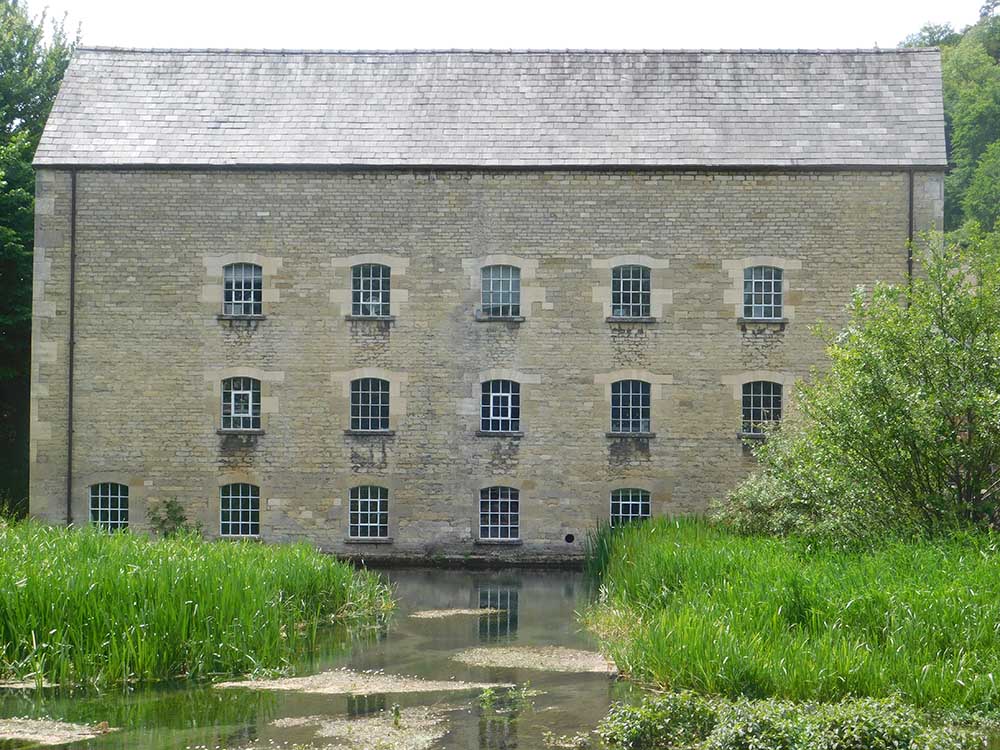
The texture of the stone is even harder to achieve- a subject for another post. But for now- here is part of a scratch building of the Belvedere Mill that I have started. The stonework is all hand scribed, in patching plaster, on card.
Note again, the color difference- I have another photo of the mill that is the exact color of the model.

I was born in 1947, which makes me, I think, just about the average age of the readers! For many years I planned to build a railway in my retirement and always envisioned a large area to build in.
The reality of down-sizing has left me with a room that is 14’ X 22’ which isn’t bad, but it must be shared with my books, hobby supplies, work bench, and the hot water heater.
The layout will not have all the parts I hoped for- but I’ll have to make do. The track is all planned out and I now have to get the annoying bits done- building the platforms, laying the track, and wiring the whole thing, so I can get to the part I like – the scenery! And then the best part- running trains!
I very much enjoy when readers post the entire building of their layout from design to completion and I plan to do the same. Hopefully, I can figure out how to make some videos as well – Dave makes it look so easy, but I’m sure it isn’t.
I guess this is the first post in the series about building “Chalford”.
This can never be said enough. Thanks Alistair, for all you do!
Tony, Kitty Hawk, NC.”
A huge big thanks to Tony for sharing his church kit build – I really enjoyed this one.
Having a theme for your layout really does make a difference, and I think Tony’s is a great example of this.
His post also reminded me of Dan’s:
And when it comes to churches, there is Rob’s: Church scratch build.
That’s all for today folks.
Please do keep ’em coming though, it’s still ghostly quiet.
And if today is the day you get going on your layout, just like Tony, the Beginner’s Guide is here.
Best
Al
Need buildings for your layout? Have a look at the Silly Discount bundle.

The other interesting thing about the railway at Chalford was that banking engines (helpers in American) were used to assist freight trains up Sapperton bank from Brimscombe to the summit, returning light engine. More doable nowadays in miniature with the modern digital control systems.
Rod Mackay – about the banking engines – I totally agree that this will be an interesting operating part of the railway- and not usually modeled- DCC makes it doable. I recently corresponded with a gentleman who grew up near Chalford and as a kid would count how many goods vans were being pushed and how many pulled- not 50%! I have also corresponded with a gentleman who rang the bells in the Chalford church when he was young. The internet is an amazing thing!
Beautifully detailed models, and inspirational, thank you. May 1956, I just turned eight.
As some on Al’s site may know from the articles he has so kindly posted of my layout, I’m a model builder. That said, I’m always in aw of folks who take on the challenge of building a model of a real place. Yes, my stuff looks like what something may look like someplace, but not a real mine or factory. I really especially appreciate those who pull it off as well as Tony! Really good job, thanks for sharing.
John from Baltimore
very nice church.good job
Tony,
Fantastic. Very nice job. Much further along than I am. Still in planning and making room for layout. I’m in Virginia near Richmond. But I’ll be in Duck NC next week enjoying your weather.
Dan.
I luv your kit bash of the church. Great Job!
Big Al
There isnt a better way to start my day than to sip my coffee and read an amazing missive like Tony’s. It clicks the happy switch and positivity is the theme of the day.
Tony
You are an accomplished modeler with a talented artistic eye. To many of us that for some reason can only glue stuff together, slop some paint and achieve maybe a passable something or other we marvel when someone like you shows us their masterpieces.
Fantastic narrative also. Many thanks.
Stunning work!
Stunning church model Tony and a worthy addition to what will prove to be a beautifully modeled railroad. Very inspiring and I look forward to following your subsequent posts. Good luck! Glyn
Picture of river scenery is outstanding! Very nice work!
Tony – very good work on replicating the church, a beautiful model. Reference to coloring – very good point on lighting. It looks like Cotswold stone can change more dramatically than most. I do not know at what height your main roadbed is to be nor the thickness of your resulting benchwork. For my layout – much of it has 36 inch clearance to the floor. I have eleven 16 in wide x 15 in deep x 35 in high with casters – from Target. This allows me to roll them out for work under the layout or use the top for a work tray. My train room is 10 feet x 26 feet without any appliances or other obstructions.
Wow! Excellent and inspirational Tony, Thank you for posting and I am looking forward to reading of your progress in due course.
It does not matter how much or how little space we have for a model railway, it’s never enough and one of the (enjoyable?) challenges is making the compromises that retain the integrity of the location and the operation within the space available.
Best wishes to all from Down Under
Andrew in Oz
I am going to try to draw the church in SketchUp, then build it on the 3d printer. Please wish this old US Army [disabled veteran] good luck and I will send All a photo if i am able to draw the church in Sketchup. I forgot to tell you that I lost the left side of my brain & all memory in April of 2000. Hat
really nice church. i see faller kits, i have had some of them before. made me want to start making my own buildings, just to save money. but i like the kits as well. also really like the water work.
Wow! That church is wonderful. We can’t wait to see the progression of the new layout.
nicely done