Eric’s been busy on his his latest N scale layout:
“Hi Al
Wensdale Moorside project. (N Gauge)
I know I have been quiet recently but I have been struggling with devising my new layout and I know you enjoy seeing them in construction so here goes.
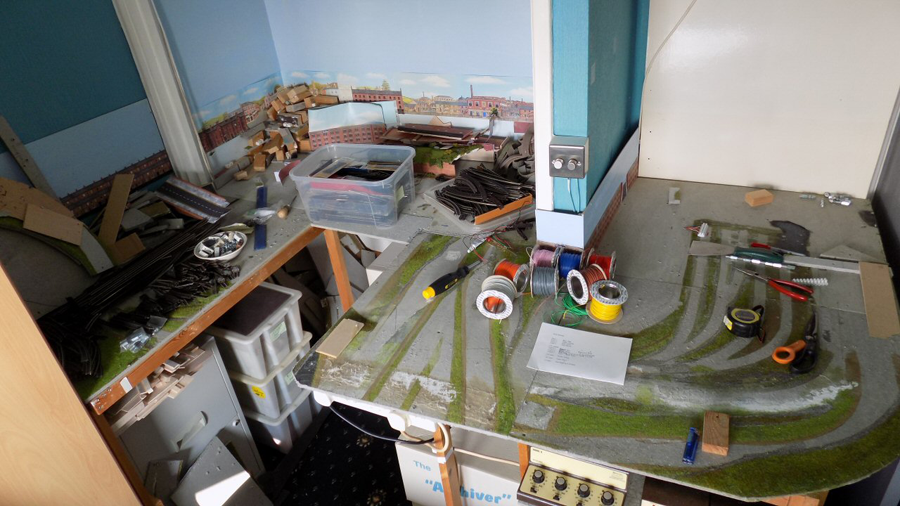
As I mentioned in my final mailing of the old layout I wanted to try giving myself all round access instead of having to crawl under to the quite tight centre hatch so I cut out the front section as you will see in the first picture.
The problem was that I didn’t want an end to end layout and I wanted different levels, well to be very honest I spent around 5 months trying to get it to work trying many different track layouts and driving myself nuts into the bargain.
So in the end I have relented and enlarged my centre hatch with less front space and eureka I am happy again and feeling constructive.
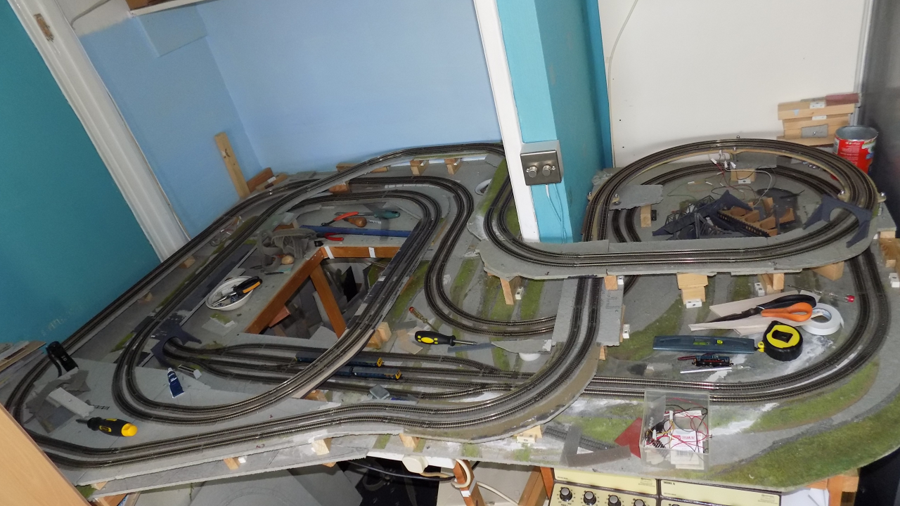
This is a simple twin track layout that is large enough to run two trains per track using four controllers. What delights me with this is that trains will appear over the three levels popping in and out of tunnels on different levels that will confuse the viewer.
The scenery will be minimal with just moors, castle and farm, with a bit of luck there will be a small river scene in the centre. I have quite a bit of the scenery done now which I will start showing in my next offering. This time instead of having169 lights working as on my previous layout there will be no lights on this layout at all so daytime videos will be the order of the day.
Keep up the very good work you do Al, we love your mailings.
Happy modelling
Eric (Leeds) UK”
Great to hear from Eric again. His last post is here.
“Hi Al my tip is I get old slate roofing tiles and break up into small pieces then glue them to make dry stone walls
regards
Kevin”
“Hi, from America,
I’m doing an 8’ X 5’ in our basement HO scale. 5’ because my longer cars were derailing often around the curves. So I took to some reading up on the curve diameters east and then west of the Rockies and found out lots that I needed to change. Diameters of my curves has got to go bigger.
A four foot radius was then used by taking a string attaching it to the center point and screwed down and using a pencil marked it out. Now I’m adding mountains by using 2”foam 4’x8’ sheets cut to s rough shape of my mountains then using the slash and jab technique to make them look awesomely real.
Then made bridges 100% by hand an installed them temporarily to see now how it looked. Purchased a train station put it on the model, found out the proportions were wrong for the mountains of how I wanted it to look. Should have had the HO scale model first for comparison. Fixing it now by making mountains bigger and with a tunnel. Will send pics after almost done, later.
Sincerely
William”
“Hi Al. Just posted this video, shows some more of the 14xx with a Hawksworth Auto- Trailer added… then surprise surprise… Changes on Dave`s Model Railway again ..LOL ..well cant just sit back, got to keep having something to do… as they say… always something to do on a Model railway Layout.
Regards
Dave”
Brand new ebay cheat sheet still going strong.
That’s all for today. Thanks to everyone – please do keep ’em coming.
And if you want to join in on the fun, the Beginner’s Guide is here.
Best
Al


My tip for marking out set radius curves is to drill a wooden lath with a centre point for a screw, then holes to suit a pencil at the radii of the curves you use – e.g 2nd, 3rd, 4th rad or their inch / mm equivalents. Put the pencil on the end of the last rail, locate the centre point with the screw and away you go to the next change point. To help with flexible curves I have one of those draughtsman’s aids from when people used to draw with pencils on paper. It is flexible rubber with a bendy metal insert, shaped much like a flat bottom rail. I bend it to eyeball a flexi-curve line and it helps to keep the rail in position until you can pin it down
So very impressed with the quality of the layout and I’ve probably said it before but it really makes me want to get up and do more to mine. I feel that I’ve hit a bit of a stumbling block though with my efforts to have the fiddle yard/s below the scenic layout boards. just looking at some of the videos does inspire me though and motivates me but I get so easily lead away from what I want to do. I have all good intentions about clearing the lower deck area and starting work on the fiddle yard/s but then I find that I’m doing something else instead. “Must do better and try harder” as my teacher said.
Regards
Roy
Eric, thanks for giving us the gauge first thing. Wish everyone would…
I am looking for some help. I am replacing track that runs through a tunnel. I removed the old track and laid new road bed. I am using N Scale flextrack to deal with the curve. The tunnel length is 33″. I can reach about 6″ on either end and secure it with nails. Now the question is how do I secure the track in the center part of the tunnel that I can barely reach. Would glue applied to the underside work? Any thoughts would be helpful.
To glue down the track ..use copydex ..great products a lot of us use it for track laying …Dangerous Dave
Great layout! Thanks for sharing. Always helpful to see other’s work. I just got back into the hobby after a lot of years. (N scale also) YouTube and everyone’s videos are so much help for new tips on everything. The best thing I’ve found that I wish I had 20 yrs ago is the Rotax compass I found on Amazon. Best & easiest thing ever for doing all your radius work 😃
Eric, Looks good, would love to see a track plan [especially with grades].
I am working on a similar goal.
Layout is an “L” that is 36″ deep, 7′ on the long leg, and 6′ on the short leg.
Really struggling to get 2 levels [how did you get 3????] with a reasonable grade [limiting to 2.5%]
To 5.59pm. The right side is a 3/4 rise helix at 2% the rest are just rule of thumb but still close to 2%, Track plan? well if you follow the tracks round on the picture you will see the overall plan as there are just the two tracks.
Eric
great seeing upgrades on these layouts get plenty of hints .thanks for sharing.
Cleverly done, layout is complex, interesting and well thought out. Hope you don’t have a “Big Boy” though to run the curves lol.
Dave, that’s not where you put the tail lamp on an auto trailer, it normally went over the left buffer – where you appear to have an oil lamp in fact, just not lit – or in the middle below the windscreen. The headlight when propelling the trailer was an ordinary loco sort which also went on this bracket just below the centre window. There was no light above the windscreens, the odd mountings etc you see there supported the regulator pivot on the inside. On the loco when propelling, the tail lamp went on the middle buffer beam bracket, and in some cases the headlight went there too when hauling. And having a lamp on the inner end of the loco, next to the trailer, particularly a red one, is a big no-no. More fun to enjoy!
Rod
Eric: “5:59 pm” here again. At 2% grade I calculate you need almost exactly 4 feet diameter on the inner curve. Hard to tell the scale from just looking at the picture.
WOW, Looks complicated. Good job getting it all in that space.
Dave, just how high is the incline? It must be my eyes or camera trickery but it looks a lot higher than 4 inches which is what the incline set you have bought is meant for. Great to see the 14xx with all its sounds!!! Shame to see a red light on the autocar in totally the wrong place and so out of character, you have the oil lamp there why not put an led in that?
Great layout all the same,
The incline is 4” , and yes the 14xx is a very nice little Loco , the auto car of course goes very well with it as of course that is how they ran a lot of time on the branch lines .. as for the red light it’s just part of the pack that came with the interior lights , it’s out of kinder I know but from a distance ? I already have a white light ibut no led in it , but too complicated to wire up with a tiny red for me …
Hi Rod , yes a boo boo with the red light I know , its what was with the pack from TTS with the interior light strip , this has to connect it to the strip light plug , so has to be near the top , I may just take it out , but it was a case of having it and using it , in the dark from a distance its just red light showing …bit too intricate work for me to add a tiny red LED in the oil lamp that I have sat on the bracket ….may try and get someone to add one for me at later date …onwards with the changes just now ..an to answer the question is my upper level 4″ ..yes it is spot on …the incline just fits ..the only problem is the 8ft ..it could be doing with being 12 ft to give a smoother run and getting to the flat more steadily …Dangerous Dave
Great use of space Eric. Interesting cork screw layout with multiple levels. Lots of planning makes for much better layouts. Rob McCrain
Cheers Dave, I also have a ‘too difficult’ basket, overflowing in fact. If it’s any comfort, it was a fairly regular “Barry handsignal” (we had a few odd ones) to hold up a Bardic lamp and just point to it in the daytime, or flick it on and off the white aspect at night, to tell a driver he’d come off the terminus at Barry Island with the red lights still on at the front of the unit!
Rod