Got this in from Frank.
The pictures are a bit small – but it still looks impressive. Frank, I know what the posts will say: “We want some video!”
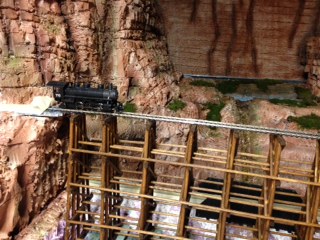
It’s an amazing layout. I think the bridge is a work or art.
Big thank you to Frank for sending theses pics in.
“Hello: here are some pics of my layout. I’m new to all this but I have had good luck with some of the result of my hard work.
Thank you Frank”
Impressive stuff from Frank. Let us know your thoughts by posting below.
Best
Al


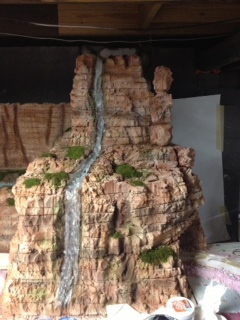

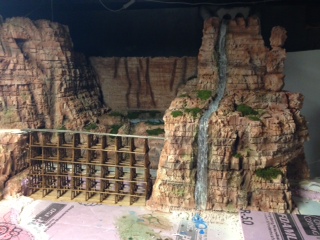


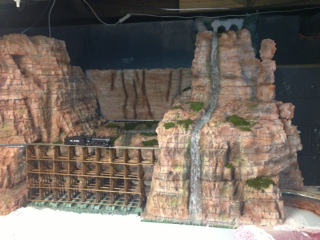
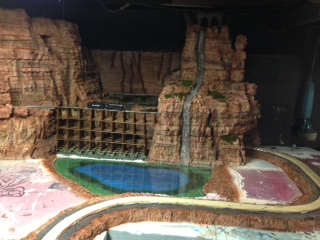


this is an amazing stunning layout.i think the water fall is inspirational.well done you look like you had fun making that.
good job
FANTASTIC!, especially the rock work and the bridge.
Impressive! Shame about the pic size but more on this would be great.
Dave G
A lot of fine work gone in to that Frank , those cliffs and railway Bridges (viaducts) are fantastic , well done
This must be very large in size considering the scale of the locomotive. The size of the mountainous
area is quite high. What a great job for someone who says he is new at this. I only wish that I had the time to do this wonderful work. Maybe some day. Terrific layout!
Hi Frank,
Brings out the passion in you for modelling and really a great effort of detailling.
Congrats.
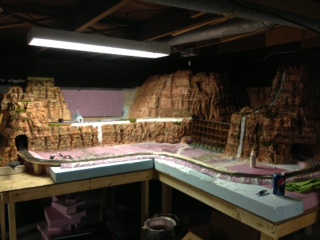
very nice alot of time and work in this one just shows a model railway is not just a flat track stuck to a board with a little imagination and planning the outcome can be way more than you expect this one i like saved some of the images as like the use of the foam board to build the mountains.
just one thing i would do a little different i would have blended the lines ine the mountains so they where less prominent or tried to get them to look like the sediment seams great work 100%
Brilliant stuff. Rocky Mountain High! Got through a few sheets of polystyrene there! One question, where does the track go that crosses your great bridge? Can’t make it out on the pics. Also one slight criticism, the bridge surely needs some diagonal bracing lengthwise as well, to make it structurally correct, doesn’t it?
Cannot wait to see finished pics or a better still a video as Al says.
Cheers Mike S
Frank, one word…Outstanding!
what is the size of your train set? we have a small space in our basement and this layout looks like it could work for us. We are new with this so we are looking for ideas A suggestion to Alastair: it wpold be helpful for us beginners to know the size of their sets to give greater ideas of building our layouts, jsut a suggestion.
Fantastic job, looks like he’s made the best of a limited space, a problem with”O” guage. I have same issue, thanks for many excellant ideas!
Love your mountains! Great to see Lionel. More pics soon please
Brilliant! And very inspiring.
Frank, this is amazing. What tools did you use to carve the rockwork shapes out of the styrofoam? You’ve got some nice strata in there.
if you follow the track in photo 16 you see the track is big loop
that layout was simply “AWESOME” great use of bridges and tunnels!
I am most impressed ! Will you please keep us updated on the progress? I want to see the finished article. How about some details of the locomotive?
Looking forward to seeing the finished article, but don’t rush it and spoil it!
Cheers! D/
Wow, a lot of very artistic work. Really nice.
I think you can no longer consider yourself “new.” What a terrific project you have going! Enjoy!
I have been requesting O gauge layouts for
A long time. Yours is inspiring ! Great job!
Please show more.
Dick from Bethlehem, Pa
One super great job. I love the altitude.
Frank for n person that give us this result on something u call new …. U will
Amaze us all in al your layouts doesn’t matter witch scale u do it will
Be awesome …. Well done msg from south africa
U rock
I can only agree wholeheartedly with all the above comments. GREAT job! And, how did you form the foam into rock faces, and what paint did you use. Thanks for sharing!
Cool layout I too love the trestle bridge.
To whoever is responsible for including THIS MAGNIFICENT O-gauge LAYOUT:
I’ve waded through years of HO railroading, on this site, and gleaned good ideas for my O-gauge railroad, such as the CD turntable which now about-turns my SuperStreetS vehicle in their garages.
I’ve been loyal and today’s mail brought me great satisfaction
Besides awesome scenery, the man deserves accolades for his compact use of such an HO-rivaling space advantage. Never mind his talented efforts, the layout has greatness from the home-made constructs not available in our (my) scale.
In addition to praising Frank’s passion AND the photographs that tour his time, I throw kudos to Allister Lee for offering up this stunning railroad.
I plead for more accomplished O-gaugers and other less stellar players to share their works. Perhaps the scenery’s not top notch or even non-existant. It’s unimportant because beginners, as Frank once was, need to be encouraged by different stages of others’ attempts at O-gauge railroading.
looks like a lot of work. looking very good. you can tell that you put a lot of time in your lay out. great job.
I’m someone who builds layouts for alot of people! And all I have to say is this is a beautiful job. Appreciate you sharing this,hope this will encourage lot more people to build. Pictures can’t do this layout justice! Keep on building!
Frank, for guy that is new at this you are doing fine.
Hi Frank, Very impressive scenery modelling. Yhe mountains look good. I am about to build gauge one model railway in the workshop. Will post photos.
Well done Frank. Cheers Chris G
What a brilliant layout, the rockwork is very impressive, and what a time consuming and stunning bridge you made. Well done
the layout looks great. i appreciate the layout in O scale. the locomotive appears to be a Lionel #675 new around ’52 to 54. have two of my own. will be looking for more on this layout. great job.
Words alone are not enough to describe the accomplishment of someone new in building this layout. The use of foam to build the mountains…outstanding. The construction of the trestle bents and the trestle bridge itself….outstanding. With your talent and obvious hard work you will have no problem having fun with model railroading.
Very nice.
I am a woman who is working in ‘N’ scale and I have a basic tip for those that work in other scales. It is a simple trick to figure general scale dimensions when you are planning a track layout.
If you find a layout that you wish to model in your scale, the following chart may be of help you.
============================
|| If you find a layout in ‘O’ scale ||
|| and you want to figure it to: ||
||——————————–||
|| ‘HO’ scale, divide it by 2 ||
||——————————–||
|| ‘N’ scale, divide it by 4 ||
||——————————–||
|| ‘Z’ scale, divide it by 8 ||
|===========================|
|| If you find a layout in ‘HO’ scale ||
|| and you want to convert it to: ||
||——————————–||
|| ‘O’ scale, double it by 2 ||
||——————————–||
|| ‘N’ scale, divide it by 2 ||
||——————————–||
|| ‘Z’ scale, divide it by 4 ||
|===========================|
|| If you find a layout in ‘N’ scale ||
|| and you want to convert it to: ||
||——————————–||
|| ‘O’ scale, multiply it by 4 ||
||——————————–||
|| ‘Ho’ scale, double it by 2 ||
||——————————–||
|| ‘Z’ scale, divide it by 2 ||
|===========================|
|| If you find a layout in ‘Z’ scale ||
|| and you want to convert it to: ||
||——————————–||
|| ‘O’ scale, multiply it by 8 ||
||——————————–||
|| ‘HO’ scale, multiply it by 4 ||
||——————————–||
|| ‘N’ scale, double it by 2 ||
============================
Absolutely splendid layout and outstanding work! What are the dimensions of your layout?
Frank,
A Master Effort A Master Piece
Thanks for sharng
Keep on training!
Tom N
great layout
Hi, Well what can I say that hasn’t already been said, it only leaves one word that comes to mind and that is, Awesome!!! Enjoy and Keep sending us pictures of your progress please.
Dear Frank
Thanks for sharing so much of the detail of your layout. It is OUTSTANDING
Also very inspiring. I have set up a simple layout to run trains with my son but now feel like tackling something more substantial.
We would like multilevel like you have and mountains and that bridge!!!!
If you could share some detail on the framing of the layout and the bridge I would be grateful.I think others would tooo!!!!!!!!!!!
Great Work Frank! For being new to this, you certainly appear to have gotten the hang of using extruded foam insulation for scenicking. Beautiful job on the rock work. And very impressive is the custom bent work for the trestle – Awesome! Keep up the good work.
VERY NICE “O” GAUGE LAYOUT WHEN YOU GET IT FINISHED.
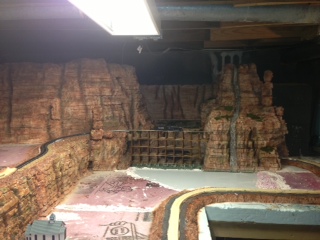
Hmmm, That looks like a corner in my basement. I love the mountains and cliffs. That tunnel opening looks like it’s going into the Mayan Temples and the rest of the mountains look like the cliffs in the Grand Canyon. The rock colors and textures are dead-on. I’m Curious at what you used for colors. Paint? White glue and sand? Too bad the pics aren’t very big on my monitor I really wanted to see it up close but definitely done by a craftsman, Gave me a few ideas for my future new layout too, though mine will be in HO scale because I already have the track, buildings, engines and rolling stock from 30 years ago. Two thumbs up for the not so new newbie !!!
That is a fantastic layout thanks for sharing it.
Great to see something in 0 scale. Keep up the good work.
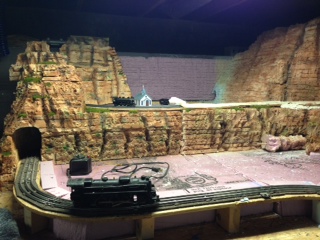
Frank should be very proud. I love the foam jig for assembling the trestle frames. Too bad the pics are small but after some study I have to ask: Is this layout one big 2-level loop or are we seeing a very novel combination of 2 scales—O for the lower loop and HO (or even N) for the upper? The upper loco seems very small and the track looks different. Just a question from a novice fan. But really, really well done. Thanks, Alastair, for showing O scale.
Frank,
Very impressive work with the foam boards. The layering and coloring looks very realistic. Actually the some of the vertical lineations look not only like vertical weathered joints, but also like blast hole half-casts. You must be a sedimentary geologist or been around a lot of rock.
It appears you are using two scales, O with Lionel tubular track in the foreground and HO with a Bachmann track system in the background. That will create a cool “forced compressed perspective” to the viewer.
Again nice first attempt.
Tim
Very commendable work! Could this be the upcoming representation of the famous “Gorre and Daphetid” HO RR of the 50’s?
Your use of vertical contrast is very skillful in showing forms with much interest and variation in the scenery that gives so much opportunity for detailed interest in your overall pike. And all this, within an area for O-gauge, on what appears as an equivalent to two 4×8 base areas, represents a remarkable achievement in the doing.
I can’t wait to see more pictures with better lighting to equalize the overall pike level of illumination that will show your work in it’s best manner. Take your time so you don’t succumb to the “hurry up syndrome” and spoil what you have started as you near the initial completion!…oops!, did I say completion? We all know that a model RR is never completed…………
Kudos!
Glen Krause
Spokane, Washington USA
Amazing layout, love the waterfall, inspirational for any modeller
Very nice:-) please show us more till your done,and a vid when it’s done.
lost for words most of the above haved covered it, if you are new at it a very fine job it certainly gives us a pick up just what can be done thanks alot. the pond at the bottom out standing.
I bow to the master. Simply fantastic
Hi, The foam used in the lay out to form the mountains etc is Styrofoam, which is an extruded polystyrene.
we sell extruded polystyrene in the uk for modelers. Ours is either Green or yellow and comes in a variety of thickness’s and sizes.
You can reach us via our web site by clicking on “shop”
The web site is greenfs.co.uk I will be using the foam on my layout when I get round to starting in the autumn.
dave wright
WOW! The rocks and mountains are GREAT.
Frank
Very Impressed with the rock formations they are so realistic, The Trestle Bridge is an amazing piece of engineering. for a layout of its size you have created and eye catching railway.
Look forward to seeing he finished product
Lawrence
Fantastic,will be waiting the finished layout
Beautiful!!!!
Very nice work. One question on mountains How were they stained and did you stain on the styrofoan directly
Very Impressive. Could we see some larger photos….please.
WOW…. this layout is really nice
Incredible attention to detail the mtns trestle colors waterfall.
It all looks so REAL.
NICE Job Indeed!
More Pictures Soon…………..
nice looking layout .
I have a question ,did you leave an access to the tracks in the tunnels in case of derailment ? if so where?
Fantastic !! piece shame about pic size !! bigger better but hey awsome effort
Cheers russ
UK
It’s a cold winter day in Minnesota and Frank’s railroad is inspiration to head down to the train room and work on my mountains.
Frank! Very nice layout, indeed! Great rock formations, fantastic bridge! Good job!
Awesome Job on the railroad, I am just getting started on designing mine for build later in year{next year} was wondering what you used to make the trestle what was poured into the form?? everything was just spectacular for the job you did.
P.S is their going to be a video in the future
pretty impressive use of space…the foam sculpturing is artful and brilliant.!!
I am planning a layout in a 5 1/2’x 6′ space too, in my small apartment!! and am planning on the use of ‘5’ or so upward layering’ as well. But I am starting only 3′ from the floor instead of ‘table level’…and using paper mache scenery. the waterfall is done so well.
amazing work Frank,wonderfull pictures,looks like a lot of real nice work
Now this is model railroading. Got my interest updated on making items from scratch instead of pre-made to look pre-made. Really a nice job for beginners to look at, and of course the pro’s have questions……. that is the great part of it!
Nice mountains
I really like the idea of working with and carving foam. Using a pieces of foam
both for the foundation and mountains add both height and depth to your railroad. Nicely done … detail superb … that trestle bridge a work of art.
VIDEO … VIDEO … VIDEO!
Thanks for sharing!
best regards,
Tom
Fantastic looking layout, love the waterfall in particular
Amazing and fantastic layout. Compact neat and very natural.
Really well done. Congratulations
I also run Lionel and am very impressed with your work. The styrofoam really
makes the layout stand out and I love the bridge work.
awesome, pretty much what everyone has said before me
There is only one word to describe your layout Frank and that is AMAZING!!
Would love some video. I bow to the master. Cheers, Douglas
This is an outstanding no-word tutorial of how I can only hope to begin, and to finish, my anticipated layout. This set of pictures is worth “more than a thousand words!” Thanks, Frank. I will attempt to print out each picture, and begin the process. Best Wishes, Kevin
Frank,
Please provide us a tutorial on how to do cliff and rock face as you have done in this fine layout example.
lot of work but well worth it. glad to see “O” gage stuff on here.
SO FAR WHAT YOU GOT DONE IS BEAUTIFUL. CAN’T WAIT TO SEE IT FINISHED.
Looks good, but with all of that foam isn’t it a bit expensive? I love the mountains but wondering if there is a cheaper type of foam that can give the same effect?
Are we losers or what? What a funny group we are. I would say we are artist, just look at the art work we do. Can’t help it trains are fun.
that layout wory that you done is great, it,s very awesome that the best I have seen yet ,only if I could do something like that, that great.
Very realixtic well made finally o guage me too, hzve built simular bridge over gorge and was 6 ft long.keep posting thanks
john
Very impressive layout ! The mountains, rock and bridge are outstanding. Thanks to all who participate in this great hobby and to Al who makes these posts possible.
Incredible patience. I wish I had as much. There is artistry in us all and all we have to do is let it out.
Looks Great don’t see very many 3 Track on Tables mostly at shows at lest I haven’t Great Job I love Mountains I have them on my HO set
very nice I like the mountians doing good work there
Wonderful, just wonderful. I love a guy that will expend the time to construct wood trestles and bridges! Gives a layout that man over nature feel that trains capture so well. Thanks for sharing your hard work with a guy in Sugar City, Idaho, USA. Happy Railroading! Kurt Hibbert
What a beautiful display of engineered mountains, trestles and tunnels. Congratulations, to a self made ‘expert’ modeller.
Frank
This shows me a tremendous amount of effort for a more than sarisfying result. I’m tearing up 2 layouts to start on one giant one. You are certainly inspirationsal and you have given me a boost and ideas for my katest one. Thanks
What is left to say except FANTASTIC!. Thanks Frank.
Picking up on Mike Kaludjer’s request for more O gauge layout examples, what about the OLD American standard gauge? My first train, a Christmas gift back in 1942. was a Lionel freight train, standard gauge – 2 1/8 inches wide. I still have it plus other standard gauge equipment and enough track to circle my house twice! Yikes! Anyone out there have a standard gauge layout?
Also, I recently discovered the world of “Garden Railways,” using G scale track.
frank looks great not very many o gauge fans out there. I have a 10 x 12 layout & can only feature 10 accessories there is never enough room! thanks for showing
fantastic! your scenery is superb! a video would be great
What can I say, just fantastic Frank, you put a lot of work into that layout, and it shows.
Thanks for the pics.
Regards Ron.
Great layout and loads of interest by the looks of the messages. Like all the photos especially the water scene.
Love the foam work and I’ll save this for a how-to on my next layout.
Spectacular!!! I am saving this for my future reference. Great Job!! Rog 🙂
Great work Frank, and so glad to O gauge for a change. Your with Styrofoam was super, and the trestle turned out awesome.
PS: Gerald I think the engine was a 2026.
I am just starting on my layout. Great ideas. I hope mine turns out half as good as your. Thanks for all the step by step pictures. The bridge and waterfall are outstanding.
David
Love the layout!
Hi Frank
this is amasing all that time and effort is paying off well done mate cheers
Very impressive layout in 3 rail 0 gauge.
Great job Frank loved it the first time!!!! 2nd Time!!!
Great layout I am going to have to step my game up.
Fantastic! I’ve been on this hobby a long time but you sure nailed it and the first try. Same problem as my railroad though, not enough light.
Wonderful and inspiational,I am working on completing my “Train room” I have O guage and 027,that was great Thanks so much
Very impressive work.
Outstanding work…would love to see more detail information. Specially on the cliff structure. Very realistic, thanks for sharing.
One of the most impressive layouts on this site. Great job.
Nice job but he should put a few more light fixtures on the ceiling so we could see more of the details.
Other wise it is good to see an O-gauge layout for a change.
The lady with the sizing problem ok O gauge is twice as big as oo gauge but when it comes to size it is also twice as deep and twice as high which actually makes the difference 8 times bigger if you need proof if you are in oo just go and by an on30 train or an O gauge model house and put it on your oo layout I found out the hard way John A ,Al please show me how I can send pictures to your site they are just disappearing ???? much obliged
AWESOME LAYOUT and at last some one who also uses LIONEL O scale three rail Well done and a great inspiration, I take my hat off to you and bow to your superiority
Ernie UK
The area size of your layout depends on just how much area you have and it should not really be a problem because as we have seen because of AL the bright sparks of model railways seem to have some great answers we all should give time for discussion whether to the new or older participants . It seems that space and cost as usual control the layout if you have an inclosed area weather is not a contention ,the bigger the space the better and when you design your layout design it so that you start of small and add on till it is completed this allows you to get trains running try your hand at laying track,scenery, wiring ,structures , you will now learn the type of railway ,point to point ,continuous , dog bone ,two level, combined whatever, one good thing about our hobby is that you can join a club , talk with the modellers on this site including Al’s how to books ,but always keep in mind it is your layout you can do as you please and there is nothing to stop you from re-siting all or part anyway you like .You should look at Gauge first of all (the distance between the rails ) it controls all other aspects of model rail therefore the size of your layout in area one of the first pieces of info. you should have is a scale & gauge conversion table track gauge sizes for N 9mm,HO 16.5 mm , HO is twice as big (wide) as N but when you add an engine rolling stock or buildings HO is 8 times as big so if you are designing don’t think one size fits all Best regards JohnA
That was some great pictures……
Let me also add my support for seeing more O / 027 3 rail layout options. I’m relatively new to the site and this is the first one I’ve seen in this gauge. Even though smaller gauge examples are wonderful to learn from, this one really hit home. I also learned a lot from seeing the trestle jig. I’ve wanted to try something and have now learned how to develop much greater consistency in a multiple trestle set up to support longer lengths of track across an extended gorge. I’ll be saving this example for future reference. Frank … You are a rock star!
Minnesota Mike
ABSOLUTELY without a doubt, one of the most impressive layouts yet, albiet on a smaller scale. I am amazed with what Frank has done with the mountains and most of all, the trestle bridge. Kudos, Frank. Job well done!
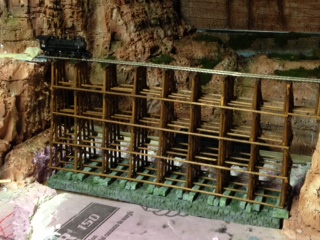
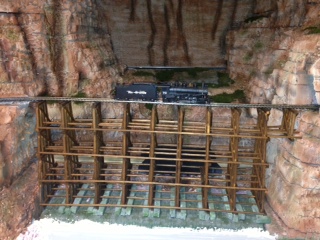
Wow! is the perfect reaction to Frank’s hard work. Wish I were half as talented. And because I don’t have Frank’s amazing talent, I have a question. There is a bridge over the mainline of the Grand Trunk Western Railroad near the farm where I grew up and I walked over that bridge twice each day from the time I was in kindergarten until I “graduated” from the eighth grade. I am planning to rebuild that bridge on my layout and I want to ask Frank about the dimensions of the wood he used in the fifth picture shown here. Any details that he might be willing to give me will be a tremendous help. My trains are also O gauge, so he doesn’t need to convert any dimensions. I also like the idea of first laying out the sections of the bridge on paper. That will make the project much easier.
To answere the gentleman with the question about the bridge treasle.
That was actually for the upper track witch is HO scale.
I used 1/4 inch round and square doll rods.
In the 3rd photo you’ll see I made a jig to make each one the same.
I also took a piece if pine 6x15x3/4 inch. And marked
Out a grid drilled 1/4 inch holes 3/8 deep and glued the bottom legs into
It for stability.
very nice layout
My wife and I have always had 0 gauge trains but when we moved into the new smaller house we switched to n. After seeing the work Frank got into a small area it makes me wish we had not changed gauges. What an inspiration! I am now thinking we will put a double loop of 0 around the perimeter and at a higher level of our 10×16 foot bldg.just to continue enjoying all of our O gauge stuff. Please let me know your thoughts. Congrats Frank on a job well do,,,,um in progress!!
Absolutely Amazing. Very creative. I agree the waterfall is inspirational. The bridge work and mountains are very well constructed as well. Great Job!
Verifying the Lionel 2026 in pics 6 & 12 is accurate. I enlarged pic 12 as in looked very familiar and could distinguish the cab num. Got in 1947 and still have full set with 2026. Runs as great as it originally did.
Terrific effort and vey good realism in trestle and mtns.
Gotta get started on my new layout.
Bruce
Well…that’s half the state of Arizona.
When will you be doing the other half!?!!
There are not enough words in the Engish language to describe what Frank has achieved. My mind boggles at how a complete novice can achieve such an outstanding layout. I am not familiar with O gauge but I am sure it could be converted to any of the others.
Fantastic
Beautiful layout, love your use of Styrofoam, my favorite material for mountains..
I love the trestle template. I have been wondering how I was going to build my own. Also, can the rest of you folks start using Spell Check on your comments?Sometimes I feel like I am reading comments from folks who did not graduate from High School. Capitalize; puncuate; you can do better.
WOW! And I mean WOW!
Very nice. And very cool.