Gary’s been in touch – he’s sent in this wonderful narrative of hand laying HO scale track:
“Hi Alastair:
My name is Gary (Elmont, New York, U.S.A).
I am a retired Pennsylvania Railroad Freight Conductor and I am attempting and just finished the first phase of my project which is to build a working model of the Pennsylvania Passenger Yard (Sunnyside Yards) (now Amtrak) in in Sunnyside, Queens, New York.
I am new to HO and wanted to share my experiences with the BEGINNER HO model railroader hoping that it will save them time, aggravation and money getting started and working with this hobby.
I have been following and really enjoy your emails showing different model railroad layouts and tips and information on the hobby. I want to show you what I have done and get your opinion.
This is really meant for the beginner HO Model Railroader, of which I am.
OK… Let’s get started…
I am not new to model railroading and like many people my age started off in the 1950’s with a set of O gauge Lionel trains which were given to me by my parents.
They only came out at Christmas time as we did not have that much room in our apartment.
When I got married and started our family and eventually bought our own home, I started using our unfinished basement as a place to set up the trains for my children.
By this time I had 6 sets of Lionel and many Plasticville structures, switches, crossing gates, etc.
But working as a freight conductor on the Pennsy, I wanted the layout to be somewhat realistic and I started working with switches and signals and blocks and having them work together.
My children eventually grew up and moved out living their own lives and were not really interested in the trains. So the trains were packed up and stored until November of 2017.
My niece asked me to help her son with his Lionel trains and so my wife and I went over to their home and my nephew and I spent the next 5 hours wiring under the table and building a model railroad on two Ping Pong tables put together. The bug bit me.
We came home and I got on YouTube and started looking at model railroad videos. I decided to get back into the hobby but Lionel (as much as I loved them) took up too much room so I made the decision to go with HO scale.
I did not just want to have some trains running around a 4×8 table; I wanted to do something realistic. An important piece of information you need to know is that as a freight conductor for the Pennsy and then the Penn Central and then ConRail (I retired after the creation of Conrail) I fell in love with the General Electric GG1. I actually worked on the original first built #4800 GG1, rivets and all.
I decided my layout had to feature the GG1. Before all the railroad mergers, I spent a lot of time as a freight conductor assembling the passenger trains in Sunnyside Yard and running them into Penn Station where they would eventually start their trips to either Philadelphia, Baltimore, Washington DC or Chicago.
I decided to model the Sunnyside Passenger Yard in HO scale but I did not have the room to build a complete model. SunnySide Yards had 31 passenger tracks, it had at least 10 engine yard tracks, it also had a Long Island freight yard west of the engine yard.
In the southeast corner of Sunnyside yards was a smaller freight yard which had a US Post Office Station which would load mail cars that would be attached to the front of the passenger trains and run down to one of the main cities.
I had to scale it down.
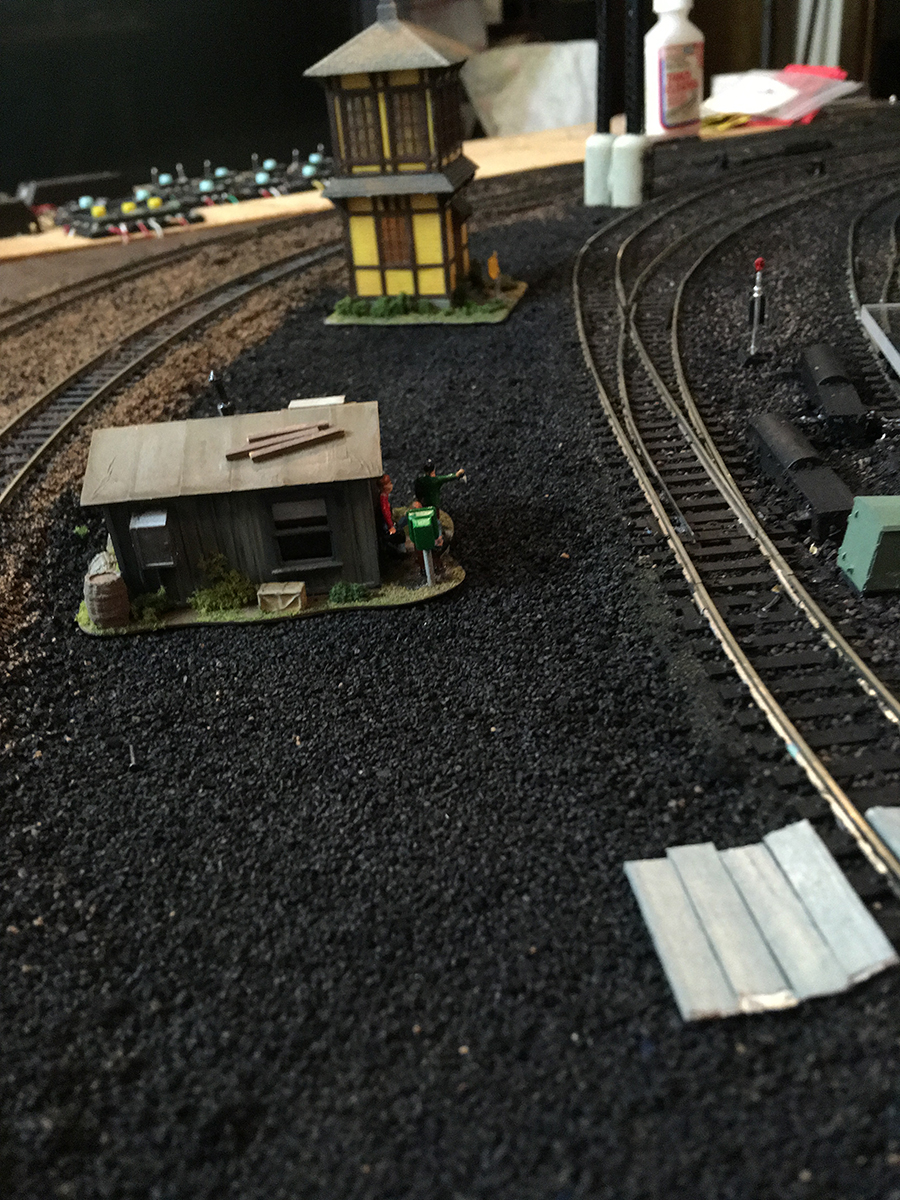
My project in HO was a 2 track main line which came from under the East River and looped around the east end of Sunnyside and into the passenger yard; 6 tracks for the passenger yard, Yard master Towers on the East end and west end, switchmen shanties throughout the yard, a large long commissary building built along track one, a few power and maintenance buildings and then on the north side of the commissary building the 10 track engine yard with a large two stall engine maintenance house and some maintenance platforms.
My layout would focus on the 2 track main line around the layout, the passenger yard, commissary building and some other buildings and the engine yard.
Little did I know how complex this was going to be. I have split the project into 4 phases:
Phase 1 – Main Line and Passenger Yard (track work, switches, signals)
Phase 2 – Engine Yard (trackwork, switches, signals)
Phase 3 – Commissary Building area (the train crews, porters, cooks) were housed and work there preparing the passenger trains for their trips.
Phase 4 – Buildings, scenery, figures, etc.
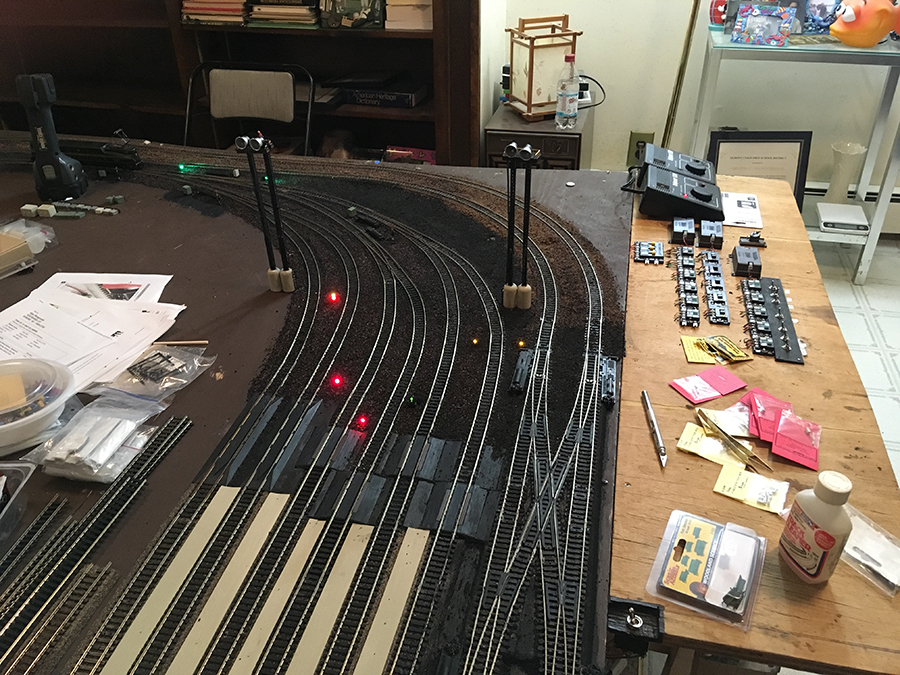
I have just completed Phase 1 which has taken me almost 8 months mainly because of the following:
– I did not make a detail plan that included the wiring and connections
– I did not realize how precise the track work and turnouts needed to be laid out
– I had no experience with the electrical foundation that needed to be in place before I laid the first track.
After I started and during many derailments, and many electrical shorts and ripping up track work and relaying I realized that I could not do the entire project at once and I had to get experience in track work, ballasting, blocks, remote uncouplers, turnouts, road bedding, leveling, etc.
I decided to work on one section of the layout and complete my education for the above areas before I tackled the rest of the layout.
This is where I am now. Now when you look at the video and the still photos you will understand why it looks like there was not much done. But for me……… It was a lost of work; a lot of redoing and a lot of aggravation.
So with this in mind I will send you the still photos, the video and my experience and tips for the BEGINNER model railroad. I hope it helps someone.
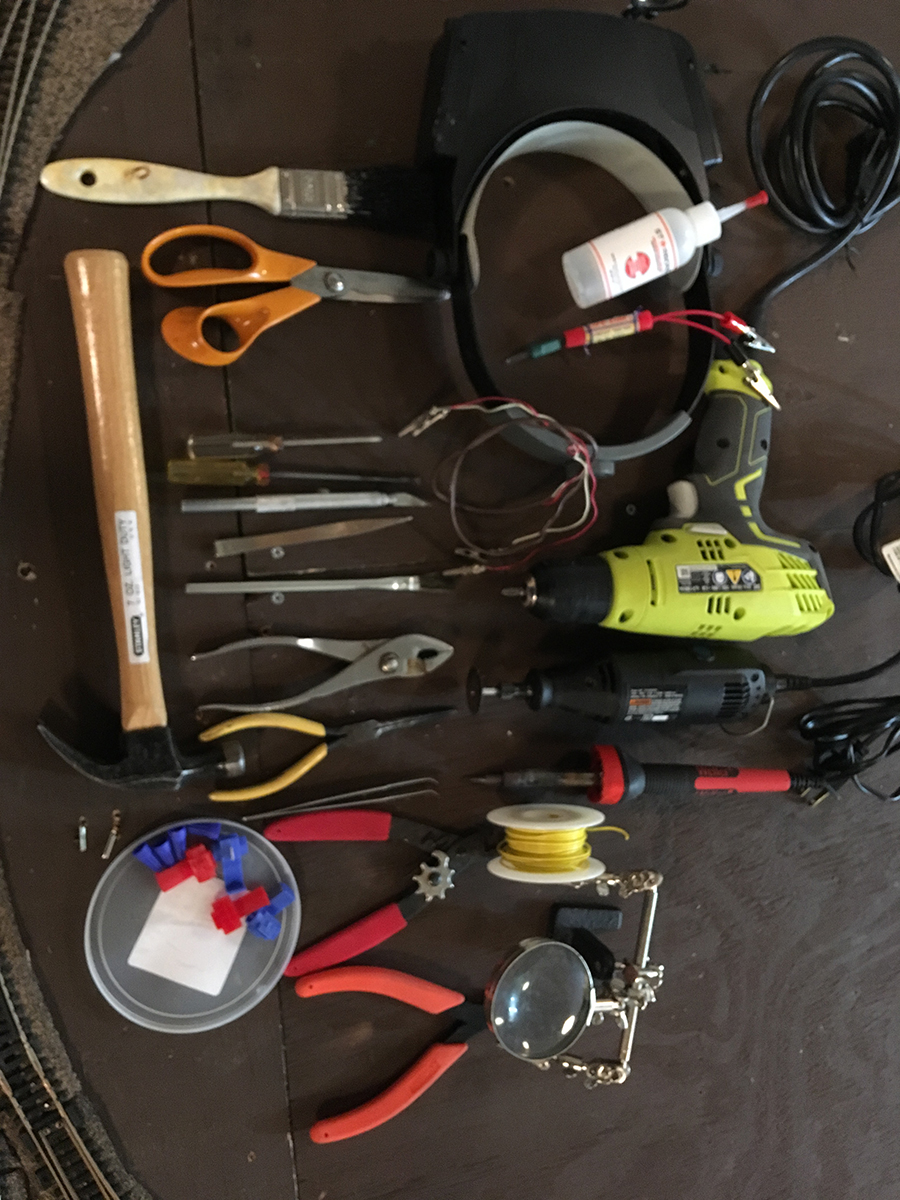
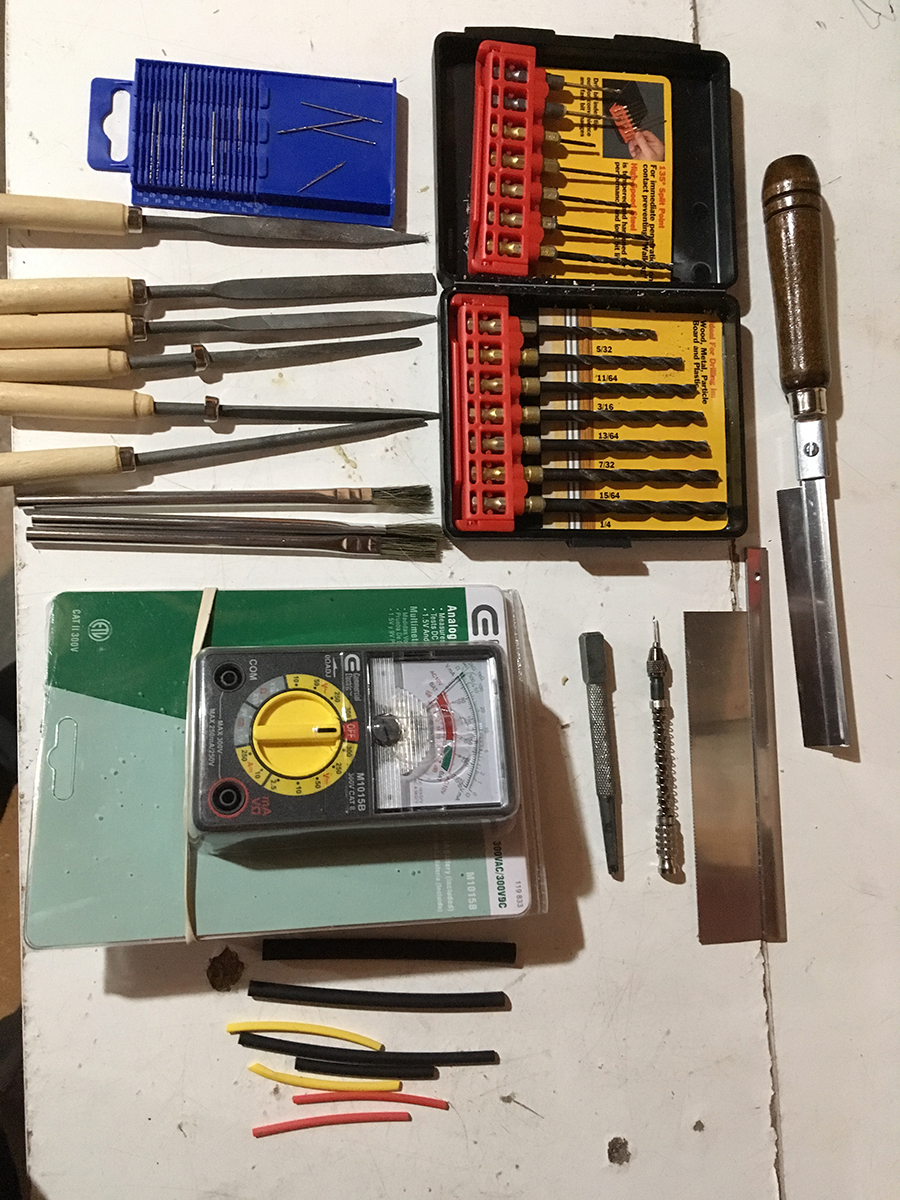
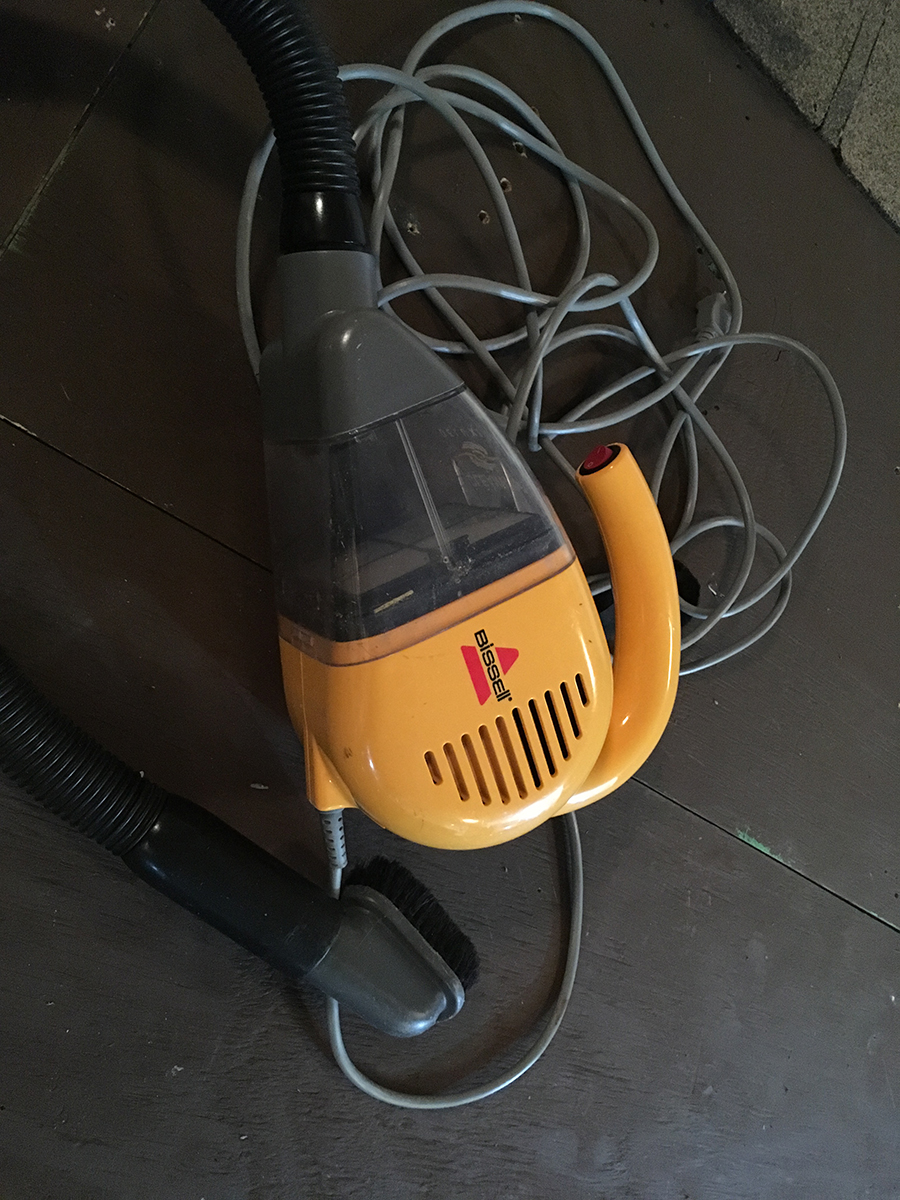
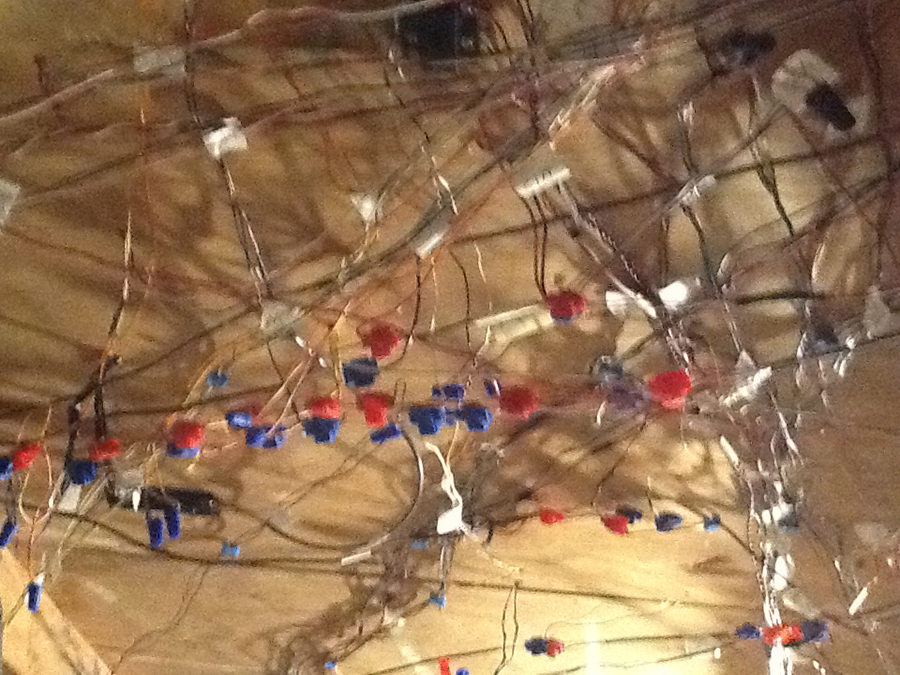
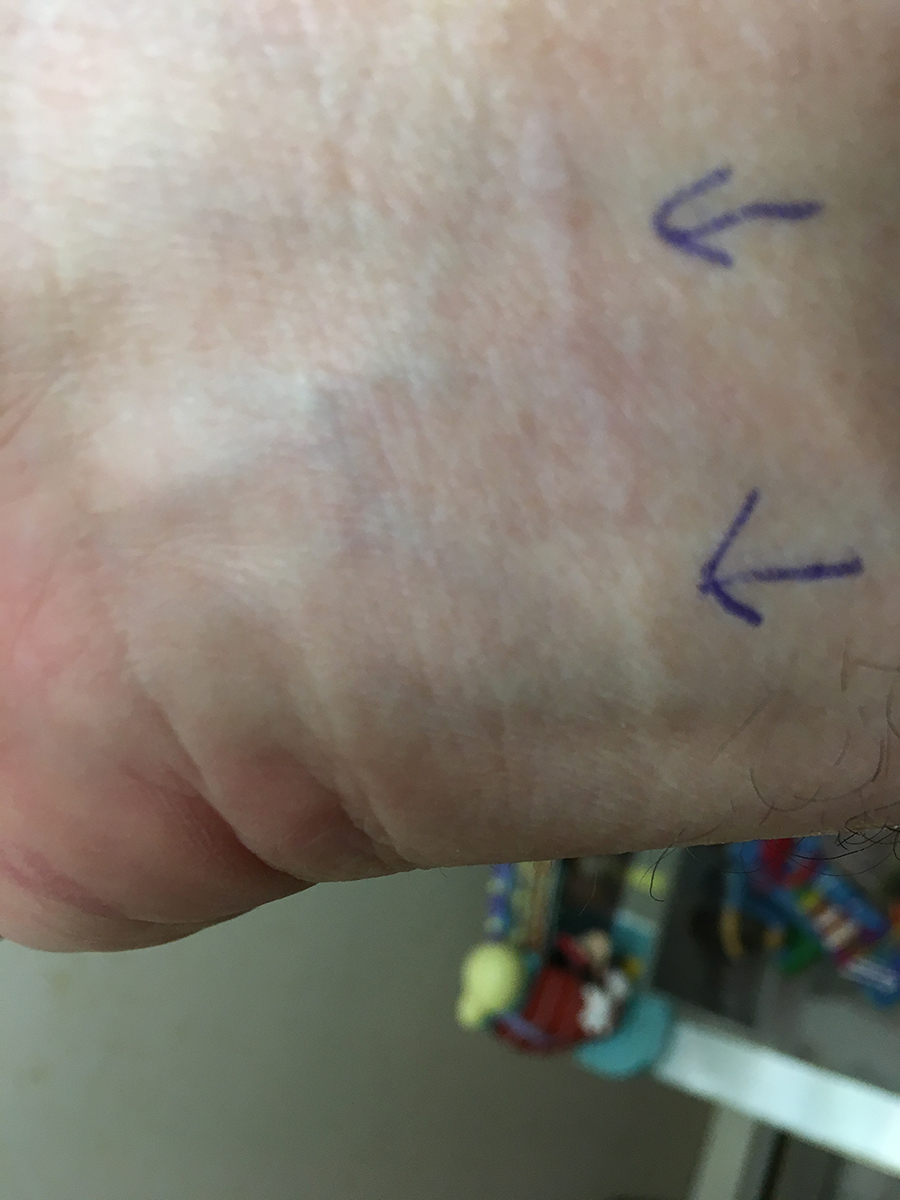
The pics: basic tools, under table wiring, layout stills, scar on wrist from hot solder from soldering under table (do not do this).
Hand laying HO scale track:
This list is the real reason I put all of this together; to help other BEGINNER HO Model Railroaders learn from my mistakes (and I made a lot and there are probably more to come). My mistakes cost me a lot of time.
When you look at my video, you say, “…what’s the big deal……he has a 2 track main line running around the layout with cross overs on each side; on the inside are 6 yard tracks with switches going into the yard and out of the yard……”.
Much of the track work and almost all of the switches were pull up at least once and re-laid. That’s why it really does pay to get your Hand laying HO scale track right the first time around.
The main 4 reasons are:
1) My project was to complex for the lack of experience I had;
2) I did not realize how different HO electrical was from O gauge;
3) I did not plan in sufficient detail
4) my track work was sloppy causing many derailments.
HERE is my list of Do’s and Dont’s: (not complete by a long shot)
DO PLAN: Before you buy your first engine or first track, make a detail plan that will include the track work, the electrical connections for switches and signals, major building and scenery components. Put in as much detail as you possibly can. Then:
– take that plan to you nearest hobby store or model railroad club that is using the same scale that you are planning and show them your plan.
– ask them what to watch out for.
– ask them the sequence that you should start building in; what to do first before you do something else.
– try using a model railroad computer package such as SCARM to draw your layout.
SCARM will tell you the size of your layout and give you an inventory of what and how many tracks you have to purchase.
– Utilize YOUTUBE and the internet. There is a mountain of information and videos tha will help you understand. Many people have posted how-to video’s such as “TOM TRAINS AND THINGS.
– call the manufacturers of products you think you want to use and question them. I have found many people that are into model railroading are more than willing to share there knowledge and experiences. IN SHORT – GET AS MUCH INFORMATION AS YOU CAN BEFORE YOU START SPENDING MONEY…….ITS FREE!!!
DO FOLLOW your plan
BE PREPARED that some things will not work the first time.
BE PREPARED for it to take longer than you planned.
BE PREPARED to work with very tiny objects.
DON’T DO SCENERY UNTIL ALL THE TRACK AND ELECTRICAL COMPONENTS ARE COMPLETED
HAND LAYING HO SCALE TRACK:
– MAKE SURE YOUR TRACK WORK IS 125% PERFECT!!!!
– MAKE SURE YOUR TRACK WORK IS 150% PERFECT!!!!
99% IS NOT GOOD ENOUGH
this is one of the main reasons why it has take me so long.
– MAKE SURE YOU LAYOUT TABLE IS LEVEL…..REPEAT……
MAKE SURE YOUR LAYOUT TABLE IS LEVEL
– MAKE SURE YOU TRACK WORK IS LEVEL
Above statements are not typos
– there is nothing more aggravating that derailments and having to walk around your layout to re-rail an engine or car that has derailed because of a track imperfection.
– Lay your track work out on a temporary basis to make sure it fits; it is what you intended it to be.
ELECTRICAL
– BEFORE YOU LAY ANY TRACK…….. run AC and DC buses under your layout so that you can use them as feeders of electricity when needed and you don’t have to run lines all the way back to you transformers.
DO work over your table. Everything is small. A screw falls off the table and you could spend a lot of time looking for it.
DO magnetize some of your screw drivers and small pliers.
DO get the right tools. I have supplied a couple of pictures of what I feel are the basic tools you will need. You will eventually wind up with more than these. A company called Micro Mark has a good supply for small tools.
DO as much work as possible on top of the layout table before you work under the table. Minimize the amount of time you must spend under the table.
NEVER NEVER solder under the table. I have supplied a picture of the scar on my wrist which I got from hot solder dripping down my wrist. I consider myself very lucky that the solder did not get close to a vein.
DO TEST………………..THEN RETEST WHEN YOU ADD SOMETHING
AND MOST OF ALL………….DO ENJOY IT.
As I work on my next section which will be the engine yard, I will give you an update and add any more DOs and DON’Ts that I find worth while.
If anyone has any DOs and DON’Ts they want to add, please let me know.
I hope this has helped.
Happy Modeling……
Gary”
What can I say except a huge thank you to Gary for taking the time to put together a wonderful piece on Hand laying HO scale track.
I think it’s one of the best narratives I’ve read – and so helpful too. Thank you, Gary.
And what’s more, I think his layout is going to look fantastic. Really can’t wait to see updates on this one.
Please, please do leave a comment below. I’d love to know what you all think.
One last thing – if you think Gary has been helpful, you’ll absolutley love the Beginner’s Guide.
That’s all for today, folks.
Please do keep ’em coming.
Best
Al

Thank you Gary. I’m now 75 and I just finished building most of my tables and that was fun. More fun than I’d thought. I’m stringing bus wires now. I’m nervous about using those plastic wire joiners. I really appreciate the amount of work you’ve done, and redone. I have great hopes for my layout, with a mixture of remote and manual switches. I like the hands on approach. I’m looking forward to seeing how you go about our similar problem-solving. Best of luck to you. – Graeme.
Gary I like your layout. What I do not really like (for you) is all the wiring.
A suggestion for you. USE TERMINAL STRIPS. They are two rows of screws for connecting like wire. They make wiring must easier to trace if there is a problem or if you want to add wiring later. The picture of the wires is scarey.
please take this as a compliment not a bad wish.
You may write me back if you want to.
Wow the picture of all the wires made me crinch! Why oh why not use a solerable copper self adheasive buss strip under the layout to carry the feed? It cuts out all the need for a wire buss feed which I din’t personally like.
Thanks for sharing the beginning of your journey. As with anything in life, we learn from our mistakes. Al’s Beginners Guide was very helpful to me as well as narratives like yours. Great job! Cheers! NJ Mark
great job.
Gary- great work. As Al always says, you’ve got to start….
I also live on LI and take the LIRR past Sunnyside often. It is one amazing complex. I love to see what’s going on there each time I pass.
Keep up the good work.
Great layout Larry. Please post more pictures and videos as you continue to build your layout.
Very nice post Gary. The narrative is great along with the photos and video.
I really like the history behind your plan for the layout. You mention the GG-1 and I had just a couple weeks ago commented to a YouTuber about how my Dad had taken me to see a GG-1 pulled train just outside of Washington DC Union Station
back in the early 50’s. Thanks for sharing your layout and hope to maybe see you on YouTube in the future. Cary B AKA cbgadget on YouTube
best narrative i have seen on this ever !!!!!!!! i’m 78 & have always loved model rr’ing…have copd & am limited in my physical working ability…you have made me reconsider trying again. ty for all your work…keep those vids. & progress coming
Gary fantastic work and the narrative was spot on!! Want to see more from you as you continue to progress- Bill in Virginia
Gary:
I grew up near the Sunnyside yards and have fond memories of Saturdays afternoons with my dad watching the freight cars shunting to make up the freight trains. I’m in my seventies now but this yard was a big deal and very busy in the fifties. Kudos to you for making a model of this. I’m building an N Gauge layout, my first one, so I can identify with your “first time” experiences. All the frustration evaporates when my 4 year old grandson marvels at this layout, mistakes and all, and makes it all worth while. Thanks for the video, looking forward to your next one. John
Wonderful work Gary! And all your suggestions are spot on. Keep them tracks clean and enjoy
Rob NJ
Hey Gary,
thank you for sharing your progress in this project. Looks quite ambitious, but I have faith in you.
With regards to your scar: “if it smells like chicken, you’re holding it wrong” Andy in Yakima,WA
Gary, love your layout, and your patience & persistence in ‘getting it all right’.
My one question is: How will you access the centre area of your layout. I would think you will need an access hole to ‘pop up into’ so that you can reach problem spots that inevitably arise while running trains. (Or, will you not have any tracks beyond arm’s reach from the edge of your layout???)
Your narrative and experiences are spot on. And common for most of us. So take your time and enjoy the ride.
Jim AZ
What a great article on the of startup of a model rail road layout. It covers a lot of what someone will learn only later There really is no deep text for those of us who begin a layout for the first time. I really liked his term “Redo/Redid some things A term rarely mentioned by those experts we see pictures shown here. What frustration to be a beginner and finish a portion of the layout only to have to rip it up and fix that part of it anew.
Hi Gary, a very nice list of do’s and dont’s. One thing I must stress (speaking from experience) is make one hundred percent sure that your work table is level. I had a modelers knife roll off the table, point first onto the floor missing my foot by a millimeter.
For a beginner in HO, I think that you have done exceptionally well.
I personally would rethink your under the layout wiring for future problem solving.
I have used suitcase connectors (in this country they are called quick connects) under my layout. They are very easy to use and and as the name says “quick connect”. Also a great help in problem solving.
A very nice start and hope to see more as you progress.
Brian the HOn3 guy. – Knysna RSA 🇿🇦
I wish that I had had this list in the 1990s when I built a very large layout for my son! Excellent advice.
Gary –
I to am sorry to say, I am appalled at the wiring, you did a spectacular job on the top of the layout, but I am afraid to say that underneath detracts from all your efforts. Barry’s law of building something: If you do a neat job, whatever you are building will go together smoother and work better!
In my profession we call it a “rat’s nest”. I am an electrical/electronics engineer with a fetish for running wires parallel and numbering them with little numbered tags, one tag number per circuit. Here in the states, the general term for them is “Brady” markers. They are about 1/4′ wide and 1 ” long, imprinted with numbers in some range, usually, 1 to zero or A – Z.
They come precut in a booklet and peel off easily, Just peel and wrap around the wire. I am sere that there is an equivalent product available around the world.
..
The reason for doing it this way is that if a loco starts up, it or goes up a grade, the town’s lighting does not dim due to something called a ” ground loop”. A bit about that later. The third, and probably most important reason is that you aren’t constantly bumping your head under the layout while jiggling a wire trying to determine where it goes or what it for.
For instance, put all of the street lights on a single circuit with a switch back at the control source. Same with all of the building lighting, etc.
By way of explanation, a “ground loop” is a phenomenon where by if something like a loco travels down a section of track away from a power source, the voltage drops due to the resistance of the track, it is good old E=IR. From what I have seen, most track is nickel plated steel, which are lousy conductors. We therefore wind up laying down a huge buss with small section feeders.
Another way might be to run all of the feeders of a smaller gage all back to one large point adjacent to the power supply. Same for the neutral for exactly the same reason. You now only have to contend with the very small voltage drop across the smaller feeders.
As for all of the copper wire that will be needed, consider finding an electrical surplus store and take a look at multi-wire telephone cable. or multi-wire cable in general. It may seem expensive and labor intensive, but stripping it down might just be something to do while watching the tele.
Al – Sorry for being so long winded, but I read all of your articles, have as yet to start my own layout when about 2 1/2 years ago.I was just at the point of ordering the lumber to get started when I fell against a concrete step and broke my ankle. They tried pinning it back together but were unsuccessful. I underwent a hip replacement which I proceeded to break and yet another surgery was required to clean up the damage.
Then I tripped and fell and broke my ankle on the same foot as above. While in rehab, I discovered a lump in my left breast and it turned out to be non-benign cancer. Since I try to contribute at least some time following you publication, this long winded treatise above is an attempt to contribute something to the hobby.
If you would like a simpler or a more comprehensive explanation, please let me know.
Gary;
I urge you to plan on an open area in the middle of your layout. Add HO size, age and eyesight, and you have built in issues with access. Guess where the problems will be! There are a lot of ideas as to how you can cover it if you don’t want just a hole.
For your yards, I have used a single DPDT (on-off-on) switch running through a rotary switch to control only one track at a time.
I couldn’t tell if you have a pulse controller, but they are great for slow speed running. Easy to make if you are not afraid of electronics.
Dave in Clyde, NC
Great job. Like what you did. I’d like to be on your list.
Hi Gary,
Thanks for sharing your all too familiar experience. Been there and done that, got the T shirt etc…….
One thing that I learnt was that labelling the end of every wire and documenting it in a note book is invaluable. It will go wrong down the line and you sure as heck will never remember what that white wire does when it’s connected to the green and runs across the table joint before connecting to another two wires!!!!!!
Especially when you are upside down under the table looking up!
So I suggest you tidy up the wiring using connector blocks or solder tag strips and bundle them into looms for you future sanity.
But do keep the updates flowing, I love a good read and a nosey at others layouts.
Kindest regards to you,
Mal
North Wales
A journey of a thousand miles begins with a single step. Gary, you have the patience of Jobe. Keep on hackin’ & trackin’. Jim from CB.
Excellent narrative Gary! When I first read that you were attempting to model Sunnyside Yard, I almost cringed, because overly ambitious plans often lead to frustration. You sensibly scaled your effort to capture the flavor without the actual layout. Someday those GG1s with long strings of tuscan cars will be gliding through your turn-outs and hopefully bring many happy memories. Your beginner tips were marvelous. Because of the varied skills involved, model railroading can be fun but also frustrating. I commend you for your patience to “try, try again” until you got it right. Nothing says big time railroading like the GG1 and the Pennsy.
Excellent advice. One thing I would add is don’t be afraid to take a sabbatical if you are not sure how to proceed. My sabbatical lasted 6 months!
Gary–nice work and I started to agree with a couple of other posters about access to the middle of the layout….then one of the shots in your video showed a space between the layout and the back wall. If that’s true and the only thing in the middle will be buildings…then there’s no problem. However, if you have tracks that are more than 3 feet from the edge of the table then you could be in trouble because, no matter how much testing you do–a derailment/stall will ALWAYS occur in an area you can’t reach! (lol). Be sure to do the middle (buildings) area first because you don’t want to run the risk of bumping/scraping or crushing the completed rr tracks & accessories. Good luck and as others have said–reconsider the wiring–it scares me too.
I Loved your list and film My first and only bothersome thing that nobody before asked was ,,,, You said that is 9 feet wide 99 feet long 7 feet wide
Pleas I am confused.. Please What is it??
Gary, Construction aside, as a childhood Queens resident riding the Long Island RR, the Elevated and the New Haven RR from Penn Station to New Haven and later as an adult Amtrak from FL to CT passed this way many times. Thanks for the memories!
ANDY FL
Gary –
I have been following this site for about 7-8 months. In that time I can not recall a better post than yours. Explanations, comments, suggestions are all straightforward and easy to understand. I also grew up in the 50’s playing with 3-rail trains. No doubt about it they are far easier to wire than 2-rail trains.
You have learned a lot in a short time and sharing here you will help many other less experienced people starting to build their own layouts.
Looking forward to all your future comments, suggestions, pictures and videos
Thank you for sharing and al the best going forward.
SantaFeJim
gary, i worked in ssyd in 1968 for 3wks as a yd fireman – saw the handwriting on the wall and went over to the lirr. upon promotion to engineer and qualifying in penn station i came to know the licity trackage. took all my life to collect modeling tool box and at 77yrs am still working building my rr. thanks for the tips and experiences you point out. keep up the good work. pat gordon – blet div. 269
Thanks for sharing. We have moved three times in the past five years and I am getting ready to start modeling again.
Thank you Gary for sharing how you did the steps necessary to make a credible and interesting layout — a labor of love!. You have demonstrated the importance of showing a lot of human activity in realistic settings. If you plan to weather buildings and vehicles that will greatly enhance the realism!
Hi everyone, I’m Peter from a little town 3 hours west of Brisbane, Queensland, Australia.
I have been modeling Marklin since I was 10 and now 80, the times I have rip up yards, tore out wiring and it goes on and on. But since Marklin when digital I have never really had a wire problem, less wiring, and more fun running trains.
My layout fits into a 6 x 6 yards special shed and it was not long before I ran out of room, so I put a helix in and took my trains down under, created a yard that I use as engine storage and passenger cars. I will share my joy with you.
I am going to start construction of an HO layout in a few weeks which I project will be 305 square feet. I plan to put foam over plywood, then a layer of felt on top of the foam. I am thinking about running wires in the foam instead of under the wood. They will still be hidden by the felt. Anybody got any comments on that idea?
Very nice setup