Gary’s been back in touch with plans for his HO scale operations yard:
Here’s his first post and pics on the track work so you can get up to speed.
“Hi Alastair…… thank you for giving me this opportunity to thank you and all the guys that responded to my blog and pictures on my Sunnyside Yard project.
I do not know the right words to express how I feel after seeing the number of responses that were posted, the suggestions and positive views on what I have done so far. I do not think I am a sentimental guy but WOW, FLABBERGASTED, TOUCHED…….. I don’t know the right word…..THANK YOU ALL.
I asked Alastair how I could respond to your questions and he said to put this blog together and he would post it.
So here it goes…… I am going to list by subjects that you commented on:
WIRING…..
I agree with all of you that the wiring got out of hand. I did label each of the connections. I have two transformers; one for A/C and one for D/C each going to a Power Distribution Board. From there, I have 4 D/C buss’s and 3 A/C buss’s.
So far, the D/C buss’s I have are used only for track power and running the engines and one undertrack uncoupler by Railcrew.
The A/C buss’s feeds the power for the signals, switches and lights and future power needed for scenery. The wiring started out organized but when I started having the signals work in conjunction with the switches that’s when it got crowed. I also have wiring for the 4 blocks that are on the layout. Right now I have 20 switches (turnouts) and 15 signals. Each switch (turnout) has 3 wires that have to run from the switch machine to the switch controller.
I haven’t connected signals to all the switches yet. I bought a terminal switch but I did not know how to use it to cut down on the amount of wiring. You still have to run wire to the connectors and controllers.
The HO scale operations yard is going to add more so I am thinking of having the engine yard have its own power source. I have to figure out where to locate it. I am going to have many small blocks with signals that will store the engines.
One of you gave me some good advice on how to avoid a “RAT’s NEST”. I am going to look into these “Brady” markers as they are called. I haven’t run into a “ground Loop” problem because I have separate power supply for the lights and trains.
I am also going to take your suggestion and run separate A/C lines for the different accessories (street lights, housing lights, signals, etc.).
For the Electrical Engineer, I hope your ankle heels. As for the lump that was found being non-benign; my prayers are with you and I hope the biopsy is negative. Right now I am in remission from my Lymph Node cancer. Went through 8 months of chemotherapy; still have a few side effects remaining but I am doing OK. Enough of that, let’s get back to model railroading.
Another gentleman wrote about “solder tag strips for wiring and bundle them into “looms” for your future sanity”? What’s a LOOM? I will investigate that.
SIZE OF LAYOUT & CENTER OF LAYOUT
The layout table 9 feet long and 7 feet wide.
It originally was going to be 11 feet by 10 feet but I was concerned about getting to the center of the layout. So I decided to make it smaller and I have area around the whole layout to walk around. I purposely did not build the table into a corner or against a wall and I measured my arm span to make sure I could reach into the center of the layout. I have provided a picture of the main portion of Sunnyside Yards:
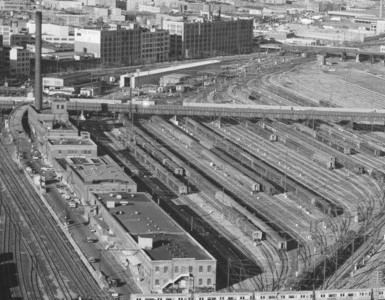
It’s not the whole yard. Not shown, the bottom left hand corner leads into the Long Island Railroad Freight yard and to the right there are actually 31 passenger tracks not shown and then east of that was a smaller freight yard where the post office was, also not shown.
This picture is the basis for my layout but it won’t look exactly like this. If you look closely will see the passenger yard to the right of the center buildings, then there are the buildings (commissary building, and power supply buildings); behind the buildings you will see parking lot and cars and a street going up a ramp (I am not doing that) and right next to the smokestack on the right you will see the two stall engine house (I will have to make this from scratch because of the shape) and the left hand corner in front of the buildings is the engine yard.
This is the basis for my layout but it will not look exactly like this. In the center of my layout will be these buildings, so once they are in place, I should not have to worry about reaching over. My plan after all the track and signals are installed is for me to measure the center area and build this portion outside the layout. When done, fit it in and lay it down in that area.
TOGGLE SWITCHES
I have started out using SPST (single pole single throw) toggles for changing the signal lights. Then I started using the Snap Relay by Atlas for that and now I am going to use the Tortoise and or the Atlas Deluxe under table switch for throwing the turnout and changing the signal color.
I also use a DPDT (double pole double throw) toggles to turn power on & off to a block while also changing the signal color at the same time. I will continue to us DPDT because you can control both D/C and A/C current with the one switch.
I don’t know what a Pulse Controller is but I will look it up. What did you mean by “slow speed running”?
Gentlemen……. thank you…… like one of you said…”…all the frustration evaporated….” when I read your post and compliments and suggestions.
I will be starting on the engine yard tomorrow. I don’t think my layout will look as good as some of the model railroads you guys put up that Alastair shows, BUT IT WILL BE FUN.
Oh and I also ordered Alastair’s Beginner book.
Alastair…………..many thanks.
Gary of Elmont”
A huge thanks to Gary for sharing his HO scale operations yard update – another wonderful post. What I like most about it is it always comes back to the most important point – having fun.
That’s all for today folks.
Please do keep ’em coming. And if you want to get cracking on your layout like, Gary, the Beginner’s Guide is here.
Best
Al
PS Latest ebay cheat sheet is here.
PPS More HO scale train layouts here if that’s your thing.


Great piece Gary. Keep us all informed of your progress
Thank you for sharing.
Gary. Like your story. I think most of us went through the same learning curve. I have been working on my O gauge Lionel layout for some 4 years now and based on what I have learned, I would love to start over again. I am about 99% complete and am going back and changing areas so I have more work (fun). You said you are using AC for your lighting and accessories. I have changed everything to LEDs and can’t think of any HO accessories that run on AC. LEDs last a lot longer and once you understand there needs are easier to wire and the DC power supply is easier to control. Well you seem to be having a lot of fun and that is what it is all about..
Steve from Toms River NJ
Gary;
A pulse controller that was mentioned may be a transformer/controller that enables better low-speed control of your engines. This was especially useful in the early days of the hobby. I had an MRC dual pack controller from the ’60s that had a “pulse” switch. I used this to start my engines and once up to speed I would switch it off and throttle back at the same time, much like switching gears in a stick transmission car.
Today’s modern DC controllers have much better circuitry with much better slow speed control, and the locomotives have enhanced circuitry as well. In fact, I read a posting that using the old pulse control on newer engines is not a good idea, so I have replaced my older controllers with a more modern ones.
My most sophisticated dc controller has the following features:
“nudge” – for low-speed operation – it gives a little burst of energy for switching/fiddle yard operations.
“momentum” – provides a prototypical gradual build-up of speed or reduction of speed.
“brake” – what it sounds like, replicates applying the brakes to your locomotive, not as drastic as shutting off the power, more controlled.
Hope this helps. Good luck with your good work.
Wire loom; there are several types. Think of a hose or tube,. Designed to either protect or bundle wires, or both. Two types useful for model RR’s would look like a tube slit lengthwise or the type that looks like a coil. The coil type is wound around individual wires to bundle. (The coil type can be a real pain in the posterior to apply in confined areas especially after wires are installed and tested.) Loom is sold by most automotive parts stores.
Gary;
“Slow speed running” is an imprecise term. What I mean is that you can select to operate an engine at a true crawl speed, not really possible with ‘a “normal” setup.
Mind you, that I am discussing an older technology electrical system, not DCC. I have never operated in DCC.
What the pulse mode does is clip half of the sine wave of AC current by inserting a diode into the circuit between the output of the transformer and the rectifier. The result is that the DC voltage (when the pulse mode is activated) is running at only 30/25 CPS, rather than the normal 60/50 CPS. The pulse mode switch is a DPST (On/On) switch.
I build my own control panels from scratch. I have seen a pulse selection switch on a MRC Model 501 transformer, and I am sure others exist.
Dave in Clyde NC
A loom is just a bunch of wires running parallel to each other and bound at regular intervals or in protective tubing along its length to keep it all together neatly. Nothing more than that. Trust me, as an aircraft electrician from way back I have wrestled with a few looms from several electric cables up to looms of wires around two to three inches diameter (thick).
Garry
Another way to make a loom is to bundle the wires together and use small cable ties. This actually make a great loom and is easy to pull apart if you need to.
One more tip. Label your wires at their source and their destination. When (not if) you have to track down a fault you’ll be more than glad you made the effort.
Good luck
Hello Alstar, thanks for every thing that you are doing, as a model builder, molder R.R. is the one thing I like doing. Building a big lay out I have note done. I am making the tables now for my lay out.
Gary, Can’t wait to see the lay out. I have a 10′ x 10′ room and I am chosen to go around the room. I am making my tables 4′ x 3′ so I also can reach 3′ in but my coiners will be a little deeper. I will have a bridge to inter the center of the lay out, maybe two. I do have a closet that I will have to get to it so that might be my second bridge that I will have. I have been reading everyone input on all that has been posted and I have changed some of my on stuff that I will be doing. And a big thank you to everyone’s input. I pay for your remission that is going on with your body. I have very bad lower back issues, three surgery’s, a lot of procedures and it is going to take me a long time just to get the tables done. It is what it is but you make the best of it, hold your head high and try to walk a straight line because I am all over the place, ( lol, laugh out loud ) for the folks on the east side of the big pond. Back to the lay out. And yes I want mountains and switches every where, this is my very first train room/ man cave. Yeah I have had my room has a man cave but it would always get full of furniture??? Always. So this time I made sure that would not happen again. I filled the room with all my train stuff and the train stuff that my father had, inherited. So I am making my tables one at a time, it hurts and i push through it. I am glad to be working with wood again, I smile and work on. I can’t wait to get my tables done. And yes there will be film at 5:00. Lol
Keep on trucking and keep it on the rails. I am planning on my O gauge and HO gauge.
Stephen SDG. St.Petersburg Fl. USA
Gary, I just love the way you have explained everything step by step. I am an old man of 77 and just cannot comprehend so quickly anymore, but when I see how you explain thing’s so precisely, I am very confident that when I don’t understand something I can always go back to the beginning of your explanation and re-read the process that I will understand every word. Thank you so much for that. I am sure that I speak for a lot of model railroaders my age who need that xtra word of explanation to understand how things are done. Thank you again. Rocco from New Jersey. I will save and cherish this article. Also thank’s to Allister for this wonderful and knowledgeable website.. Be safe everyone.