Bill’s been in touch with his HO scale switching layout.
Well, I say, HO scale, but he’s also playing with his others too, as you’ll see:
“Hello Al,
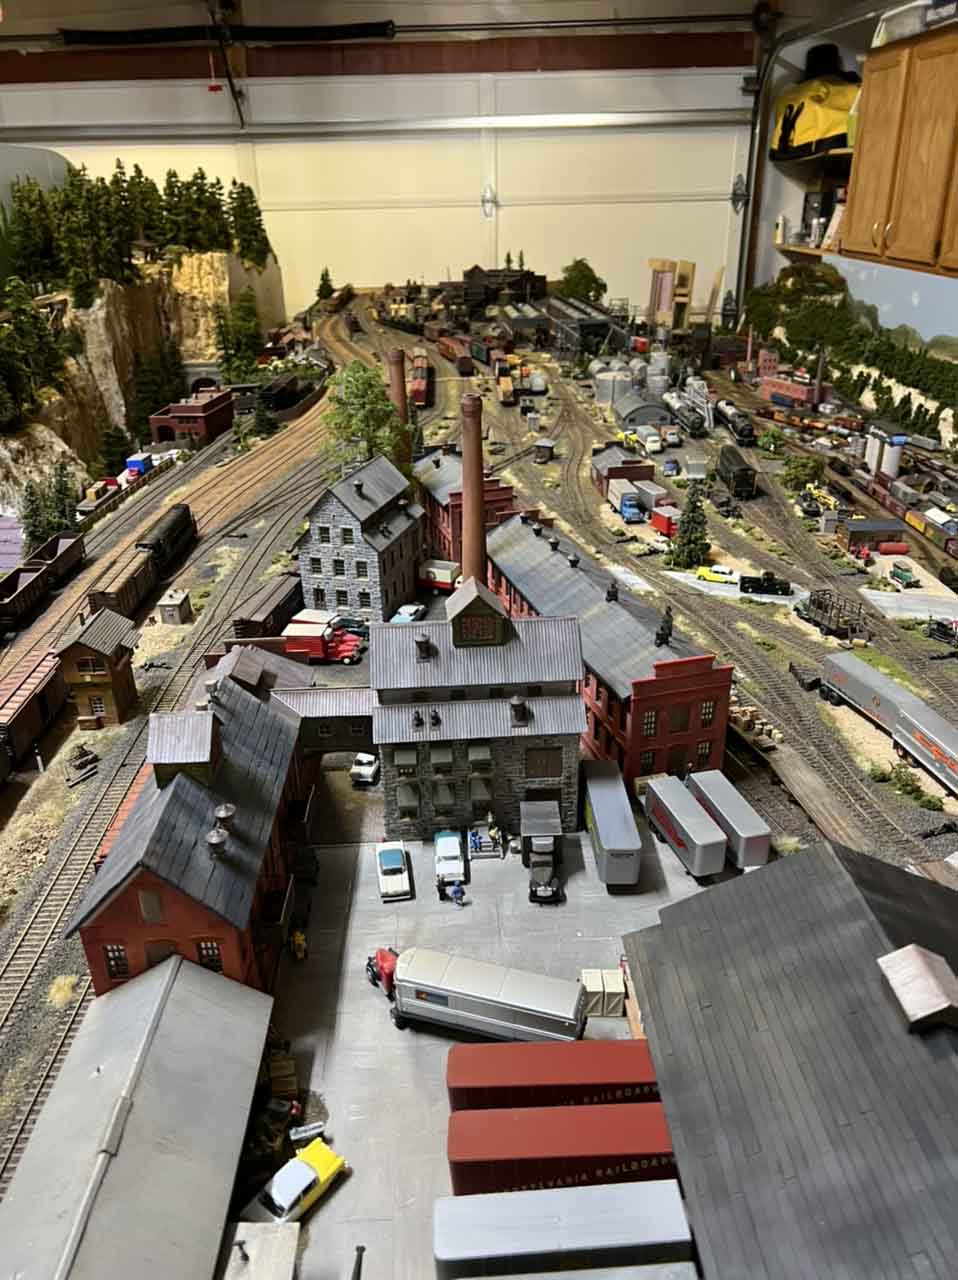
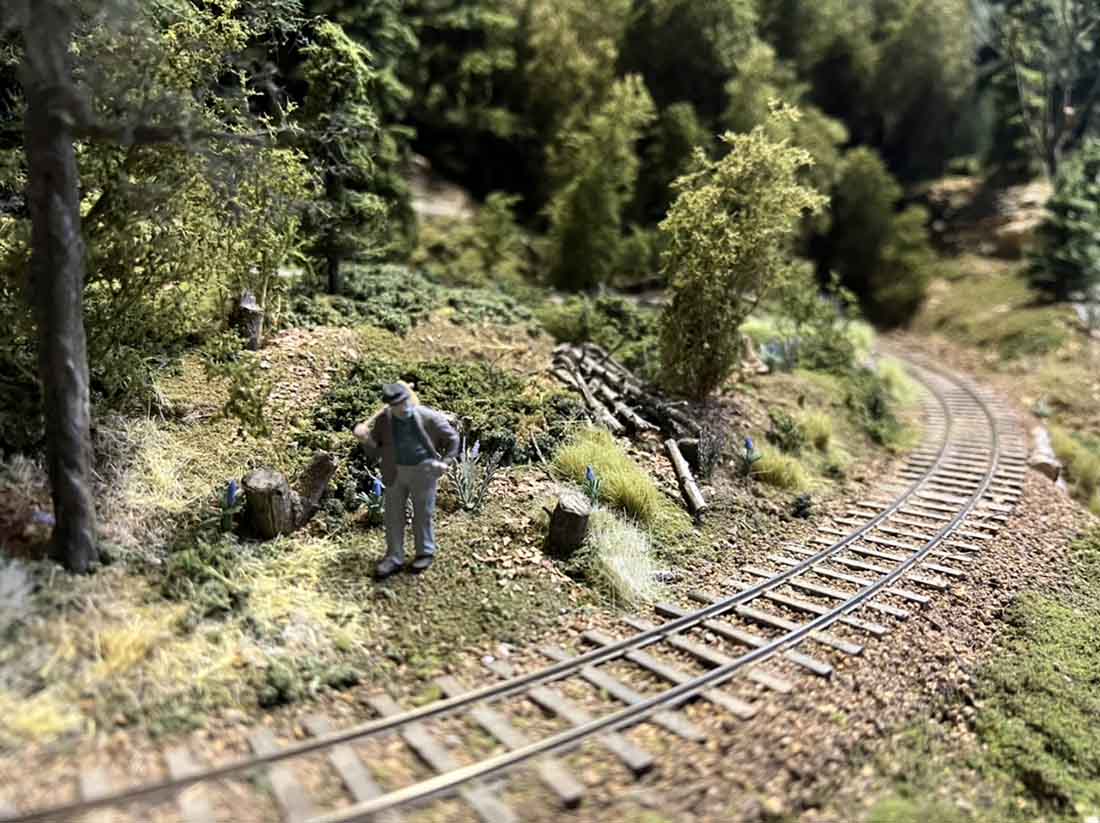
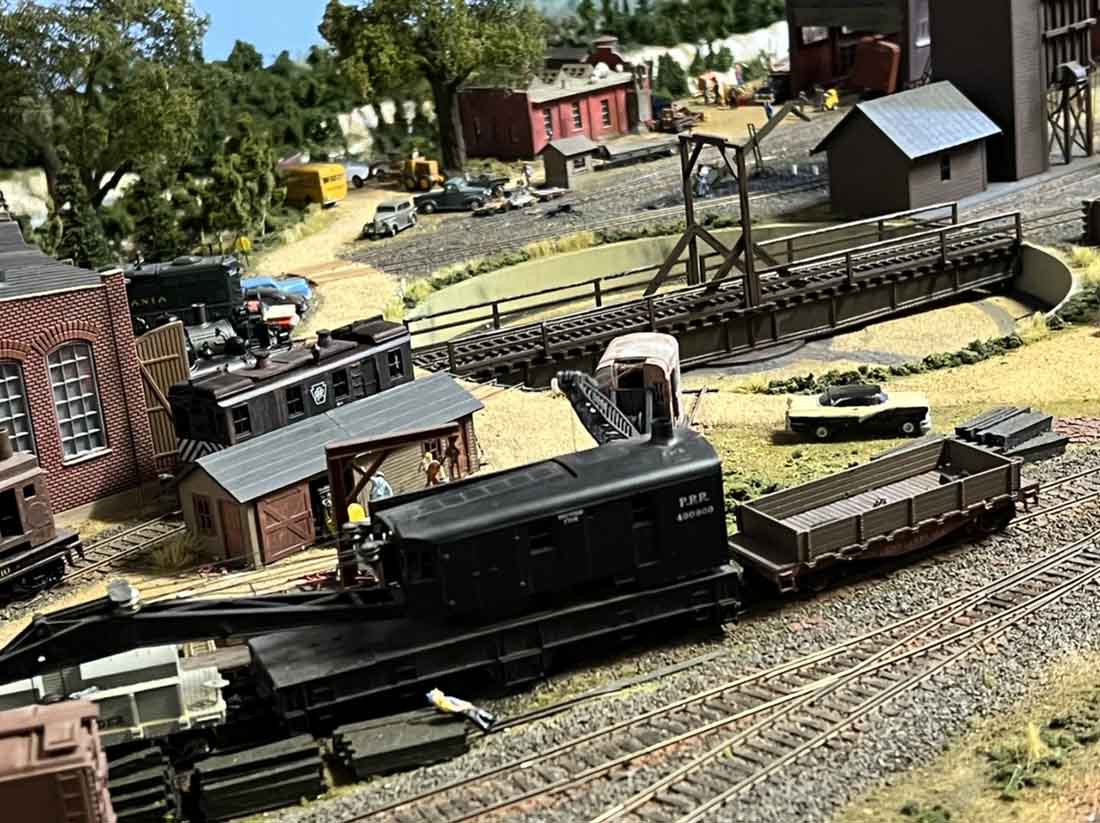
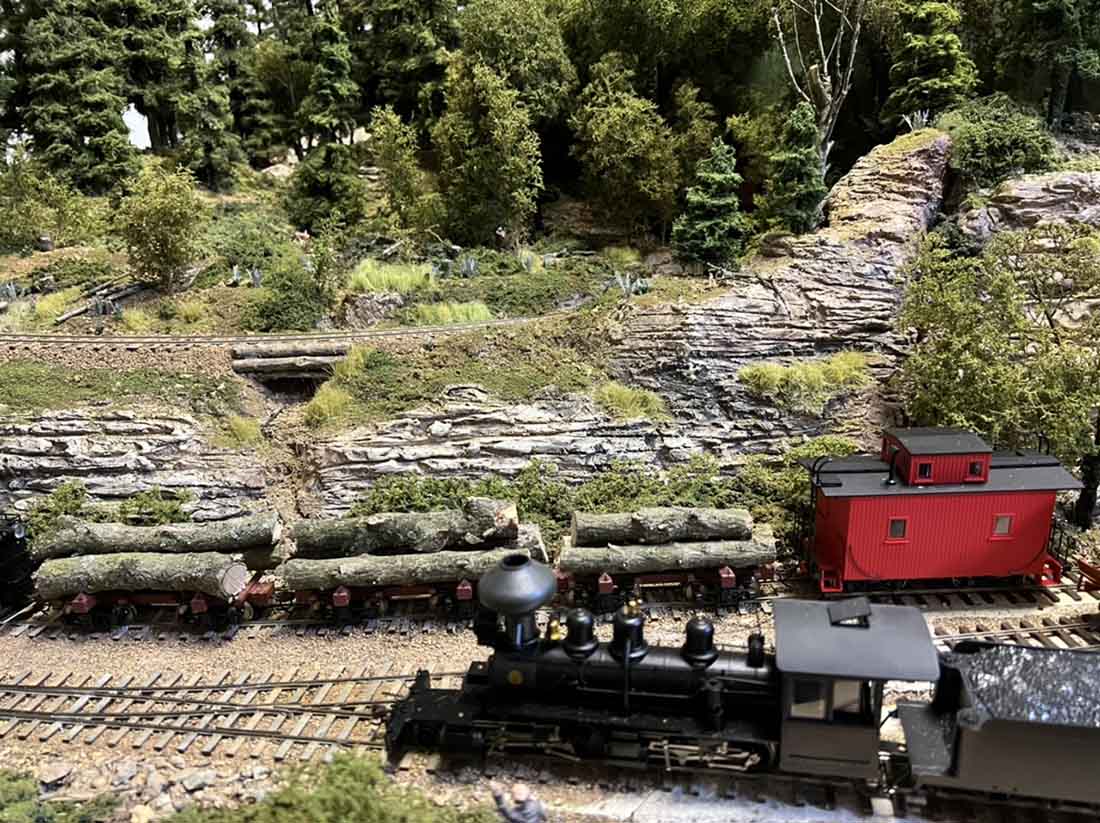
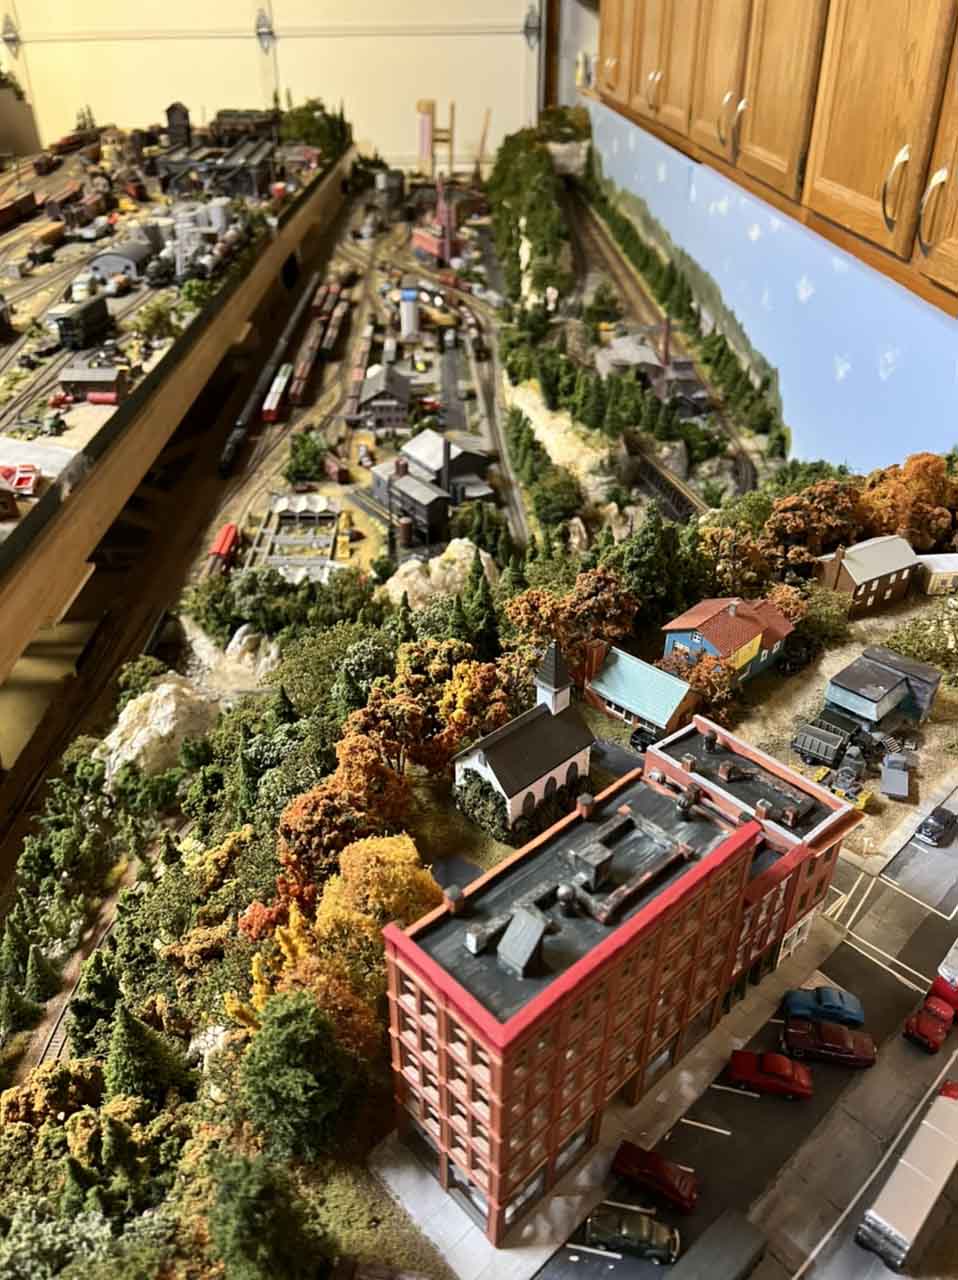
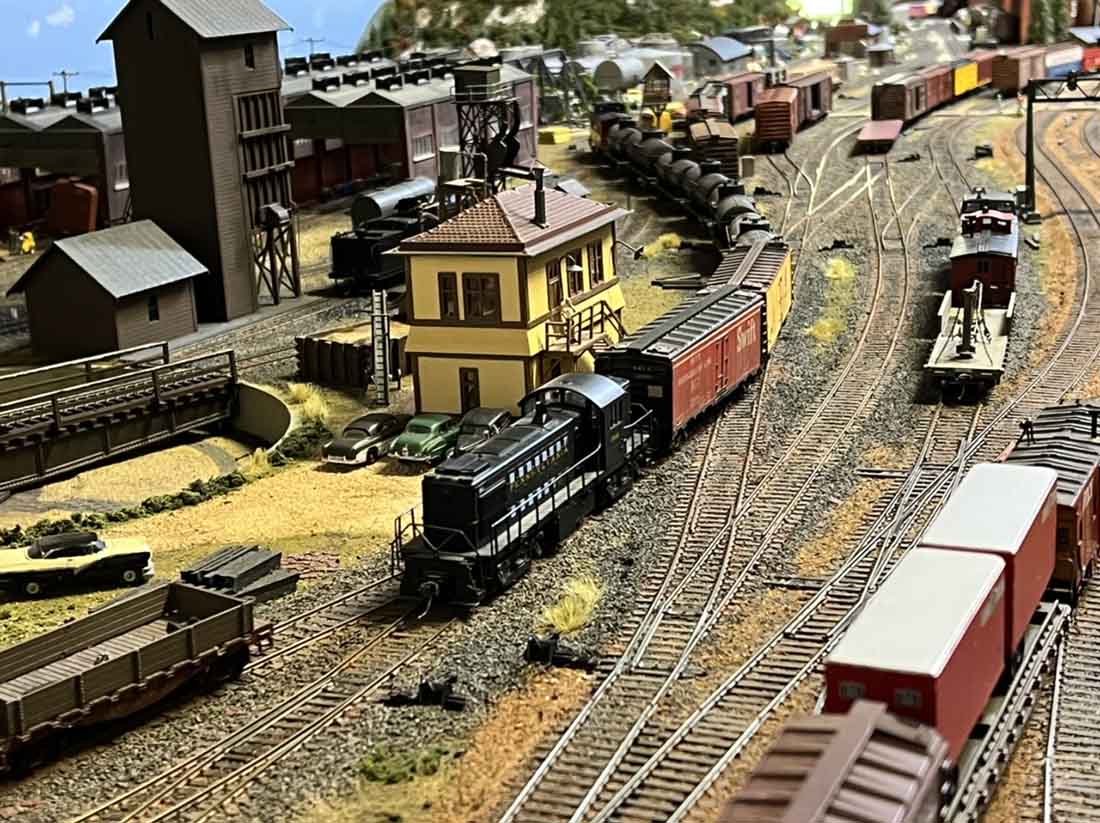
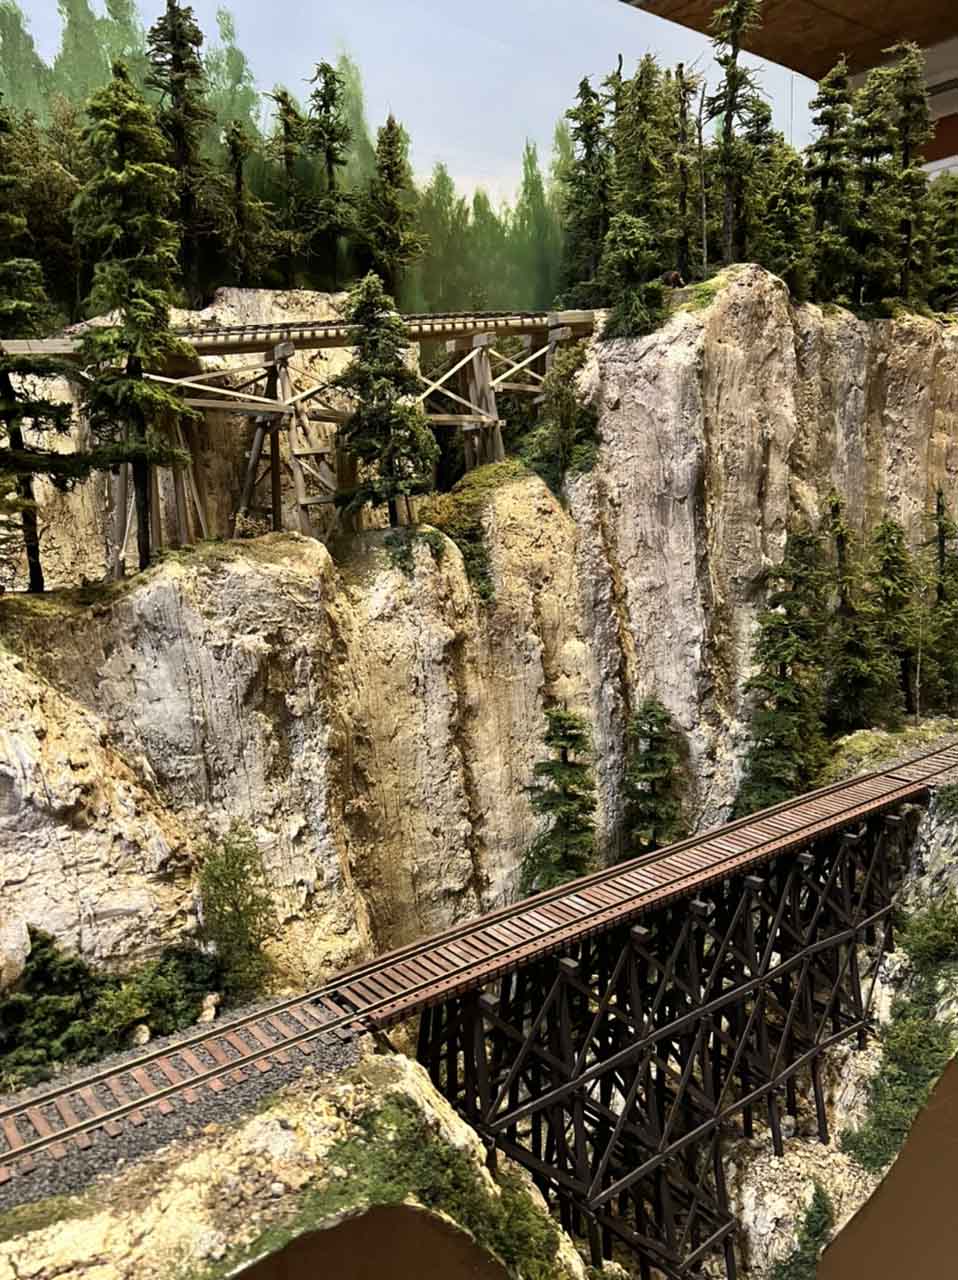
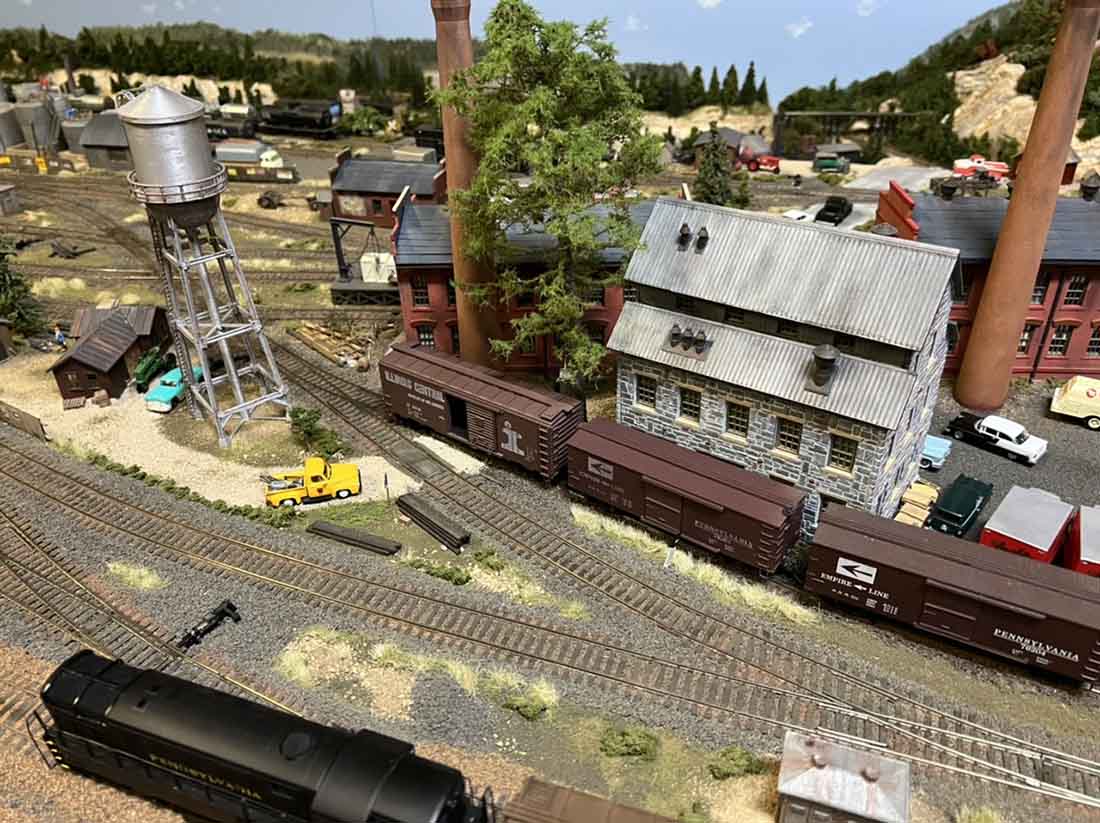
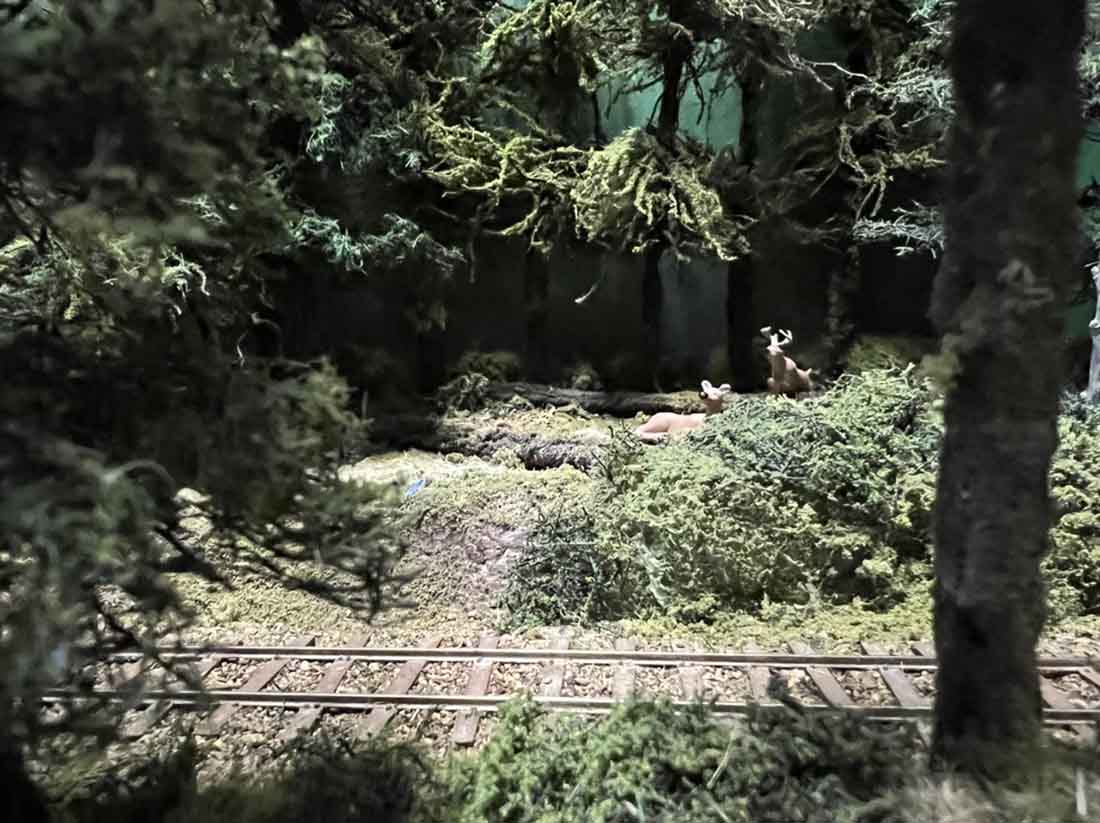
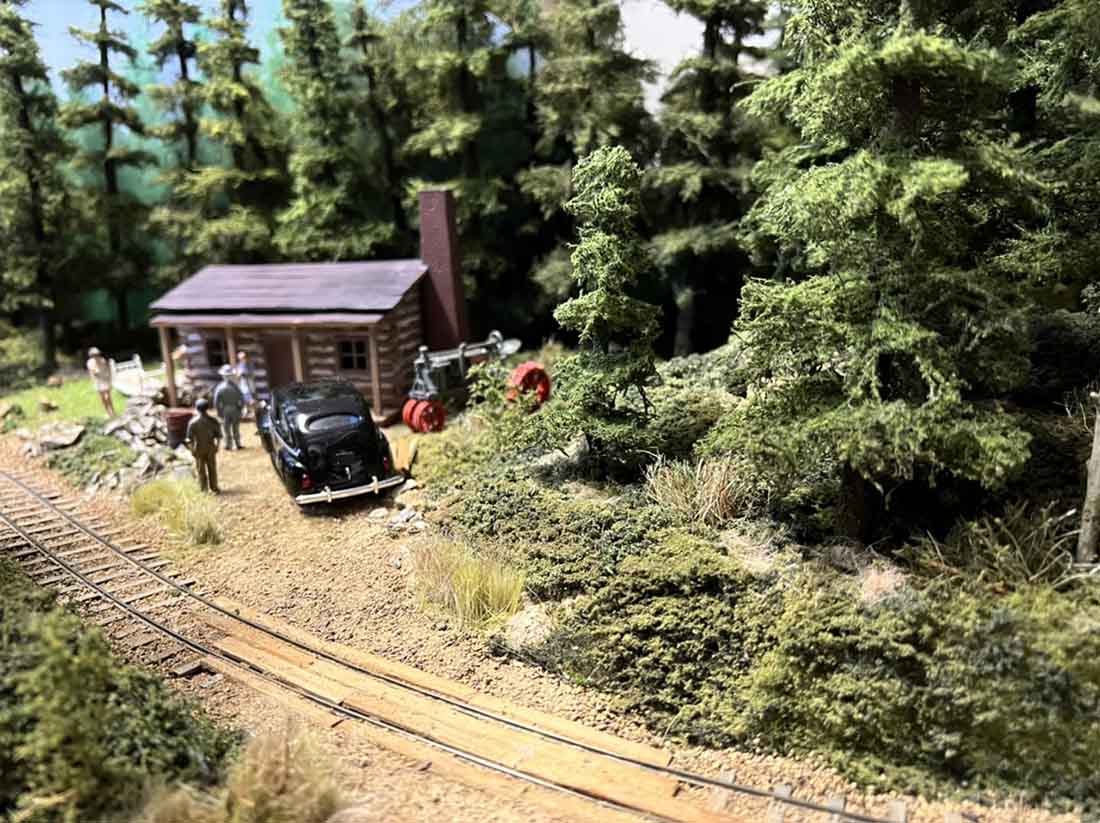
I’ve been busy still working on scenery for my small O/On30 layout (4-1/2 X 14 feet) but took some time to make sure my other two layouts were cleaned and running.
I know we all have opinions on track cleaning and there is no one best method. The best method is what works for each modeler.
I used No Ox IDA Special last summer and now a year later I just have given the tracks a lite wipe down and I continue to have great results with very good electrical conductivity.
Having given everything a lite wipe I decided it would be fun to run all three layouts. I had great fun watching all three layouts perform very well and enjoyed cool sips of lemonade as I sat back and watched and videoed.
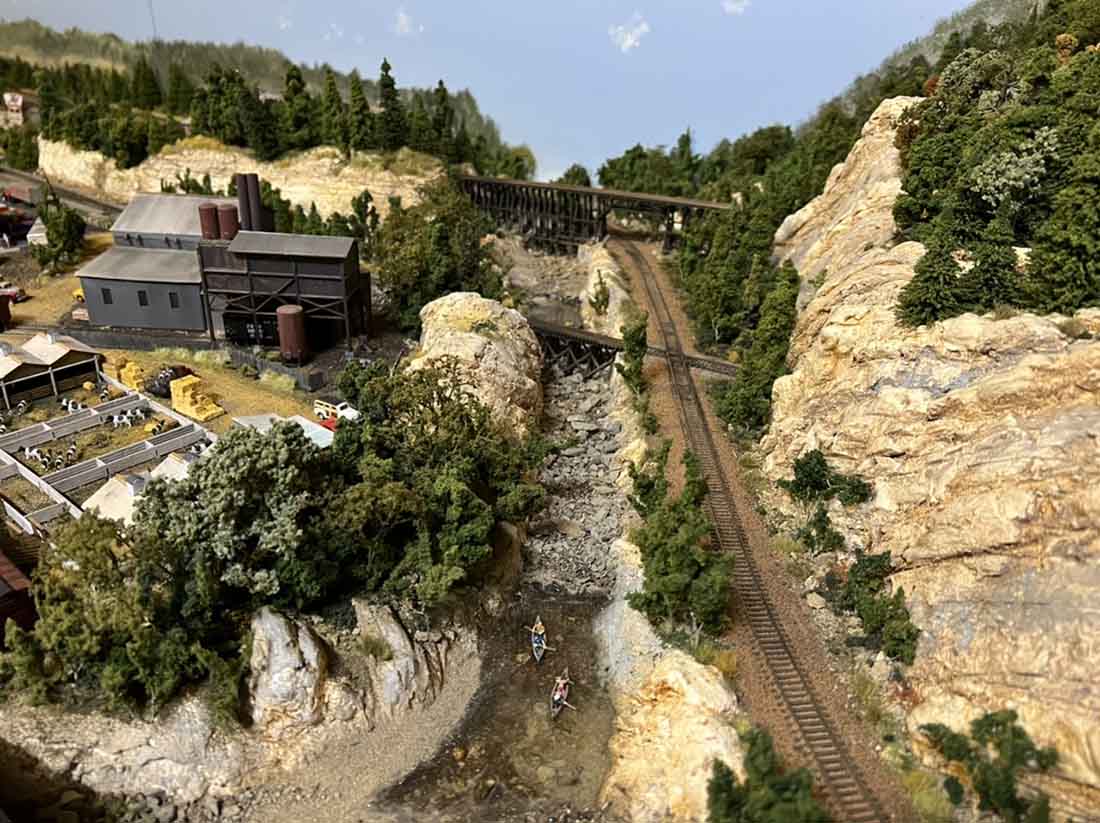
In addition to the O/On30 I have the 4 X 16 foot HO scale switching layout and the 3 X 15 N Scale layout.
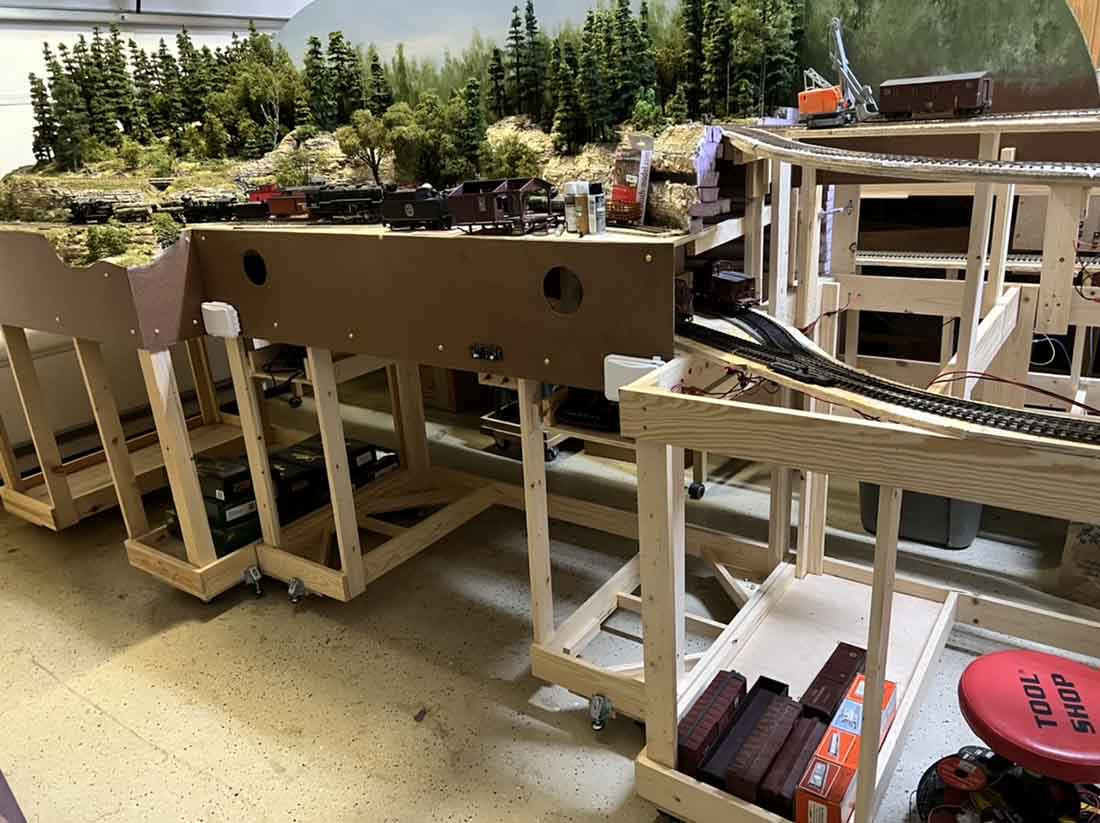
Each layout has different themes and scenery to keep it interesting. Each layout is mounted on castors so each are movable in my garage.
I’ve attached video of my afternoon of multi scale running. I will do this once in a while in my one man empire and enjoy the fruits of my fun filled labor.
All the Best
Bill in Virginia”

A big thanks to Bill for sharing his HO scale switching layout. You can see his last post here, which is just as impressive.
Bill’s post also reminded me of this one:
Now let’s move on to George – who also mentions Bill in his missive.
And as his post is on turnouts, it makes sense to follow Bill’s switching layout with it:
“Hi Al,
This is a rudimentary wiring diagram to show how I powered my turnouts.
One must install the microswitch so that when the servo arm turns to turnout it hits the switch lever and the light, then turns from green to red.
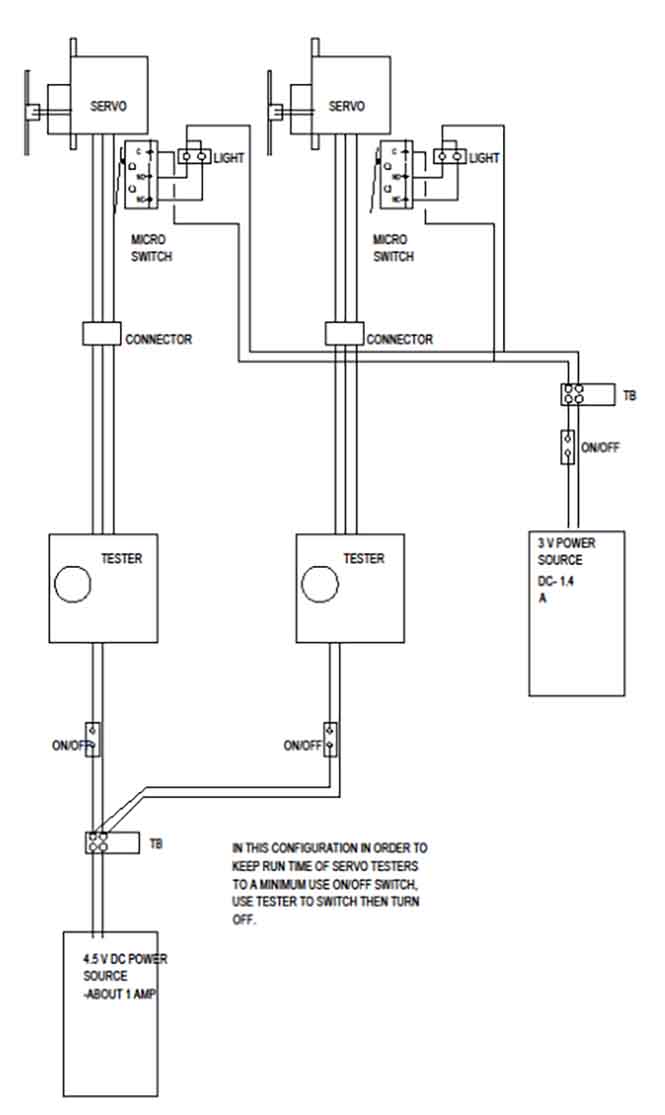
The tester mounts on your panel or if you have a very thin facia only the dial can show. This is the way I did it.
There are many ways to skin the cat but this is a very strong turnout method- guaranteed point throw which I will use from now on. Puny solenoids and expensive tortoise motors that do not work when you need top mounted gear are out.
This is cost effective and I hope long lasting.
For all you computer guys hooking up Arduino and other gizmos for computer and DCC operations is a can do and you eliminate the tester but substitute other stuff.
The main point is a $2.50 servo with metal gears, driven by a 4.5 V source is the best motor to turn any gage turnout.
I mentioned in a response that I was toying with a box on top and next to the turnout that housed the servo and a small green/red light.
I really don’t want to go under and do the tortoise dance- more like torture trick- and I can mentally accept the box on the layout which could look like an electric cabinet.
You young-uns can go below and do the torture trick which is the preferred method and this scheme is no harder than a tortoise, cobalt or other hidden motor and when your layout demands no ugly contraption below the impact on top aint so bad.
Real clever guys, like Bill of Virginia, can remotely locate the servo in a house, hide the push wire, and really blow the minds of the gentry. You have some power to play with.
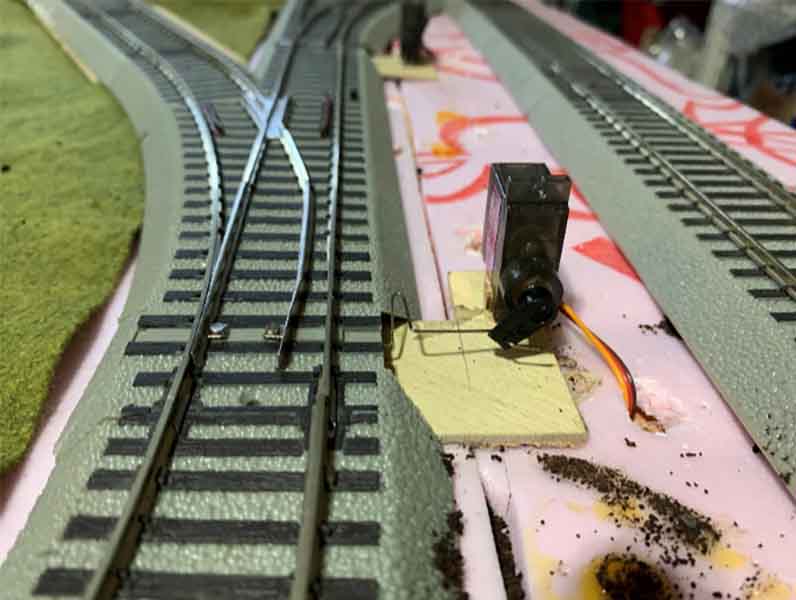
Servo mounted vertically on an S scale defective turnout – The turnout behind it was defective too. I put a kink in the rod to take up a little mismatch between servo throw and point throw but it works like a charm.
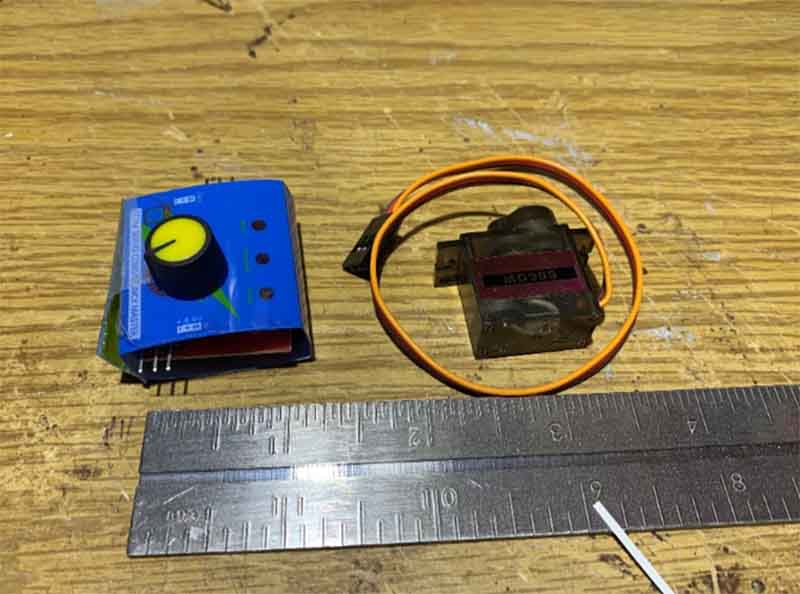
Tester on the left, servo on the right.
George”
That’s all for today folks. A big thanks to Bill and George.
Please do keep ’em coming.
And if today is the day you decide to join in on the fun, the Beginner’s Guide is here.
Best
Al
PS More HO scale train layouts here if that’s your thing.
Need buildings for your layout? Have a look at the Silly Discount bundle.

Hey fellas, what is the brand and model of the servos shown in the photo’s? I’d like to try and find some here in Florida or by Mail Order to get out from under the cost of the Tortise machins
Awesome – Awesome and Awesome Bill. 3 great layouts Thank you for sharing with us
Andrew in Oz
Stunning detail, Bill. Well done. I love it!
Hey Bill, I really admire the trees on your switching layout. How’d you make them? All of your layouts look great!
Jerry
Bill, seriously outrages layout .So much for your automobiles ,lol
The Critic
Unbelievable Bill. Thanks for sharing. Very impressive. Watched your video at least 3 times. Details are spot on !
You had to use “stunning” because I can’t think of a word better than that. Truly amazing work.
Couple of comments on the servo motors for switch control. 1) check Ebay – MG90s TREX 450 9g Micro Servo Motor, in bulk can be about $2.50 each 2) note that a servo will not run on DC, unless you open the motor and remove the circuit board inside the motor. Servo’s count the pulses from the rotation of the armature and send the info to a controller which keeps track of the position of the output shaft. 3) a company in the UK – Block Signalling https://blocksignalling.co.uk/ makes an inexpensive controller board for servo’s (SRV4 Servo Controller (4-channel) and each channel can control more than one motor, like both switches in a crossover which always move together. 4) The micro sw’s are a good idea, but the Block Signal board also has LED outputs. John from Baltimore
Currin
Google ‘small DC servos’ and then “servo testers”. You will have a host of units to choose from with pricing all over the place. Most important is servos must have metal gears and they cost more. A variable DC power source set at 4.5 V from Amazon serves all my servos because they dont run at the same time.
Bill
When the close ups make you think ” Is that real or a model” you know you have just seen work of the Master. Awesome.
Jaw dropping perfection.
Beautiful!!
Astonishing detail I feel like I’m trackside as a boy again in the summer watching the trains go by . What incredible eye for detail and realistic scenery . You are an inspiration to the model rail roading community …. Thank you .
I had a great time watching your trains run ! Nice work on those layouts !
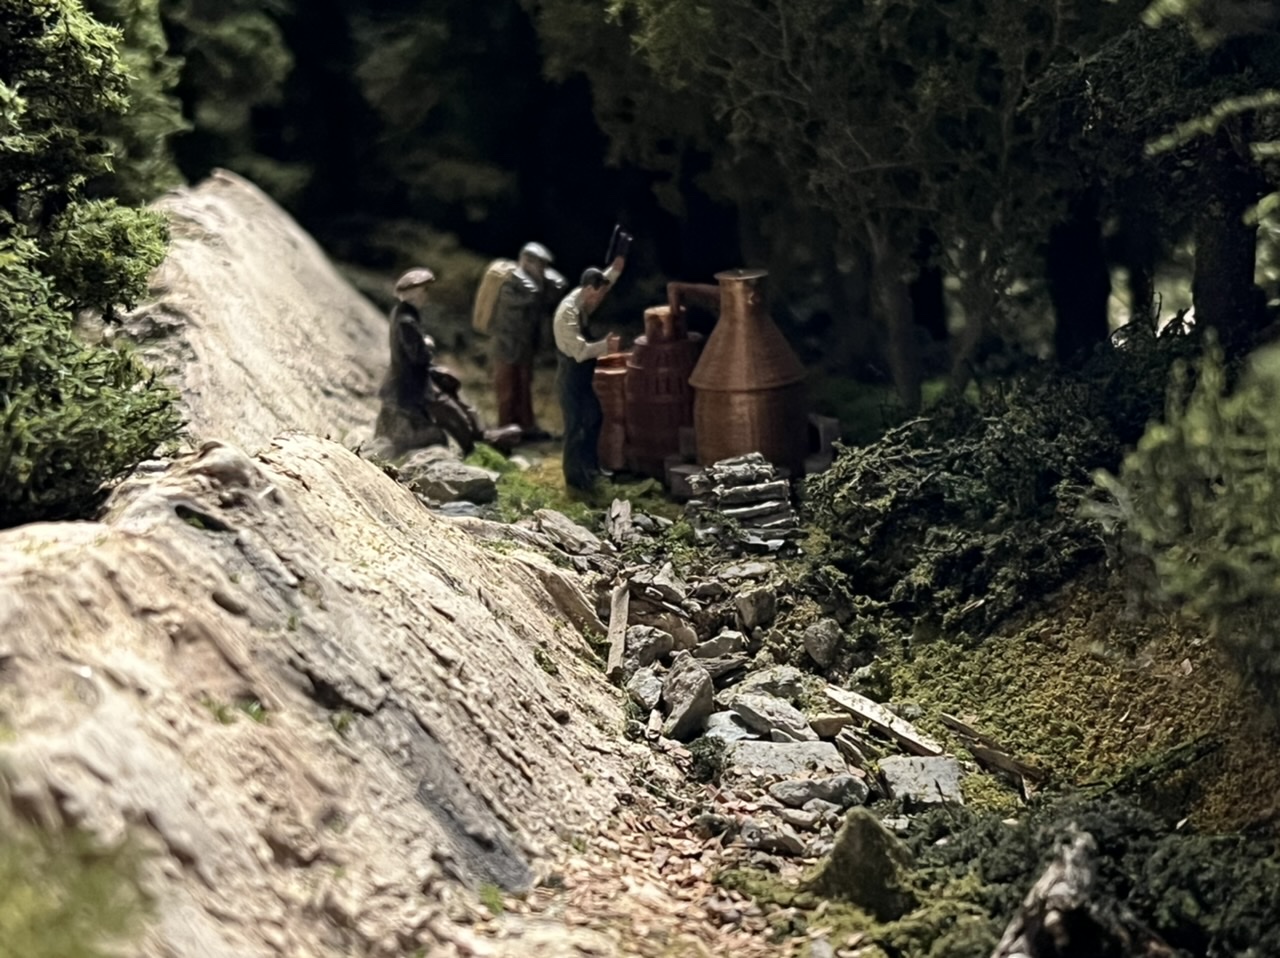
Bill…..impressive…. I love the detail in your scenery, especially the moonshine still. Nice to see you working that yard making up that train. That’s fun. Nice speed on your trains.
George…..thank you for that HOW-TO on the turnouts above table. Its getting harder for me to get under my layout and this looks like a great alternative. I am going to turn you diagram and instructions into a PDF and save it.
What is a tester and what does it do in the circuit?
I would suggest a little diagonal bracing on the legs. Especially in a garage where occasional bumping may occur. Absolutely stunning work.
Great Multi Scale Layouts all operating at the same time with beautiful details. Would like to see the Layout Track Diagram how you were able to put in the route to make it visually longer…with the same train going along it’s route thru the tunnels to come out and seem to double back lengthening the run. Is the N Scale Layout sort of a Duplicate of the H.O. Layout? Noticed the Sound was turned Off till the End of the Layout Video. The Main Downtown large Industrial complex looks lith the Old HOWE Scale Factory Complex downtown Rutland, VT. I have been the several times and have a large paperback book giving the history of that area. Also, Liked the explanation of the turtle turnout switch machine wiring diagram. ~ From Mike in N.H. U.S.A.
For those of us who are a little electronical, a standard Arduino UNO can directly handle 4 servos directly. At less than $10.00 for the UNO and the sensor connection board it is an option.
Bill–now that everything is running properly it is time for an expansion. You need a line (any of the 3 scales) that runs through all 3 modules. Even if there is no turnouts etc. how neat would it look!
Congratulations on your project.
Great detail and realism.
Don
A servo cannot simply run on DC power. It has a + and – and a signal wire from which it gets instructions. So without taking it apart, as John Frye correctly stated, a servo tester- about $.200- makes the servo work by turning a dial and no work to the servo is required. There are other things you can do, as John described, including a very simple wiring connection to the tester but I didnt want lose people in techno talk. There are many videos on this and you should watch them.
Again the main point here is a small servo turns points the best.
Bill, soooo nice! Only one suggestion: in the 12th photo, the closeup in town, with the large section of the curving road to the right on the bottom, blue truck on the right of that area, the 3rd white strip of lane dividers appears to have a curve to it (I held up a ruler to the image). It curves to the left while the road curves to the right. You might want to turn it 180 degrees so that the strip curves to the right along with the crack in the center of the road – it’s as if the white strip was made with a curve just for that location. Turning it will take advantage of that curve.
A True Artist !!!
dont get me wrong all 3 layouts are fantastic. Beautifully looking but what amases me also in his layouts is the space he has and the $$ involved. i have the $$ but not the space and i will admit i am very jealous. it is making me want to sell my home and buy one with a 3-4 car garage, but i am too old and would not survive the project. again, i am very jealous and all 3 are great!
Impressive layouts! Just think if you’d done the three into one scale. What an impressive N gauge or H.O. layout you’d have to fill that garage!!! Poor vehicle’s have to brave the weather element’s!!! Ha ha.
Indeed, stunning is one word I would have used for this layout. Detail is excellent. Especially like the detailed road. Geoff
Bill,
If I may ask, where in Virginia are you? I’m near Richmond. Still in the planning stages here.
Dan
BEST depiction of an industrial area I’ve ever seen! (& I’ve been to 3-4 NMRA nationals’ layout tours!)
Bill–I have been following your layouts for some time now, and even though I don’t have a layout of my own, I am very, very impressed with what you have been able to accomplish on your layout. How do you ever keep up with it all? It looks like it takes up all of your garage space.
Sometime a while ago, I got onto Alastair’s website, and he has been entertaining me for all this time.
My name is Bill too, and this has been a pleasure to see. It looks like you have a great variety of scenery in your layout, and it sure does make for some wild video.
Keep up the GOOD work!!
Very nice layout. I love the hooking and dropping. Do you have to switch tracks manually or do you have all the switches programmed?
Hi all is Bill from Virginia. First thank you all for the wonderful comments. I truely love our hobby and enjoy sharing with everyone.
Jerry – You can see how I make my trees by looking at some of the videos on my YouTube channel. The channel is Model Railroad Adventures with Bill and look for episodes EP135, EP126 and EP127. Also Ive started to build a new type of tree and you can find that one called New Tree Build Extra.
Mike – the O Scale track is a folded oval with a two track hidden dragging yard in the center. That bend gives it a longer run. The N Scale is sort of a continuation of the HO scale in that I can build trains on the HO anx then run them on the N Scale. I have some similar equipment to create that illusion of continuity.
Terry – no room for any more expansions at this point but that is s cool idea lol
Ruben – never saw that stripe until you pointed it out. I will fix that .
Bob – actually with the layouts all on wheels it doesn’t take up that much space. I have a standard size two stall garage. If I had bigger I’d have more layouts lol
Dan – I’m in Richmond on the north end near Short Pump. Send me a message via my YouTube channel and we can connect .
William – really doesn’t take much to keep everything in shape. I keep the garage door close as much as possible and it doesn’t get too dusty so easy to maintain.
Eric – all are manual switches for me on all layouts. I enjoy working the trains as I operate and that includes aligning the tracks as I switch cars out. For me it’s fun and I get exercise following along .
Good to see the benchwork, a lesson I learned building my second layout after retiring to our new home. Takes more work than a table, but well worth the effort.
Beautiful layouts . Great detail. I love it.
Weill Bill what can I say but THANKS THANKS. YOUR LAYOUTS ARE A THING OF BEAUTY. They look so real and the track layout is very innovative to say the least.
And George thank you for your Knowledge and helping other model railroads.
ALL WAYS THANKS AL
Bill, I love all the pictures of all the scenery, they are very AWESOME, all of them. I also love the video it’s also very AWESOME. Great work, I always look forward to seeing your post’s, they are so AWESOME!!!!…..Thank you for sharing !!!!!
impresssive
What an amazing layout. I tip my hat to you friend:
Bill, you have put together an all around great layout. Everything you have accomplished is what we all would hope to aspire to. And your voice on the video sounds perfect, with a lot of enthusiasm and good energy. Commentary and content description is welcome and good all around! Thank you for sharing.
F A N T A S T I C V I D E O !!!
Beautiful layouts. They are very well-detailed and seem to be operating flawlessly.
Thanks for sharing.
Fantastic.
+WOW WOW WOW
Never get tired of looking at this!
Great camera work. Thank you
Bill, once again you’ve blown us all away with your excellent layouts, photos and videos. You really are a creative genius to make such fun and realistic scenes on all of your layouts. I don’t know how you find the time to excel in so many aspects of model railroading and make videos of it all too. You are an inspiration to all of us who enjoy seeing your work (play?) I’ve watched many of your videos, but this one was one of the best because it showcased all three of your magnificent layouts running trains. Thank you! Thank you! Thank you!
And a big thanks to Alistair for providing this forum for model railroaders around the world.
Thanks Bill for sharing all 3 layouts. I really enjoyed watching your video. Cheers Rossco, Adelaide, Australia