Gary’s been in touch with quite a HO track layout project:
“Al:
Here is the narrative of my HO layout (Mt. Thornton National Railway Park).
Thanks for all you do. I hope you find this project worthy of publication.
So, a year ago, Covid dictated that my annual 750-mile trip from Ohio to my youngest daughter’s home in Nebraska for Thanksgiving and Christmas and my 1,900-mile trip to my oldest daughter’s home in Montana for my annual ski outing was not going to happen. Instead, it was going to be isolation at home with just me and my wife.
That’s when I decided that it was time to resurrect my old HO equipment from over 40 years ago and thus the journey began. Since I live in a patio home with very little extra space, finding an appropriate location was a major challenge.
The only option seemed to be my two-car garage that was already occupied by a workbench and potting bench down one side and large storage shelves down the other side with just enough space for the car to fill the center.
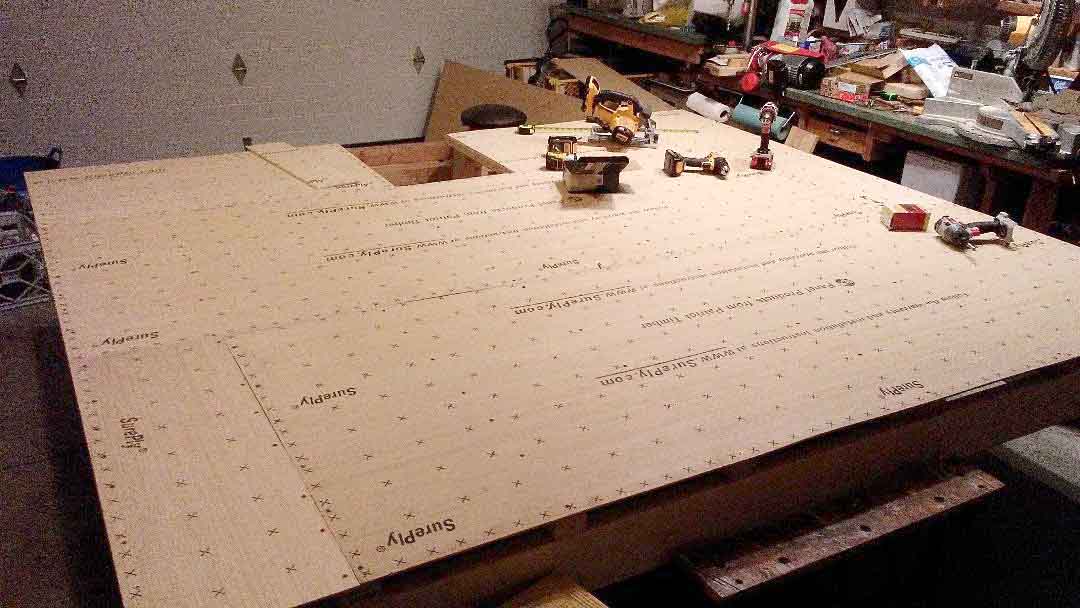
The solution was to build an 8′ by 10′ table with a notch to go around the garage door opener when the layout was hoisted to the ceiling, allowing the car to fit underneath.
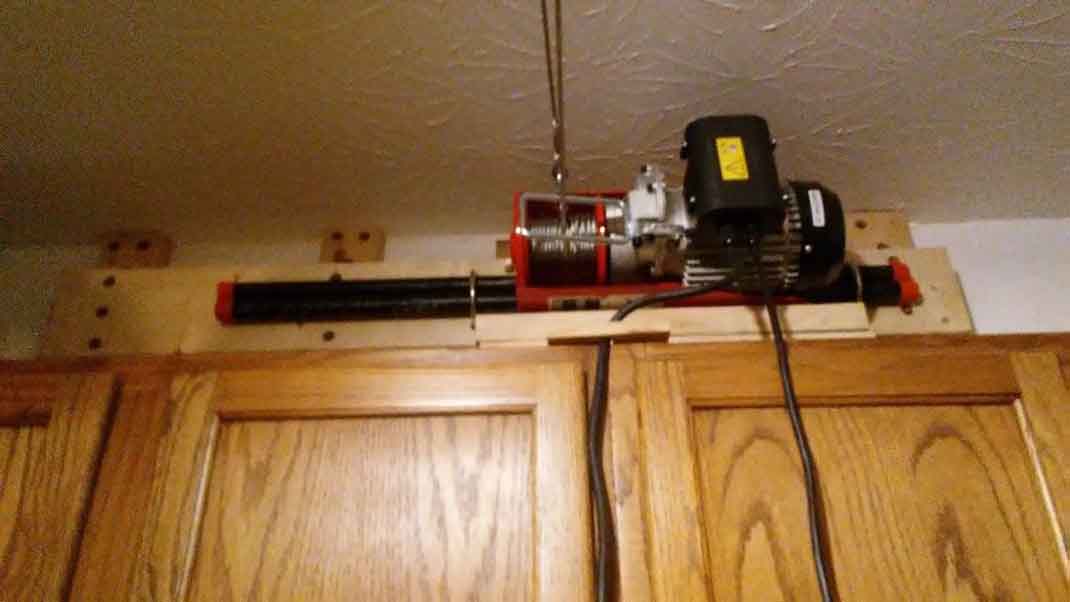
So with a power winch, pulleys and some cables the idea seemed feasible (to me but not my wife). Mounting the requisite 3 x 6 beams, the pulleys and especially the heavy winch proved to be a challenge for one person with no help, but it worked perfectly on the first practice lift attempt before track work and scenery were in place.
From there on, every attempt was made to keep everything as lightweight as possible other than the (2) 2×6’s and the (6) 2×3’s that formed the main support for the ¼” plywood base. Everything after that was Styrofoam, paper, plaster cloth, sawdust, eight gallons of light weight plaster, tracks and scenery.
I’m not sure which came first, the basic idea of the layout or my introduction to your blog, but the ideas and inspiration have proven invaluable.
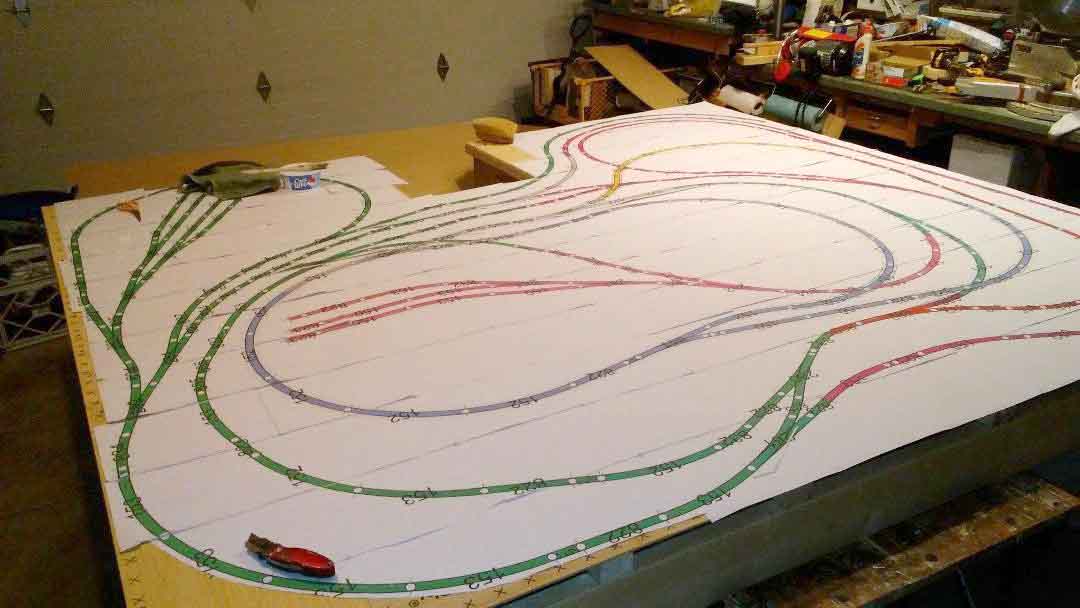
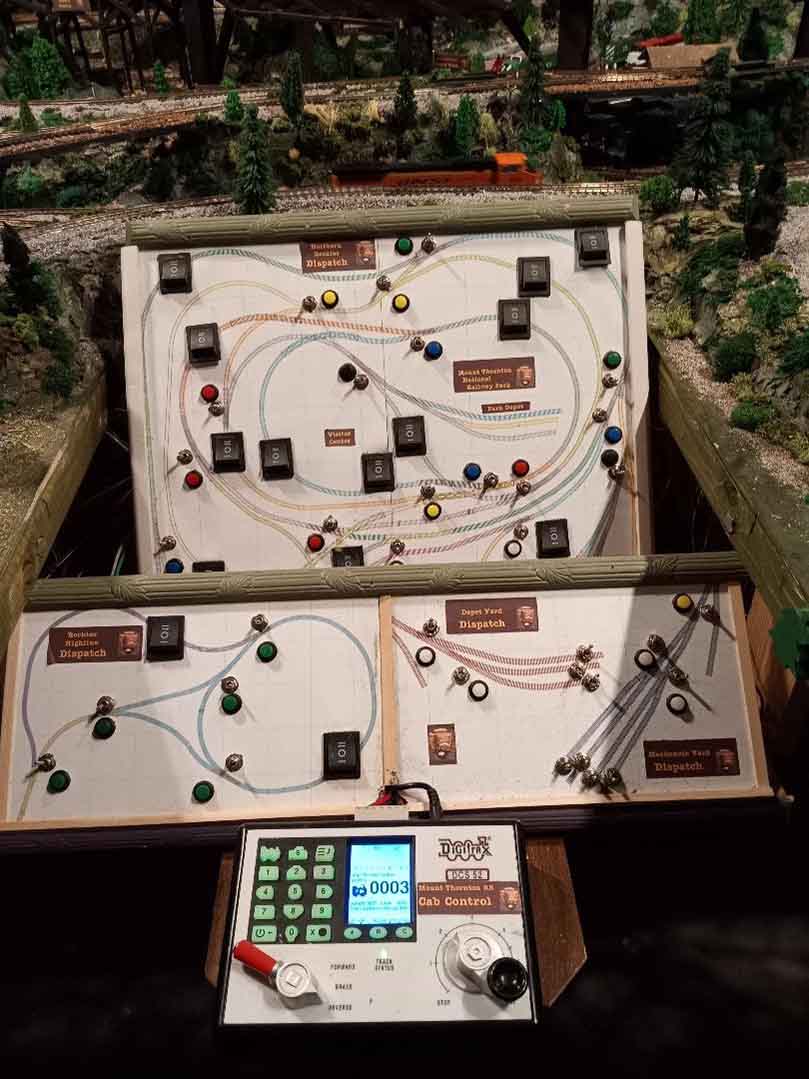
I started with AnyRail and did my computerized layout and then printed it out full scale (something in excess of 140 pages), which I mounted on my plywood base, but only gluing the track layout portions.
A scaled down printout later became my control panel.
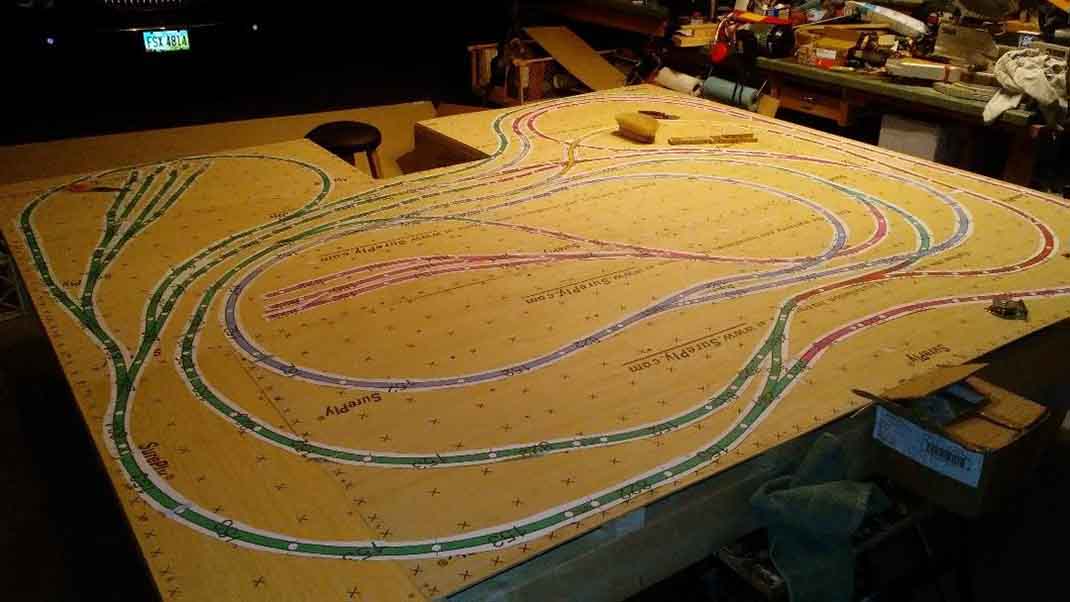
From there I cut away the non-track paper and it was ready for Styrofoam (track areas) and plaster cloth everywhere. A portion of the plywood was cut and lowered below grade to create the gorge.
The next phase was to sculpt the hills, mountains, canyons and the gorge with the lightweight plaster. This was easily one of my favorite parts.

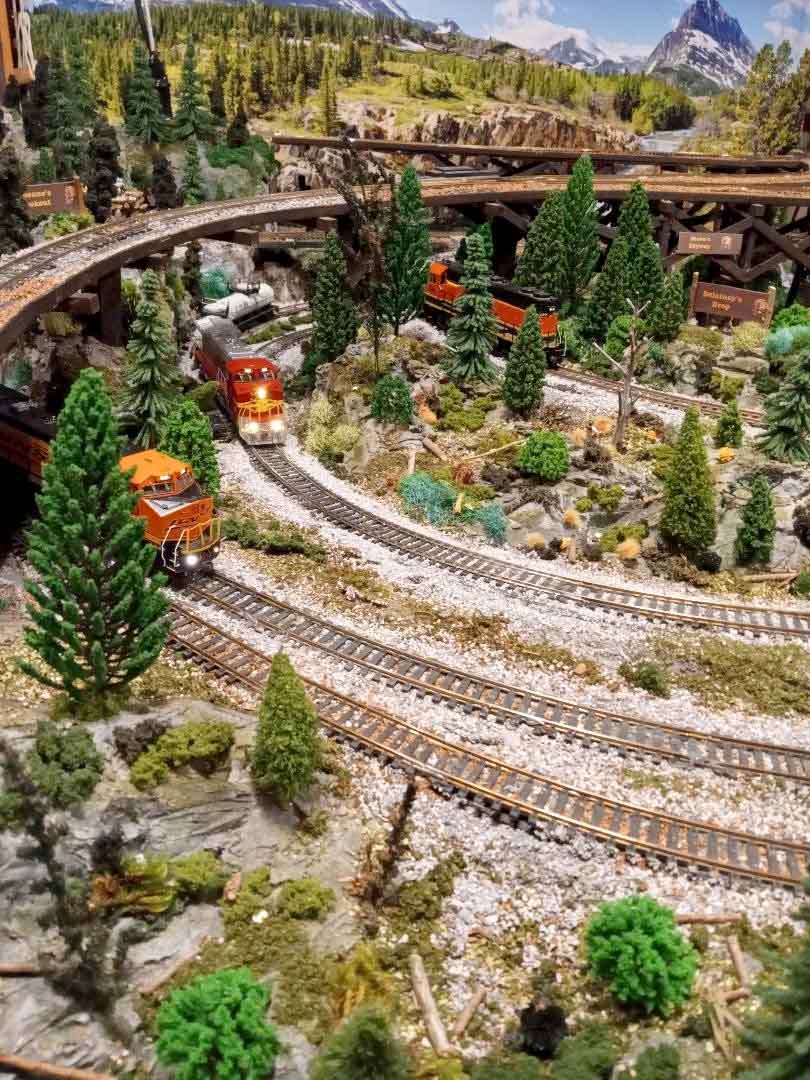
Next was the track bed and then the track which was all old Code 100 track in 9″ sections that needed to be cleaned, laid out in place, the rails soldered and then the drop wires soldered to the track. In all, over 200’ of track was installed. This was easily my least favorite part of the project.
The entire layout is wired as 4 master sections with 5 or 6 subsections within each. It is all DCC, however my control panel switches would allow me to run DC if I decided to add a few wires. There are 4 reverse loops that I have working fairly well with the automatic circuit boards.
A bonus to the capability of winching the table off the floor was the fact all the under table wiring could be done without crawling beneath the table – a real life saver.
I noticed in most of your posts that a theme becomes very important to most modelers. I had not thought of that aspect, but eventually my theme has brought me the most joy.
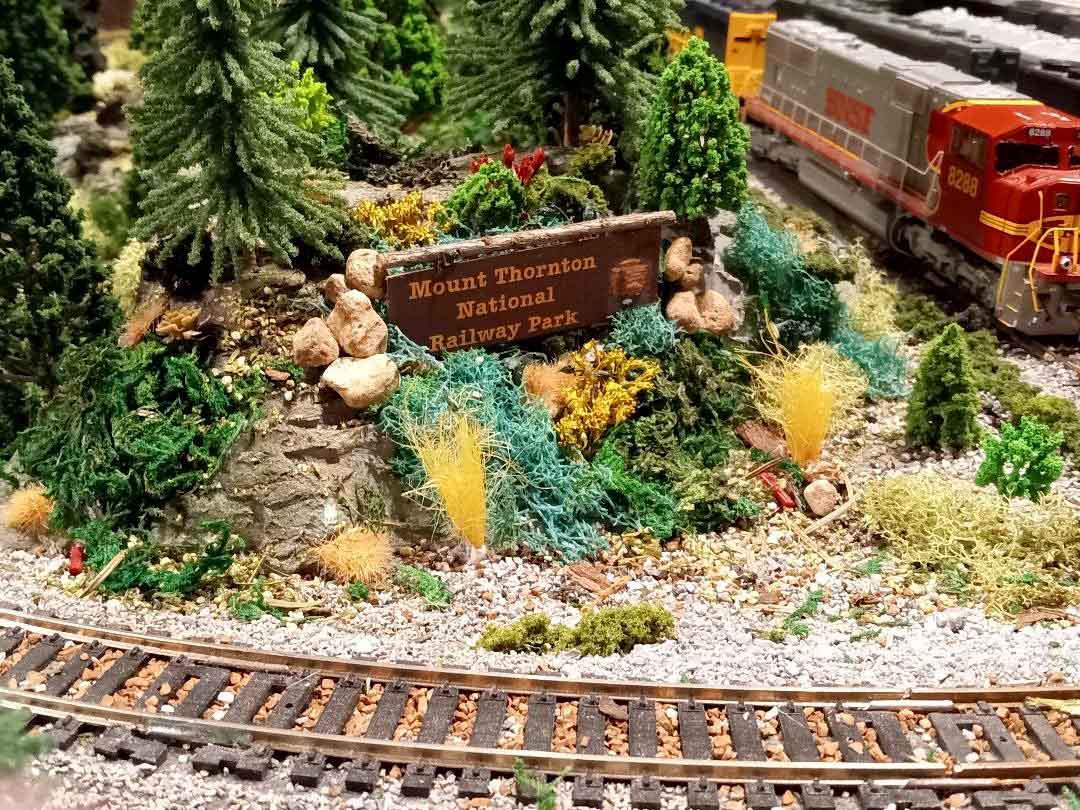
The idea started as a western US mountain layout with the requisite tunnels, and ended up as the Mount Thornton National Railway Park, complete with national park scenery, signage, vistas, park activities and even a visitor center.
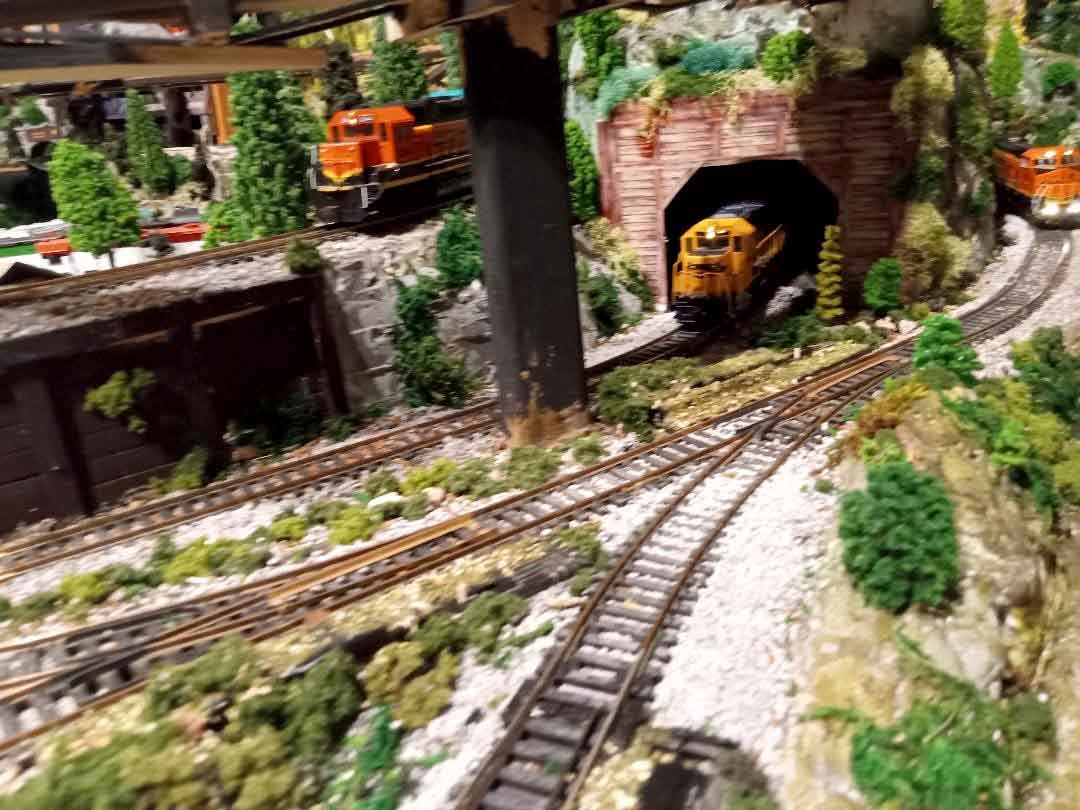
It also is based on BNSF routes through the Rockies and includes most of the legacy locomotives, especially Santa Fe, Burlington Northern, Northern Pacific and Great Northern along with the fictitious Mount Thornton & Gary’s Gorge RR.
Now the fun part of the theme, as all the “national park” features are created and identified with appropriate signage for all the members of my family:
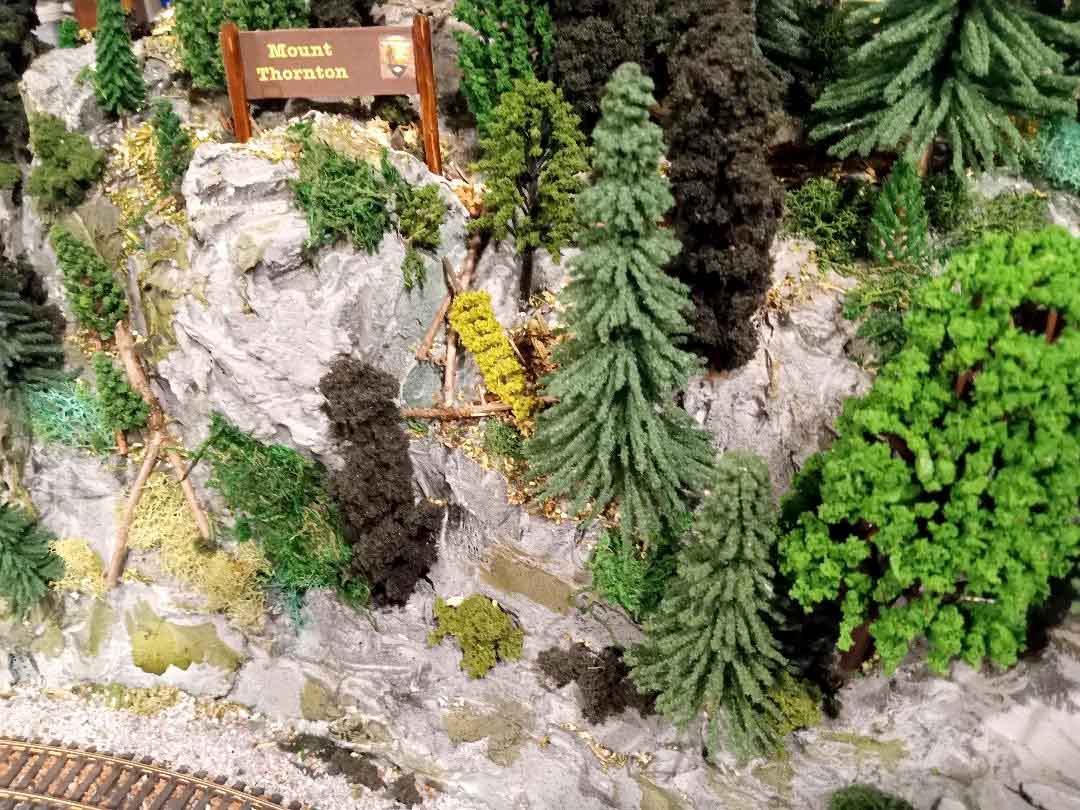
Mount Thornton – (named after my dad) – major mountain with tunnel and highline
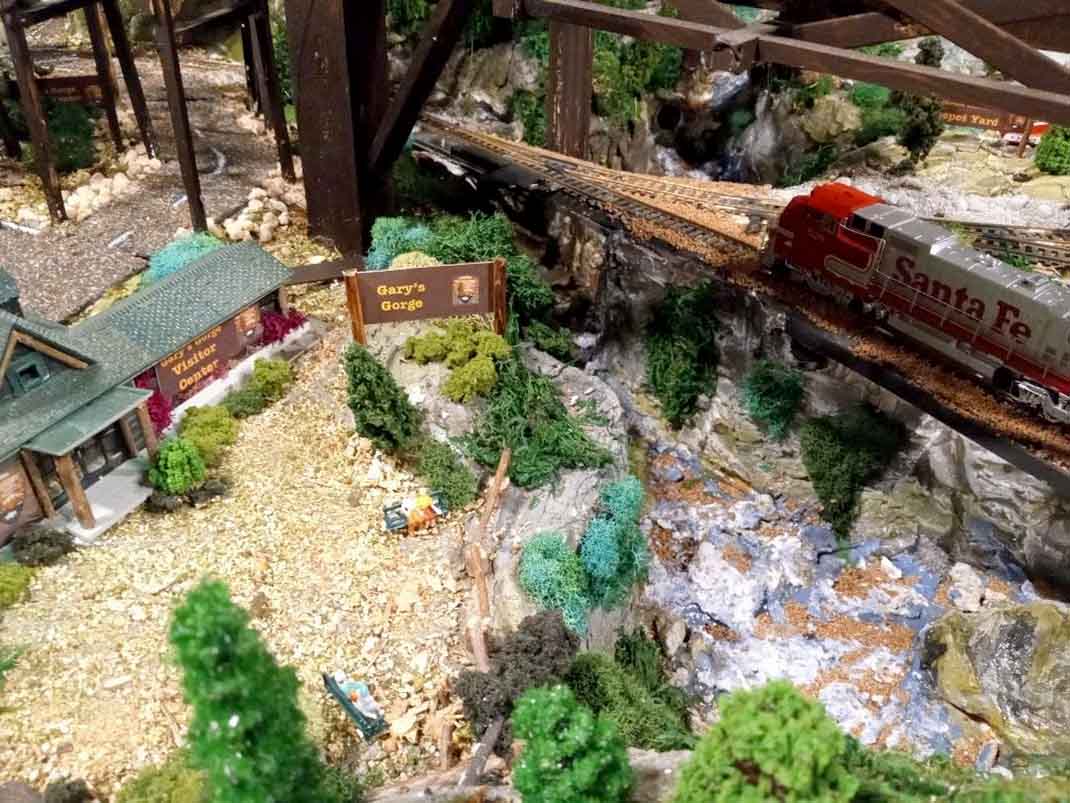
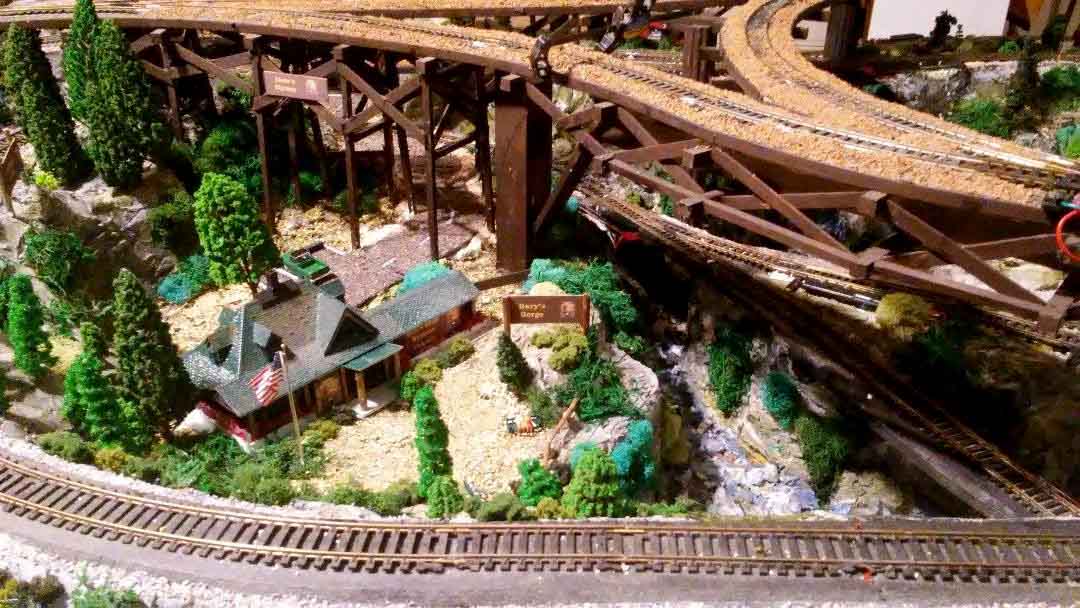
Gary’s Gorge – (you get to guess where that name originated) – below grade stream and canyon
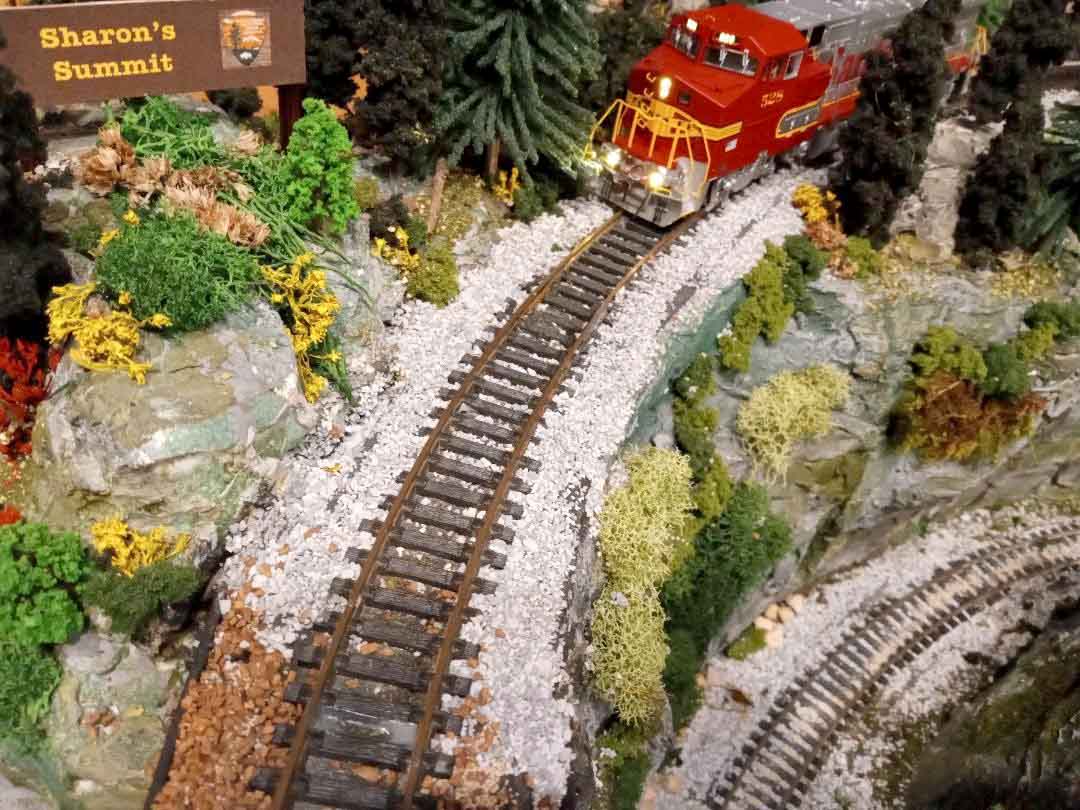
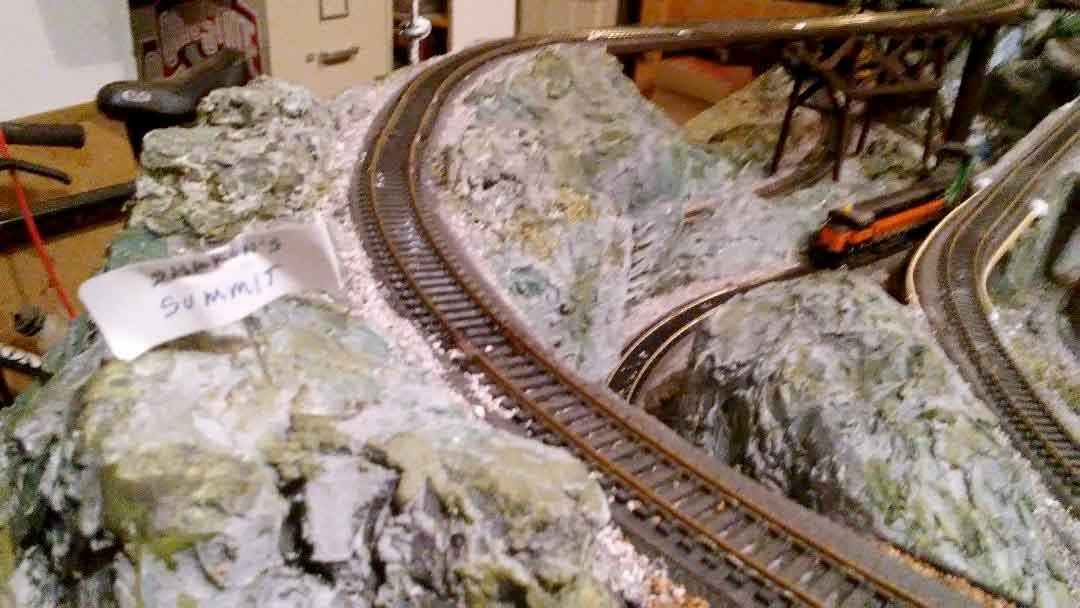
Sharon’s Summit (wife) – highline route rides the top ridge of the summit
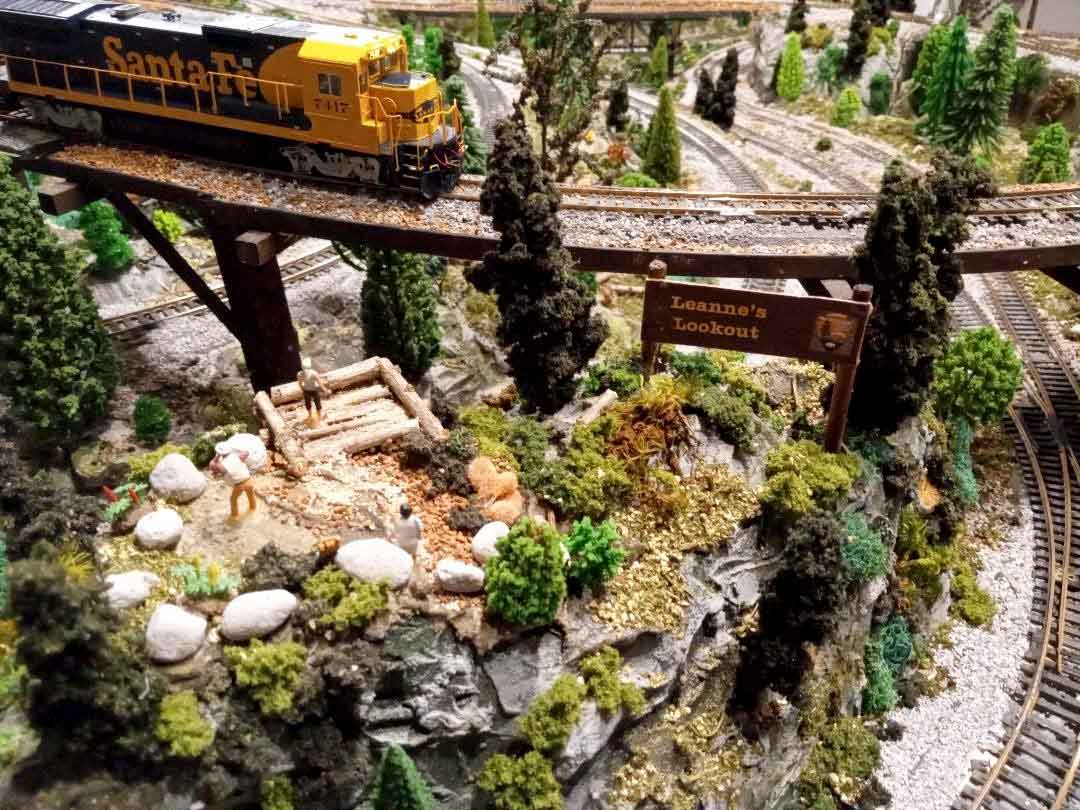
Leanne’s Lookout and Leanne’s Loading Dock (daughter) – overlook of highline and canyons & special loading dock (see below)
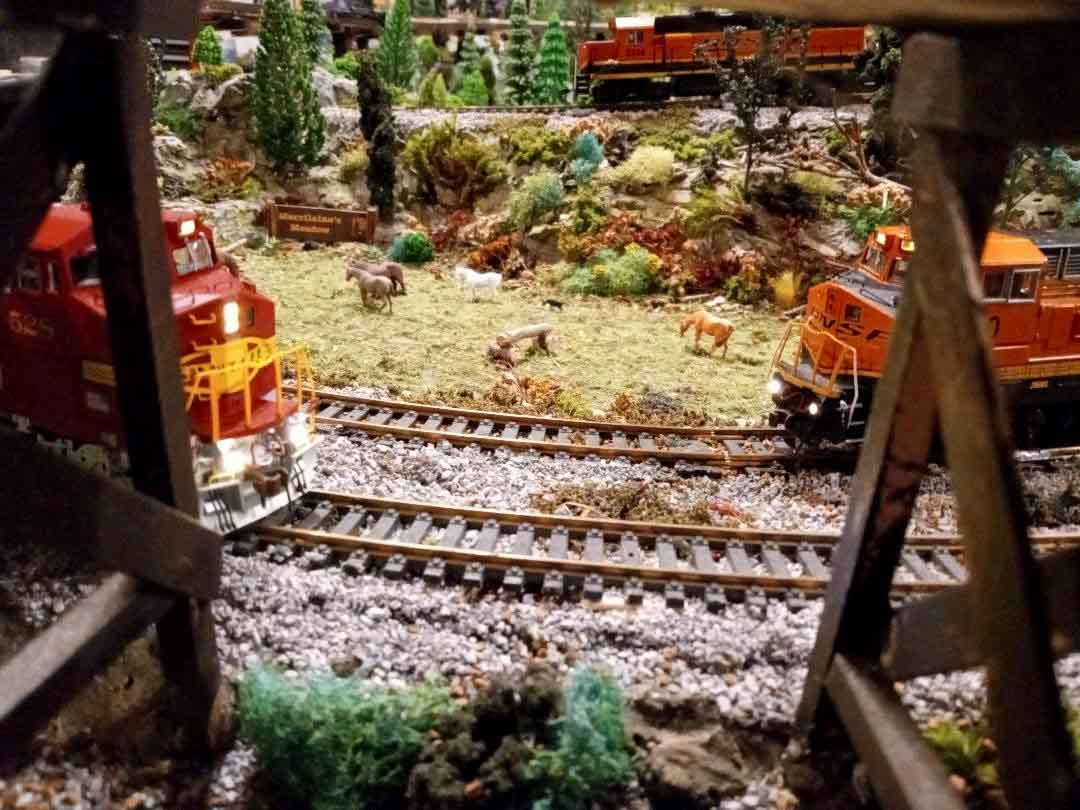
Merrilaine’s Meadow (daughter) – spacious meadow complete with horses
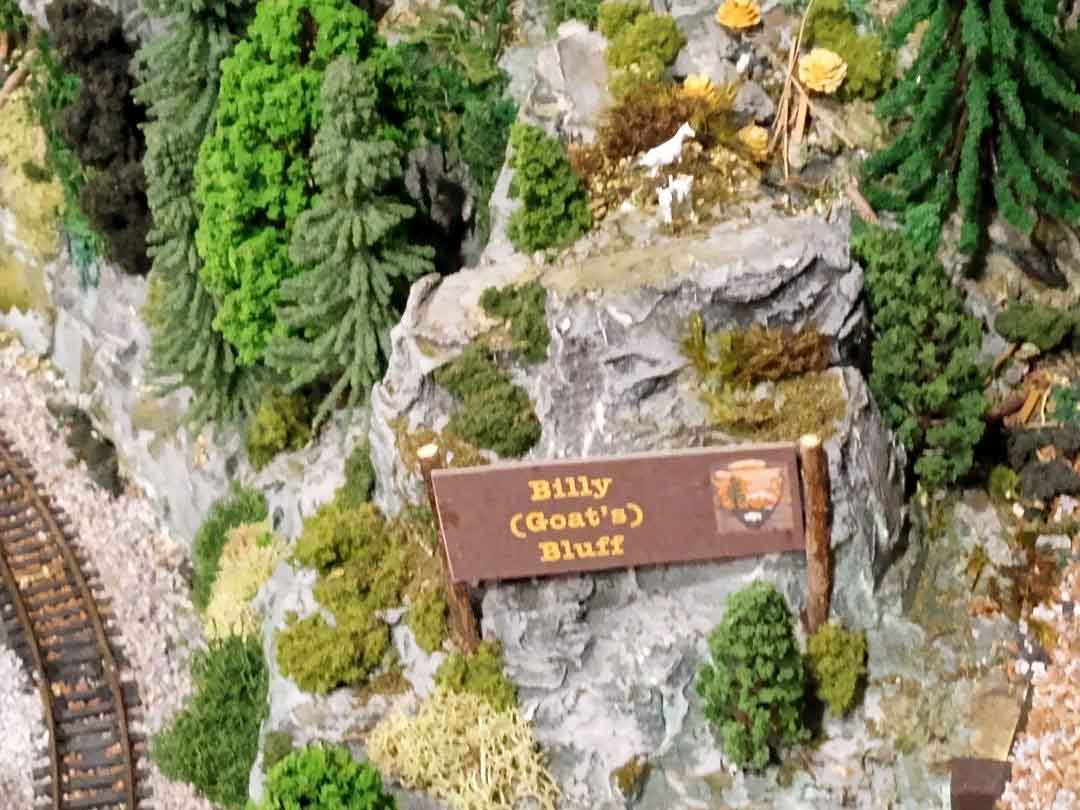
Billy (Goat’s) Bluff (brother) – the mountain goat, symbolic of the Great Northern RR
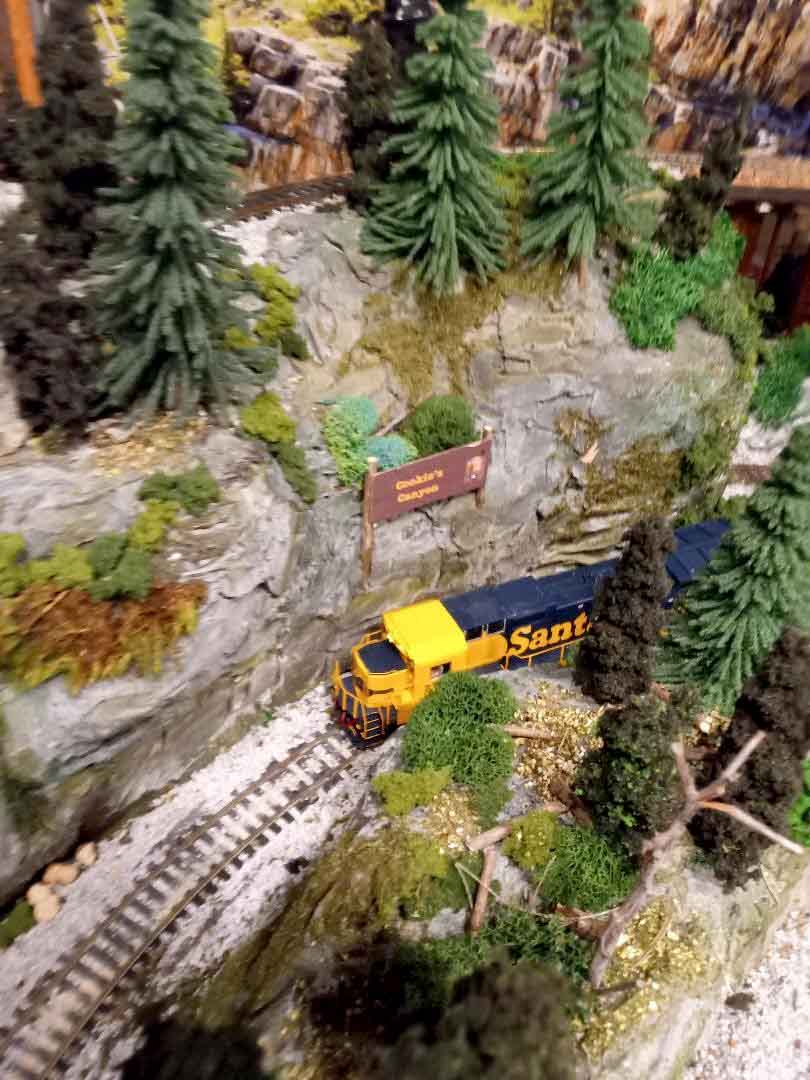
Cookie’s Canyon (sister) – deep canyon with track running through it
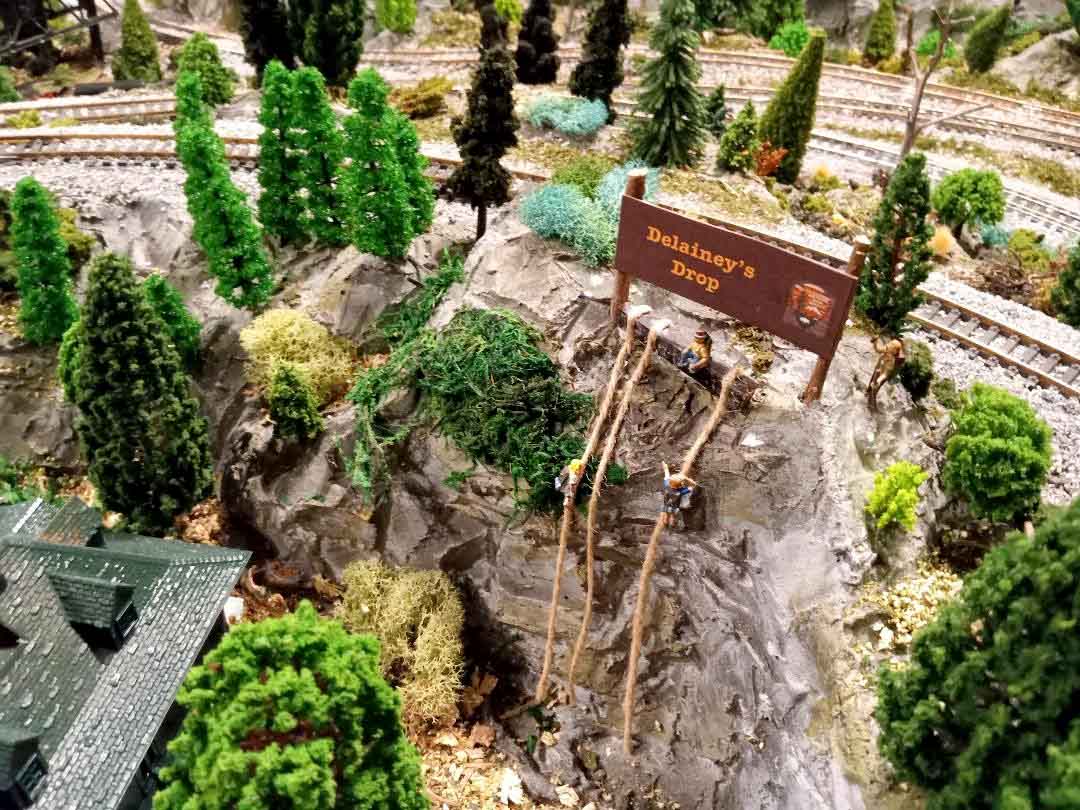
Delaney’s Drop (granddaughter) – rock climbing area
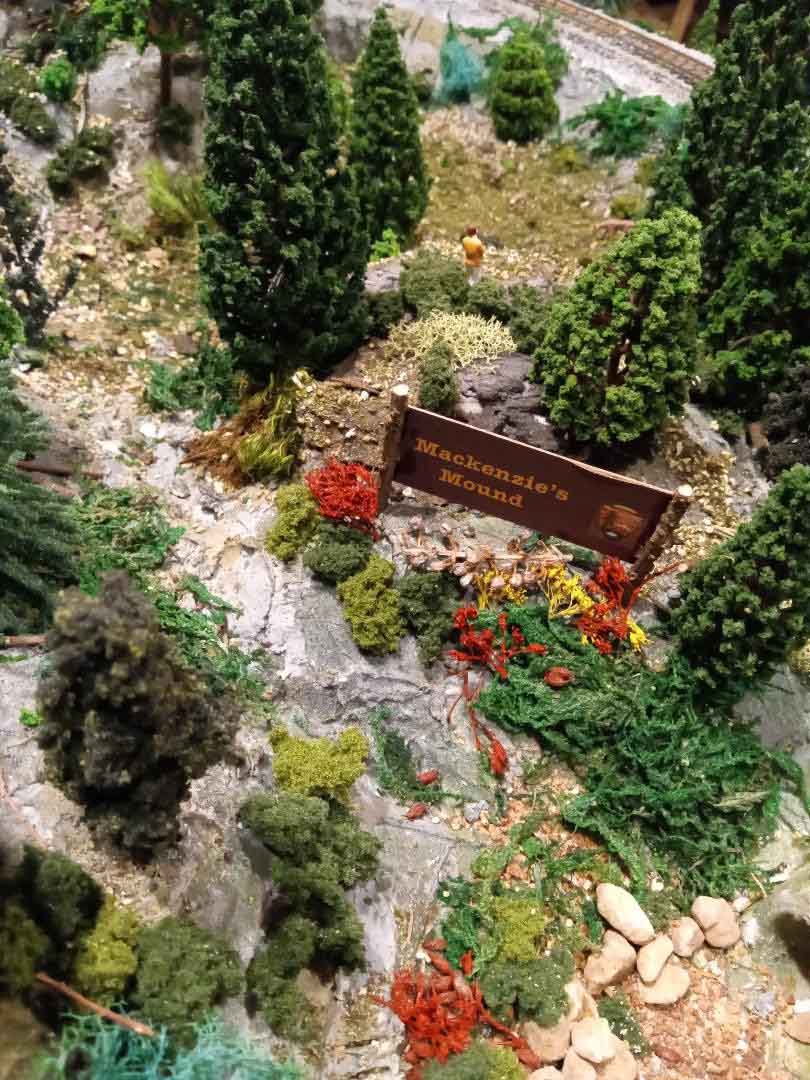
Mackenzie’s Mound and Mackenzie’s Mound Yard (granddaughter) – Mound overlooking the yard in one direction and the grazing deer in the other
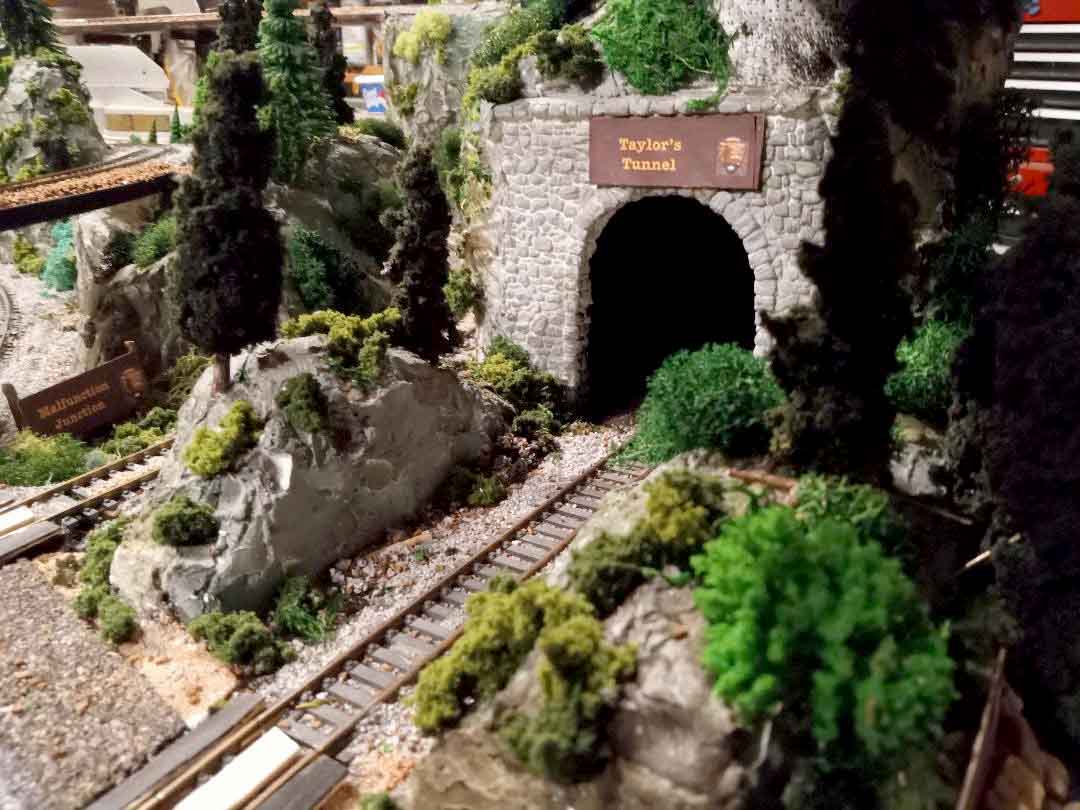
Taylor’s Tunnel (granddaughter) – entrance to tunnel below Sharon’s Summit
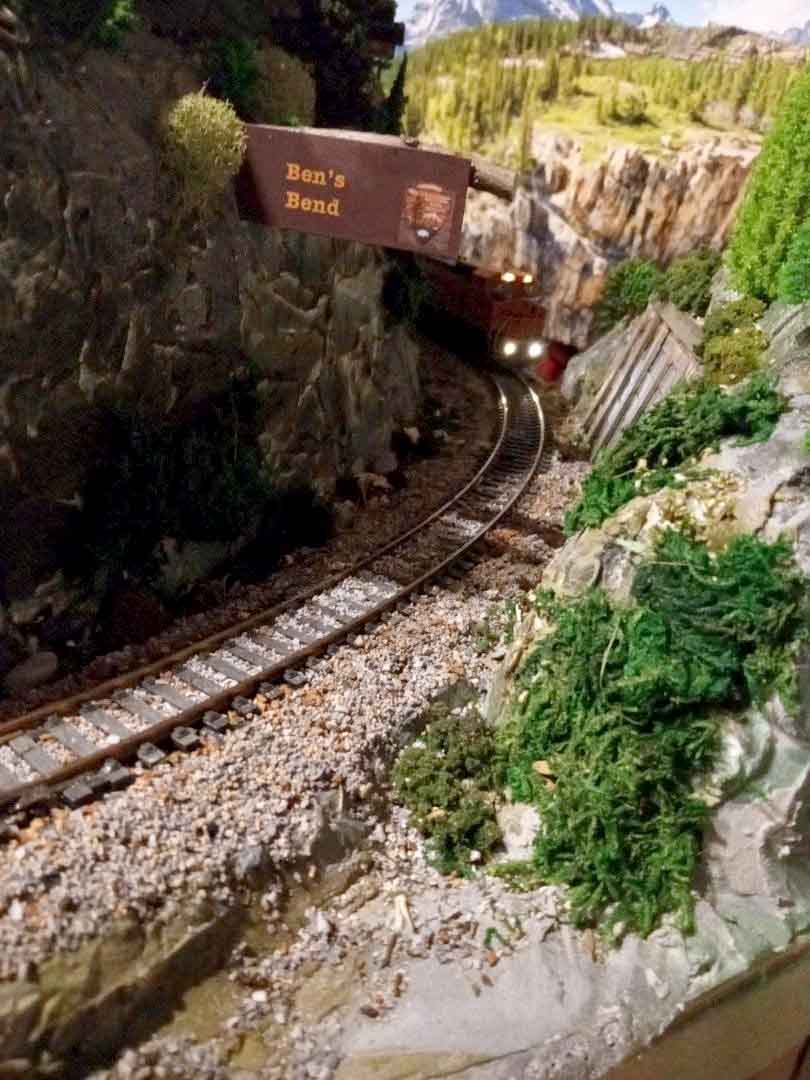
Ben’s Bend (grandson) – deep bend on the back of Mt Thornton
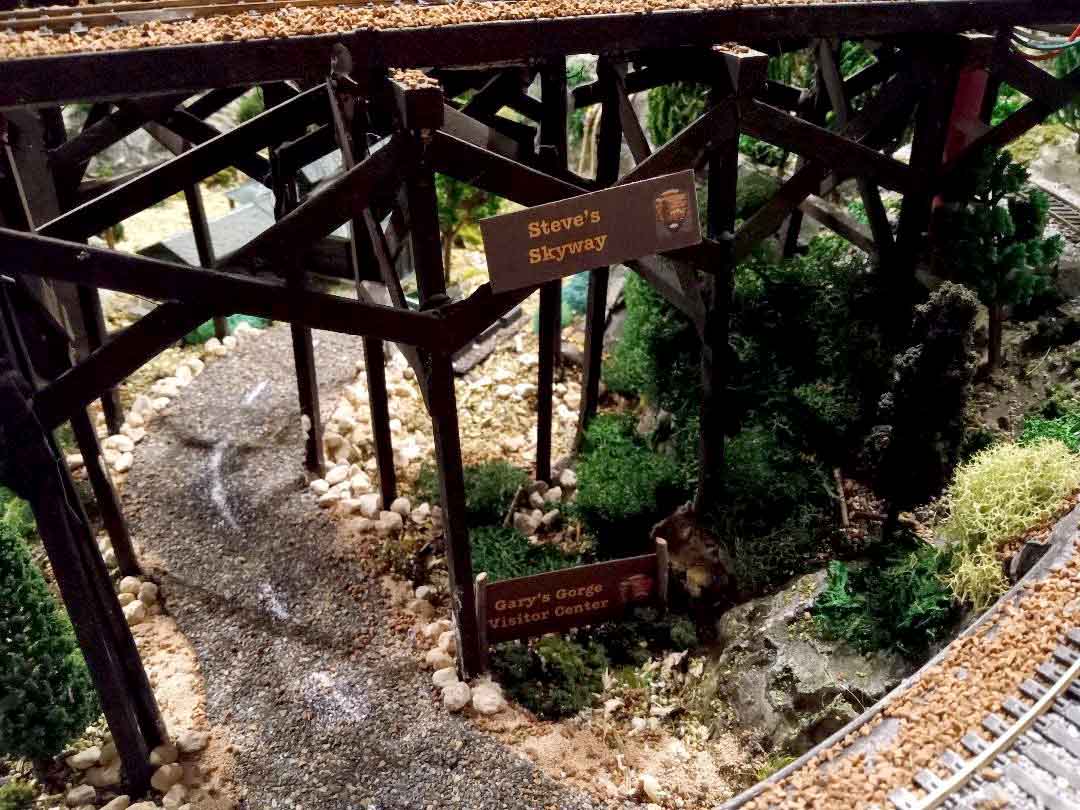
Steve’s Skyway (son-in-law) – highline track around Mt Thornton and atop Sharon’s Summit
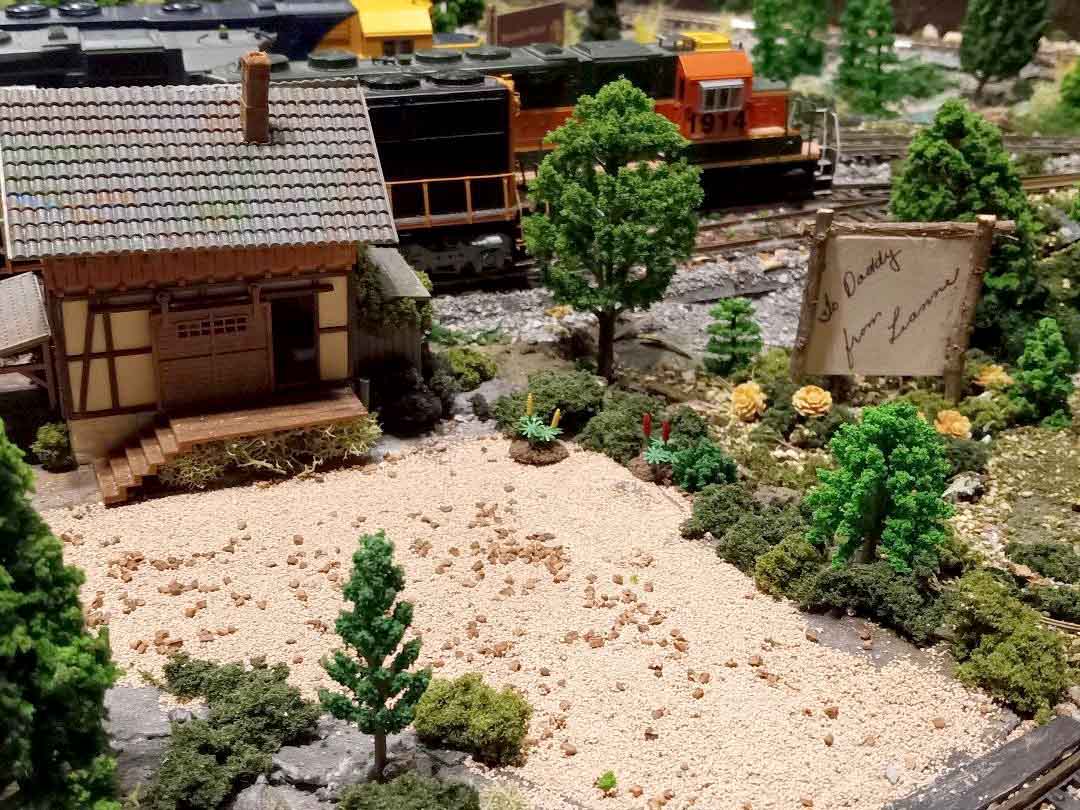
The freight depot is special in that I discovered it in my stored HO stuff and it was still in its original box and sealed plastic bag. What made it special was the tag in the box as it was a Christmas present that said “To Daddy from Leanne” – so that meant it was 40+ years old. It now has a permanent home on the layout, complete with its own “Christmas tag” billboard.
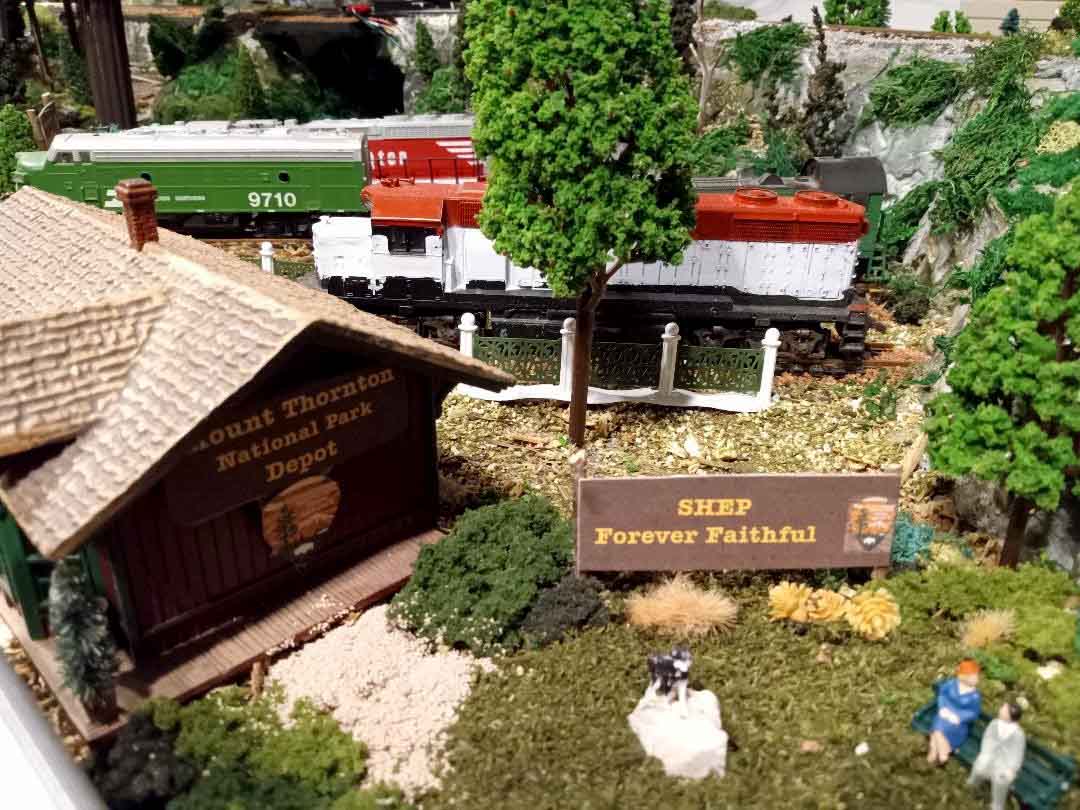
Then I came across a story of a special dog that has become part of the Great Northern RR lore and fit so magically into my national park theme that it became part of the small memorial park adjacent to the Thornton National Railway Park Depot and the Legacy Locomotive Museum.
As the story goes, Shep was a Montana working dog and maintained a vigil as his master was taken to the hospital. Unfortunately, his master passed away and his body was moved to the depot then onto a train for the trip back east.
Shep followed him to the depot but couldn’t board the train. So for the next 5 ½ years he lived under the depot platform and greeted the 4 passenger trains that came through every day, hoping for his master’s return.
Ironically Shep died as he was hit by a train as his hearing failed with old age. The memorial that was built in Fort Benton, Montana to honor Shep – “forever faithful” – is fittingly recreated as part of this national railway park.
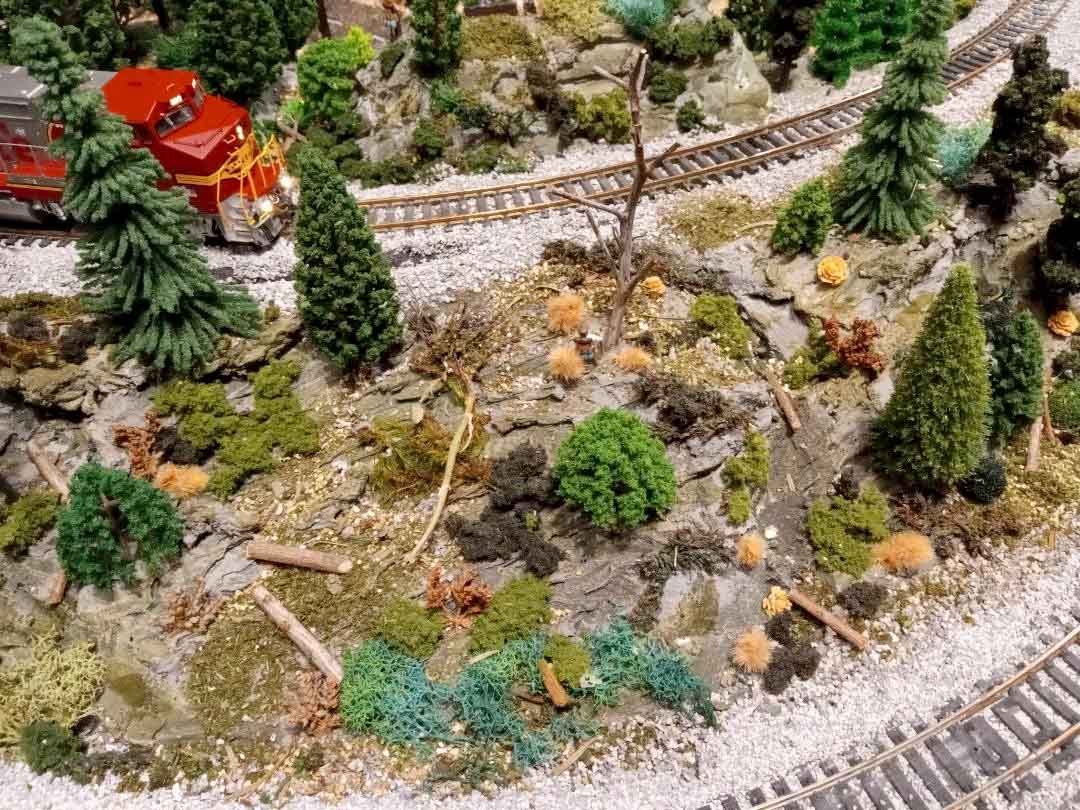
Painting, staining and application of grasses, shrubs and trees was my second favorite pastime as I spent many years as a landscape architect and contractor, so I was able to utilize those skills in miniature. I hope it shows!
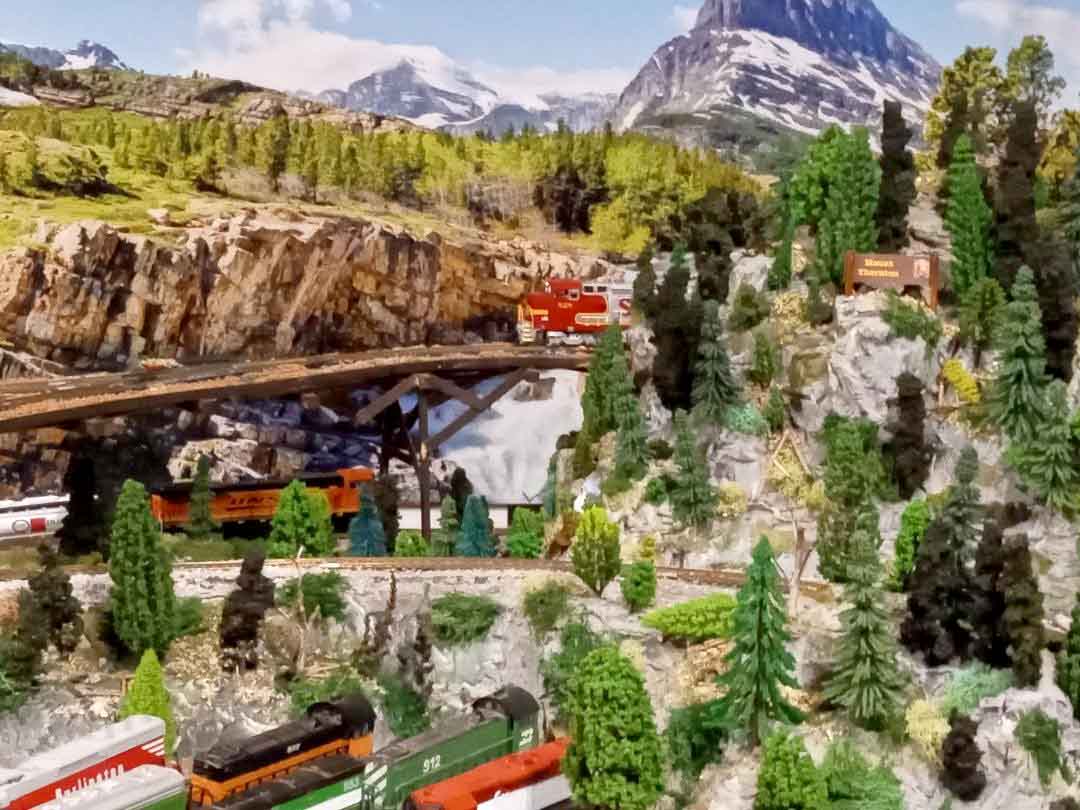
I had never thought of a background for my layout but your blog’s many examples convinced me I should try. Since my layout has access from all four sides, I decided to pick a main view and I found a perfect wide poster to pull off a great background.
Since it would be in the way of conventional garage activities, I mounted it with rope pulleys to raise it out of the way when not railroading. The 90” x 30” poster is an actual photo from Glacier National Park and has the mountains and the start of the gorge that fits perfectly with my layout.
I still have lighting and signaling left to install and as everyone says, “you are never done”. Lots of touch-up and refining still to go as well. My immediate challenge is to get my locomotive’s couplers (new DCC models) to match my rolling stock couplers (old standard cars).
I almost forgot to mention, what you see was all done in 1 year and I am 80 years old, so some of the heavy stuff was challenging, but what a blast this journey has been. Never too late to start!
Gary”
A huge big thanks to Gary. A wonderful narrative and a wonderful layout.
Please do leave your comments below.
That’s all for this time.
Please do keep ’em coming.
And if today is the day you get started and join in the fun, just like Gary, the model train Beginner’s Guide is here.
Best
Al
PS More HO scale train layouts here if that’s your thing.
Need buildings for your layout? Have a look at the Silly Discount bundle.

What a great lockdown project, what a great layout, well done. Some great photos, only one missing would be a shot of the whole layout as finished.
Mike S
Love the photos and layout. Love how you came up with the names of the places. Great ideas. So lifelike.
Fabulous concept Gary and great explanation.
It’s uncannily similar to an N gauge plan that I have but you skipped over the bit where you convinced your wife about the ceiling hoist.
I only have a small one bedroom flat in the UK (condo in USA) so I can’t see another way of building an 8×4 size layout other than dropping down from the ceiling onto the 6×3 dining table.
How can I convince my wife that it can be disguised when hoisted up?
Fabulous concept Gary and great explanation.
It’s uncannily similar to an N scale plan that I have but you skipped over the bit where you convinced your wife about the ceiling hoist.
I only have a small one bedroom flat in the UK (condo in USA) so I can’t see another way of building an 8×4 size layout other than dropping down from the ceiling onto the 6×3 dining table.
How can I convince my wife that it can be disguised when hoisted up?
Great layout ,very venturous. You didn’t need all that paper and waste of time drawing. Evidently you had plenty of imagination and know-how to construct this fine layout.
The Critic
Gary
wonderfully, masterfully done..kudos!
your background provides so much depth to your layout
and, appreciated your descriptive narrative
Wow, so much – just shows what determination can do. Also like the fact that areas have been named after family members who I am sure will be looking forward to seeing it running.
Very nice Gary. Your landscape skills did show up and I really enjoyed the narrative. The national park theme is a great idea…
wow, great job. You can come do mine anytime. We are about your age but started a bit before the lockdowns. Got only 2 parts at least looking like what I wanted. Got an 8 by 10 and a 4 by 4 English town. (been given lots of nice stuff} to start. Ill be at it til I am 100 no doubt.
Gary
You are an inspiration to us all. Absolutely great work and themes with family connection. The method of layout was clever especially since there were elevation considerations and your background helped a whole lot. Nice winch setup.
Keep us posted and let’s see some trains making noise.
Stay safe and well.
George from LI, NY
hey Gary, what a fabulous. layout you’ve created . i especially love the way you’ve done the mountains and the gorge you’ve done a great job sculpting everything. I’m just getting started on my h o layout to build the mountains, hills etc but I’m not that gifted to do what you’ve done . I’d appreciate any tips that you could share, to help me in my efforts to have great mountains like yours. again a really great job you’ve done… thanks. val Utah!!
Great Gary the best comment was your age, your ageless. Wonderful layout and great idea for the garage layout. Thanks
Absolutely stunning. You’ve created a masterpiece.
Wow that’s great.!!!!! Would like to see more. Let’s hope mine turns out that good.
Just curious about some of the turn radius. Seems tighter than what I’ve seen recommended elsewhere. Love the detail work!
Mad respect for you, Gary. Nice work!
Great looking layout! Very imaginative and well done 👍🏼
Reply from Gary
First of all, thanks everyone, for viewing, commenting, and appreciating my Mt Thornton National Railway Park HO layout. Your comments are very encouraging to this old guy (though I somehow feel much younger again after this trip back to my childhood as my brother and I built a great O gauge layout as young teens).
To Mike: I will attempt an overall layout picture for a future posting – thanks for the idea.
To Adrian: Convincing the wife that winching the table to the ceiling was not an easy task, and believe me, it would have never flown as a project above the dining table, thus the garage installation. I suspect that if it was N gauge and not too tall with mountains, etc., you might try creating a large box frame that raises tight to the ceiling. Then just install a nice chandelier in the center or maybe a few can lights that make the entire unit look like a beautiful ceiling light.
To Val: The mountains are quite easy the way I did them. Both mountains involved some elevated track work, so that became the base structure. From there I used the Styrofoam box that my winch came in, cut it in half and cut out a tunnel entrance on both ends. Couple that with the structure of the tracks, wads of paper (I used leftover Christmas wrapping as it was that time of year), cover with plaster cloth and let it set-up. The smaller mountain just utilized the elevated track, wads of paper and plater cloth. The key to me from there was to use the lightweight plaster and a putty knife and just slap it on, trying to not get it too perfect.
To Dean: Everything was a little tight when one tries to squeeze so much running track into the 8×10′ area. My goal was to have many continuous runs with lots of options. The slopes do reach 3% in some areas, but they don’t appear to cause any problem. The curves are a minimum of 18″ radius, but I will admit to an occasional 15″ track to make things fit. So far, my locomotives don’t not seem to have any problem, but I am sure that I could not run the Big Boy. My switches were the biggest issue, so much in fact that the one area became a “feature” and was named “Malfunction Junction” due the derailment issues. If you revisit the “Taylor’s Tunnel” photo, you will see that sign off to the left.
Thanks everyone for your comments.
Gary
What a great layout you’ve created Gary! From the winch setup to the landscaping and family names, really a first class work of art! One thing I would like to suggest is instead of changing all the couplers, just change one end of a few cars to match the new engines. Leave the rest of the cars alone.
Bob N scale in MI and AZ
Awesome layout! Really like the theme and how you named places after your loved ones.
Gary, your layout is outstanding! I love all the attention to detail throughout the layout, but the “Christmas tag” billboard was so special it brought a tear to my eye. Excellent work, thank you so much for posting!
Great close-up photography of some great detail! I would love to see some longer shots for perspective and the “big picture.”
This is a great layout for the space provided. I am 67 and currently starting my HO retirement layout. These contributions are great for creative ideas to incorporate in my layout, The benchwork is up but now the fun begins. Thanks for contributing!
Gary,
Awesome/great-looking layout! Very imaginative and well done. How did you make the ‘park’ signs?
Reply from Gary:
Bob: I was planning to change only one end of a few cars – thanks for confirming that it was a feasible idea.
Glenn: The park signs were really quite simple. I found the National Park emblem on the internet, pasted it into a Word document using a “mailing label” format, made the background dark brown and the letters yellow, created the multiple descriptions and printed the actual labels. I peeled the labels and placed them on both sides of card stock, cut some “posts” from my Bald Cypress tree in my yard (the small branches make great HO scale logs or posts as seen throughout the pictures), a little glue and the signs were complete.
Note there is difference between a hoist and a winch. be sure to choose the correct one for the job, so you don’t get an unpleasant surprise.
A winch is meant for pulling horizontally. Most have no reverse brake or powered function. To extend the cable you simply release the drum and pull the cable out by hand. If you use a winch to raise a weight, when you release it it will come crashing down. A winch can typically be recognized by having the cable running between two roller the width of and parallel to the drum.
A hoist is used for raising and lowering a weight from above. It typically can be recognized by having a cable guide in the center over the drum. A hoist has a brake and is powered in both directions, so is suited for this purpose. Because of this extra mechanism, a hoist is usually more expensive for it’s capacity.
Stunning layout built with a pieces of family history, the love of the mountains and a sense of humor (Malfunction Junction). We’ll done!
What a great layout and honor your family Sir. A greater tribute could never be done.
Wow; a lot of excellent work in that layout. Like many others, I hope my layout comes out half that well and I’ll be happy
Reply from Gary
ScenicsRme: Thanks for the technical enlightenment. I called mine a winch but it is indeed a hoist, even though I end up lifting by pulling horizontally through my pulley system. I knew I wanted to hoist the table, so luckily, I made the correct choice.
I loved the layout and can’t believe how detailed everything is.
Gary,
Thanks for the instructions on how to make the park signs.
Looks great.
Hey there Gary,
I have a layout that suspends from the garage ceiling as well and for the same reasons.
However I used a 110v winch good for 1500 lbs. I used lag bolts to mount to drywall covered roof trusses. As for the base I used light steel studs for the base and 3/8″ for the sub surface. The trip from floor to ceiling is about 9 seconds.
The layout sits on 36″ tall light weight square tubing sawhorses. 1/8″ wire rope is used on the pic points and is easy to use.
Gary’s layout is fantastic. He reflects many of fantasies about layouts which have been scuttled by the wife. Being 86 now, the fantasy still lingers. Right now, I seem to be only a collector. Thanks Gary, you’re an inspiration.
I loved the idea of naming things after the family members, Can I use that on my layout? I’m just starting to build an 8′ x 24′ O gage layout in my garage.
Gary, I read all of your layout 3 times awesome my great grandson have a 4×8 lumber layout in my my 8×14 foot basement we hope to make it bigger now we know how we will start building our lift in my garage next spring the hoist idea is wonderful thanks again for sharing now we can go bigger.
Wow cool to see toggle switches again. Great scenery and structures.
Frank in Orlando
Reply from Gary:
Curt – sounds like our hoists are similar however my capacity is 1320# using the double cable on the lift. Mine lift takes about 13-14 seconds. My over weight limit I was working with was about 300#/each lifting point and I think I stayed well below that, but my cable 3/16″ plastic coated wire rope, thimbles, and clamps were all based on that guestimate. I have 4 legs that utilize self-locking folding hinges in the down position and are supported by magnets when in the up position
Harold – you are never too old to start. Remember you are only as old as your wife makes you think you are!
Eugene – you can certainly use the idea, but your family would want you to use their names – just guessing.
for Adrian to convince wife for drop down from ceiling layout…..mount a lovely ceiling light fixture under the layout base; so, when hoisted up, it looks like it belongs and place a ‘wall’ around the layout base so that when hoisted up to ceiling, it appears to be a boxed look under the ceiling.hiding the layout from below
good luck
Evidently you are a very determined individual, you were not defeated by lack of space . That must have been a chore to mount the hoist , those darn things are not light .
Very impressive. Great track plan and layout . Your scenes jump to life and it’s awesome you included specific scenes to honor your family members . It’s those details and extra touches that really give a layout purpose and meaning . Very nice work and craftsmanship throughout . Would it be possible to post again some images of the entire layout and even a video of the trains running round ? You’ve captured a great deal with the images you did post however with such an intricate and intriguing layout you’ve left us all thirsting for more of the overall view .
Regardless , it’s a wonderful layout and narrative , thank you for posting and sharing and yes it is well worthy . I hope none of the modelers out there ever feel like they can’t or shouldn’t post the creations … it’s a hobby for all generations and all levels of experience. You’re obviously very capable.
Outstanding workmanship! Your signs of with relative names on them amazing idea. Beautiful layout, your skills in building it Wow!
love all the bridges, the different parts of the park. very nice job. lots of work.
Really nice layout. I wish I had the talent for the landscaping that you have. My, and my grandson’s, layout is pretty basic. We are using many of my old engines, some from my youth, so we are still DC. Your track plan is really interesting. Keep it up.
To me it is just incredible you built this beautiful and creative layout in about a year. It just goes to show that age is just a number. I loved the idea of you naming so many sights after family members. BTW, I have been to Missoula many times and know all about ‘Malfunction Junction’.
Kirk in Tacoma.
Very AWESOME layout Gary. It’s amazing how much track you have in a small layout and your scenery is very awesome too, I like how you had all of your family listed in your layout, I’m sure that was very exiting for all of your family to see. Great job for as little room you have, well done !!!!!!
Great job of finding working solutions for an obstacle many of us face, You did an unbelievable job in one year. Very realistic and well done. I think your layout should be a great incentive to some older modelers who might be hesitant to start a layout. Keep up the great work.
Regards
Roger in Kansas
Marvelous scenery. A great inspiration
Love the layout! Loved the story about Shep. I am familiar with the story as I am from Great Falls and the railroad station in your story is in Fort Benton (just north of there). I, too, have modeled my layout on the Great Northern of the 50’s and 60’s.
Great looking layout Gary
Thanks Gary, for sharing your photos and comments about your model railway. What s fantastic job. Send more when you have installed your signals etc. Great work. Cheers Rossco, Adelaide, Australia
Great job, it turned out beautifully!
Sedat from Türkiye
Gary, great story and such an amazing layout. I’d like to see more details of your hoist setup for raising and lowering the layout. I loved your photo backdrop – it really brought the foreground layout to life perfectly. I think Merrilaine’s Meadow could use a fence between the tracks and the meadow to keep the horses from wandering onto the tracks. The story about Shep the dog brought tears to my eyes: such a sweet but sad story. The fact that you accomplished all that layout work in a year at 80 years old gives me hope that I might get one of my three layouts beyond the planning and track on foamboard stage before I hit 80.
When I first saw your track plan laid out on the board, I thought “He’s got those tracks too close together. But when I saw the actual construction, I realized you’re a better three-dimensional thinker than I am. Your landscape design experience obviously helped to create the multiple levels of the layout. Like others, I’d like to see the trains running and more overall shots of the whole layout. Thanks for sharing your great story and photos.
Thanks Gary for sharing your layout! What a great effort. It makes me envious as I still haven’t got my layout operational. Cheers Rossco, Adelaide, Australia
A superb layout with wonderful personal family connections.
Andrew in Oz
Well, this has to be one of the most detailed and beautiful layouts I have ever seen for its size and many larger layouts. I can’t say enough about it. Magnificat.
Nice theme and clever development of the idea. Some really nice details.
A very, very impressive layout and so much detail it is a feast for the eyes. So much to see you will never get bored.