Paul’s been in touch – he shows us how to create a model train cab ride:
“Hi Al,
I decided to have a go at building a camera train.
Not knowing how well things would go I bought 3 of them. The cheapest I found them in the UK was £14.09. They arrived in a couple of days too.
The “manuals” could be a bit better and I found that the app it asks you to download doesn’t work on later versions of Android. Luckily I had an old tablet running Android 6 that still works and it installed fine on that.
The devices I bought tart transmitting immediately without the need for a password (even though a password is printed on the sticker). As the range is limited to 10m though I don’t think it’s an issue.
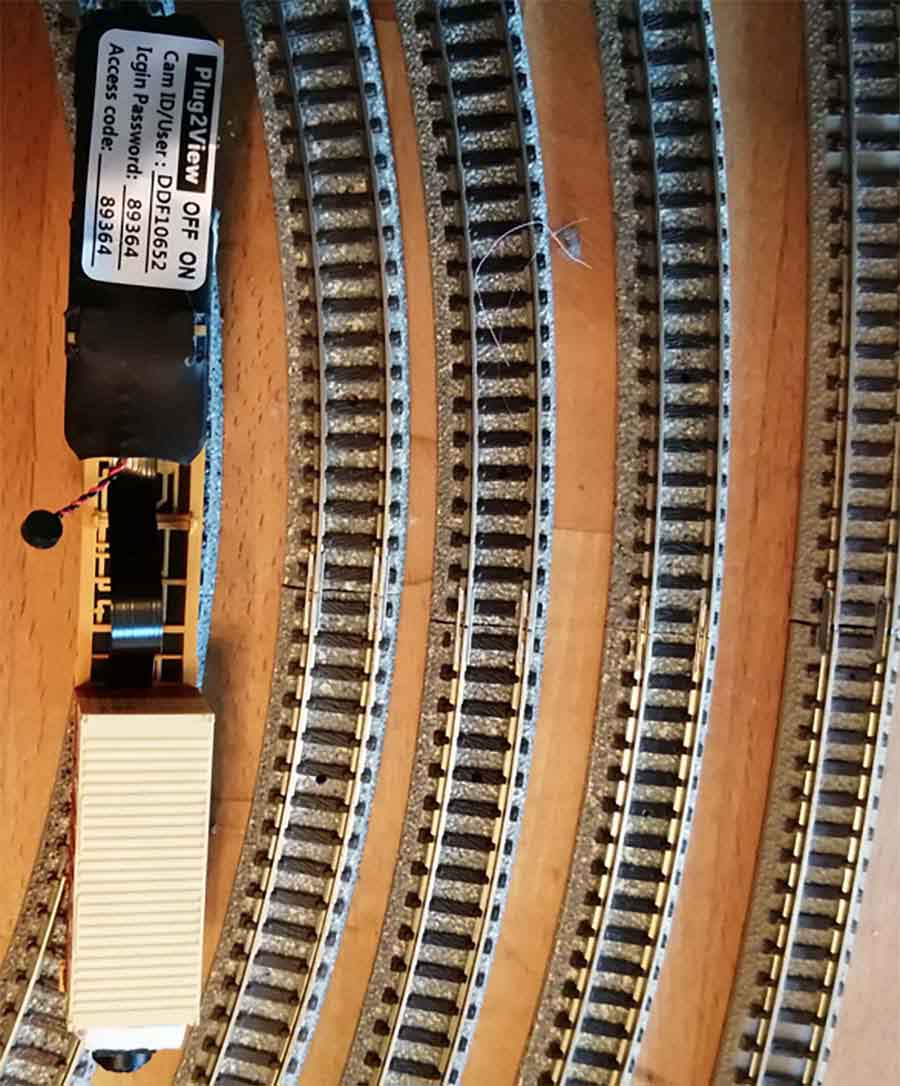
They look like this:
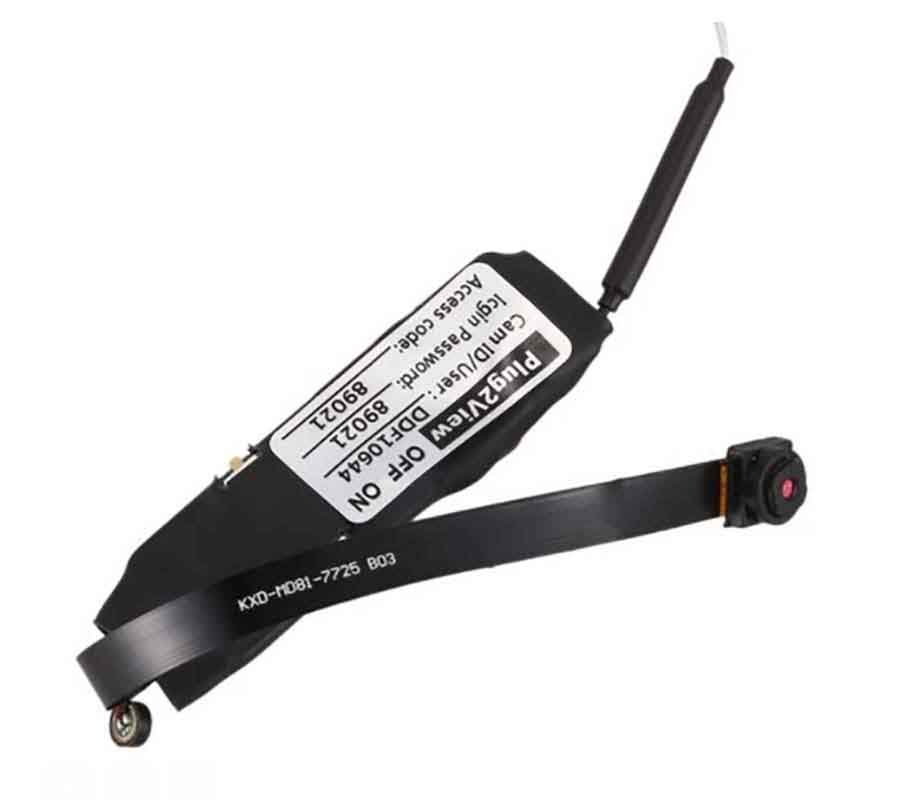
And come with a USB charging lead.
As the manual isn’t very explicit here are what the switches do:
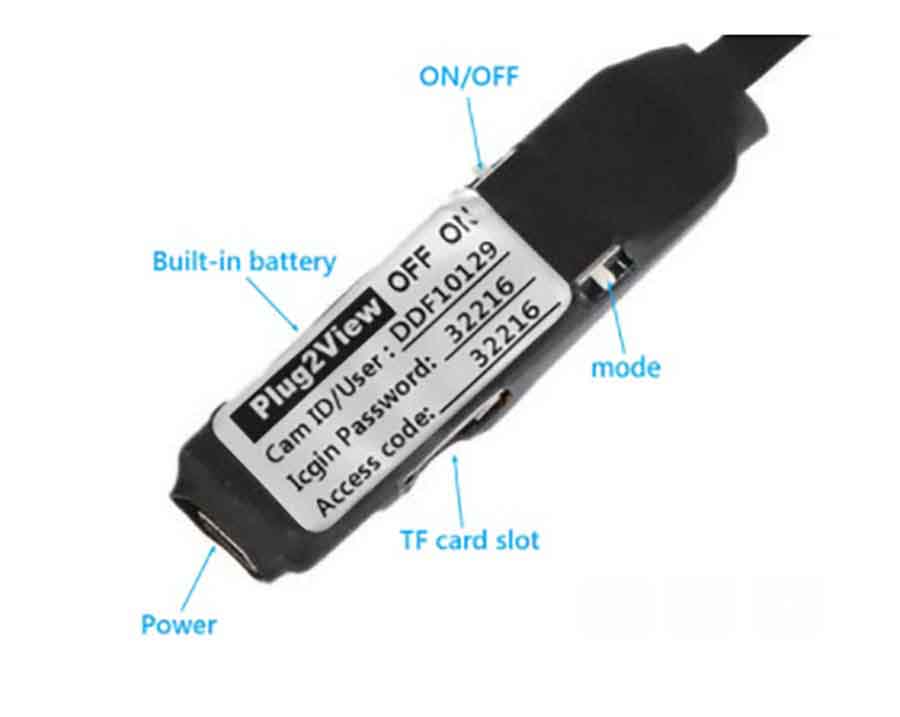
There is also another very small button tucked under the microphone cable that resets things if the unit stops working and the web site says they can take a card up to 32GB to store video. The app also stores videos without the memory limits.
“On/Off” does what it says.
“Mode” switches on WiFi. The unit sets a network up called THPC000027ULNEF and tablet connects to this. The switch has to be pushed towards the camera end of the device for this setting. Its other setting is IP, and it’s apparently possible to assign the camera a fixed IP address. I haven’t found a way of doing this yet, but I’ll report back if I do. Perhaps this is where the password might be relevant.
Note that all 3 units set up a WiFi network using the same name so having two cameras operating at the same time might be difficult. Again though, if the cameras are operating using fixed IP addresses perhaps this is possible.
Anyhow…
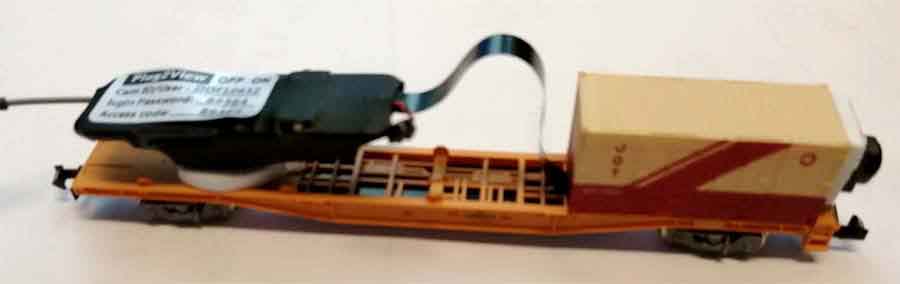
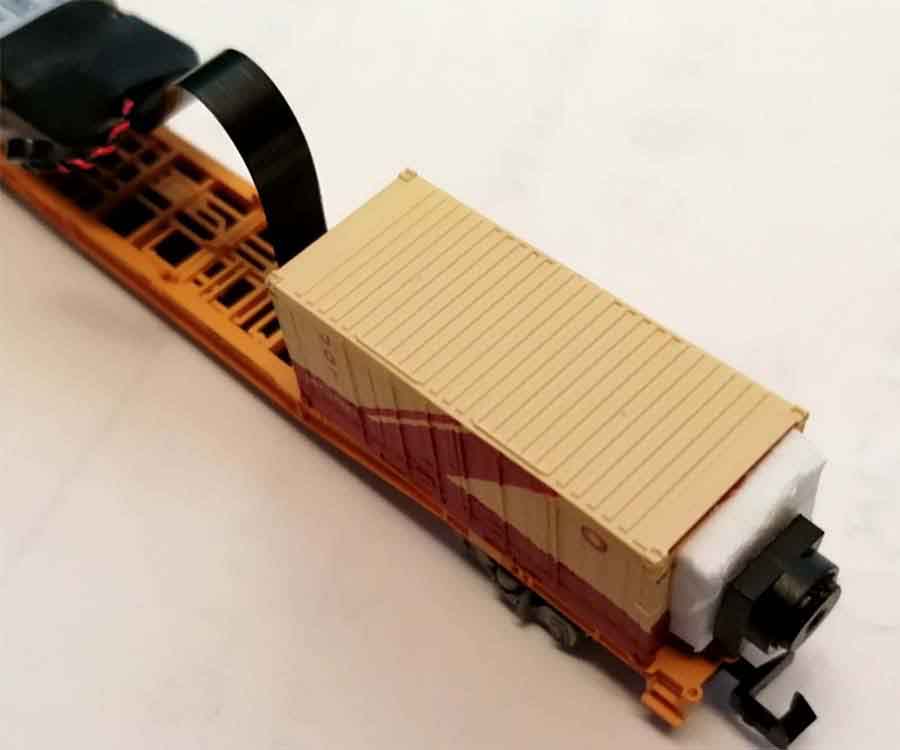
I fitted the camera to a container wagon like this:
It’s fine on straight sections, but the field of view is very narrow, and on curves the camera is looking tangentially rather then following the curve. The tighter the radius, the greater the difference will be between the desired and actual sightlines.
This is made worse by having the camera mounted at the front or back of the wagon, as on tight curves the camera won’t be over the tracks at all, whereas on larger radii it might be.
I tried with (left to right) 243mm, 280mm, 317mm 354mm and 541mm radius curves.
The pictures below show the two extremes of a 541mm radius curve and a 243mm curve, with the camera front mounted:

Here the camera is just about inside the 541mm curve.
Here the camera is completely outside the 243mm curve.
All is not lost though…
The camera will always point tangentially to the curve, so it will point at 90˚ to the long side of the sleeper immediately below the centre of the wagon it’s mounted on.
If I mount the camera at that point on the truck it will always be inside the curve, so we’ll see at least some of the track ahead. The greater the radius, the more track we’ll see. The camera will still be pointing tangentially but if it’s above the mid point of the vehicle the perceived deviation between the actual and desired sightlines is diminished.
A shorter vehicle with the camera mounted above the electronics is one way to achieve this (but then overhead clearances might then be an issue). Another is to have two linked vehicles with the electronics on the rear one and the camera on the leading one. The shorter wheelbase will make the camera stay inside the curve more, even if it’s mounted at the front of its truck.
I hope this helps other modellers out there.
All the best,
Paul (in Manchester UK)”
Thanks to Paul. Dean also has a helpful post on making cab ride videos with a camera:
Now on to Dick.
He’s always been a thoroughly decent chap when I’m short on stuff to post – you’ll know his layout from the links below.
And now he’s sent this in which is a delight to watch:
“Hi Al, this is my you tube video link of the portable layout I set up with the help of my neighbor friend Dick Stern (oldtaz) who has sent you wonderful pixs of his N scale layout.
The video is just over 7 minutes long, all taken by oldtaz’s cell phone.
We had over four hundred visitors who enjoyed our efforts.
Many were intrigued by the track plan. It was a folded dogbone double track mainline with 4 sidings and two crossovers, but large enough to confuse people as to where the trains were headed. The music quits early on the video and I can’t seem to fix it, Earlier I had good music on there which was a problem for you tube so had to change to the music on it now.
Neither of us are healthy enough to do this public display work anymore which is why we both have N scale layouts to work on now.
I have spent a lot of time on my large California Zephyr Route N scale layout the past 2 months.
With 3 weeks left to work on it before I have extensive back surgery, progress may slow to a crawl for the next 3 months.
So I will be sending updates of the California Zephyr Route again very soon. It is a huge layout and I am the chief cook and bottle washer with no helpers.
Anyway I hope there are some that will enjoy the video.
To all of our model train friends on your site, please be well and safe and you too Al..
Thank you so much for this site for us to connect with each other and share our enjoyment with the hobby.
Sincerely
Dick Sr
Hardin Mt USA”
And here’s Dick’s other layouts.
That’s all for today folks.
A huge thanks to Paul and Dick.
Please do keep ’em coming.
And don’t forget, the Beginner’s Guide is here if you want to stop dreaming and start doing.
Best
Al
PS Latest ebay cheat sheet is here.


Paul: An excellent tutorial and answers a lot of my questions about cameras and installation. I would have liked to have known the brand of the camera and have seen some shots from it to better explain the curve problem. Those could be still pictures if necessary. In some cases it’s nice to go back to the basic “how it works” etc for those of us who want the nitty-gritty information rather than those who just say: “I put a camera on the front of the train and it looks like this”.
In any case, thanks for the great information
Terry/Idaho USA
Paul
Great stuff- Many thanks for your input.
Dick Sr
You’re my kinda guy. Love moving cars and trucks and the biplane. Layouts should have other things moving- not just trains. There are old American Flyer log loaders, cattle loaders, etc that added excitement to the layout and they dont make that anymore. Wish you well with your back. Getting old is not for sissies.
Big Al
Thanks
All be safe
George from LI, NY
Ok that looks pretty neat.
very cool web cam!!
Paul — Great tutorial. Wish I had seen it before I disposed of one of those little cameras. Do you know if there are any that work with an iPhone?
They tart transmitting? Wow – I bet that’s an added plus for you single guys in the U.K.!!! 🙂
Dear Al, Thanks for what you do although I have over 1100 files archived. Re: Paul’s
camera train. Pin hole cameras became available in black and white only. I mounted
the camera in the nose of an F7 with the transmitter in the B unit and battery and
traction motor in the rear A unit as a pusher. A long with a VCR and 17 inch TV, I got
a dim picture. I mounted two hi power LED’s (new then) on top of the lead unit
which gave me enough light. The visitors at the shows enjoyed as we had a 20 X
40 foot modular layout with a four track main. Those were the days. Cheers to
Paul for his efforts. It’s a fun project….RJL
Dick Sr. Great video…loved the moving vehicles, and wondered what system you used for that? Best of luck with you surgery
Dick,
Where’d you get the moving vehicles scenes from?
Love the idea. A possible suggestion to fix the tracking problem of the camera. Inside the boxcar mount the camera base on the top of the wheels so that it turns with the wheels. Would need to allow for turning space in your boxcar framework. You obviously know more about this than I but it is just a possible solution to the problem. I am getting ready to start my own layout and that is definitely something I would want to include.
Paul.
Great idea and a very nice tutorial. If you could have a mount coming through the carriage so the camera is mounted to the bogey and turns with it it will improve the angle on corners.
I love cameras mounted on moving things. The other is a camera in a trackside building. Giving a view down the tracks.
Have fun with it.
Tony and Gerry:
The moving cars are all made of scrap wood and junk.
Using one slow moving motor brick from a BBQ spit supplied power for the cars and the airplane. Notice the roads have slots like slot car track. underneath the city scene are some handmade wooden pulleys that guide a cable around. The cable has metal attachments clamped to it that stick up through the slots to grab the underside of the vehicles to pull them around on the roads. The vehicles can be changed out or rearranged. The airplane is light and uses a long springy wire coming out of the water tower which is situated over the motor brick and connected to the drive shaft of the motor brick as there is a shaft on both ends, one to drive the pulleys for the cars and the other for the airplane. The water tower edge has slight dips and rises to allow the plane to rise and fall as it goes around its circle. The whole city, sawmill, people, cars, buildings, was made from nothing more than chunks of wood, cardboard, paper, and just junk. It was so fun to watch.
Paul, thank you for the info on that camera, I have looked at those wondering how well they made work. I have used the mini cube cameras which are a hair under an inch cube in size (about 25mm cube).
I found they do pretty fair mounted on a depressed center flat car, I may get one like yours and try that. I would like to attach the lens to the front of an engine, the rest in a dummy unit if the wiring is long enough, or use a vista dome passenger car and set the lens so you are seeing out the vista dome and put the rest of the gear in the same car. I won’t want to ruin a good car body to do that though. I do wonder if one could push a good 6 wheel truck in front of the loco and mount the camera lens on it if it would stay on the track, the lens body looks fairly large. Also wonder if a pen camera could be dismantled and used if the body around the lens area is smaller. Anyhow now I have smoke rolling out of my ears, time to go work on the layout.
Hi Paul,
Nice explanation of the way you installed and use your camera.
I do like the fact that the view of it is rather narrow.
To me it looks like the view from a cab of a Steam locomotive is quite narrow too.
Can you tell me the brand of your camera?
I would like to try it mayself.
Thanks in advance
Thanks for all the comments. I found the cameras on ebay for around £14 in the UK by searching for “wireless mini video hidden hd 1280*720 camera module wifi ip pinhole diy spy dvr”. There is an IOS version of the app as well, but I’m not an IOS person so can’t say how well it works.
Apologies about the transmitting tart!
Wait a minute, I have one of those with tiny camera head/battery fed out front watching bird feeder. Those Philated Woodpeckers are awesome… Very good idea for next setup lol.
Love to see the moving cars and airplane! Would like to see cars coming up tp a RR crossing with gates and/or blinkers! Nevertheless, a great layout! Good job!
I’ve been trying to figure out what I was going to send you but since you ran Chapples Train Rama on again. At that time people have asked how the Tabel’s cars and planes were made movable. I didn’t answer that question at that time so I will now. I will put together the pictures of how the tables were made for the moving cars and planes Which were all made out of scrap material. Dick was asked to set up his trains for our town’s 100th birthday. In our old depot. I told him that I would help him with the town. He said to me wouldn’t it be neat to have moving cars in the town. That’s when I got the big idea of going ahead and making the town with moving cars and possibly an airplane. I have been trying to figure out what I was going to send you in the way of an article. Now I know what that is going to be. I will set up the pictures and how the tables the motors the cars the planes in the buildings. I will start working on putting that together for you al this afternoon
Dick Stern
old taz
Dick. I’m fascinated by the airplane but can see the wire might cause problems if it hits a building, etc. I’m wondering if one could rewire a ceiling fan to slow it down and then attach the wire and plane to it. Seems it would go in a wider circle without collision problems. Just a thought.
AL–has Dick sent you his instructions for the moving cars turntable yet and if so when will they be published?