Mal’s been in touch – here’s how to stop your trains derailing on your track:
“Al and my fellow modellers,
Reading one of Al’s eMails today I noticed in the comments how many people were suffering from trains derailing on their layout.
Well, I thought, they are not alone! I have spent a lot of time over the last couple of weeks solving all of my own.
Various things cause derailments and I have done lots of research on why individual items choose to jump off the track and ruin my day.
I thought I should share the findings with you and hopefully point you in the right direction.
Firstly, they are all solvable! Even my most stubborn lightweight wagons have been solved. What you need to do is tackle the problem systematically.
Firstly, is it the track?
The track will only work well if it is in gauge. I foolishly assumed that my track (peco 100) would be in gauge at all times, after all it is made in a factory and the rail is inserted into sleeper chairs that are a fixed distance apart. WRONG!
Flexible track on curves has a tendency to slightly tighten up the gauge. Usually not a problem until you create a joint on a curve. These do tend to press inwards on the inside rail. I used a stout pair of pliers to bend the rail back outwards and re-checked with a track gauge. That was problem one solved.
Problem 2: almost everything struggled going into a particular point in the fiddle yard section. It was NOT the point (turnout/switch for the rest of the world) it was the 2 inch (50mm) section of track before it.
Once again the plastic sleepers had not proved sufficiently rigid to hold the track in gauge. The track had rotated inwards at the tops. You couldn’t see it, but you could measure it with a track gauge. Sure enough it was about .75mm too narrow.
Now for wheels:-
OK so if your wagons / rolling stock / locos cope perfectly well on a straight flat section of track why is it they fall off the track when going through a point?
Well first it is more common for trains derailing to occur going into the point from the toe. Hence why certain railway companies insisted that there be no facing points on mainline track and where possible to avoid it altogether. Not bad advice for us modellers too! Apart from anything it increases the operating complexity and allows us to shunt more than we would otherwise.
However, having said that, at some point in time you have to approach a point from the toe end in order to choose between two (or even three) route alternatives.
The main requirement is that the wheels follow the desired route. Seems simple enough doesn’t it?
Well often they don’t bother and de-rail instead. So why? What stops them following the rails around the correct curve?
Well let’s look at the relationship between the two wheels. They need to be the correct distance apart between their inner faces. This is known as the back-to-back setting. Buy a gauge! Set the back to backs and you will be a lot better off.
Older wheel sets tend to be too narrow on their back-to-back settings for modern track. This worked well on the coarser track like Hornby and Tri-ang but often fail miserably on code 100 and probably won’t even entertain code 75 track!
The best option for this type of stock if you can’t adjust the back-to-backs is buy replacement wheels. A caution here too. Dapol wheelsets seem to have very small flanges that are designed for code 75 track. They do not resist sideways pressure at all and will pop off the track with the slightest sideways provocation.
The Hornby replacement wheels are slightly deeper flanged and work really well.
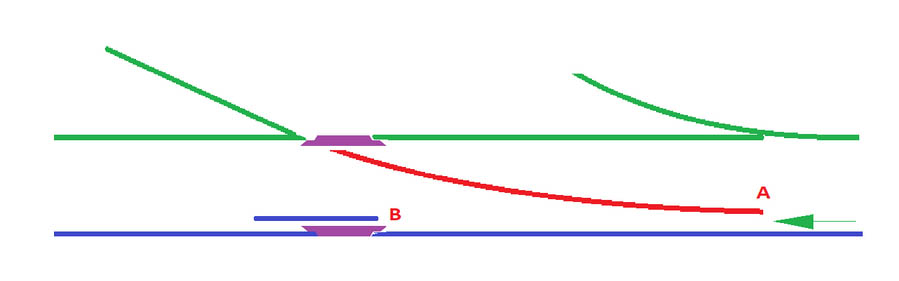
Anyway let’s look what happens if the back-to-back is too narrow.

If the wheels are too narrow you can see that the flange is likely to collide with the switch blade at point A or collide with the check rail at position B.
Either way you will see the loco/wagon jump up slightly as it does so. Push it through by hand with very light finger pressure and you can feel the collision. Bad enough on the straight through section but almost always disastrous on the curved route and don’t even think about a curved point where both routes are curved!
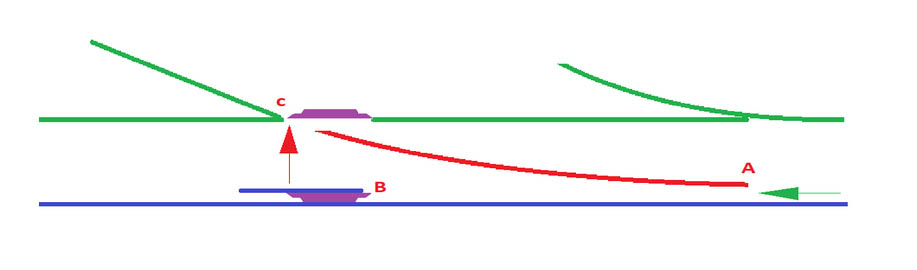
So you might think the wider I have the wheels the better! Wrong again I’m afraid. Let’s have a look at what happens if you spread the wheels out so they are a tighter fit between the rails. i.e. too wide.

So initially it looks like we have solved the problem. As both wheels are pushed towards the rails then the clearance past the switch blade at position A is increased and no collision occurs, likewise at Point B the flange is held far from the check rail… but there is always a BUT!
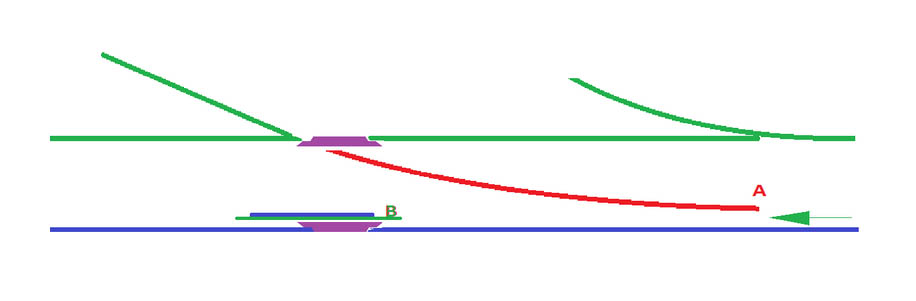
Look carefully at position B. The flange of the wheel is far away from the check rail, so as we said no collision! BUT masses of free-play. The option is there to slide inwards and move closer to the check rail. So what then happens to the wheel crossing the frog?
The free-play at position B between the check rail and the back of the flange has allowed this wheel to ride inwards pushing the far wheel outwards, often catching on the wrong side of the frog and riding up outside the rail. Derailing!
Again this is particularly a problem for the curved route as it is easier for the wheel at the frog to arrive out-of-gauge and slightly at an angle to the intended route further promoting riding up and out.
i) Ensure your track is in gauge everywhere. You can’t be too particular in going over every inch even if it looks correct it may very well not be.
ii) Ensure that the wheels you are running actually suit the track it is on. If not replace them.
iii) Set the correct back-to-back using a commercially available gauge on every set of wheels you have.
iv) If you still have problems with trains derailing then try closing the gap at B, which will prevent the opposite wheel escaping over the Frog. The suggestion to glue in a small strip of brass or very thin plastic to the inside of the check rail will catch the sideways movement before it allows the far wheel to get outside the frog.
v) You can glue check rails into position on the inside rail of any curve to do the same trick. Why not? Real railways have them and exactly for this reason, they don’t do it for fun you know! I did this on my own curves where the tracks split over a baseboard join. Before, almost everything de-railed, now everything passes without problems.
I hope you have found this explanation helpful in trouble shooting your own problems.
Happy Railroading everyone!
Mal
North Wales”
A huge big thanks to Mal – trains derailing can drive anyone mad.
Mal’s post reminded me of ken’s: Model train derailment.
And now on to Dangerous Dave:
“Just uploaded today, short session to show I’m still here!
Regards
Dave”
That’s all for today folks, a big thanks to Dave, and especially to Mal for taking the time to put that excellent derailment ‘how to’ together.
Please do keep ’em coming.
And don’t forget the Beginner’s Guide is here if today is the day you make your start, on your layout.
Best
Al

Like to thank Mal for the guide, very simply explained. I too suffer from random derailments, need to take some more time checking using your guide.
that is amazingly helpful. thanks Mal. Will rush off and buy a gauge ASAP!
I have carried the same exercise and agree with everything Mal describes. One other factor which I was told about by an exhibitor is that if using track pins in the centre of the sleepers they can cause the rails to pull together slightly – especially if driven in a bit too hard. I now pin my sleepers at the ends instead.
Good guide for derailment. Possibly the biggest bug bear in the hobby.
Great to hear from you Dave. Got any further modifications planned for your layout?.
Mal, Most interesting advice and instruction. Shows us we don’t take time to research problems. Great tutorial
The Critic
Mal, great advice, much appreciated. Also some wheel sets have plastic axles, those will bend out of shape. Again thanks to Mal . Most importantly to Al for your great site. Rob, Hamilton Ohio
Probably the best item that’s been published on this blog well done.
Sound is awesome along with everything else. Thanks.
I would like to thank you Mal for the guide, very clearly and simply explained!!
A good guide for derailment too. Probably the biggest bug bear in the hobby. I will be looking closely at my two layouts.
Dave you never cease to please and amaze me!
Peter
Great info from Mal. Hi Dave that video was nice and I was able to understand everything that you said. HaHa
Funny this should come up now as I’ve just withdrawn three wagons from use as a result of back-to-back errors!
Great explanation Mal. Such a small imperfection causing such a major headache.
Very interesting but why is it that a full train will go over the same piece of track most of the time but then all of a sudden the train derails any thoughts
Thanks
Andy
Always cheering to have Dave’s input. Do we think that Santa was self-isolating? Santa wouldn’t miss Dave out – he’s a good boy! Delightful that there’s no need for social distancing or masks at Rippingdale Junction – oh, those good old days. Keep smiling.
A huge thank you to Mal for his diagnostic wonder, this should be framed as the major rule for happy railway modelling and running, an absolute wealth of tips.
Secondly, a big thank you to Dave for his consideration of us lesser mortals who with garden railways are not able at present to get outside and do anything constructive,
Also a very big thank you to you Al for your emails which wonders for maintaining sanity in the present time.
A great article! Very well done, you will have saved the hobby fir a lot of people! I know what I’m going to be doing for the next few weeks!
Andrew
Yes, lots of thoughts as to why this happens. The tension in the couplings often keeps the bogie/ wheels sufficiently in line to negotiate a problem and this may occur over and over again until something changes, maybe you slowed down a bit and the train bunched up? This changed the coupling alignment and next time through the problem occurs.
Try putting a little bit of tape on top of the wagon/coach that derailed and keep doing it. You will probably find that it is just one or two problem children! Then go through the routine of checking the back to backs, the track gauge and the check rail clearances. You won’t be far off fixing it.
Btw. Of course this is a similar problem when you are reversing a train. The free play in the axles allows the wagons to take up slightly skewed positions in relation to dead ahead. Thus adding sideways load.
Mal
North Wales
Thanks Mal – that’s the clearest explanation of derailment causes and solutions I have come across. Your article came at just the right time for me!
Thanks to Dave as always. We have nearly 11 months to behave ourselves, then maybe things will look up.
Thanks for the heads up! I never would have guessed that new track coming right out of the factory would be anything less than “spot on”. Now I know.
Mal…… great blog……..great information and how to…… I have been using the gauge for my code 100 track but never thought about the wheels back-to-back…..Thank you and thanks to Al for posting.
Also, thanks to MARTIN TAYLOR about using track pins in the centre of the sleepers that can cause the rails to pull together slightly – especially if driven in a bit too hard. I now pin my sleepers at the ends instead. I never realized that. This was spot on. Thank you.
Big thumbs up from across the pond to Mal for the lesson. I saved this as a Word document for future reference. It is written so even I can understand it. Again, thanks for making this simple.
Good clear information regarding derailment problems. Thank you Mal.
Dave as always I enjoy your layout.
Would you (or have you already) share with us how or where you got your backdrops and how you blended your layout into them?
Such nice work. I have 50 feet of backdrop ready for something besides all blue sky.
Dick from Hardin Mt USA
Thanks Mal for the good imformation. Been having trouble with derailment on my setup Thanks again.
To everyone who commented.
Thank you all so much for the positive feedback, much appreciated. I do hope that at least we have eradicated a few problems. Andrew raised a very good point about seemingly random derailments.
It has inspired and to be fair encouraged me to do a part two for you to further look at the role couplings, weight, and some other issues I have come across have to play in the derailment problem. Because let’s face it, if someone is going to get it wrong first time then it is going to be me! So I get plenty of opportunities to fix problems! I will try to get part two to Al soon. I need to take a few pictures and set up some rigs to demonstrate what actually happens first. But do leave it with me and I promise I will get episode two out shortly.
Take care everybody! Stay Happy!
Mal
North Wales
Great to see Dave back! Love his videos! Was worried he hadn’t been on here, in fact my theropist said if he wasn’t on here soon, I would have to take to drink!
For Mal. Can we do something on tight curves on a slope, to keep front wheels on steamers and light cars from jumping rails. I was thinking a pair of taller guide s on inside of rails to let wheel flanges rub against. Just a thought.
Mal, Nice work, I friend sent me this: 41 Class loco has spring loaded buffers. S Truck wagons coupled to the 41Class have spring loaded buffers. “Standard” Kadee couplers on both. Rounding 18″ curve the opposing buffers bypass each other, and lock horns. When you come to the next straight, the locked buffers flip the S Truck wagon off the track. Solution was to put Kadee couplers with slightly longer shank on the 41 Class. Now the buffers don’t lock. S Trucks stay on the rails.
Mal that idea of using plastic glued guide rails sounds a good one I shall be trying that , and yes agree on flexi track on a curve can distort a fraction which will cause derailments , some times better using fixed track on the curves …….Thanks all re my video ..Paul that was my best Queens English in silent mode ..LOL …Macbear you and me santa missed so let’s just hope next year we get preference …Richard H Chapple Snr I did show adding backdrops when building the layout but its going backa. few years , but they are bought in packs of 3 giving 10ft. approx from Gaugemasters costing approx £8. $10 …..well worth it ..just paste on to backboards as you would with wallpaper …..Dangerous Dave .
Mal, I sure appreciate you posting this good advice as I have some of these issues that need to be fixed. Also, make sure your cars are at the correct weight also.
Thanks you
Mike
We encountered a problem on the 7 1/2″ gauge club layout and had a lot of derailments with wheelsets picking the points on a facing point switch. We got some advice from the big guys: The track leading into a facing point switch needs to be straight and exact to line the trucks up properly to navigate the switch. We had a curve leading up to the switch which we tried to align but ended up putting a guard rail on the inside rail to force the wheels to approach the points properlt.
Excellent tutorial, along with others I have some work to do!
And a big thankyou to Dave, it is always good to see trains running; great camera work.