Lawrence has been in touch – he’s working on a Suspended model train from ceiling.
“Al
I don’t know if you will show this and following emails as they will be radically different then the norm.
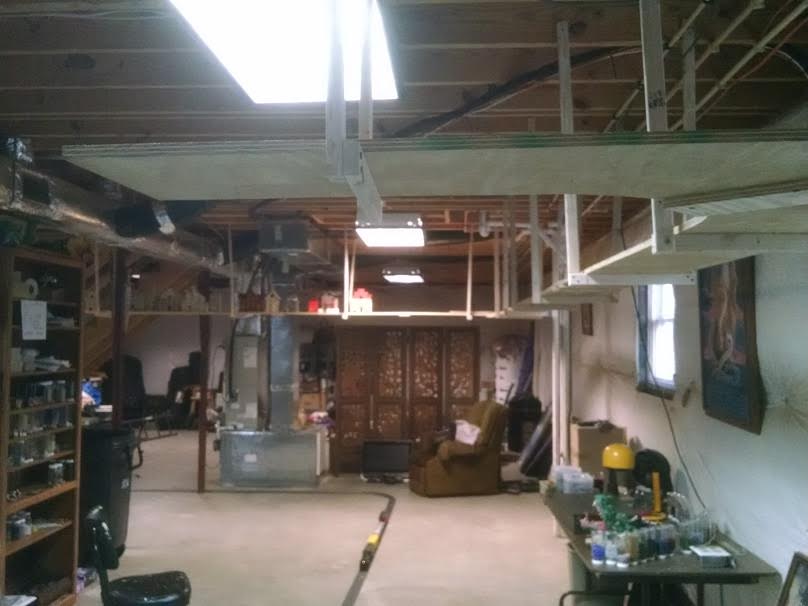
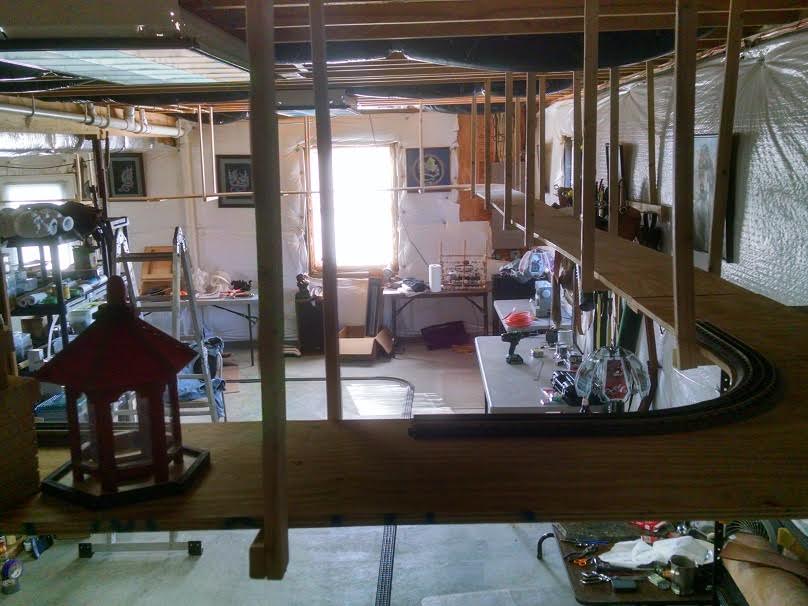
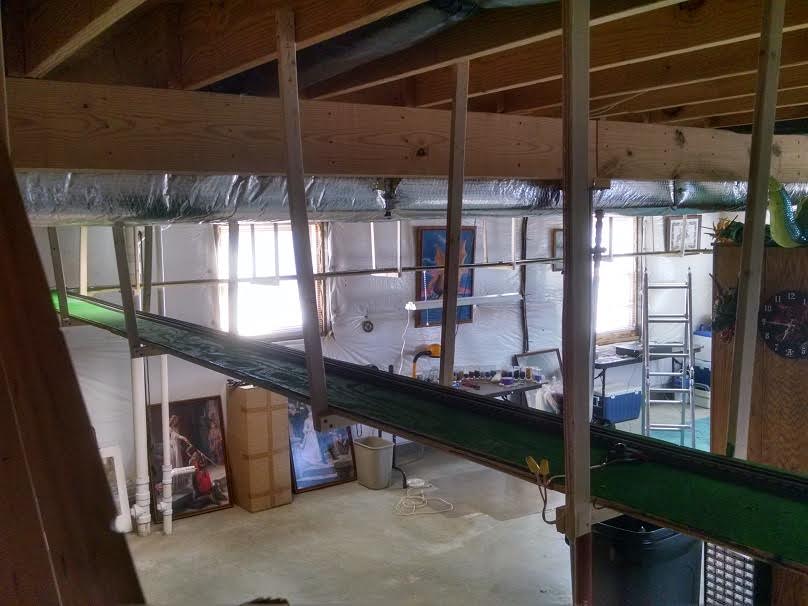
It is a 96 feet long overhead (six feet off the floor) single track system around half of my basement. Overhead because the multiple hobby (leather, chain maille, archery, etc) workbenches are around the wall. This is only one of my many hobbies.
I am not after reconstructing a specific city. What I want it to display the things that are interesting to me. Because it is six feet above the floor I will not be adding a lot of the scenery that is normally seen as it will not be seen from the floor.
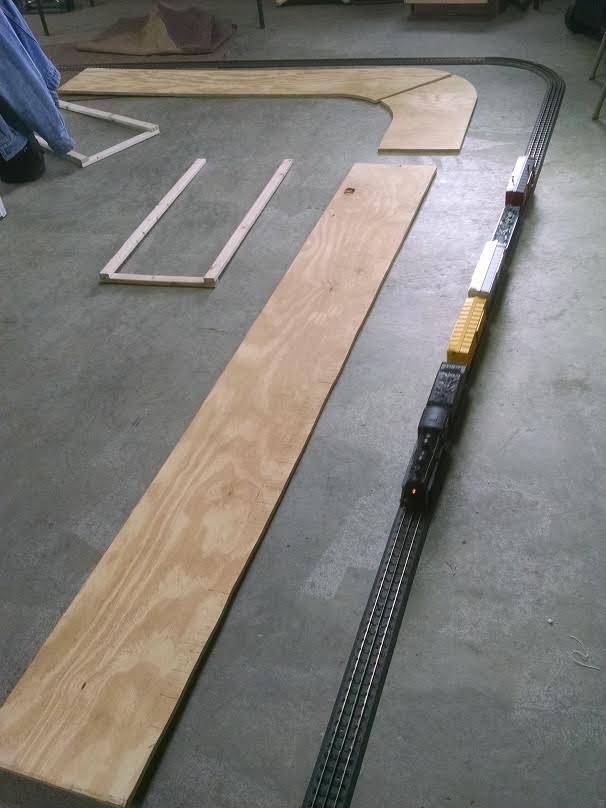
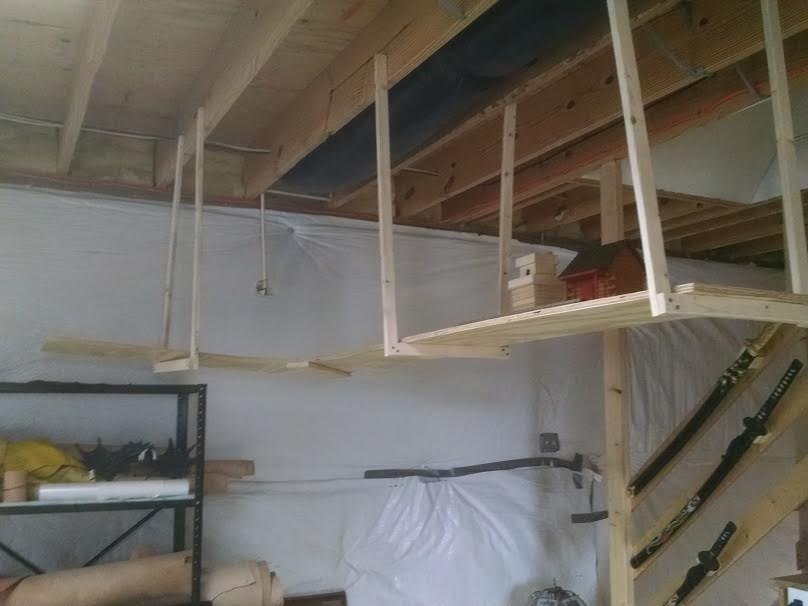
The train used is a O gauge Realtrax Christmas kit, expanded with one rolling stock and about 80 feet of new track. Hanging the track base from the basement rafters was a real trick. The track had to be wide enough for the train, some houses and all the wiring (on the top, out of sight, instead of underneath). So layout all of the wood and track needed on the floor first. To ensure all the hanging hardware, the base, and enough of and the right track was available.
Then the process of mounting the hanging rails and piece by piece of the track base around the room. Painted the upper base green, no grass as it will normally not been seen anyway. Still process of painting the rest a gray for a visual eye disappearance. Put down the track with an electrical connection at each corner. Put the wiring down on the back edge upper side and connected all points. Tested the track with train and then screwed the track in place. Not being too critical on the mounting of the hanging pieces I have some high spots and low spots – great with small ups and downs.
Phase 2 (next email) is the background appearance to the train. Simple, cheap, and very different.
Lawrence”
My word, a suspended model train from ceiling, 96 foot layout! Can’t wait to see how it pans out – a huge project.
Now on to Jack:
Jack’s been in touch again (his last post is here).
“Al,
Progress continues.
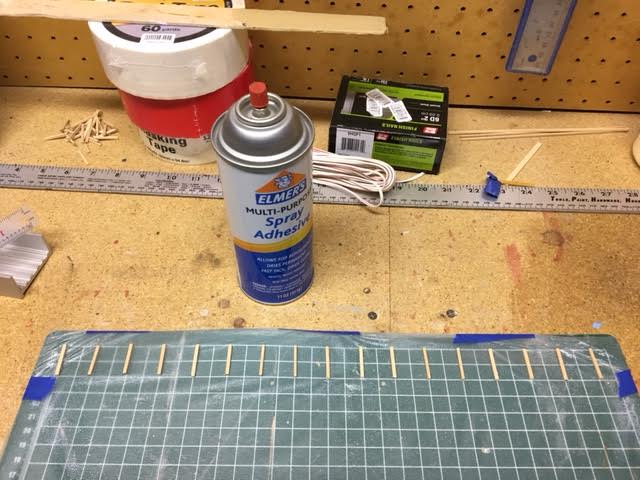
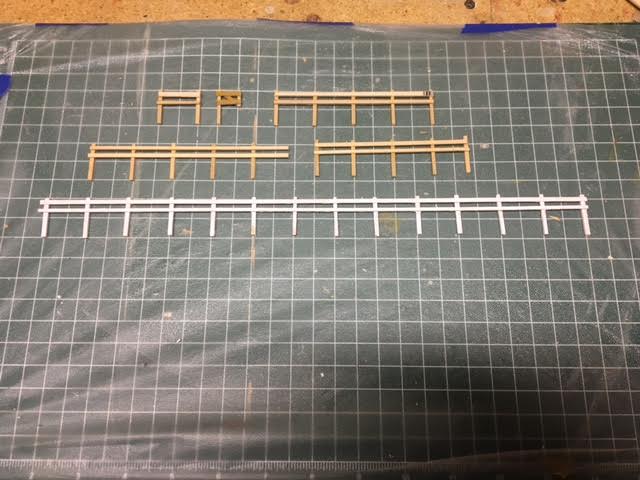
I wanted to make a fence from balsa strips I had, but wondered how to keep everything in alignment.
I have a cutting board with lines on it. I taped cling wrap to the face hoping the wrap would keep the posts in alignment so I could attach the rails.
That didn’t work, so I sprayed the wrap with spray glue. I could then line up the posts and glue the rails to them. When dry I could peel the fence from the wrap.
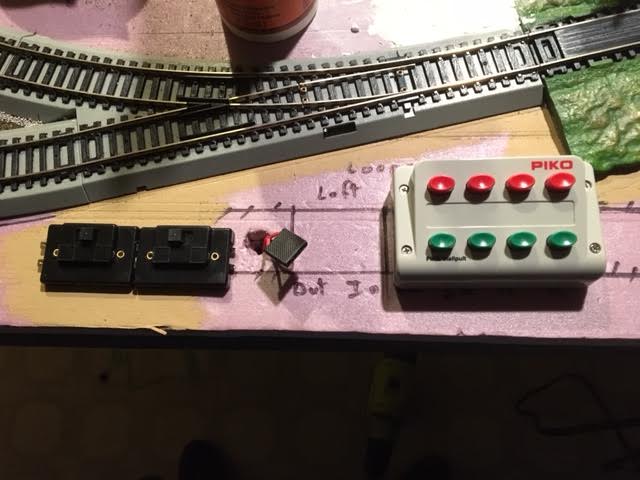
I didn’t like the cheap Bachmann switch controllers that came with the switches, so I bought a Piko switch controller. Much better quality.
I had been using an eye dropper to apply the diluted white glue solution to smaller areas of landscaping, but it didn’t hold much glue mixture.
While at the pharmacy I noticed a child’s medicine dropper that holds up to 5ml. It was packaged with a medicine spoon which I found useful in spreading turf in concentrated areas.
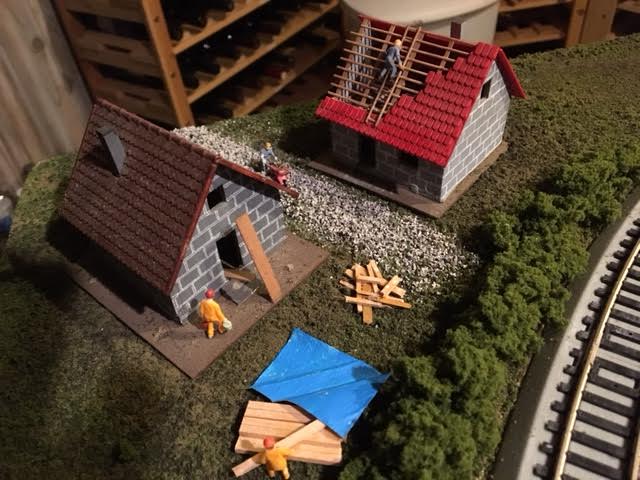
And on the layout, a developer got a deal on some land by the tracks and is putting up two small houses.
That’s all for now.
Jack”
A big thanks to Jack and Lawrence for sharing his suspended model train from ceiling.
And if they’ve inspired you, the Beginner’s Guide is here.
That’s all this time folks.
Keep ’em coming.
Best
Al
PS Latest ebay cheat sheet is here
PPS More HO scale train layouts here if that’s your thing.





Great idea Jack using the spray glue and the plastic wrap. i use a Wax Paper base myself for similar projects. I have used the process to frame model houses and trestles. Wax paper was an item used in the days before the invention of plastic wrap, and tends to be a little less clingy. In case you ever want to repeat the experience, you also may be interested to know that spray glue comes in a less sticky version usually called “Reposition-able” spray glue. Great for us, as it allows easier removal of the fence posts or whatever. It was originally used by graphic designers before the invention of computer programs allowed them the convenience to position their artwork on a screen.
Thank you for your post(s). –Tom
Great ideas…
John
CA-USA
What an idea for a layout -out of the way- good luck to you, its teriffick.
Ninety Six feet is what you call a descent size layout!
Lawrence a 90 odd foot layout in a basement!!!! Mate that`s bigger than the living space in most of our UK homes all rolled together! Lol! Wish we had basements!!
Wow some massive project you have there my friend.
All the very best mate and please keep us all updated with videos and pics.
JohnE UK
Jack. Good methods you use. Thanks, I will use the dropper when purchased later.
Lawrence. You demoed part of my future project of a “hung” layout. Saw these in some restaurants years ago. Had no room for one on old home and no basement. Just moved into new home with both. As you, I have O gauge and the overhead route will be first installation. You rekindled this for me. Where do you live?
Bruce in SC USA
Lawrence: With the track 6 feet in the air, is there a viewing platform that visitors can stand on to bring it up to eye-level viewing?
Lawrence, thanks for bringing this to my attention. We are about to move to a much smaller house with only two bedrooms with no room for my trains. No basement either but it does have a one car garage where I can do exactly what you are doing. Thank you! Problem solved!
Frank, near Mickey Mouse Orlando
The 96′ overhead layout looks to be way over constructed for the roadbed. I have a G scale overhead in my 12′ x 14′ room and the roadbed is made of 3/8″ plywood and has held up just magnificently for the 1999.
Jack and Lawrence, get jobs indeed. Wish I had the room, my wife and I are moving into a smaller place. From a four bedroom house to a three bedroom house. I still have my man cave, the room is a 10′ x 10′ room so with that said, back to the drawing board. I have HO & O gage that I would like to put in that room. Good luck right!! Well I have a plan but we have to move there first. So with that said if every thing goes well, I say by the end of the year i should be starting on my train layout. I keep on reading what everyone has been posting and getting some good ideas. So keep me on the back burner and keep on sending info and you should see me at the end of the year and the beginning of next year.
Stephen in Tampa USA
great idea for the fences. what a way to go a railway above my workshop thanks for the idea. back drop could be mirrors or security cameras down to the workshop computer. just joking how much fun is this hobby.
Hay Jack also try those ear wax removal kits, they have a blue squeeze bulb. I have been using the same one for years. Use white glue mix 50-50 just flush it out with warm water when done. Thanks for the fence making tip. Tom Payson AZ
Great inspiration Jack, I’m trying your fence technique this evening.
Lawrence: Don’t you think that dust might be a problem? I had to move and consolidate my layout from my basement to a spare bedroom because of the constant dust problem.
Regards, Tom (USA)
Love your tunnel! Very clever esp the use of foam to reduce weight, When my Grandson and I built our tabletop layout we were obsessed with building a two level tunnel through a mountain in the corner. This of course tuned into a falls as well. Any one reading this should go to sgintime.com to see pics of ours. As parents and Grandparents we sometimes do not realize how important the memories we create are to our children and Grandchildren. Snapshots in Time: The S&G Railroad is a book I wrote about our journey together on Amazon.
JACK
I hope you don’t ever have any derailments.
At that height it would go back to kit -form. I like the idea of the 6 foot height.
Donj USA
Great, thanks for all the tips. I do have one question: how could I send pictures of my train board ? I have a “N” scale with MGM back lot and town. I have a HO scale with a circus, Ringling Bro.’s unloading, tent is up, in town a building is on fire and fire dept. is trying to rescue two people in windows. I enjoy your site very much.
Great job!! Your inventiveness with materials at hand show through. Thanks for sharing. You have no idea how your posting has touched some of us, keep it going.
Jack…..great narrative and modeling tips…..:thank you.
Lawrence…..great project …….
Leave it to me being critical , Those wooden hangers do look tacky and bothersome. Why didn’t you use ( L ) brackets in reverse, stem down .That’s how i have my shelves in my shed. they come in all sizes and material.
Where’s there’s no wall to connect to then use a threaded rod with cross pieces.
Then you can integrate the rods into the scenery say as a signal bridge or towers
The Critic
Jack, ditch the bachmann track and get KATO! Its the best there is AND the switches are utterly RELIABLE!
Totally Amazed at the 96 ft Hanging Model Railroad! Especially the fact that you have a DEEP Basement. I am in a 102 yr old house,,, with a LOW Basement,
You hit your head if you tried to stand up! Wish the basement was at least 2 feet
lower. I have a buddy who has a G Scale Layout, actually a short straight section Near the Ceiling. There is a Tourist Trap Antique Mall in VT. that has a G Scale suspended ceiling single track layout that goes around the main sales room in the store. Used to have the train running,, now appears just a static display. Same Idea. ALSO Liked the idea of using a “Cutting Mat” with the cross pattern lines to help with projects. Most of us would agree, DUST is a Major Problem.. One solution will be to use an Air PurIfier to get the Dust Out of the Air. ~ Mike in Lebanon, N.H. USA.
For applying white glue solution to scenery and ballast, I looked online for pipettes like those used in science labs, but all the ones I saw were too small: 5 to 10 ml. So I used a turkey baster. It can hold a lot of watered down white glue (or turkey broth when needed.)
As an earlier comment mentioned wax paper, it was predominantly used when building balsa wood plane models and was used over plans that balsa wood parts were pinned and glued in construction. Great stuff, but better for model building than for wrapping sandwiches.
The thing that impresses me most is the creativity of the model rail enthusiasts, it could be replicating a real life geographical area or creating their very own world with their very own imagination. I went out on a limb about 6 months ago and requested Al to show my (6 grandchildren’s) Lionel O Gauge layout, he posted it and to my surprise there were over 40 responses with overwhelming positive reviews. There you have it, the great minds of individuals creating FUN. Some may replicate items to the optimal performance, others may have a figure 8 with a half dozen trees and that’s it……and it may be a highlight of fun and creativity.
A trestle, tunnel, bridge, building, pond, fence or anything else may be critiqued by those who only see through blinders. I say “ ENJOY YOUR EFFORTS!”
They are a signature of your creativity. I have been a faithful reader of this enjoyable modeling presentation for well over a year now. Thanks Al……
Never, never, never has the “CRITIC” posted a single photo of his layout, I have requested to see it at least 3 times….this makes 4…I guess I should keep patiently await his posting……carry on to the Men and Woman of the hobby we enjoy.