“Hello all, from across the Big Pond It’s Jim Volmer Sr. with an new update on my dream layout.
I have finally decided to name the new layout after my best friend. Her name is Starr and she is now eleven years old. Not my child, my children are all grown. NO Starr is my Doberman. Starr is my sweetheart, very loving, and highly protective of me. When my ex-wife would go off and get stupid acting toward me, Starr would go in front of me and sit there, just waiting for her to do something really stupid. Thank goodness, my ex-wife would back down. So since she is my loving companion I thought the best way to remember her would be to name the layout after her, and therefore the railroad will be called STARR POINT, and no, Starr does not know how to point.
Ok now onto the update. The following pictures are of the MOUNTAIN. In the last update I showed the beginning of the mountain shape with the cardboard strips being used. So here is that last picture once again.
The picture does not tell the mere size of the mountain. It measures 4 feet 3 inches from north side to the south side, 2 feet 5 inches deep and 18 inches high. Whew, that is a very big mountain. It contains three portals, and two sets of track, one set that climbs up through the inside of the mountain to the 6 foot bridge that leads to the reverse loop and cargo terminal. The lower track runs through the mountain from the south portal to the north portal, exists and runs along the river that sits in the front of the mountain.
So here is a picture of the mountain with the screen installed and one with the plaster cloth also installed. It took 5 rolls of plaster cloth to cover the mountain and the river area.
This picture is looking back 6 feet ( the distance from the mountain to the end of the bridge area ) toward the mountain.
For the portals of the mountain entrances, I decided to use rock ‘ out cropping ‘ from the old mountain. When I dismantled the old layout, I saved most of the rock out cropping to use on the new layout. I still have to make some to replace the ones I could not save, but that is okay.
The first picture is of the North Lower Portal with the rocks installed. It took approximately 30 minutes to complete this opening.
The picture above shows the South Lower Portal without the rocks installed. I wanted to show how dramatically the portals look once the rocks were installed and how they enhance the opening appearance.
And here you can see the dramatic difference the rocks once installed make the opening stand out so much more. There are many, many other options available for tunnel portals. Since this is a mountain area, what better material to use than rock ‘out cropping’s ‘ made using HYDROCAL. As you will notice the ‘PORTAL ENTRANCE’ that takes the train(s) to the upper level is not completed here. It will be completed shortly and included in the next update.
On the top of the mountain will be trees, lots and lots of trees, along with a HO Lionel operating Radar Tower and some out buildings in “N” scale for ‘force perspective’ It should look pretty neat once it is fully completed.
The ‘river’ area in front of the mountain shown below will include people fishing both on land and from a boat.
I am also going to include HO ROCK CLIMBERS for the mountain. I think it would be neat to have rock climbers climbing to the top of the mountain.
Well that is all for now. In the next update I will be showing the COMPLETED MOUNTAIN less the climbers for now the river completed less the men fishing, HO PROGRAMABLE TURNTABLE, and HOLDING TRACKS FOR THE ENGINES plus much more.
Until then, HAPPY RAILROADING
Jim Volmer Sr”
“Hi Al,
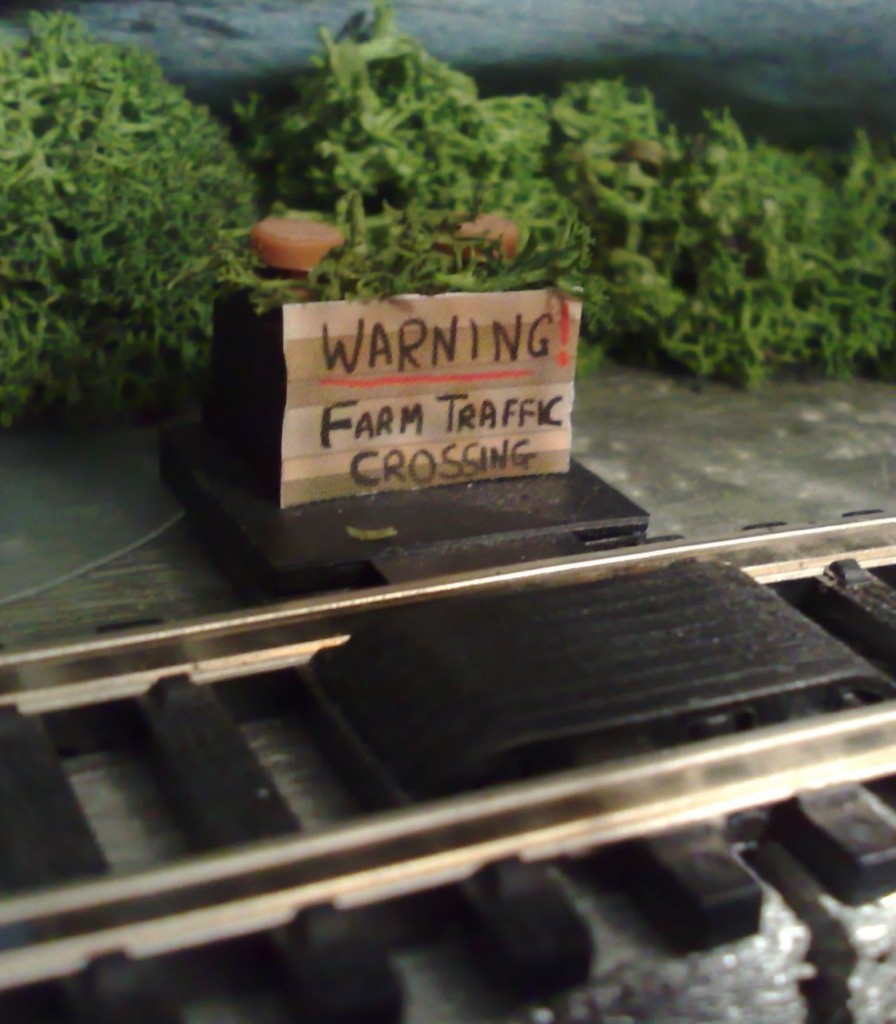
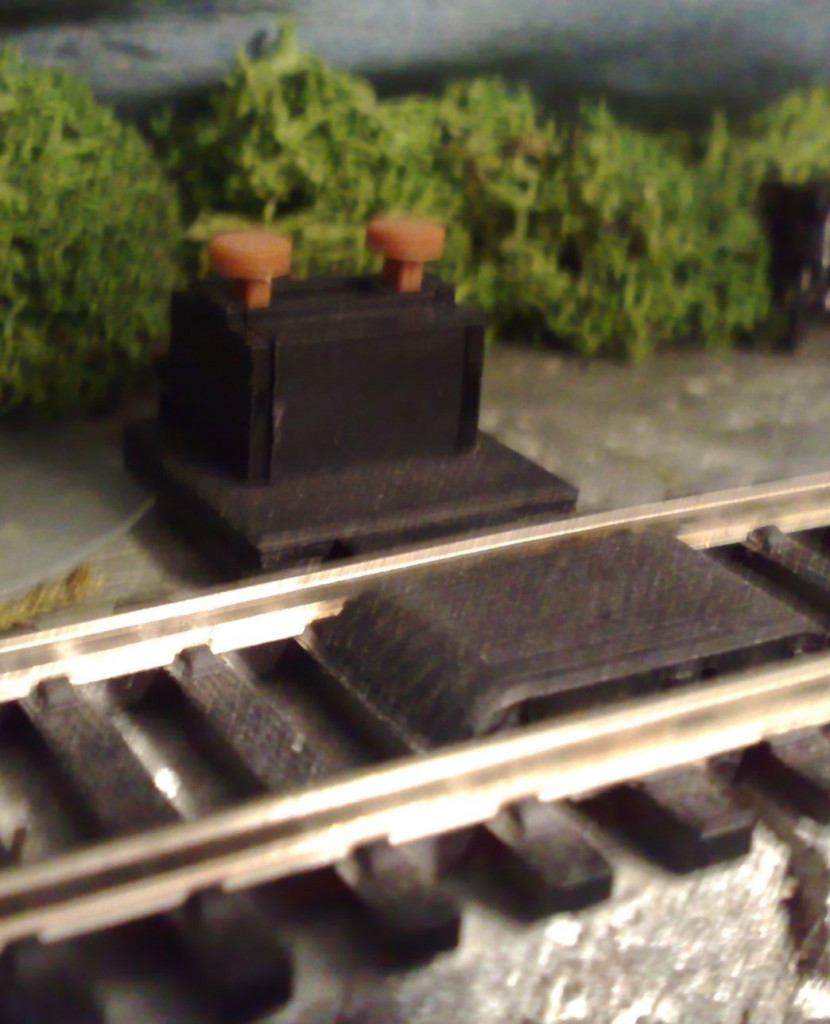
When I started the Railway In My Wardrobe, I was a complete novice and not interested in scenery. So I got a standard Hornby power rail. However, when I started adding scenery, the bulky power rail became more and more of an eyesore. I don’t have room to put a building over it. And I can’t change it out for soldered connections without dismantling the entire layout!
However, with a bit of signage on the front and some greenery on top, it becomes a raised flower-bed with marigolds. Well, almost!
Thanks for all the news, grand job you’re doing!
Robert”
“Hello Alastair,
I would like to take this opportunity in thanking your wonderful readers for their nice comments regarding my “Byodo-In 360” project.
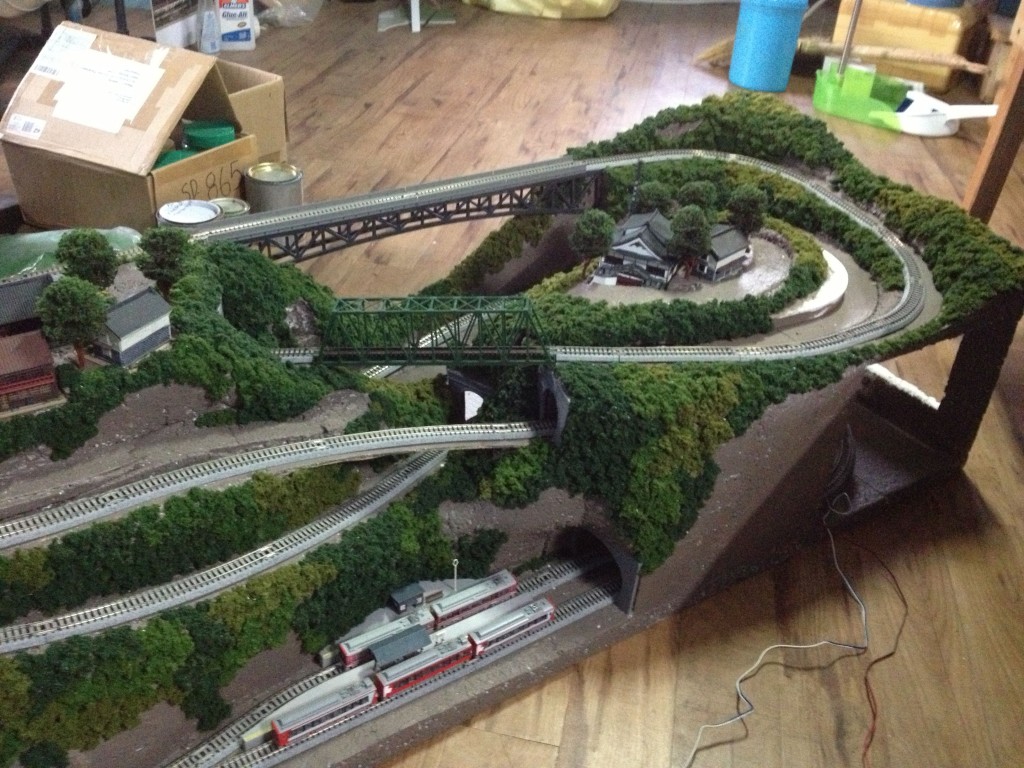
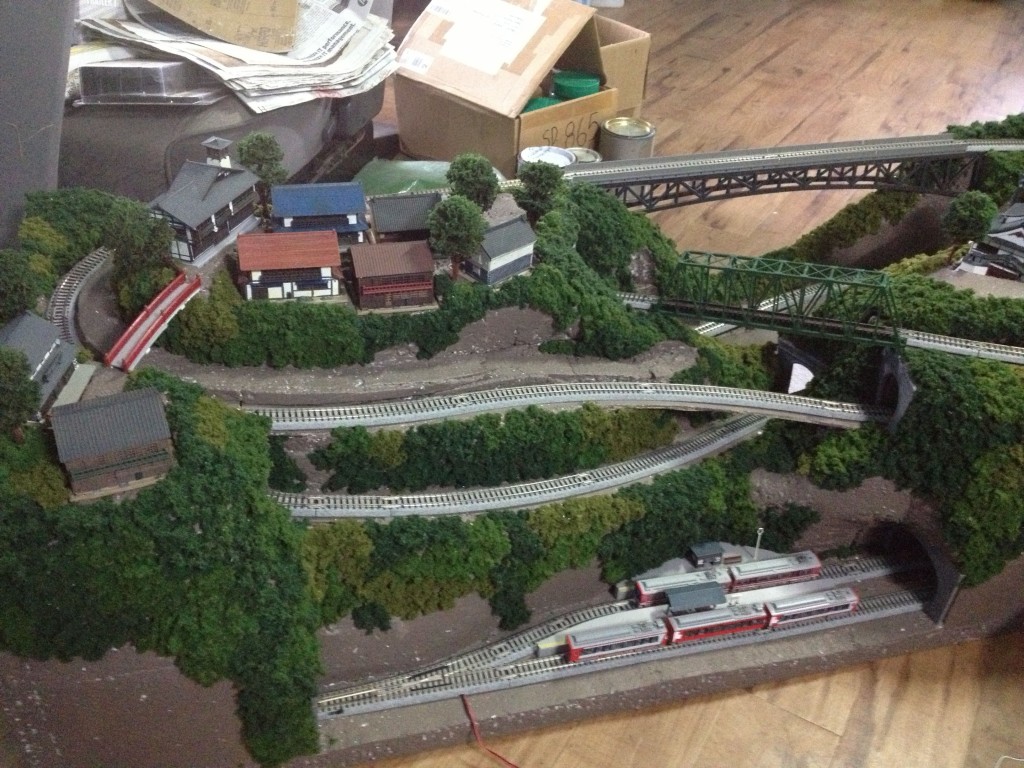
I, again embarked on another “intimate layout” project with the challenge of placing more tracks for a longer run time – but in a limited space. With a footprint of 19″ x 55″, I thought that the only way to go was up to achieve the challenge thus the mountain layout was conceptualize.
Being a member of JNS forum modeling Japan railways, I have always been inspired by the “Hakone-Tozan Railway” – a real mountain railway in Japan utilizing specialized trains to handle the very steep inclines and tight turning radiuses of the railway. While my project is nowhere near prototypical, I did adopt steep inclines and tight radius tracks (R-150mm / 6″). Height of the top tracks is at 14″.
Both Tomix and Modemo brands offer Hakone-Tozan themed trains, so they were perfect to use for this layout.
The whole layout is made out of 1″ thick white styrofoam and was brushed on with “styro-skin” for stiffness. Ground was painted with brown flat wall enamel before applying the foliage clusters. The layout has an open back and open sides for cleaning and maintenance of tracks.
In addition, both mountain tops are easily removable by pulling up to reveal the tracks that are inside the mountain – again for cleaning, maintenance or derailments.
Obviously, there’s still lots more to add like vehicular roadway, people, various grass blends, etc. so this project is far from being done. And While I initially began this project as purely experimental, it certainly has been a very enjoyable experience thruout each process as well as a good learning tool to do on future layouts.
I am enclosing 3 pics for your perusal as well as a video.
Alastair you have done a great service towards our hobby and I wish you the very best!
Mardon”
Big thanks to everyone who contributed – hope you enjoyed this post as much as me.
That’s all for this missive my friends.
Please do keep ’em coming.
And if today is the day you get started on your layout, the Beginner’s Guide is here.
Best
Al
PS Latest ebay cheat sheet is here.


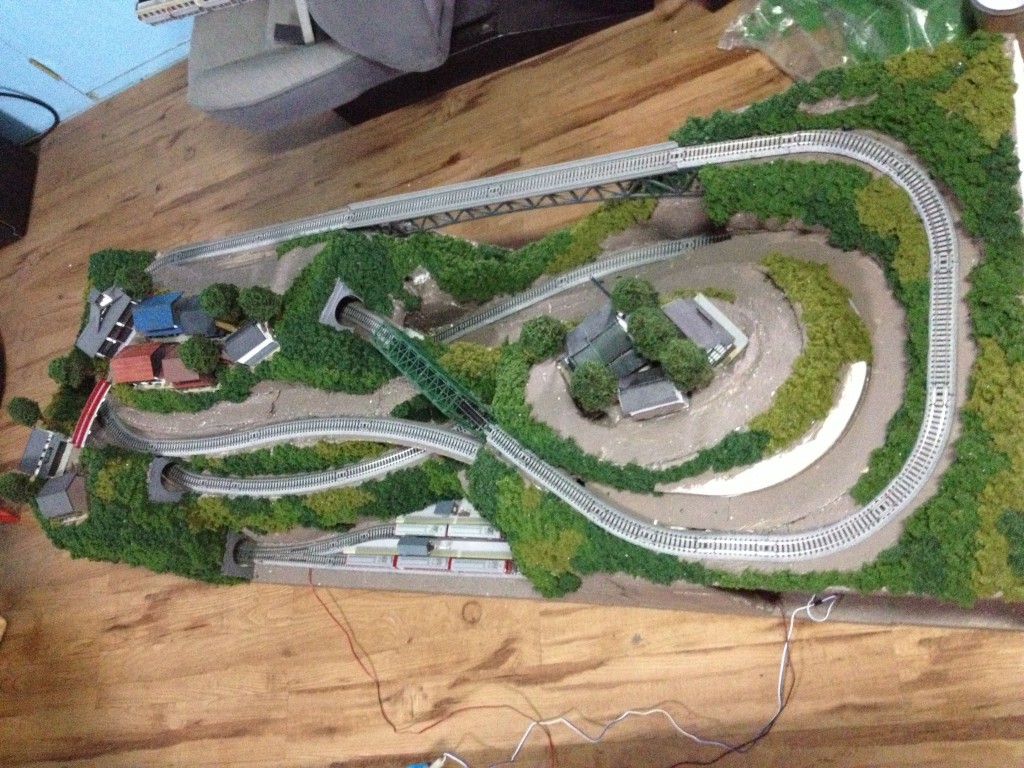

Nicely done Mardon. You have most all the goodies laid out very well. Looks like you have a fine eye for detail and layout design.
Jim & Mardon,
Fantastic layouts!! I have never modeled a mountain of any kind. Being a collector and hopefully a future modeler, how do you reach, God forbid, a derailed train in such a large structure? When I did model, 50 years ago & HO scale, I never entertained the thought of mountains.
By the way, thanks Alistar for providing this platform of professional modelers for rookies like me. Great job to both Jim & Mardon!
Mike Luhouse
What a nice start on your layout Jim,I like the story about Starr .Send us a pic…I have a very sweet ,,smart and loving pit bull that does that same thing..Her name is tootles…Love her…Sorry about changing the subject…..I have had five or six layouts,while I was in the US Navy…Have a 15×13 layout upstairs but is hard for me to get up there now that I am 68..Its all NKP….HO…With the US1 trucking slot cars for the highway…Later
Lovely story about Starr! And I like the rock climber idea. In San Diego there is a large HO layout including a railway line and trestle over about a three foot canyon, with a line of rock climbers climbing from the bottom to the top – where a railroad official is pointing to a sign saying “No Trespassing” and obviously telling them to go back down again…
I for one am looking forward to seeing the TURNTABLE layout. I have put off building my turntable until I see more examples. I know all the mechanics of building one, but the scenery around the table itself is just as important as the table itself.
Thank for all the great ideas from so many different craftsmen & train enthusiasts.
(Ringo) Starr was the original narrator of the Thomas The Tank Engine TV series!
Mardon What a layout!. Not only have you built a spectacular layout but it does give a great impression of what I for one would picture a Japanese mountain railroad to look like in full size original. It just oozes realism in the scenery and layout. You have created a layout that gives the viewer many items to attract the viewer and keep there interest. Your pictures confirm this and I bet to be able to look at the layout from different sides adds to the viewers pleasure.
Jim That’s some mountain your creating on your layout, Its huge.I would make one comment. The size of the stones particularly around the tunnel entrances do not appear to be in scale with the gauge of model you are creating. Certainly large rocks, and bedrock could be very large but the stone used around tunnel entrances would be much smaller and to scale. The rocks you have applied would weight tens of tons if not more and would be i) almost impossible to move and ii) would require such massive foundations as to be impracticable in a restricted space site on the side of a mountain. The large ones at the top of your entrance would at the very least prove to be a danger in reality and would have been removed when the tunnel was constructed. Please take these comments as they are meant to be constructive. It is important that we think about scale before we start to construct, especially scenery.
What manufacturer makes a programmable turn table.