“Hi Al,
Never done an entire loco thank heavens, the time commitment must be huge, but I have had to make a couple of simple chassis sort-of from scratch, albeit using commercial axles, wheels, gears etc.
The first was to replace a cast whitemetal chassis block in a loco kit which seemed to have been cast with the sides at an angle to each other, quite unsalvageable. I had tried sending it back as a complaint only to be told the pre-drilled axle holes were “supposed” to be breaking out through the bottom of the casting on one side “to make it easier for you to fit springing”! Yeah, right.
The second one was because a mate turned up with an old K’s kit of a GER tram-engine (like Toby the tram engine) which wouldn’t run. All it was, the body was a little low one end and the cowcatcher was fouling the rails and shorting out.
It just needed a little Plasticard pad sticking onto the chassis mount, so I did that, held it in place for a count of thirty, said “There, fixed it!” and whipped my fingers away – needless to say I had superglued the plastic to a bit of skin as well, and the whole chassis flew into the air, tore the skin loose, and fell to the tiled floor with a resounding bang.
It was one of those old K’s ones with the motor sides and bearings glued together and integral with the frames, so a total write-off (I couldn’t get the motor to run again properly, although I did try). You should have seen his little face, a proper picture, so I had to replace it.
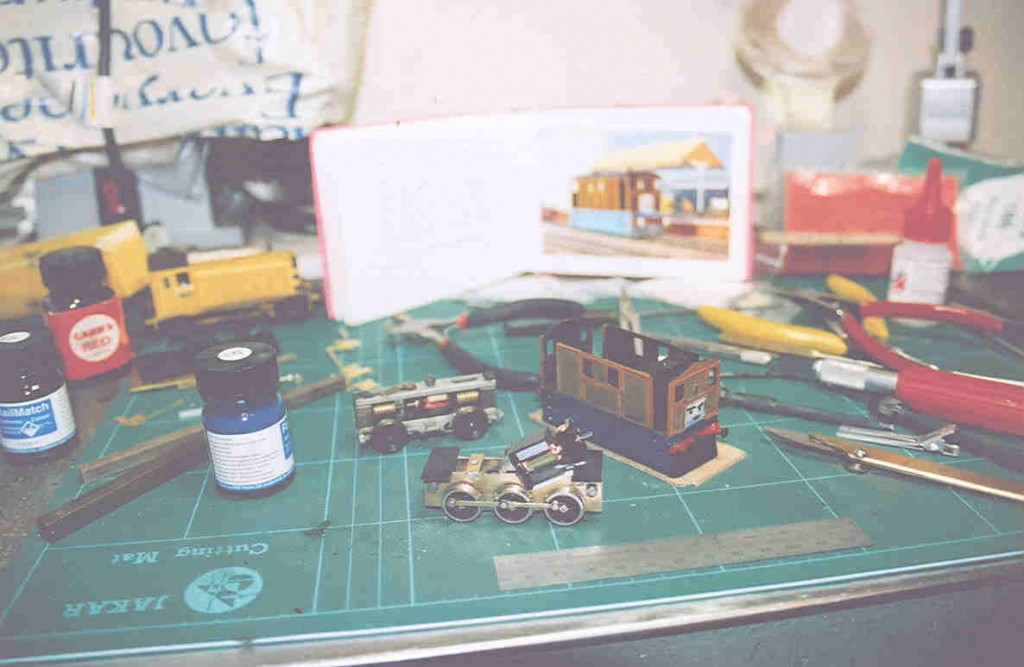
The replacement was made from 16th brass frames, bolted together for drilling of axle positions and tube spacers, and fitted with flanged bearings, reamed for Romford axles.
The old chassis was a four-wheeler but the real things were six-coupled so I thought I’d do it right, although there was no point adding cylinders and running gear as they would be behind the side-skirts.
I used a Branchlines slimline gearbox/motor mount and a Mashima motor, and added little black ‘platforms’ either end to form floors for the driving cabs. For some reason, the model had never had a chimney, I think the real ones were just stovepipe-type but all I had in the junkbox was a cast one for a GWR King, so that had to do, capuchon and all. That was a bit of a departure from prototype, so I painted the finished loco blue and brown and moulded a little face onto the end in low-melt solder, sculpted with the iron and a bit of chasing with a ball cutter in the minidrill – great fun but wear goggles.
The photo shows the new chassis in the foreground, the reassembled old chassis and tidied-up body behind, and a Reverend Awdry book for livery reference!
Rod”
“Hi Al
A short video clip of my double headed Heisler logging locomotives running on my layout.
An experiment that worked out. Was not sure how to get double headers on my DCC system until a friend helped me out.
Many thanks and all the best.
Brian”
I always look forward to Brian’s mails. And what a layout!
Latest ebay cheat sheet is here.
Best
Al
PS Want three times as much as content? You need the Golden Key. See what it’s all about here.


loved the Heisslers good job and as to the repairs and remakes . it just shows what can be done if one tries . Nice
Rod, I came I saw I conquered. Absolutely fantastic!
Brian thanks for the video
Thanks Al for bringing this all to us.
best regards,
Tom
Like your toby, they did come in both 4 and 6 wheeled versions in real life.
THATS A VERY GOOD LESSON
Hey, Rod, I can do that, too … I’m referring to the part when everything gets smashed to smithereens … Other than this, I don’t share your excellent skills – too bad bad for me!
I would really like to see Brian’s double loco pulling some cars up a scenic hill … I’d print that for my hobby room wall. Very cool.
great work nice when what you want to do comes off well done.
Fantastic story on the tram engine….
Nice work also….