Jim’s been back in touch – this time with his HO scale truss bridge:
“Hi again Al & model railroad enthusiasts.
Jim from Cape Breton here with Part #5 of my HO scale train layout & I noticed in the last posting, a question was asked about the access bridge on my layout.
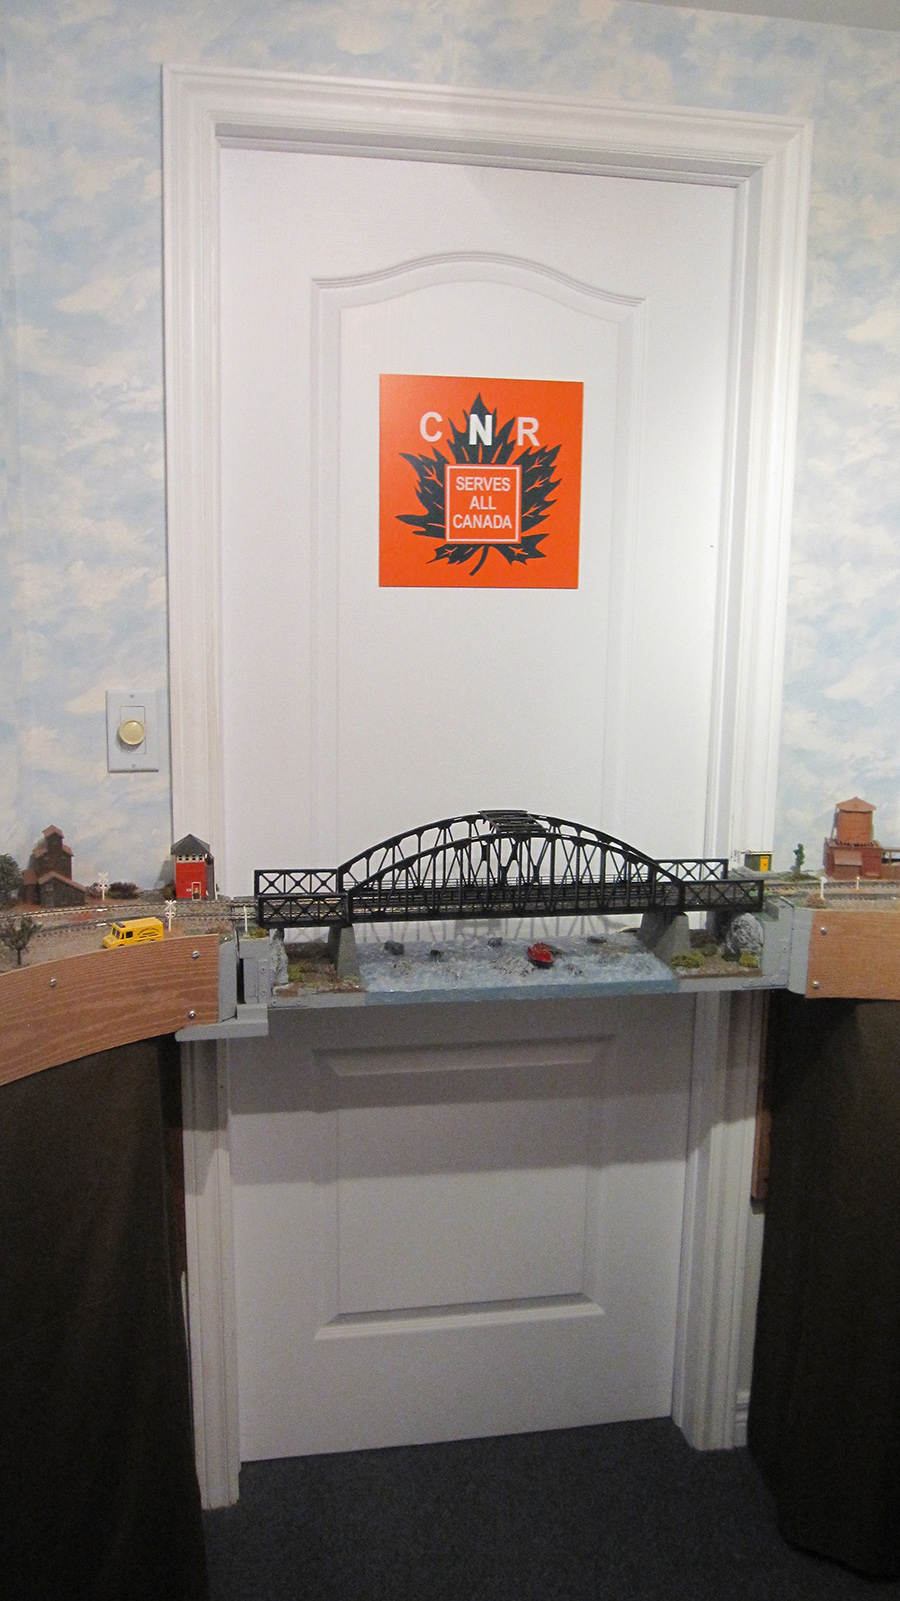
I’ve included some pictures as a reference. It spans the door opening to the layout room & the entire structure is 29” long x 8” wide x 9” high & is fastened at one end with two 1¾” hinges.
At the unhinged end are 2 small blocks of wood nailed down on the retaining wall which serve as alignment guides when the bridge is lowered into place. When opened by hand, the bridge angles back approx. 120° & rests against the wall.
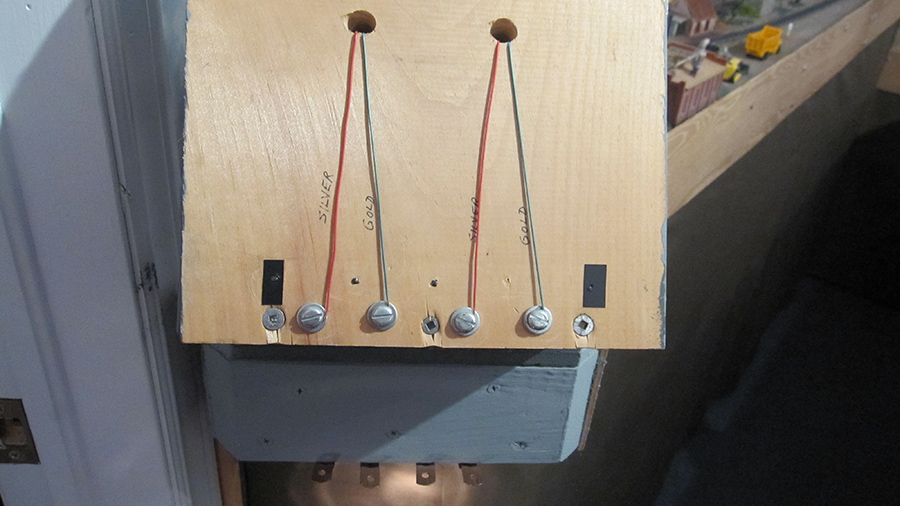
Power wires from the 2 bridge tracks are routed through holes to the underside of the bridge & connected to 4 screws (2 for each track crossing the bridge). Power wires from the approaching track at the hinged side of the bridge are routed underneath the layout to 4 flattened copper pipe straps that stick out from the bottom of the retaining wall, so that when you lower the bridge by hand, the 4 screws contact the 4 copper straps & voila, the electrical connections to the 2 bridge tracks are attained.
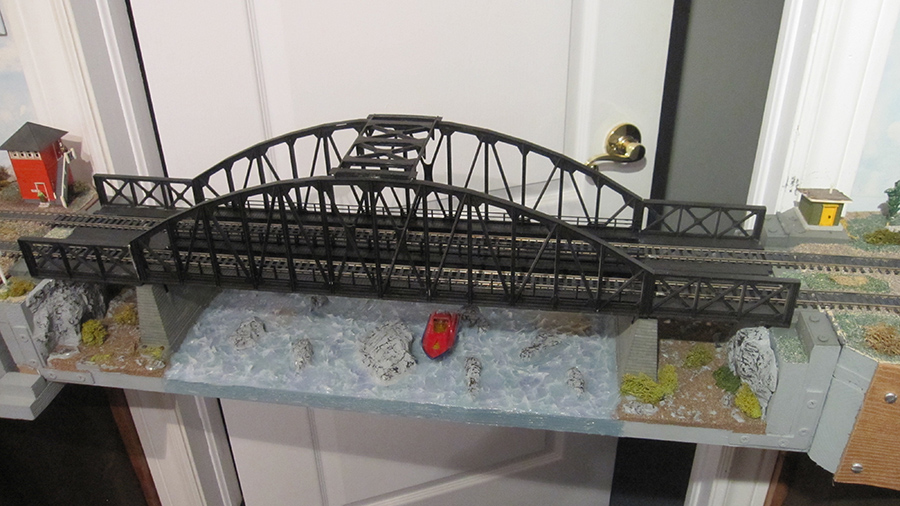
The actual bridge itself was an Atlas single track plastic kit that I split in half lengthwise & then glued other pieces of plastic together to widen & turn it into a 2 track bridge. It was then placed on it’s plastic abutments, also split & widened, into a wooden frame made to look like a river bed with retaining walls at each end of the bridge.
The layout room is 12’ x 14’ but the entrance door to the layout room is approx. at a 45° angle to the room, so it was a bit of a challenge because there had to be a curve in the track both leading up to & after the bridge.
The white-water rapids below the bridge were made with clear silicone caulking & some white fibrefill using a brush to whip up the waves before the silicone set, as I also did for the waterfalls behind the curved wooden trestle on another part of the layout.
The silicone caulking worked really well, however, a word to the wise, use gloves & ventilate well while working with it & then leave it for a day or so to let the odours dissipate.
This access bridge, when lowered, completes a 2 track mainline that enables me to run trains all the way around the outside perimeter of the layout. I hope this will be helpful to any modellers who are looking to span a doorway to their layout.
So, until next time, keep ‘em on the rails.
Jim.”

Now on to Paul:
“Hi Alastair,
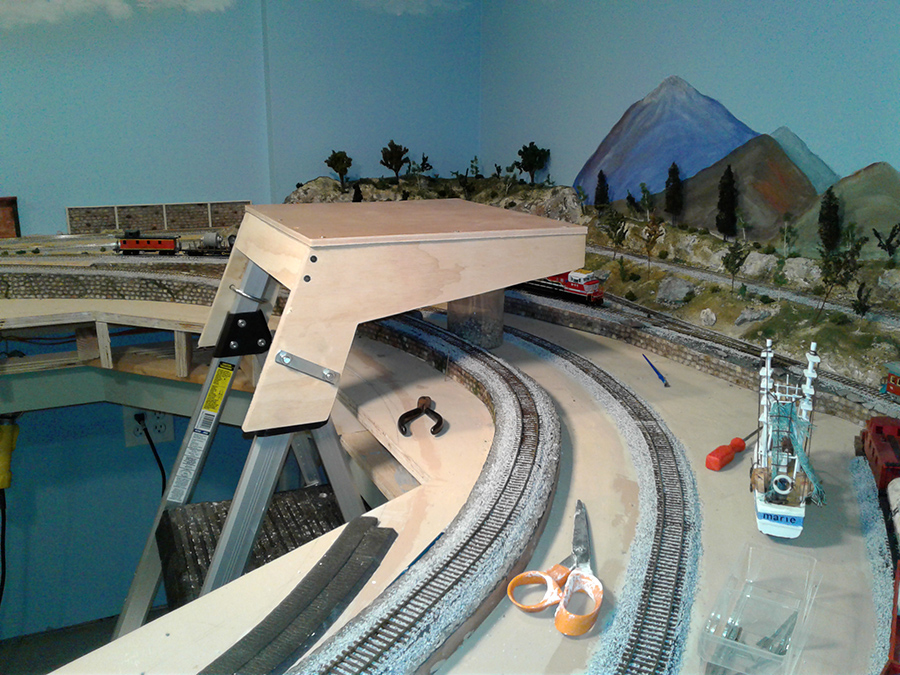
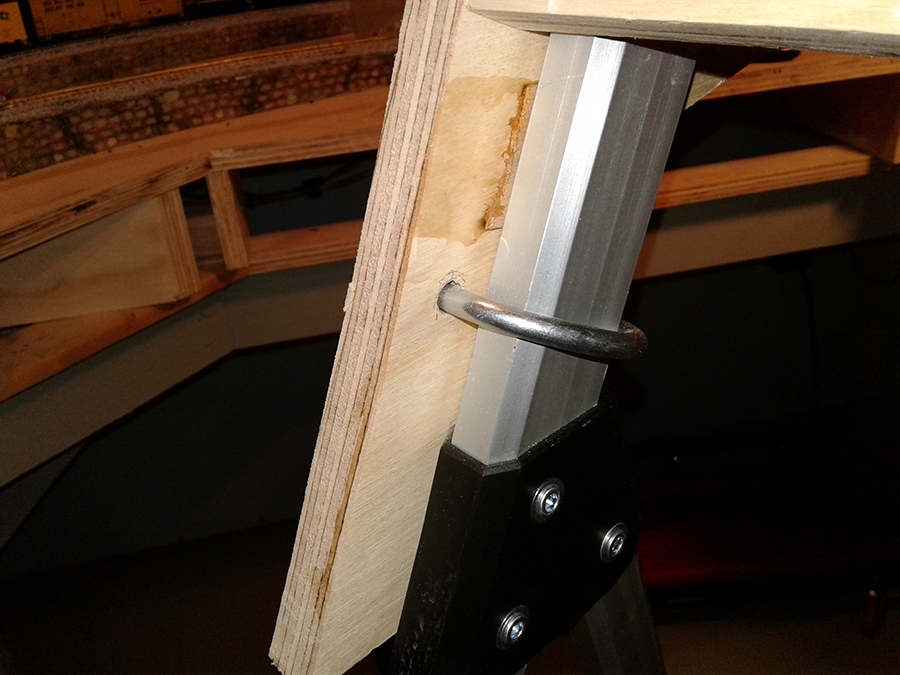
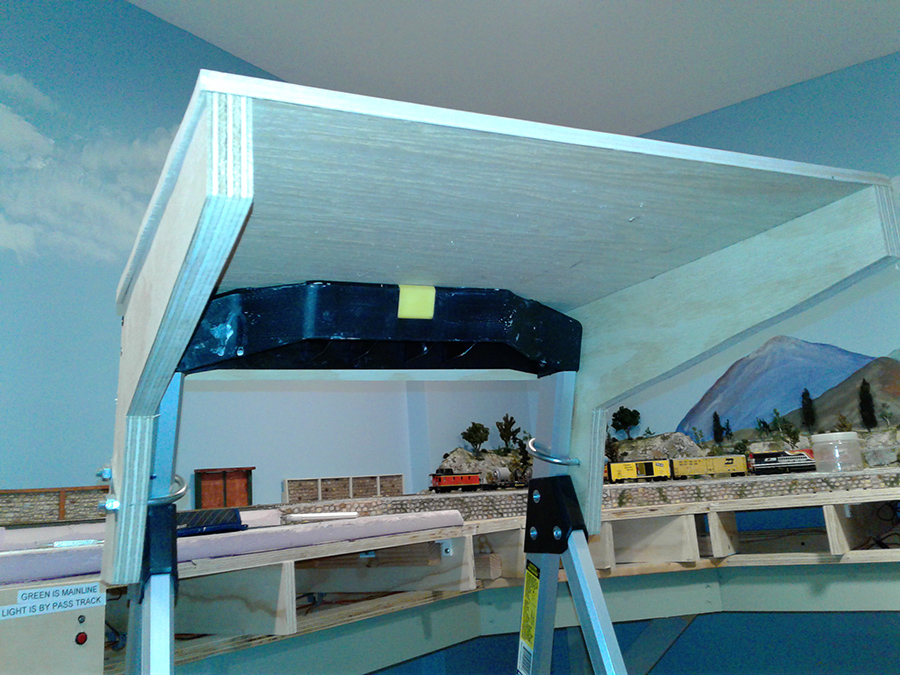
I am sending 3 photos of an adaptor I added to a Home Depot ladder to allow me to reach over my layout work on items in the back.
I did not invent this but I am cheap and didn’t want to spend $270 for the commercial version.
The ladder at Home Depot costs about $35 and the plywood and U bolts I had. The photos should be sufficient to show you how it is made. It took less than an hour.
Enjoy,
Paul”
A huge thanks to Paul and to Jim for sharing his HO scale truss bridge – both are very inventive and clever.
That’s all for today folks.
Please do keep ’em coming.
And if today is the day you get started on your layout, the Beginner’s Guide is here.
Best
Al
PS Latest ebay cheat sheet is here.
PPS More HO scale train layouts here if that’s your thing.


Hello Paul, that’s a great job on the ladder.
Hello Jim, great layout with many many trains running
Thank you both for sharing
Cary B
The hinged bridge at the doorway is so cooool.I really enjoyed Jims layout. Plenty of action and some really nice trains and buildings. thx. Farmer AL
Very clever ideas today!
The ladder is a well conceived idea for those with deeper layouts.
The bridge showed me a solution I wish I had thought of with a layout I built about 15 years ago…
John from California
Great ingenuity from both of you. I have a similar issue, Paul and I just might try your remedy.
Jim AZ
Door bridge – very clever!
A great idea for the ladder extension.It will solve a problem for me. a word of caution: Don’t build the platform too far out over the front legs of the ladder; It might cause it to tip over when leaning far over.
Thats a sweet bridge and lift up opening at the door.
The ladder over the layout. I saw that idea used on an O gauge layout in a barn.
Iboth ideas are beautiful. Old ideas can be revived and improved.
Keep thinking, and keep the trains on the tracks.
Paul, thanks for the idea.
beening new to model railroading I would like to see more detail of the bridge that you have at the door how you did it thanks
joe-CO
Nicely done.
Lucky that the door opens outward into the hall. Most rooms have doors that swing to the inside.
Marvelous info today. love the ladder addition and the kitbashed bridge with flip hinge system. Wish i had thought of the kitbash instead of dropping 90 bucks on that Central Valley one…but need something for otherside and had been thinking about a couple of Faller kits so I will look into the Atlas now
Genius…..love …. love the bridge as well
Hello Allstar, thanks for being there from us all. You are doing a fantastic job, Thank You.
Paul, great idea for the ladder bet, I just might use it. I have some places I will have to reach in the corners of my lay out.
Jim, I lime you idea also, my fathers lay out had a bridge to enter his command space. I like you idea to have scenery under the bridge, I will be using that idea to enter my room. I have a 10′ X 10′ room, I just started my table, 2 X 4 cubes. Keep on railing and keep them on the tracks.
SDG St.Petersburg Fl USA
PLEASE … will someone explain to me WHY do people think they need the HORRID SOUND on their train layouts ? It is DEAFENING !
Great ideas on the bridge and it looks great.
FYI I believe the ladder is called a “Paper Hanger’s” ladder for those looking elsewhere than HD. They are shorter than the usual step ladder to allow the wall paper hanger to maneuver a bolt of wall paper into place with out snagging the ladder.
Very Nice. You’re not cheap, yo’re Frugal.
The “horrid sound” is most likely due to a couple of factors, the low quality mic on most phones, and the acoustics of the layout room. Not everyone has the time or skills to edit their video, so they upload the raw video. I usually mute or turn my sound down and enjoy seeing what they have created.
Jack, So CA.
I have a few locos with sound which are turned off. Seems like the O guage make enough noise even on top of 1″ insulation board. When visitors stop in it was becoming a shouting match. The sound is nice but with five going at once. Yikes!!!
Now to the important part. As always fantastic information in both ideas as well as pics and videos. Much talent now if I could get some it! LOL Thanks to ALL!
I’ve been wanting to have a ladder with a reach over but the ones for sale were very expensive. Your post was just what I was looking for. Also, at some point I will need a removable bridge for access. Another great tip. Finally, nice video.
Paul –
Great Ladder, Great Idea. I have the same issue with my layout. I’ll be building you’re access ladder shortly.
Thanks
John
VERRY NICE I LOVE THE LADDER !!!!!!!!!!!!!!!!
Great layouts, I started in HO way back in the 70’s,when I had three little boys.
As they grew older I had to “mothball” my RR. Now in 2017 , I’m retired,and caring for my ill Wife . I have had to catch up, but I was supprised at the increase in costs,especially Locos,and DCC,WOW ! The gentleman with the first layout said he hasn’t got his RR finished ,and he has been working for 9 months. I have been
Working on my RR for two years, and have nowhere as much done on my layout!
He has done a fantastic job. And the bridge over the doorway is GREAT ! Well
Done by both modelers !
Paul, very creative ladder and well built! Necessity really is the mother of invention!
In some plants that I’ve worked, modifying a ladder is a big no, no, so I may be overly cautious. Yours looks stable enough, watch your balance and stay safe!
Jim, Considering a swing bridge walk-way myself for an indoor G scale loop. Like what you’ve done and curious from you and readers if anyone has tips on getting the rails to line back up easily when the bridge swings into running position.
Cary in KY
That is a great tool for reaching the back of the layout,great job.
Thanks for all the comments about my ladder adaption. It is quite sable, but you can add forward runners at the floor to hold up the front from tipping forward. It’s amazing that I got more comments this time then when Al ran it a few years ago.
I bought mine and I love it when I need it
Hi Paul,
I am a 75-year-old HO model railroader. I started modelling in 1972. That is a great addon to your ladder. I have the commercial ladder, that works very well. But, storing it is a problem. I don’t use it very often. If you use a ladder, then you can just remove the addon from the ladder a store and use it as usual.
I also have a lift bridge made the same as yours. I guess we both got it right.