Mike’s been back in touch with more on making HO buildings from scratch.
He sent me quite a few emails, and I managed to miss these (I think I get a gazillion emails a day).
“Good morning Alastair:
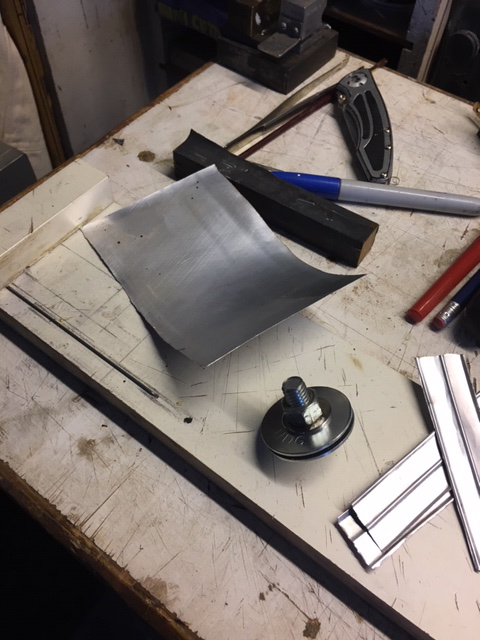
Here is the jig and roller I made to create raised rib roofing. The aluminum is a coke can, the jig is a piece of 18 gauge wire. The roller is a bolt with three washers. Time consuming but works well. The result is used on the “O” scale building.
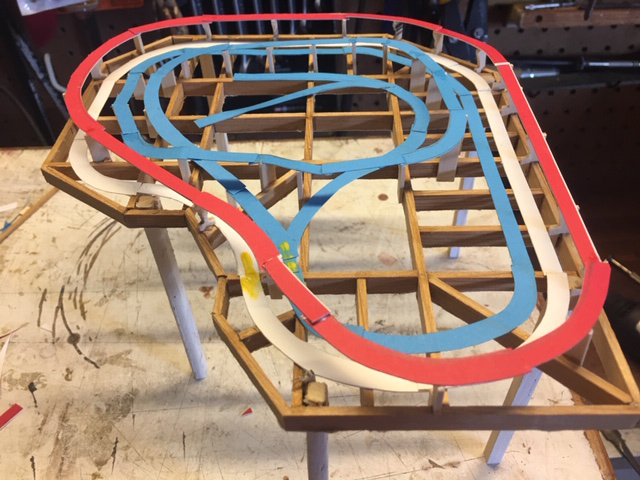
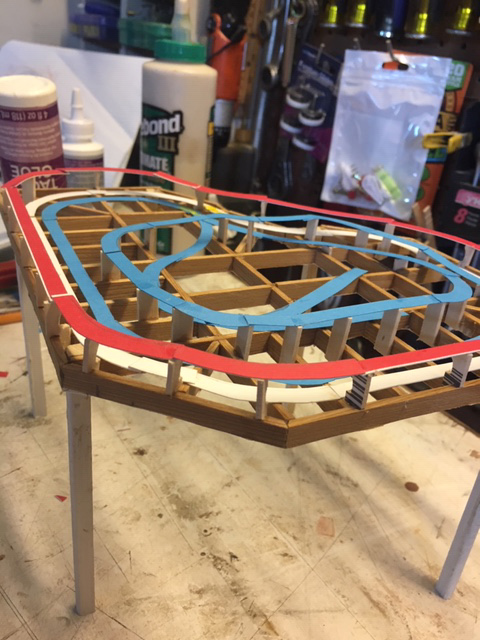
This small model gives me a better idea of flow and structure. The actual lay out will be 90”x90”..
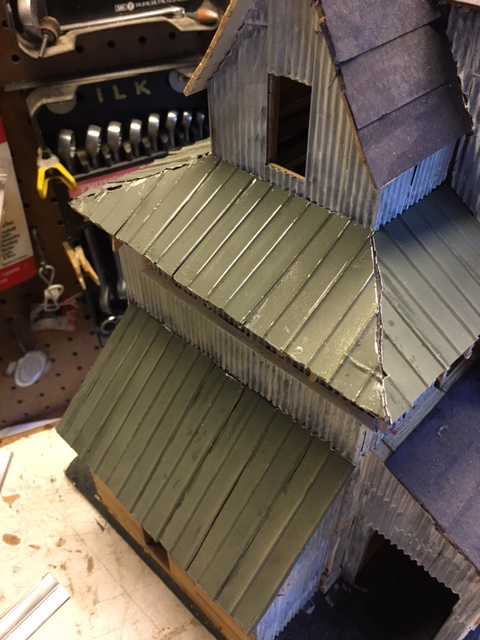
I just completed this after more than 10 months. It is an actual building in a town called Western, Nebraska. The building is an abandoned old feed mill.
I built it to capture the patina of this great old building. This is actually in “O Guage”.
I built the Skelton like a timber frame to skin the building. I completely sheathed the structure before putting the corrugated siding.
The siding is aluminum from soda cans. I cut the cans open, flattened and corrugated with a scrap booking device. The standing rib roofing required me to make a fixture to hand make each one.
Again, the soda can is the source of the Aluminium. I made all the windows and doors from scrap wood. The power pole is a chop stick with electronics parts from and old computer to represent the power transformers.
This one was labor intensive siding the underlayment, make each corrugated siding and roof panels.
The separating funnels Are dowels I turned down on my drill press.
Cheers,
Mike”
My word – amazing stuff. Just loved what Mike’s done with his abandoned mill – so much character.
Just goes to show when you get your thinking cap on, making HO buildings from scratch is easy.
And how clever to create a ‘study model’ for the layout too – it’s like a mock up of the track plan.
Can’t wait to see this layout progress. Fingers crossed Mike will keep us posted.
Please do leave a comment for Mike below!
That’s all for today folks.
Please do keep ’em coming.
And if today is the day you get started on your layout, the Beginner’s Guide is here.
Best
Al
PS Latest ebay cheat sheet is here.
PPS More HO scale train layouts here if that’s your thing.


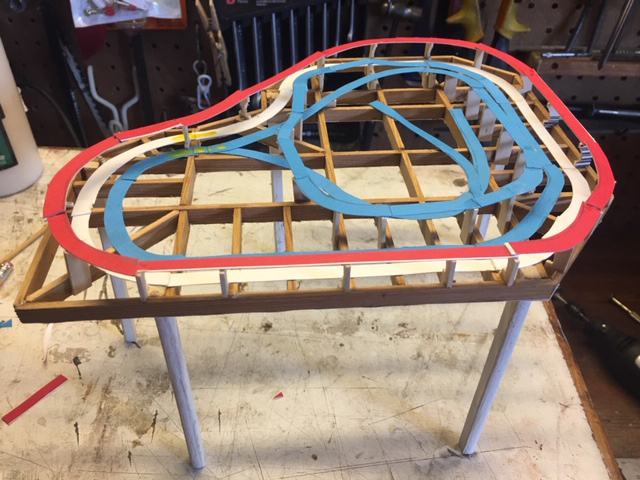
For a reasonable sized space, that track plan squeezes in a lot of track but doesn’t seem to have much operating potential. The red and white circuits just seem to go round and round with no connection to anything, and the blue offers only two short Spurs, enough to do a little switching but not to store full trains. I think you’d get a bit fed up with watching the same few trains just chasing their tails quite soon. If it was mine, I’d be thinking to make it one longer line with a couple of passing loops so trains could run both ways, meeting at the loops. With DCC this also offers the challenge of avoiding a “cornfield meet”!
My only thought about the ‘test model’ is that it would probably be better to have the red circuit running at a lower level rather than a higher one, as at the higher level
1) it makes the inner circuits harder to see.
2) it gets in the way if you need to access the inner circuits
3) whilst it is/was relatively common to see railway lines running on a hillside at different levels, it’s quite rare to see railway lines at different levels inside a hollow (apart from slate quarries, I can’t think of any).
Love the ribbing tool. I model in 4mm scale so a bit of dimensional adjustment and I’ll borrow the same method for my own models. Thanks Mike.
Ant.
The making of the corrugated siding is not very clear. It seems as though some photos are missing. I recently saw a way to make this siding/roofing by using a tool that artists use to squeeze the last bit of paint from a tube of paint. I haven’t tried it but these roller /squeezers are available on Amazon for about $10
Mike, I think your track layout is fantastic! I’m not a perfectionist like the other submissions are. I have two ovals going in opposite directions and that’s all I need! It gives me relaxation and enjoyment.
Frank from Clermont FL
Mike
Consider putting in a link between the blue and red where they nearly meet at the waist of the layout (far middle as we view the photo) it will allow you to get trains on and off of the upper loop and give the blue trains departing grand central somewhere to go on their journey through life. Returning later by the same connection or even one on the other side. This will more than add a bit of interest in the operation as you could even then plan a short timetable to run too.
As for the corrugated soda can idea. That’s a cracker! Cheap washers of the correct size for any scale. The result looks awesome. Well done.. O shall be ferreting that one away in my memory for later use when I get to the buildings in the Coliiery Yard.
Regards
Malcolm Hodgson
North Wales
Would love more information on the scrapbooking tool that you used to corrugate your cans (also for the paint roller/squeezer). Most of my models are 1/4 inch scale so this would be very helpful!
Would also like more pictures of your old mill.
The work you are doing is great — Inspirational!
John from Cali
Your use of soda cans is shear genius, and the results are spectacular.
A great way for recycling. I’m going to start drinking more soda.
I like the shape of the layout. It looks like an open piano or harpsichord frame!
just looked up paint squeezers and all seem to have ridges going wrong way – across not around the rollers
Mike–from the track plan it looks like there is a reverse loop on the blue line. Shouldn’t be a problem with O guage but in ho or n it would require a polarity change (and I hate those).
Otherwise an interesting layout but I do agree with others there should bee a connection of some sort between layers–just for the heck of it.
Terry/Idaho USA
While criticism is always going to happen, constructive criticism is important. The purpose of my layout and restrictions on space determined what I COULD do. The final layout is CLOSE TO THE STUDY MODEL but changed slightly. The model did not show the two cross overs between the white and blue loops. The blue loop runs parallel to the white. Then the blue loop turns out and up around the rail yard. The upper red loop is actually two loops, wired to run in opposite directions.
Since I have a small room, the size of the layout was held to 48 square feet. It was my golf room converted to my train room after I retired as a golf instructor. I might have done some things differently if I had to do it all over. My purpose was to enjoy the building, scratch building and running of SOME of my trains. It would have been nice to have the luxury of a 12 by 20 layout…. But I didn’t take my family room away from my family. What some of you didn’t understand… my goals are met with what I did. As far as bored watching the trains just run in circles… not at all. I have 44 locos and 120 rolling stock. I enjoy just putting out consists and changing them out frequently. I’ll send a photo of how I display/store my trains. And the finished layout. My layout is more art than toy. Cheers to all and be an encouragement to others to enjoy the hobby. My layout by being published by Alastair led me to a local guy who only does Lionel O Scale. I am currently helping him create his layout to replicate the detail in my HO. That is what this hobby is.
Your railway, your rules, as the saying goes. If it suits your space and makes you happy, that ticks all boxes. Just trying to be constructive and wishing you joy of it.