“Hi Alastair,
Our layout is an S Gauge, built around the 13 X 15 foot room using L-Girder bench work.
No reach is longer than 30" so we can get to any item easily.
You get into our center operating area by opening a swinging gate track bridge, swinging open and closed with a 12 " piano hinge.
We have modeled our layout after my hometown of Quincy, Illinois. USA. Quincy is in the middle of Central US farm country and is also the Q in the old CB&Q Railroad in the late 1950's and early 1960's.
My grandfather worked for the CB&Q for 40 years, twenty of those years as a fireman on the left side of the engine and 20 years as an Engineer on the right side.
As far as our layout is concerned I find that visiting engineers (especially the younger ones) want something to do when they visit your layout and not just look at your nice scenery.
With that thought in mind, we have built our layout with things that operators can do –not just run trains but throw switches and signals, set routes, pick up and drop off passengers and cattle, bring a siding to life, etc.
To date, I have written 4 Engineer tickets and have sufficient space in the middle of the room for 4 operators at the same time to work those tickets, each using their own handheld remote. They can
then exchange tickets with each other.
Thank You,
Mike”
________________________________________
“ I use red led Christmas lights with all by buffer stops. Cut off the bulb with about 10cm of cable on each side, the bulb can be bent 90 degrees so it is in an “L” shape. Drill a small hole under the buffer and slot the led in so the light is facing the train. Attach a resistor to one of the cables and connect to a 12v power supply.
Or if you can’t get under the layout you can wire the above setup to the track.
Axel.”
________________________________________
“Model Railroader tip:
Don’t use kitty litter for track ballast. It is made to absorb moisture and will absorb and retain humidity moisture from your household air supply, possibly transferring that moisture to your valuable tracks, locos and cars.
Use aquarium gravel instead. It comes in different sizes, is all natural, and looks much more like real ballast instead of the all one color kitty litter. It is also very economical to purchase.
Superchief99”
________________________________________
“Dear Al ,
Tip cheap model trees and really life like buy potted herb THYME the more bushy the better cut to suit for N or HO gauge at least 30-50 per plant dip in glue away you go.
Mike”
________________________________________
“My best tip is rather a simple one. Solder the wires from the transformer directly to the underside of the track and drill small holes directly under them so the wires run under the track board. This way there’s no electrical clip-on showing and no need to hide wires in the scenery.
JJS
Deacon John J. Stetar”
________________________________________
“I’m just getting started in this hobby, but one thing I’ve learned is that you can never have too much track or too many switches. Starting with a standard 4 x 8 board, I quickly added another 4 x 6 addition to allow for a bit more creativity. DON’T NAIL YOUR TRACK DOWN TOO SOON. Experiment with a variety of layouts until you’re pretty darn sure you’ve arrived at the one that’s a keeper.
Dennis”
________________________________________
“Hi Al,
Thanks very much, I will ponder over the layout suggestions before actually starting to make a firm decision. I am a relative newcomer to railway modelling though I have been a modeller for over 65 years. I am gainign expericence by working on the new layout for the Mickleover Model Rail Group – I am in charge of the back scene and rock work from pink foam. A tool I find very useful is one of my Permagrits, they will cut through cast iron so foam is easy meat, I also smack the surface of the rocks with a fine wire brush which gives an authentic pitted appearance. For paints I use the cheap acrylics from the Works, these give good coverage.
Thaks again
Terry”
“hi al,
I use kadee couplers on all of my rolling stock. adjusting them can some times be hit or miss. they suggest using pliers for adjustments but that can prove daunting. I put a pair of pliers on the “leg” and gently squeeze the plier handles with a c clamp. this way you can apply gentle even pressure on the leg. has worked for me so far. if I had to do it more than once in a great while, I’d make some sort of jig to accomplish this task. I’m surprised that no one has to date …
Bill”
“Al good day, my thoughts;
Their are very many different types of Lay-Out Artists in the world, as such all have their own particular expression, some artists are good, then there are some Artists that are just a bit better than others. These are the type of Artists that make as you say “Some make superb scenery from little more than household items. Others seem to make electronic stuff with no more than wire and tape.
The others, they buy the standard scenery crap from the manufactures and that can be seen to be the same in many lay-outs.
Mind you I like Lionel and some others rolling stock, but lets face it a whole lot of their scenery stuff that they sell, like their plastic houses, barns stations and or whatever, well their something to be said, when it says on the side of a train set box “For ages eight and up”.
A very authentic lay-out is impressive, especially in it’s presence, equally impressive are the photos of these lay-outs, very rarely will there be two the same. The more authentic looking a lay-out becomes draws upon the designer to make it look as real as it can be.
Ask any true Artist and they will tell you that their canvas is never really finished. When you compare what’s being sold, to the hand made stuff then you can understand then compassion that some have. When your young its very easy to assimilate and imagine what’s in front of you to be the real thing, when you become older such is not the case that is why in my opinion that why train sets get shoved back into their boxes and handed down to the next generation.
You can tell by the look of some of the equipment and rolling stock being sold that shows the signs of boredom and or lack of interest.
My tip, if you is to be authentic, make your lay-outs as real as they can be, as well make your rolling stock look as real as you can. If one is able to read e-mails, they have the means to make their lay-out real as it can be. I would suggest that you choose the railroad company that you have been most a custom too through out your life.
In order to start your endeavour you will need to purchase a train set or two with at the very least three switches, the size (gauge/scale) is your choice. One has to however keep in mind at all times gauge/scale is going to be determined by the room that you have to set-up your layout. The smaller gauge/scale stuff looks pretty impressive, but that is only from afar and I say this from an experience that most modellers will never, or ever have unless they had the opportunity have hired on to and or worked on/for a railroad.
I would next, pick out/up some rolling stock that your not so comfortable with. As an example, I have chosen “O-27” and/or “O” gauge because that’s what I started out with when I was kid. I would then go to my nearest hobby shop or other known place and pick up an “Artist Air Brush Kit” and as well some red, blue, green, black and white paint, suited to the Air Brush manufactures specifications.
Next, build your table-top first or as you carry on. You can pick out a lay-out design from a book or wing it, I recommend if you lack carpentry skills read a book so that understand the essentials of building a secure table. Pretty well except for the original every modellers design from a book has been customized,
Next, I would make a work area close by where could disassembling my stock one car/locomotive/engine at time. Strip down and repainted all metal parts. Most rust is just surface, so with proper sanding the metal can be brought back to smooth. There’s some amazing rust proof paint on the market to day that stops rust for good. Once all metal work has been completed set aside. Clean plastic with TSP after you have take off Hand Brake wheel(s), brake rigging and or other attached pieces that maybe on the shell and set aside. If your manufactures logo does not come off do not fret, in the real world rolling is sold and in most cases the buying company just paints right over the pervious owner’s logo and car specifications.
Nows the time to take out your air brush and get down to business and start practicing because practice makes perfect. When dry secure with an appropriate sealer and then its decal time start to customizing your fleet under the rail road company logo of you have chosen. When your working on rolling stock you can as well be thinking and planning your lay-out table by table top, and when your building your lay-out you can be thinking on how to best improve your personal customizing of your rolling stock which will lend support all details as seen from the railways right of way.
When building your lay-out plan wisely, as a lay-out is easier to build than it is to take down should you decide to change things because your plans did not turn out right.
Take care, Jim”
Now on to Mark:
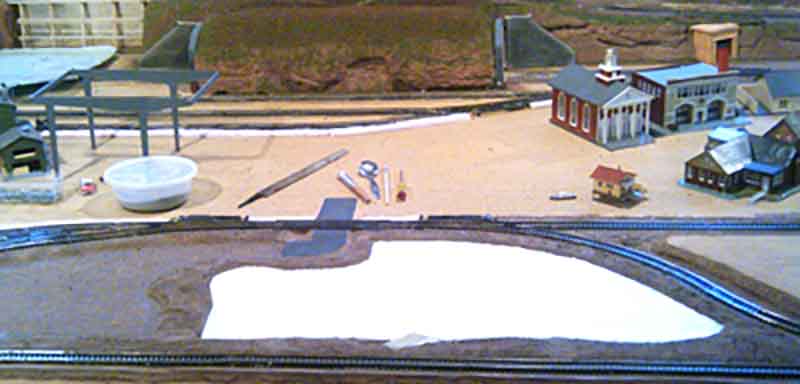
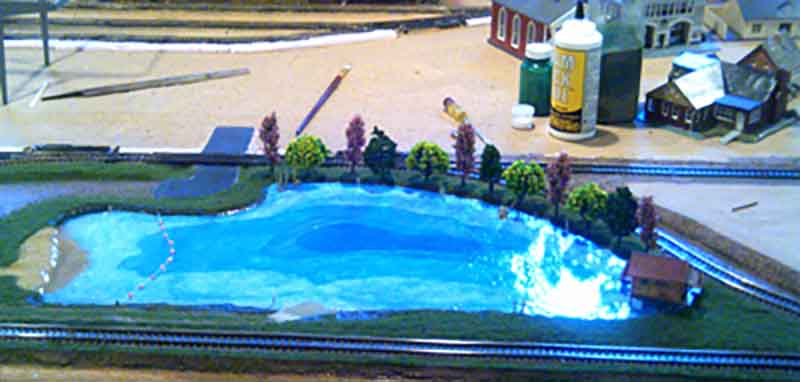
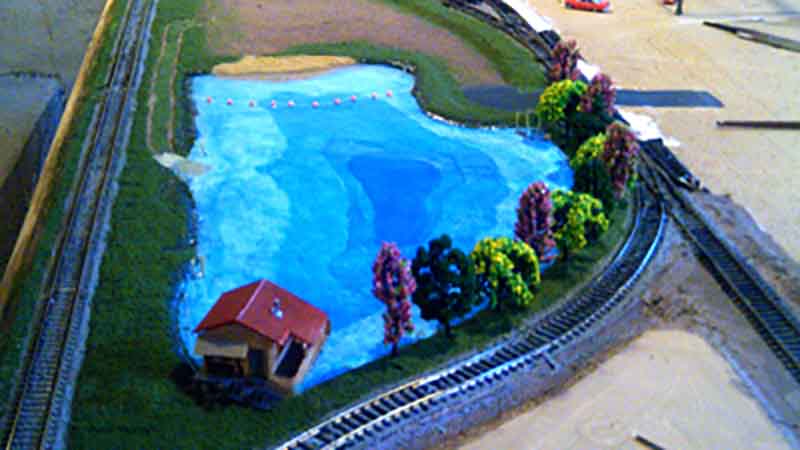
“Hi Alastair,
I have been working on my first layout for about 7 months, doing my best to take my time. My grandkids wanted to spend the weekend with us and see “Grandpas Train Set”.
Well, although the track is laid and operational, it would look pretty boring to a child. Against my better judgement I decided to junp ahead of my plan and add some color to the layout by working on the Lake area so that “Grandpas Train Set” wouldnt look so boring to the kids. Here is a before and after photo and I have to say that for a rush job it doesnt look too bad!
Mark”
A big thanks to everyone (love what Mike did with his cattle in the video).
That’s all for today folks.
Please do keep ’em coming. And don’t forget, the Beginner’s Guide is here. Course I’m biased, but why do we all learn the hard way?
Best
Al
PS Latest ebay cheat sheet is here. Still going strong.


Some god ti
ps there Al
Thanks Al and everyone. Even if you are not doing anything that there is a tip for here, they go into the memory for when you are.
Hello All, Just wanted to say Thank You for all the tips. Keep up the great tips. Here is one for ya. I was eating some Yoplait Yogart and it hit me. I can use this as a water tower. or, a power plant tower. I find useing the spers from a model kit for the legs or useing popcycles sticks for legs. The spers from a model kit can allso be used for many things like legs, poles, signs all kinds of things. Please respond. I wnt to know what you think about this. Thanks
God Bless
Rod
hi tell that modeller they make pliers for bending k/d couplers lot easer helper
There are special pliers to adjust Kadee trip pins (curved part) that work very well.
Thanks for taking time to “Pen” your ideas (who really writes these days lol). The aquarium tip for ballast is excellent as kitty litter does have to much dust.
some great ideas,keep them coming
Thanks Al and everyone, really enjoy reading the coments and hope to post soething in the near future
I say it good to see a photo I took in this edition
AWESOME! I mean A-W-E-S-O-M-E!-!-!
ALL of yor fowarding ingenius and inspiring materia. Especially todays tremendous tidbit on electric/tele poles. INCREDIBLE modeling Kim!!!
Keep up the GRRRRReat work
Cheers, Danny
Hi Al
Mike’s power poles look great.
It can be messy trying to include the Low voltage system so a black insulated wire drilled into the side the Capacitor and taken down to the bottom of the pole can infer that the low voltage distribution is underground.
Cheers
Ralph
We do it the hard way because it’s more fun. Anyone can do it right if they read the instructions. I really appreciate all the tips. If I don’t have the material described, at least I get pointed in the right direction..
Thanks
Bill
wow can see how many research you put to it. awesome if u visit my model trains webpage.
I have thank all the modeller’s for all there handy tips are just great.
Here is one of mine, plastic tubeler clothing hangers can be cut and used for pipe,pipeing, electric poles, pipe loads on rail cars, ect.
Re: Bill and Bob Butler / Tool for Kadee couplers –
Yes, there are special pliers for use in adjusting the trip wire on Kadee couplers. Several company’s make them. One source, if your hobby shop does not have them, is a company called MicroMark. They have a free catalog and the prices are reasonable. They have a website. Current catalog lists the price as $12.35 US + shipping (varies depending on the total amount of your order) and is available in HO/O and N scales. Same price, either scale! Hope this helps with your search for the tool!
I really enjoy all of the tips. I’m sure I’ll need some of them soon. I’ve had a layout for quite a long time but I’ve just not taken the time to do the landscaping. Just a couple of days ago, I bought a layout at an estate sale. It is a 4X8 with the landscaping done. I had to get a LOT of dust off of everything on the layout. I know I’m going to have to do some re-wiring and the 2 switches are manual. I would like to post some pictures and hear some suggestions/comments on both layouts but I don’t know how to post pictures here. Help please!
All great tips . The oneI LIKE Best.Slit Straw to cover the Track during Spray painting RR Ties
I enjoy reading the comments; one can learn a lot by just reading the comments.
One thing I have noticed is that your readers do not proof read their responses for clarity or spelling. Sometmes this makes readng and understanding difficult.
Thanks & keep sharing,
Bob
There is a plant “sedum” which flowers in the fall. The flower can be dried and broken down to fit any scale.
I spray the plant and create a mixture of woodland scenics earth, grass, and weeds… Spray the plant with your scenic glue and sprinkle the mixture on the tree.
Cheap and better than store bought.
Great tips everyone. I have been following along for some time and finally decided to put in my 2 cents worth. I am new to the hobby and trying to learn as much as I can. My main advice to new comers is to be patient and give serious thought to your scale. I started over a year ago with an idea and due to space constraints I was going to use N scale. After buying the first kit I realized my 70 year old eyes and hands weren’t going to allow it. Thus I am modeling in HO. Be patient. I have yet to lay any track. I am freelancing a 1900 era layout and have had tons of fun designing and redesigning my layout. I am moving from an apartment to a house and will finally have a permanent home for a layout. Keep those ideas coming. I learn something new every day.
I like your tip using cut drinking straws on track to protect the top.
After numerous “Re-Do” caused from nailing track too soon, I finally found a solution that works fine for me. The problem is, if you do not nail down your track, they often separate and go separate ways. I use the foam road bed, and found that 3M General Purpose Adhesive in the white/Red/Black Can solves the problem !! Spray a film of the glue on the back of the roadbed, and stick in place. Use a can or rolling pin if necessary to roll back and forth for a good adhesion. Then spray the top of the roadbed with a light coat and gently press your track down. If you need to remove the track and modify your plans, use a putty knife to slide under the ties to pry the track up. If you ever in your lifetime decide your layout is “Finished” then you can always nail down the track. Lol..
I get my ballast from the road outside my house. The constant pounding by traffic grinds the granite road surface to all sizes down to powder. I simply sweep it up, Firstly I sieve it with a 1.5mm mesh to get rid of oversized bits, then a 1mm mesh to get what I want. Lastly it is washed mainly to get rid of bits of vegetation matter. There we have it – the real stuff at no cost apart from the initial purchase of the mesh material.
To post any picture’s just send them to Al.
I upgraded my power pole’s to realistic insulators. I sent the pic To Al
Great tips everyone! Keep those ideas coming.
I learn something new every day!!
We can learn a lot by reading the comments.
Peter
It was so nice to see that S gauge American Flyer cattle yard operating in pristine condition. I had the same thing when I was 5 years old (along with the matching “moving people” passenger station/Pullman car, and an operable “grab-on-the-fly” mail car/mail bag). That was 60 years ago, and all those intricate little structures took a real beating over the years. I gave the remnants of that once wonderful train set to an S gauge vendor at a train show about 5 years ago.
To all the folks who insist on making their own ballast, ground cover, shrubbery etc, well, good on ya (I guess). I mean, here we are buying things like locomotives worth hundreds of dollars, pricey but well-detailed rolling stock and buildings, motorized turnouts etc., and we’re balking at spending $6 or $8 for a canister of properly-sized, ready-to-use landscaping material that gives wonderful, consistent results? I can see using alternative materials if you need/want a less off-the-shelf look, but as a money-saving initiative? Sieving road dirt and sorting through dryer lint etc. just seems like more trouble than it’s worth … false economy.
Oh, and I had to laugh at Bob’s post criticizing the prevalence of typos and lack of proof-reading in many replies, only to see that he had made two spelling mistakes himself … classic irony!
Great job as usual Alister – keep it up mate!
Mike
S scale is the best-hands down. It started with American Flyer but HO took over and is marketed the heaviest. I am a firm believer also that a layout should involve more than trains to operate because real life is that way. Love what you did. S scale became too expensive to model so I went to HO but my S scale is stored and awaiting a place for its resurrection.
Many thanks to all for the great tips. Wow what a blog.
Thanks big Al
To all- be safe and well
George from LI, NY
I love the Flyer stockyard! I’m restoring one now and looking forward to seeing it working on my layout…
Mike, have never seen that cow set-up before – ingenious and fun to watch!
Brian, Wokingham, England
Mike…..great video and great layout….looks like lots of fun.
Very very cool.
When I was a kid they still shipped livestock via rail you would be at a crossing and when the cars came by you could hear them mooing and then hold your nose ! LOL that was when the railroads were still ran on time that stock could not stay much over 24 hours in the cars before loosing weight .? Looks like the movement of the cattle worked like the old football games with a vibrating floor and the cows on the bases ?
Brilliant work Mike. Love the creativity giving the kids something to play with besides running trains. Keep up the great work.
That’s a nice job on the cattle moving before you killed the cow on the tracks lol !!! But that is a nice job !!!
Love Mikes video and the tips were helpful. Thanks to all.
Watching cattle get on the box car blew me away!
Mike , I like your cattle moving activity , great for the grandchildren, they are fortunate to have you with such a functional layout . It’s a very nice looking display … didn’t see the lSteakhouse .. Very dynamic to take it to that level . It is inspirational for us to see, thank you for sharing it . Thank
Dennis has a good idea there… I never set my track idown with nails or screws (we have a range of temperatures down here and track contracts and expands),
What I do however, is to follow my layout ‘plan’ with ‘1 inch wide foam centered
double sided tape’ just once down the middle. It holds flexi-track in place as you work it around corners and also acts as a ‘silencer against track rumble’, And if you decide to leave it there, it goes well with ballasting. And it will offer a bit of resistence when you come to lift the track the track though. Most of my track has been held down with double sided tape now.
for a good part of 20 years
Dwight in Ontario: a lot of model railroaders are just that. MODEL Railroaders. Today’ model railroading seems to consist of three figure priced buildings in kit form and locomotives require the cost of a mortgage. Many of us need to find less expensive things, or sog out in front of the idiot box, and wish for something intelligent to do.If By the way, when I started model railroading, everything was craftsman type, build it yourself A locomotive kit was fifteen dollars, and car kits consisting of wood pieces and printed paper sides could be had for ninety nine cents. almost everything else was was made from scrounged materials.
Mike: What type of track are you using? I am using Gargraves and have an issue with the #712 activator. Have you had any issues?
loved the cow loading