Henry has put a big smile on my face by adding to the model railroad dioramas on the blog:
“Hello Alastair
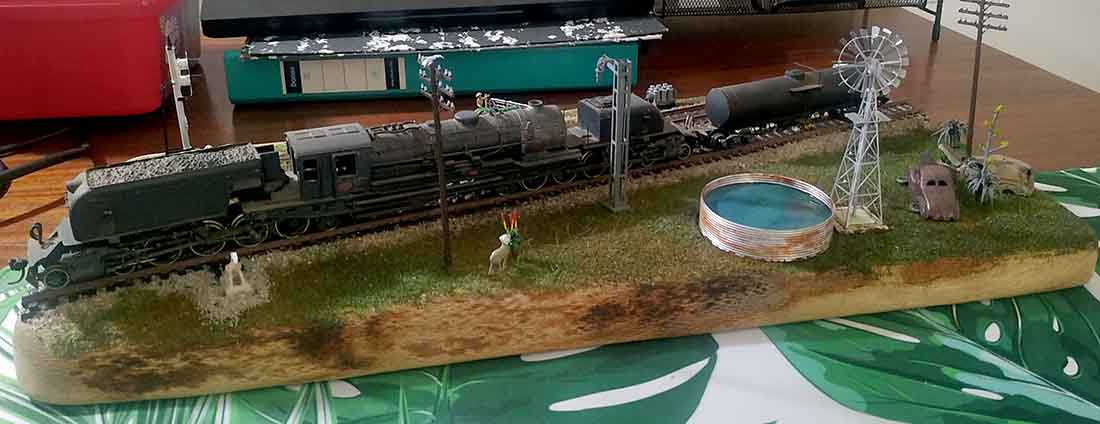
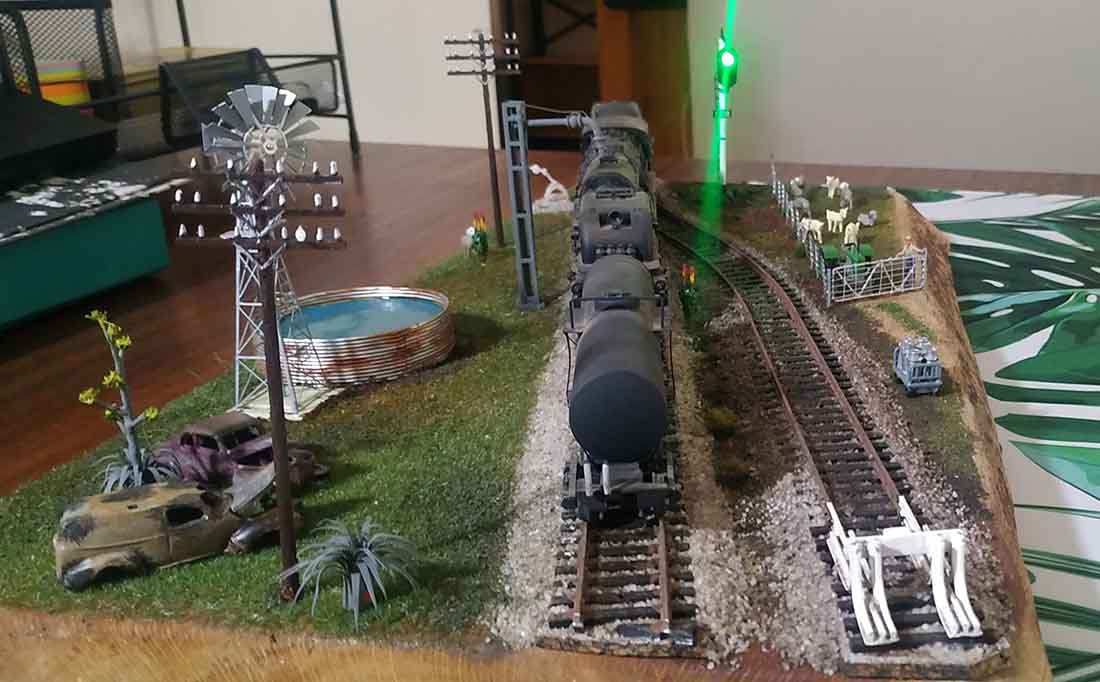
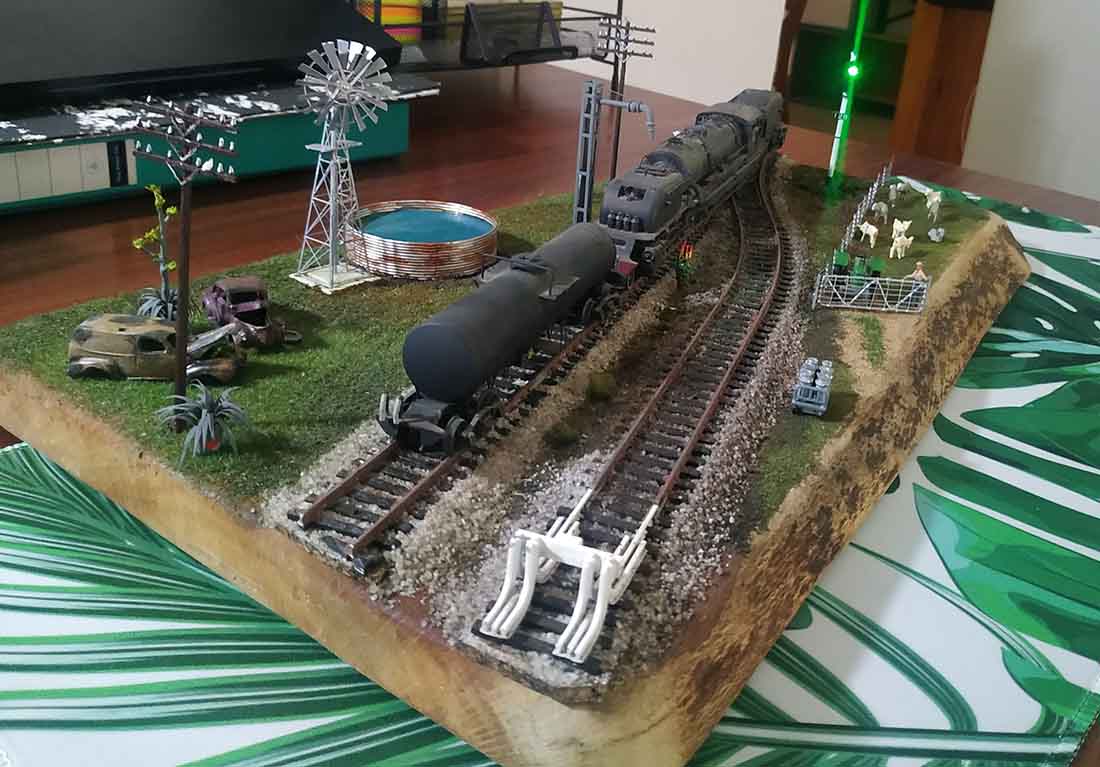
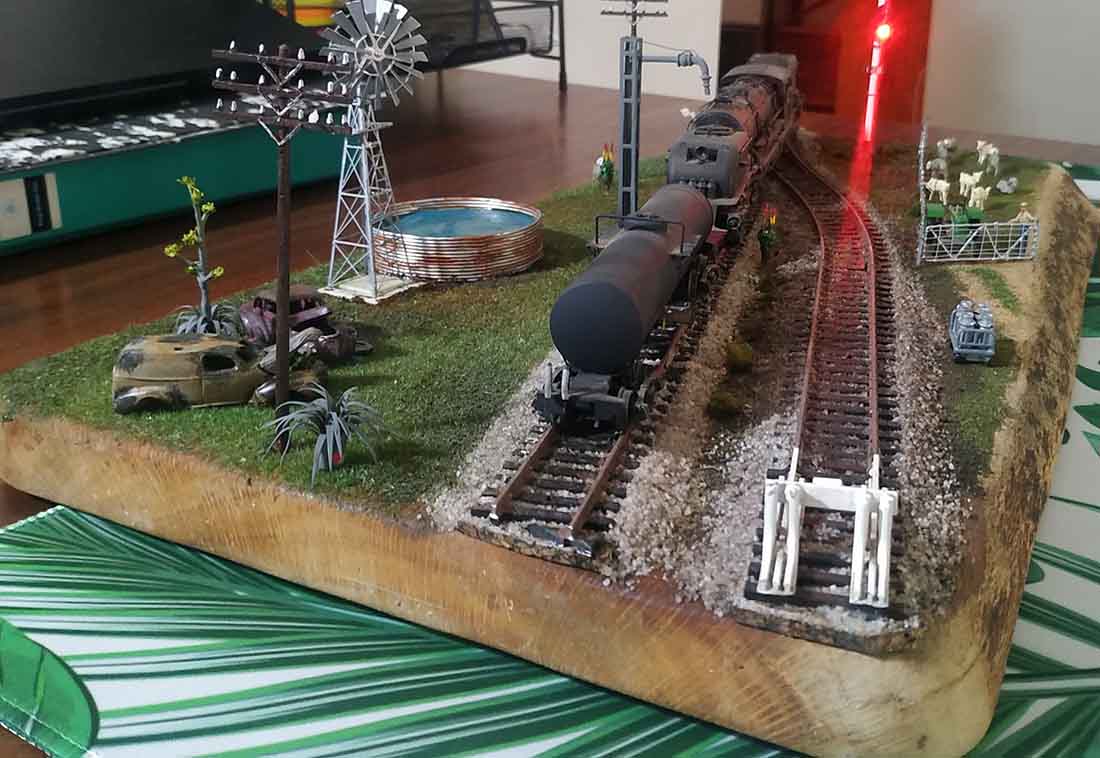
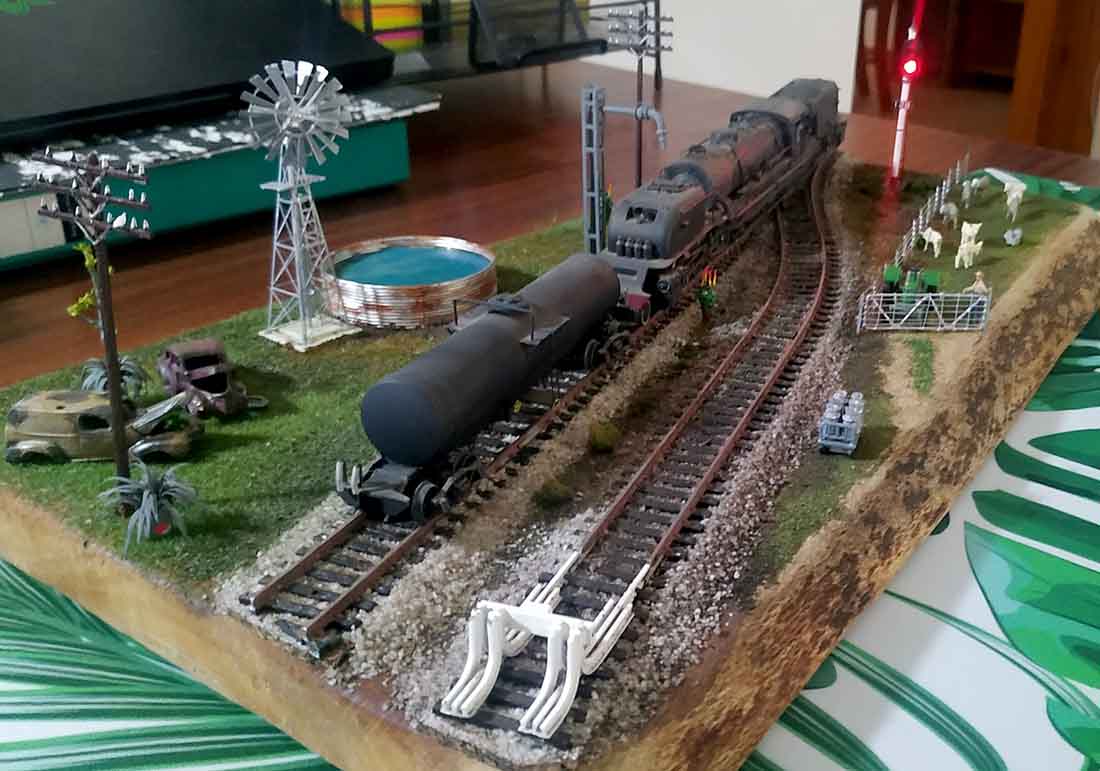
Today I had the privilege to bring some joy to someone. I delivered the diorama I built, but I asked the lady for whom I built it, if I could photograph it with the locomotive her late husband had wanted to put on display on the diorama.
I’ve had some requests to show my model railroad dioramas with the locos in place, so here are a few pictures of the diorama with a class GMAM garret of the South African railways and its permanently coupled water tanker.
(The water tankers were used so that the onboard tanks could remain full and increase the tractive effort).
Henry”
If you missed Henry’s first model railway diorama post, it’s here.
Also, when it comes to model railroad dioramas, Ben’s springs to mind:
And these:
Now on to Dallas.
He has been in touch with his N scale in a shed:
“I have for several years now read your daily missives with great interest and gained a lot of ideas and information from the submissions of all contributors.
If my eventual layout ends up anywhere near some of those I have seen I will be very pleased.
Like a lot of people, I received a Triang windup train set as a present, not sure if for Christmas or a birthday. I have no idea whatever happened to it.
In the 1970’s I worked out a design for a model train layout which I carried around for the next 30 years, still have it, in fact.
I located it some 15 years ago and on examination found that I needed a room about 6 metres (20 feet) by 4 metres ( 13.5 feet) which I didn’t have or was ever likely to have. I went looking for a plan that I could use or adapt.
At some point I acquired a book of model railway plans. One of the plans in the book was the Granite Gorge and Northern plan, a HO plan. I liked it because it looked interesting, looked challenging and I like challenges, even if it is my first actual build, and had elements in it that I wanted. I decided to adjust it for an N scale layout.
Through some calculations I determined how to reproduce the plan in my desired scale.
Using my multifinction centre I photocopied the plan to A3 and then progressively enlarged the plan section by section until I had the whole plan at the required size. I then matched up the individual sheets and taped them together so that I had a complete plan at N scale that I could transfer directly to the base.
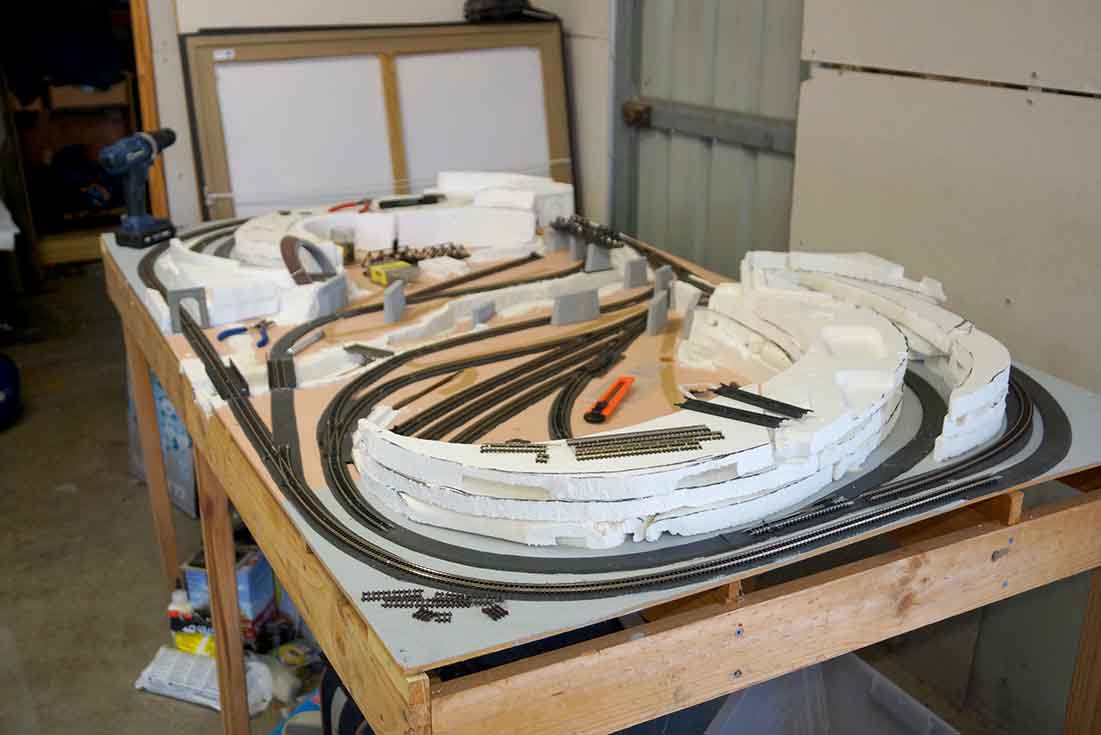
About 10 years ago I commenced construction of the table. The table is approximately 2 metres by 1 metre.
The frame is made of 100 x 19 (4 x 1) and took several weeks to construct with having to adjust the sizes of the individual pieces to suit my requirements.
The based was a sheet of 2400 x 1200 MDF 6mm thick. The plan was transferred to the base sheet and cuts made for adjustments in levels wherever appropriate. The cuts were made and the base attached to the frame.
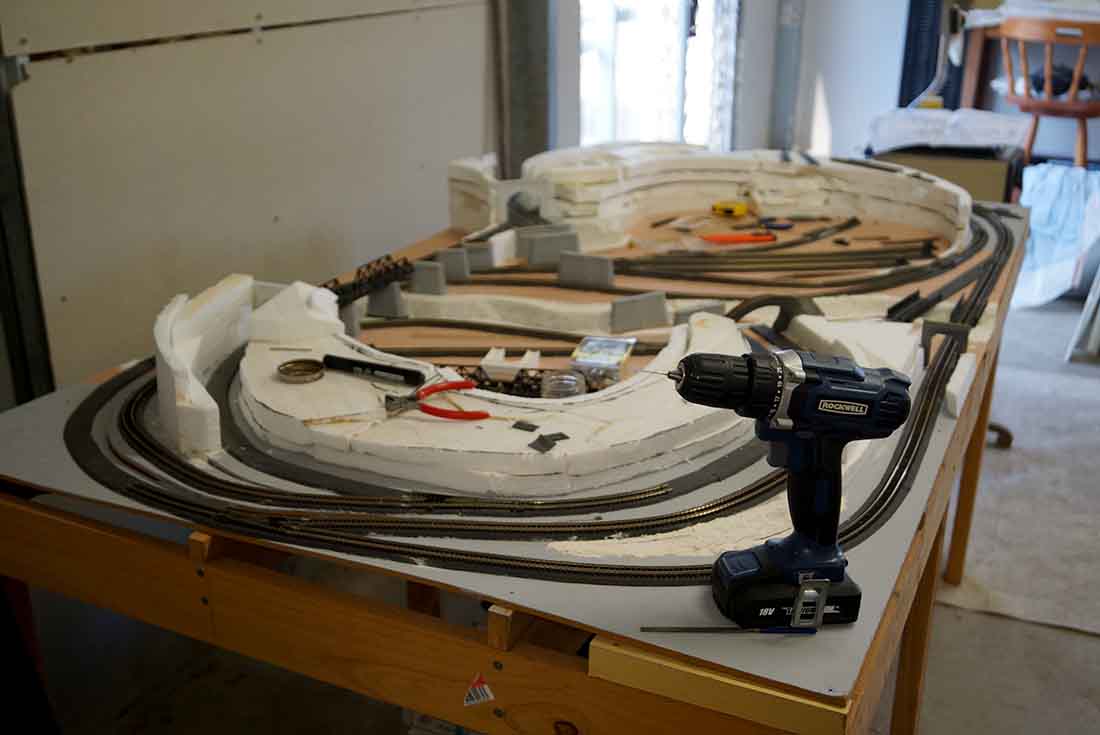
This then stood for a year or two in its basic state and then I started to develop it further. I laid down foam road bed and started placing items around the layout to see what looked best. The layout has slowly progress from there to where it is today. I have not done much on it, for one reason or another, for nearly a year now.
I retired about 10 years ago but that did not assist much in the construction. Much of my time has been devoted to illustrating children’s books. I use construction of the railway as a relief and distraction from the books and my other artwork. It is progressing extremely slowly.
For much of the past fifteen years I have been slowly buying up rolling stock, engines and building/structures when I saw something that took my interest and I could afford. As a result the final product may be a hodgepodge of styles. Time will tell.
The main theme is of the 1950-60s with an abandoned coal mine. Some of the buildings have been placed to give me some ideas
I am constructing my layout in a large shed,12m x 7m, that I have divided in half. The layout is in the studio side of the shed.
The other side is supposed to be a workshop for airbrushing vehicles. My property is a rural holding of a little under 4 acres.
Opposite me is a beef farm and bordering the forest to the south is a dairy farm. This all bodes well for visits from friendly wildlife from the forest.
We have regular visits from carpet pythons and from time to time they try to assist me with my construction as can be seen from the red circled area in one of the photos
The following photos show my current situation.
Dallas”
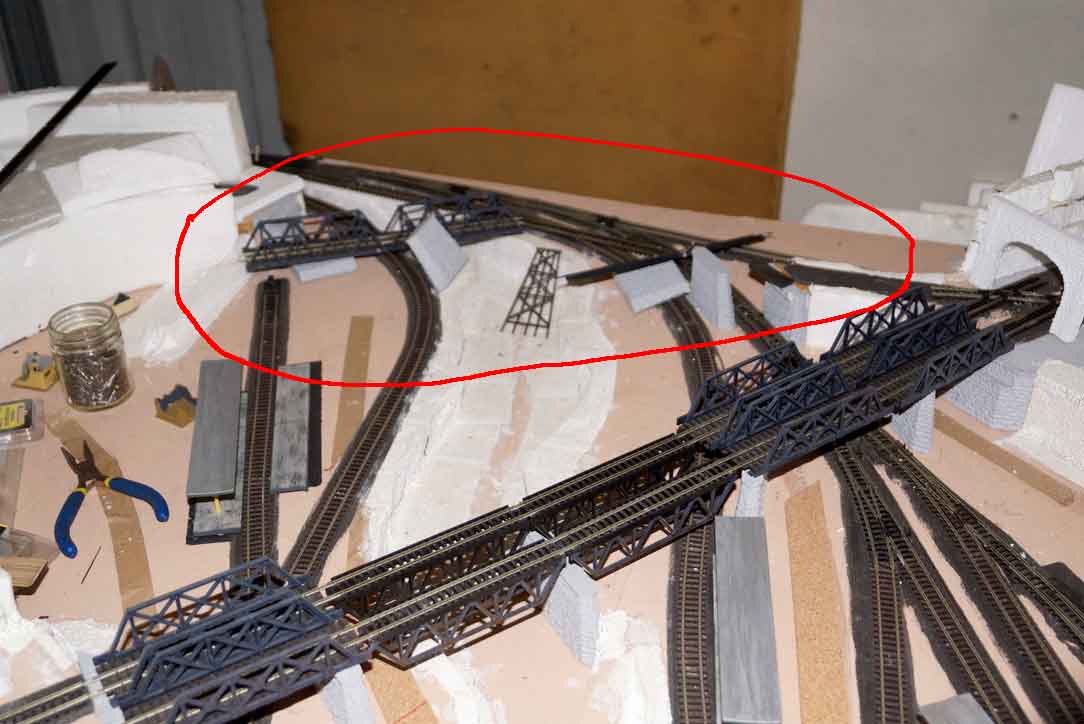
Well, I stared at the pic Dallas had circled in red, but no matter how hard I looked, I couldn’t see a python.
So I asked Dallas – the circle is just the damage the python left.
Suddenly spiders and mice aren’t so bad.
Now on to Dangerous Dave, who has shared his latest youtube:
“Hi Al…
No doubt like a good few many members and most model railway modellers I get track problems.
I have had to re lay a few parts of my layout with new bits of track, and put new joiners in to try and get all running smoothly again, something that most of us have to do from time to time.
I have also shown ballasting the track with one of those small plastic ballasting gadgets which do help to make the job a bit easier, then to finish off I have added some rust paint to the tracks to make them look more realistic, all easy to do, and could be of some help to those starting out in the hobby…
Regards
Dave”
A big thanks to Henry for adding to the model railroad dioramas, and to Dallas and Dave.
That’s all for today folks.
Please do keep ’em coming.
And if today is the day you decide to battle with pythons, lay track and build dioramas, the Beginner’s Guide is here.
Best
Al
PS More HO scale train layouts here if that’s your thing.
Need buildings for your layout? Have a look at the Silly Discount bundle.

I really enjoy Dave’s videos, even though I must listen very closely to understand him. I have noticed that, while watching the videos, the trains movement is ‘jumpy’.
I am wondering if this ‘jumpyness’ is due to the video transfer process, the video camera software, or if the DCC system itself creates that unusual motion.
Has anyone else seen this?
Dallas, Nice effort on your n scale layout. You have created a good bit of vertical interest, which always adds to a design. Henry, The diorama looks excellent with the intended locomotive on it. What an interesting loco too. Thanks for the effort to show us this. Dave, as usual, you bring us simple and to the point ‘how to’ videos. Thank you for that.
Rob McCrain
I think it’s the Video resolution that’s causing the jumpiness that you are seeing.
Dallas
What part of the world are you in? The trouble with sheds are the temperature swings will affect the track so plan on that.
Henry- Nice!
DD
much thanks
Hi Dallas:
Nice well thought out compact layout… also,,, would that be a Monty Python?
~ Mike ~
In N.H. USA.
Dallas…… send pictures when your trains are running.
Henry….. Great diorama….good work.
Dave…… great video BUT why do you use so much glue on the ballast????
I have been modelling for years but never done much scenery until now. I find I spend too much time thinking and worrying about what it will look like resulting in little action. The solution that works for me is in the video above. I ask myself “what would Dave do”? The answer of course is “stop mithering and just get on with it”. Don’t worry about making a mess or a mistake you can clear that up later, just (as Al would say) get on with it. Keep modelling everyone, cheers Kelvin.
Thanks for comments ,yes I uploaded this video from my file to YT direct and it did come out s bit jumpy , have experimented since in bc a different resolution and it’s far better , actually did it in quicker time also direct from Cyberlink director 21 to YT
As for the glue yes snit too thick but it sure stuck well
Dave
Dallas- I’m not sure what kind of track you have, and I hope that your track is good and has no electrical connectivity faults. On my first N layout, I used some cheap old track from Eastern Europe and it was horrible: nothing but trouble. I mention it now because you are at a stage where you might be able to test the track before it is all fastened into the layout. It was a big mess for me, and it wasted a lot of my time and materials. Decent nickel silver track can be found inexpensively online. It may be worth considering if you don’t currently have it.
George – Australia
matiSon – I have used Peco flex track with atlas turnouts.
I am already making a change to the layout. Up until 1992 I lived in Perth, Western Australia before moving to the eastern side of the continent. Now residing in northern New South Wales.
Before I left Perth there were two lines leaving the Perth Central Station. One ran to Fremantle and the other towards Midland. This latter split at East Perth Station with the new line running south to Armadale and beyond to the south of the State. Since leaving there is now a line running north from Central station.
One to one and a half kilometres out of the East Perth Railway Station the line crossed the Swan River. There was a wooden bridge across the river that had been standing there since the early part of the twentieth century. From memory, but I could be wrong with my aging memory, this was a single line bridge. This bridge was upgraded by building a replacement.
I am replacing the long bridge going diagonally across the center of the layout with my interpretation of the old bridge. I have a photo somewhere and once I have located it I will post it for everyone’s information.
really nice layout, and diorama.
track glue too thick Dave 60/40 for me dries in 4 hours 69* in house. You have to let it seep through and spread. my ballast becomes hard as a rock. the book says 50/50
The Critic