Paul’s been in touch with a very clever and cheap way to make a water feature for model train:
“Hi Al thought I would send you some photos of how I increased the size of my waterfont scene using toilet paper and PVA glue.
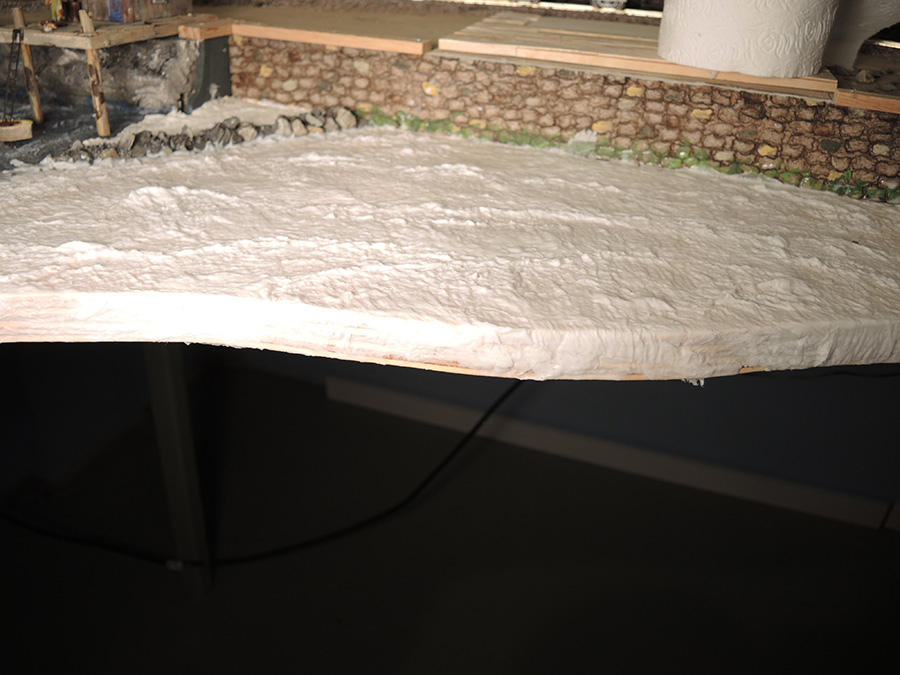
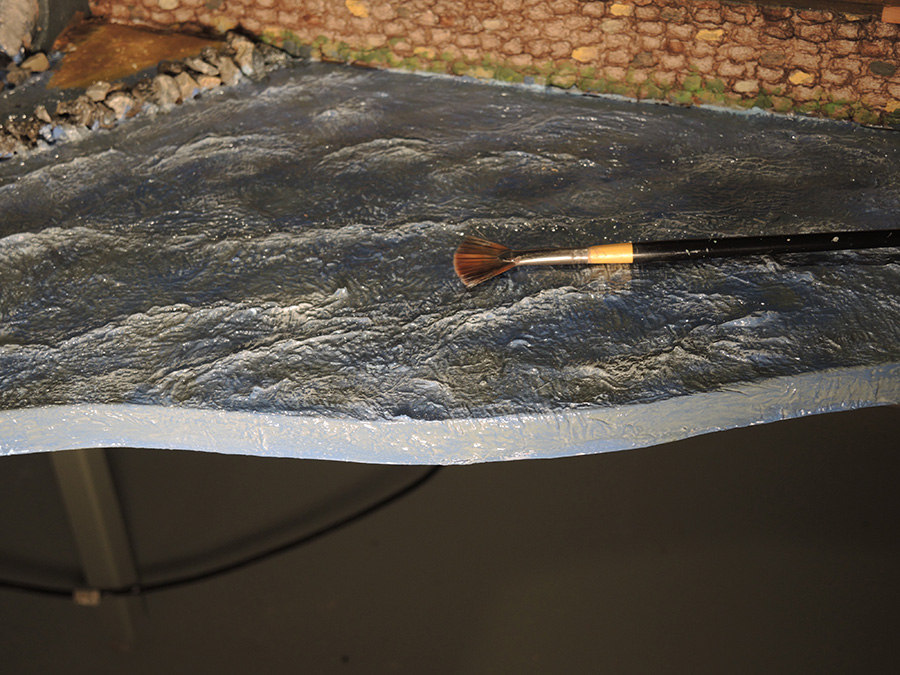
The included photos show the plywood extension and the initial steps in applying the TP & PVA.
The TP is applied about 4-5 layers thick with the PVA gluing the layers together.
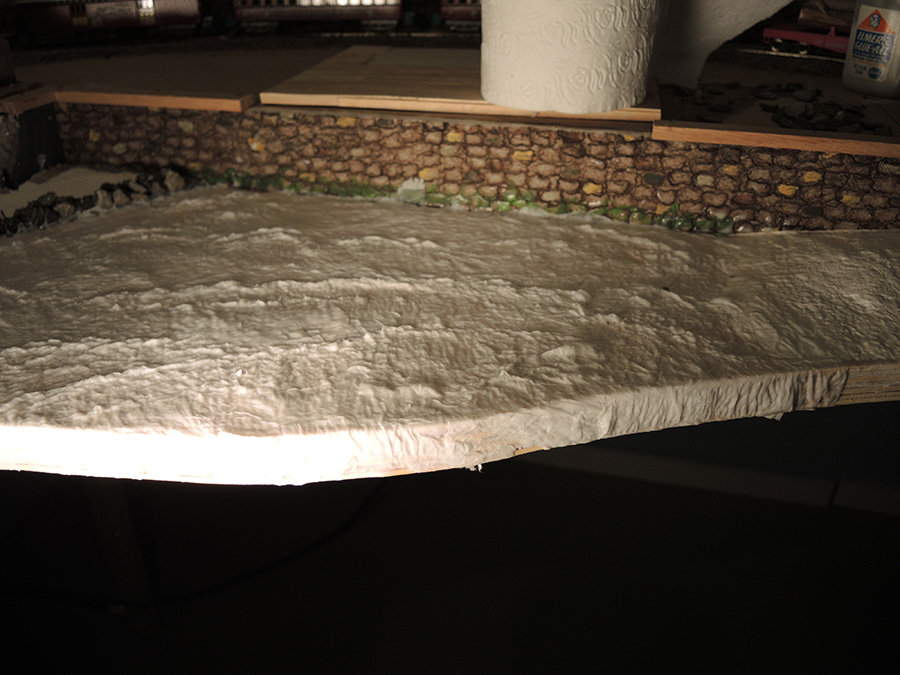
You see me “pushing” the still wet TP with the paint brush to form waves which are heading toward the shore and bulkhead.


In these photos I angled the light such that it highlighted the waves that were formed by pushing the wet TP with the paint brush. You can see the 3D effect of the visable waves.
At this point you have to let the work dry which takes a few days because of the thickness of the TP.
Once dried my wife stepped in because I failed at an attempt to match the color of the existing water scene. Naturally if you were doing this all at once there wouldn’t be any need to color match and you wouldn’t have to hire an artist.
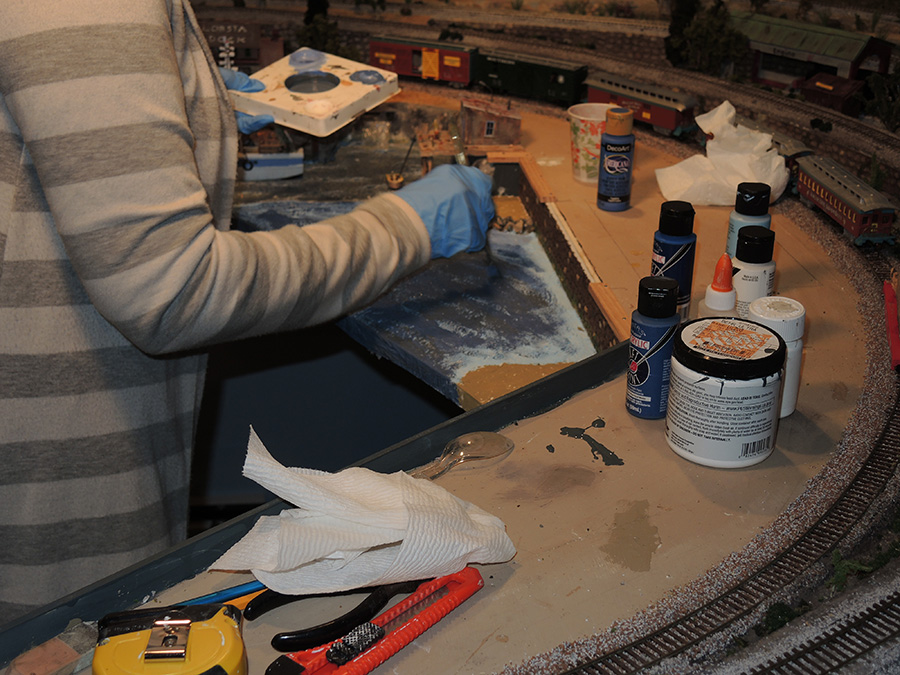
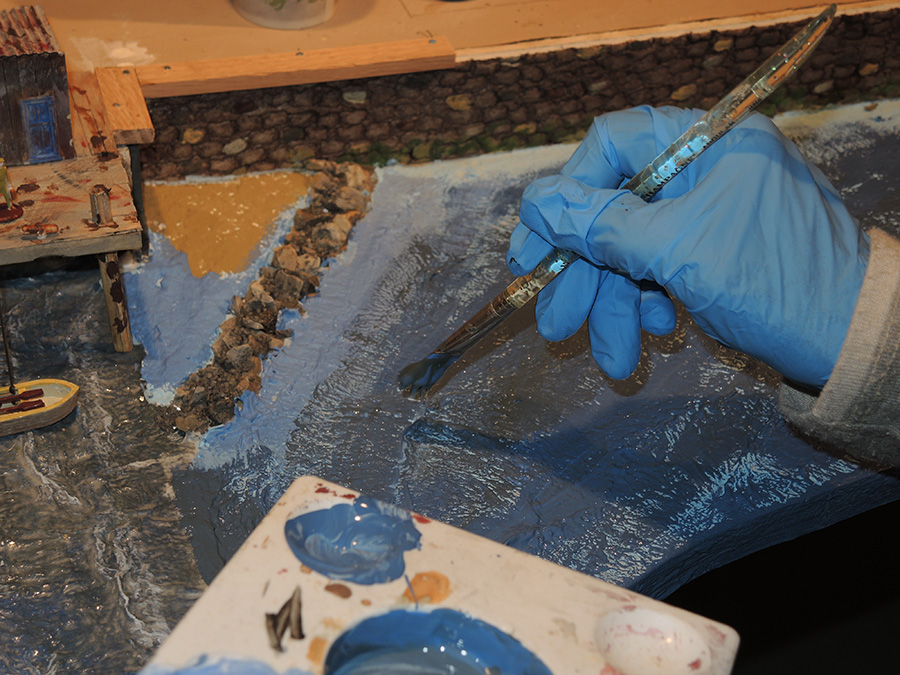
In these photos you can see the fan brush we used to highlight the tops of the waves with white paint.
You must remove most of the paint from the brush by passing the bristles over some waste material. What you are then doing is called a “dry brush” effect on the wave tops.
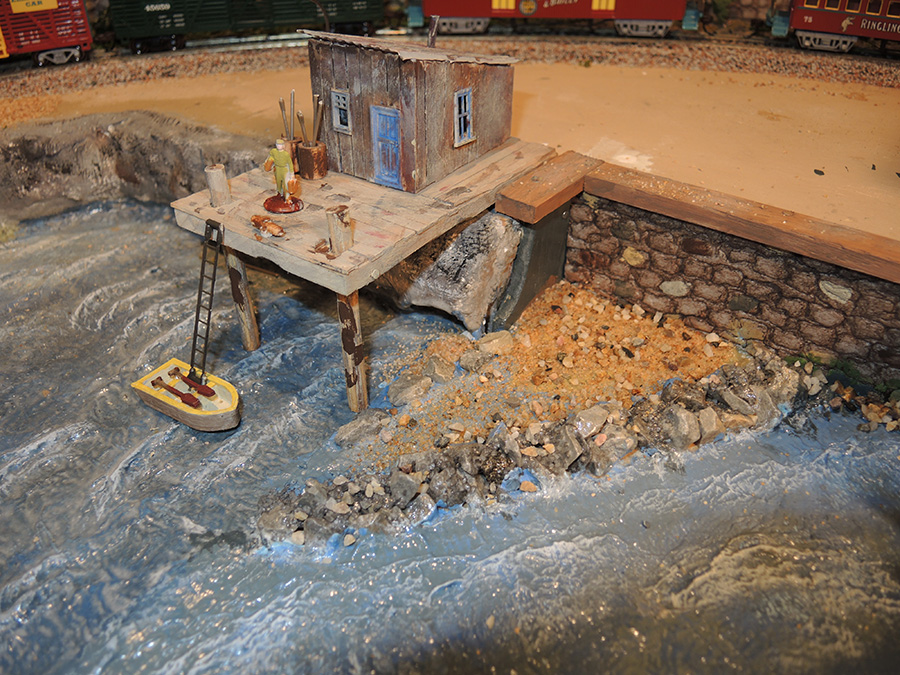
The next photo shows the jetty I built to protect the pilings that hold up the dock by the fishing shack.
This photo also shows the blending of the colors where the old and new water meet.
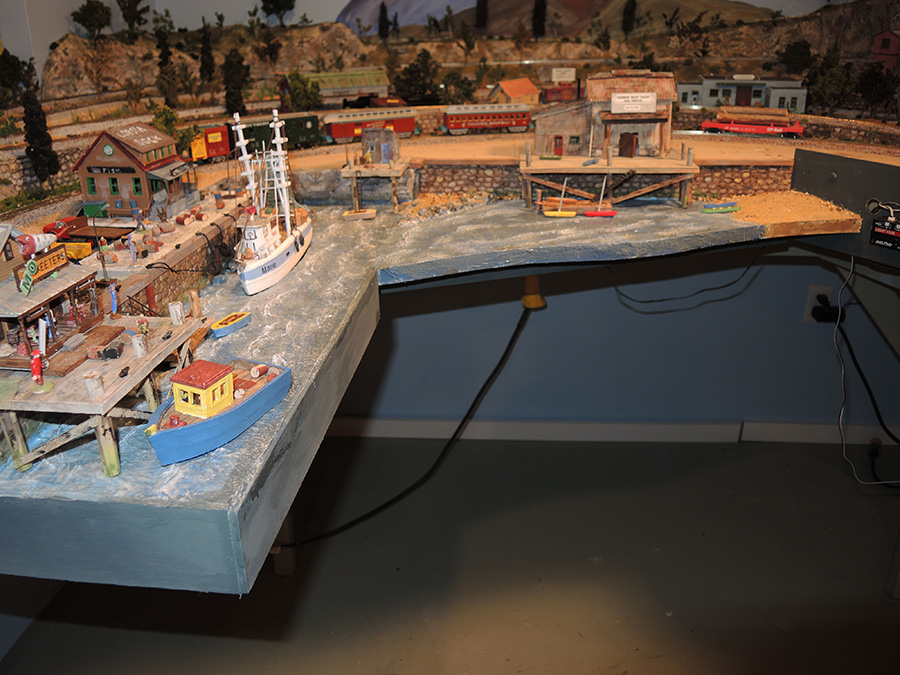
Lastly is a photo of the overall scene. The credit for this method of producing the water effect goes to Marklin of Sweden and his videos. The best part of this method is the 3D effect of the waves.
Paul”
A huge thanks to Paul for sharing his very cheap way to make a water feature for model train. Over the years there have been lots of water ‘how to’ posts, but I think this one is particularly good.
That’s all for today folks.
Please do keep ’em coming.
And if today is the day you get started on your layout, the Beginner’s Guide is here.
Best
Al
PS Latest ebay cheat sheet is here.
PPS More HO scale train layouts here if that’s your thing.


Excellent work, Paul. Most effective. I love seeing what people achieve using simple methods and household bits and pieces. The toilet paper works very well. What a hobby! It gives so much scope for such a variety of ways to be creative.
Terrific Waterfront…….Thanks for the photos..
Really like the small pier in the middle and the sand and stone work below it.
Great job Paul ! Really like the sea wall too. How did you get the block effect?
Nice work. Very realistic waves. An alternative to using expensive ‘water’ products.
Jack in Pa.
Paul,
Terrific addition.
Simply adds much more appeal to the captains to land, whether local or foreign.
Bruce in SC USA
Thanks Paul I like to say Marklin of Sweden is a wonderful site (video) Great ideas and very good information. Paul thanks again for the waves, your wife did a good job matching the color. Being an artist it could be hard to do.
Absolutely GREAT work Paul! NICELY done and GREAT way of using normal household materials for this wonderful hobby!!!!!
Keep up the GREAT work! ~Hemi
Some of the finest waves I’ve ever seen. What kind of white glue did you use and did you thin it out with water. The affect is great. Thanks for sharing it.
One of the things I so much enjoy about these posts and this hobby is seeing how folks turn every day items and junk into beautiful scenery.
I’ve been around this hobby since 1960. I never saw such a unique idea. Well Done. Now I might have to scrap my model railroad and redesign to be able to incorporate your ideas.
That is a new technique to me, and very effective. Well done, Paul, and to Marklin as well.
Mn Dan
Love it, great how too!
Great job as usual, I look forward to this every morning.
So glad your wife stepped in once it was dried. Imagine her stepping into soggy TP! More seriously, thanks for an inspiring post. Using everyday materials beats the off the shelf expensive stuff in the league of achievement. Well done.
Macbear.
i agree with john birch regarding paul’s methods. it goes to show, you are never too old to learn new ways of doing things. i have been a real model rr in ho since the mid forties.
Well done Paul, very effective final product. I love any waterfront article.
Brian – the HOn3 guy – Knysna RSA
Great.. new method….perfect results…, impressed me enough that I am going to give it a try. Hope I am half as successful
Robert Cassidy, the block work is merely impressions made in white foamboard once the paper has been removed from the foamboard. Best to get the foamboard in the dollar store since it is easier to remove the paper than from the better quality stuff in the art stores. Get a couple of cheap 1/2″ brushes and remove the bristles completely right down into the metal band. Then you bend the band slightly to form different shapes in the foamboard as you press down into it. By doing this to two brushes you can alternate the shapes on the foam by turning the brushes 180degrees as you move along the foam. After all the impressions have been made you create the colors by using various acrillic paint washes letting each layer dry before adding more. This you will have to experiment with. I believe I gave Al some photos of how I did this a while back —maybe he can repost them.
Just used Elmer’s glue straight out of the bottle. If you try this method get the very soft multilayered toilet paper not the hard stuff like Scott’s. Also you apply all the layers in continous fashion not letting them dry between layers. You want all the layers down so that when you finish you can use the 1 1/2″- 2″ brush you used to apply the glue as a wave forming tool. This you do by gentily pushing the wet TP in the direction that you want the waves to be flowing. Toward the shore or into the harbor toward the bulkhead. Once this is done you have to wait a few days till it all dries before starting the painting. Darker blues in deep water gradually getting lighter toward the shore.
Great job using the toilet paper. Which do you prefer, the extra strength or the soft? Just kidding. Cheers! NJ Mark
Love the total look of the waterfront. Great idea using TP and PV glue. Always lots of useful information in this blog. Thanks for sharing.
Frank & Kathe, FL
Mark, make sure it’s unused. But the soft gives you more material to form the waves.
I’m glad to see that Paul credited Marklin of Sweden with this concept. Marklin is very talented and has great videos. I saw this method before and I was pretty sure it was from Marklin, but I didn’t know who had the concept first, Marklin or Paul. I suspected Marklin because he would not have made a video of this without giving others the credit. So now we all know. Thanks Marklin, and thanks Paul for trying what is probably a fairly new concept and making a success of it !!
Great looking scene and concept.
Roy Brownson Jr , Syracuse Utah, USA(near Salt Lake City, Ut. Home of the 2002 Winter Olympics)
Thanks Bob for your kind comments. Those who are interested in trying this should take a look at Marklin’s video as he does the whole deal right before your eyes. This method of making a water scene is a lot of fun especially since you create realistic wave right before your eyes. I have various water methods on my layout including Realistic Water from WS and a lake made of Envirotec resin but this method gives you the most contol. I just remembered that I forgot to mention that after all the painting is done, prior to coating the wave tops with flat white paint, you should coat the whole water scene with a clear gloss acrylic varnish. I hope to see some other attempts at making water this way.
Such a cheap and simple effect, which I shall note for future reference.
THANK YOU for explaining what is a “dry brush”.
Ms. Jackie
New Mexico
Paul….. that is a beautiful piece of work. The.water and the. Dock and the wall are the best I have ever seen. How long would you say did it take you to do this?
Looks like it’ll be a rough day on the water, plus incoming tide too.
Very great water scene Paul !
The Critic
“Mark, make sure it’s unused.” 😂. A good sense of humor required….
Very nice Paul. I have a different type of question. One of the reasons I haven’t started on my traction layout is because I am fulfilling my wish to build a model sailing ship. On ship building forums, they talk about longevity. Beeswax on lines (threads) is slightly acidic and the line will deteriorate int 40 years. Certain types of clear coats will discolor the wood, etc.
So I am wondering about TP water and how long it will last. Will is soak up moisture if you live in a humid area?. Will it remain hard? What about mold and mildew? Will sunlight affect the coloration? Just wondering.
great job, looks good. The many uses of TP !!
Looks like the next toilet paper shortage is going to be blamed on model railroaders! lol
Brilliant Method Paul for creating the Rock Wall.. Wondered how you accomplished that. Less expensive than buying those plastic sheet panels! The Waves and Color of the Water are very convincing. Just Wondered about the boat hulls.. Could you have placed the boats into the wet T.P. when you were making the waves and water in the harbor? That way when you finished the scene, the boats would look more like they were in the water without any “shadow gaps” along the bottom edges of the hulls. Just a thought. Also, you might want to have some fun with guests by putting in scale shark’s fins on the surface… with a tape loop playing the theme song from “JAWS”… For the real 3 D Effect… get a Fish Oil Gel Capsule and Break it.. mix a little in water and brush it along the edge of the water line, by the Fishing Boats.. Nothing like a Real Fishy Smell by the Fishing Boats… LOL. But that might draw the Pet Cat towards the layout….~ Mike in N.H. U.S.A.
I’m very impressed with your layout! I attempted years ago to create water on my
N-scale layout, but I like your method better. I’m going give it a try.
Pretty Neat.!!!
Impressive !
Greg you have got to be kidding!! Stop worrying about the line deteriorating in 40 yrs or the toilet absorbing moisture and start building your layout. Those are the most silly excuses I ever heard for not starting.
Mike Balog I explained how to make the stone wall earlier in the replies. Just make sure you buy the cheap foam board in the dollor store because the paper is easily removed exposing just the foam. You then can make some tools using cheap small paint brushes by removing the bristles and bending or forming the ferrule into various shapes that you then push into the foam to make the stone shapes. After that it is a matter of using different color washes to achieve the colors you want on the stones. Have fun —remember you can’t hurt anything just start over and experiment.
Nicely done and good grammar and proper spelling. Some say it’s not important, but it is and it makes reading a tutorial so much easier to understand and much more enjoyable.
It’s also such a simple technique and method of creating water. A friend of mine made a coat for a metal figure from tissue paper and pva glue when we were both in high school. I mentioned it to him and he was surprised that I remembered after so many years. It’s really a great method to to use and doesn’t require specialized craft supplies…. which means it’s inexpensive.
Frank in Orlando
Interesting technique. Really well done. Very convincing waves. I really love the breakwater(s) and bulkheads you’ve constructed. My only observation would be that when you are so near the shore, the water color I’ve observed in most harbor areas is usually quite a bit more green than blue. At least that is what I’ve seen on the East and West coasts of the U.S. Of course, if you are depicting the shores of Hawaii or one of the Carribean islands your blue would be more realiatic. Along the more Northern coasts the water doesn’t turn blue until you are farther out at sea. That is owing to the effect the vegetation below has on the water color in shallow areas, and the effect the depth of the sea and the color of the sky has on water in deeper areas.. –Tom
Thanks Frank for your comments. I too don’t understand the grammar I see in some of the replies and submissions. You would think that people in our vintage would be doing much better than some of the stuff you see from young folk. I guess they were asleep in their English class.
I like the comments by Mike Balog to add realism to your harbor scene, and I would like to go a bit further and say , as it appears it’s a pretty windy day on the docks, the waves should splash up against the boats and the piles. The waves look great and the method seems like a good way to make them.
Mike I understand about having the hull partly submerged, but at the time I did the water the docks were not built. Therefore I didn’t know where the boats were going to sit. Another way to do it is to sand off part of the bottom of the hulls so the boats appear lower in the water. This would work with very flat water, but in my case the water is 3 dimensional. I guess you do whatever “floats your boat.”