Peter’s been in touch with his OO gauge layout
“Hi Alastair, Hope this one makes it to you!
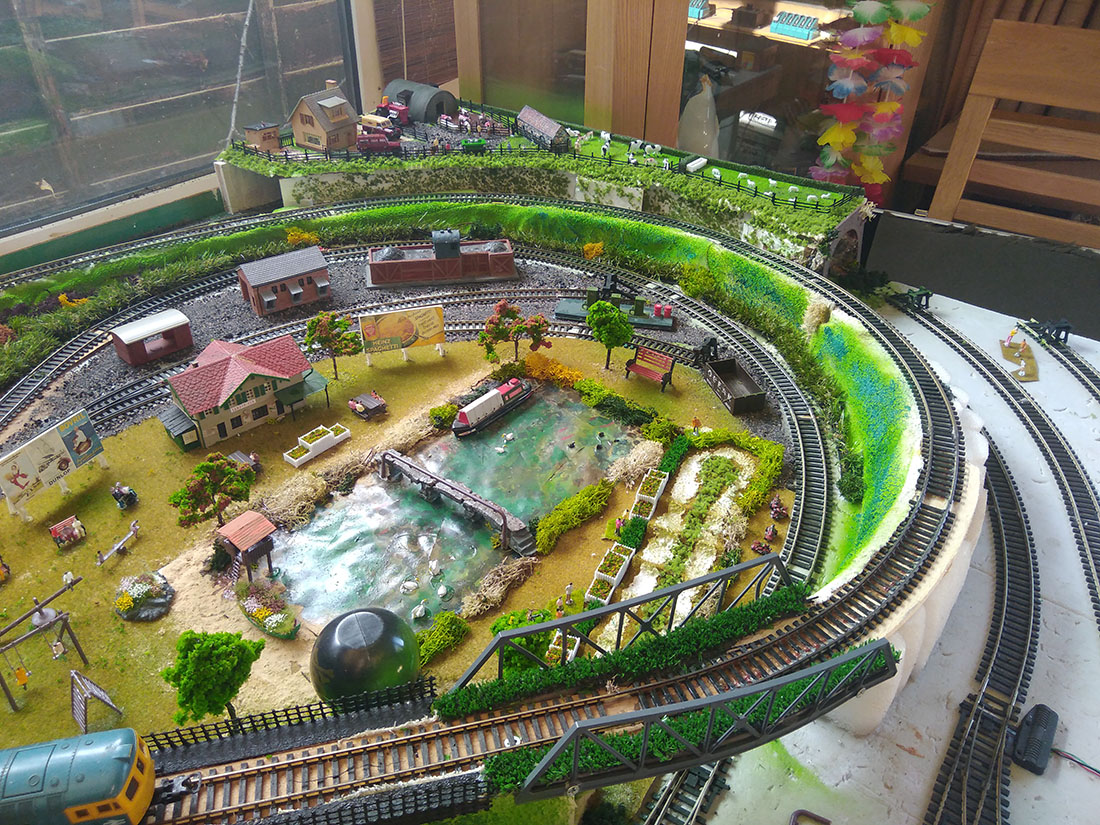
I thought this might be of interest to railway modelers frustrated by lack of space.
Firstly, a big thanks to you!! For sending all the tips, Videos, and photos over the past few years!
They have been a great help and inspiration to many im sure!! and someone like me who at the age of 76 is just starting out again after a break of some 6 years, and especially dangerous Dave with his wonderful layout videos and tips are so wonderful to watch and the change looks interesting!
I have been a scale rail modeller now on & off for over 60 years since a child of 10, through a happy marriage still going after 55years and two children which both had train sets!
I have restarted now with a vengeance!
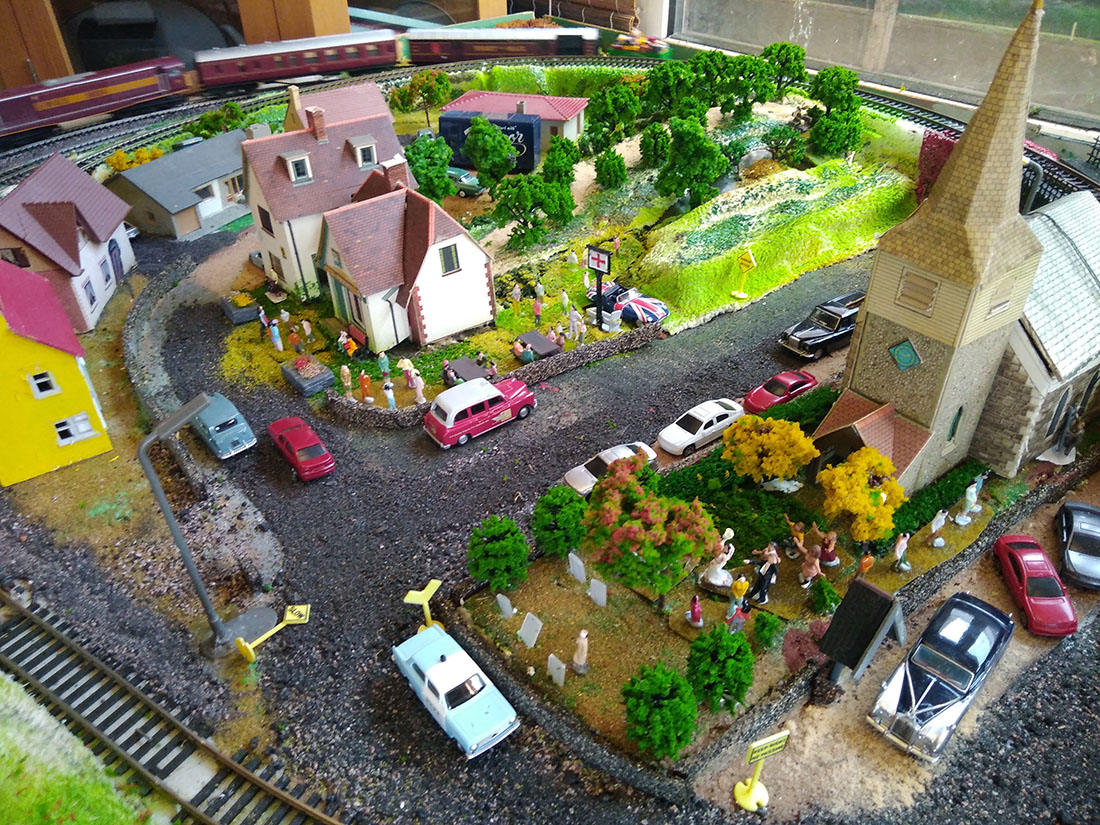
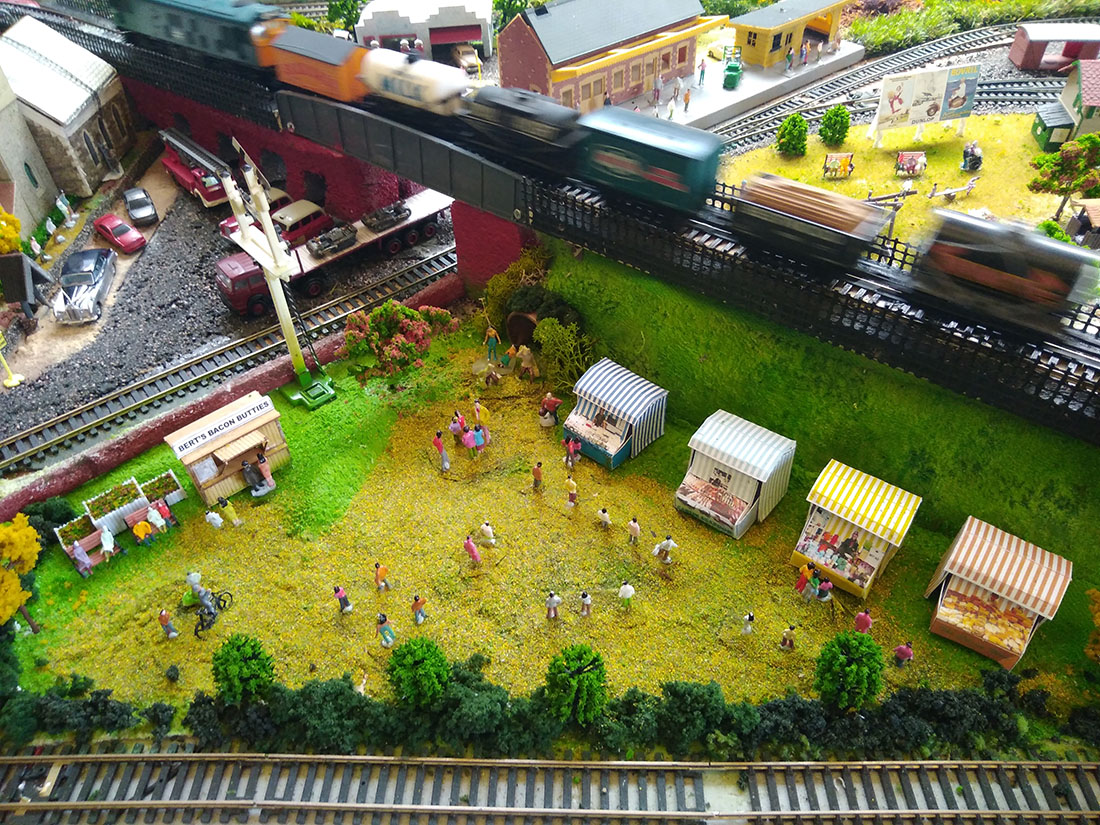
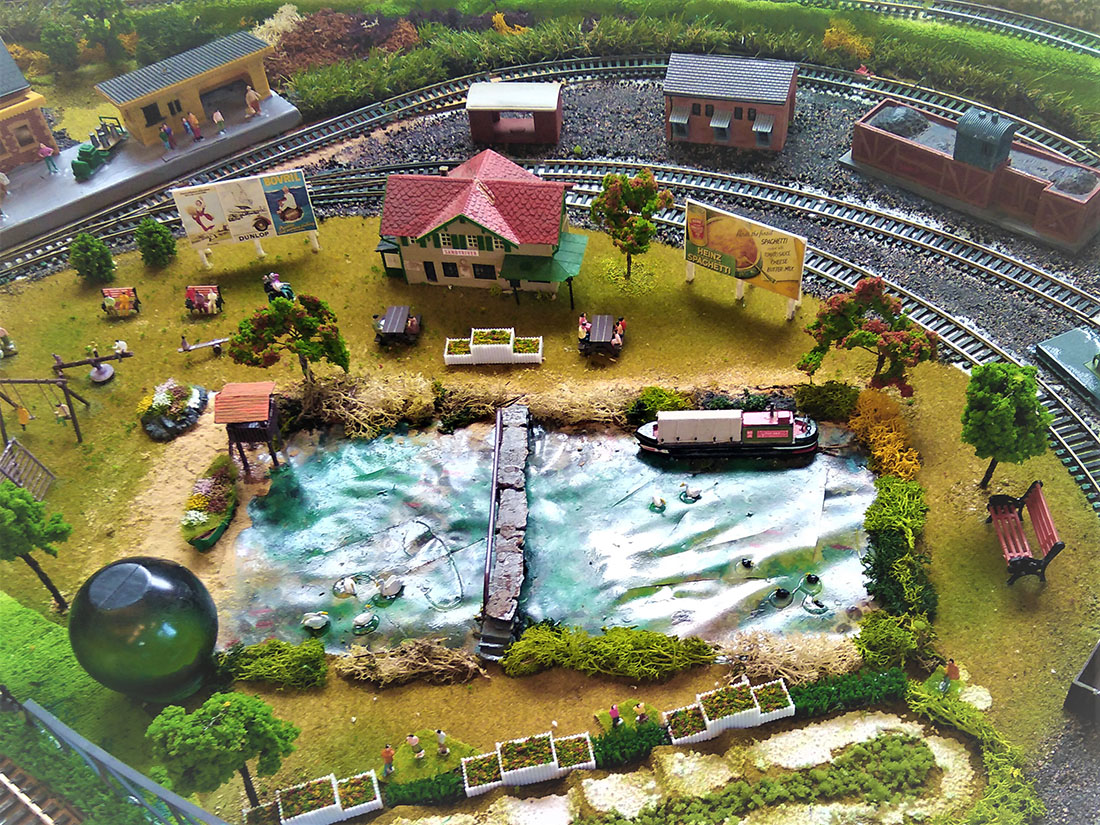
I have included some shots of my layouts so far! With still much more work/fun to do. More pics to follow next mail!
I have two layouts, one is a OO gauge layout and the other a N gauge they are both in the 1960-70s era with various scenes of interest namely a church wedding, a market, a play park and farms so far, with various steam and diesel locos pulling coaches and various trucks etc around separate tracks.
One of which I made a big change too at the start of my resurgence, as when I last put it away I decided it was a bit boring, with having the a trains going round in circles on three separate tracks on my 8×4 00 gauge layout.
So, the first thing I decided getting it back down was to change the 00 gauge to a figure eight track around two tracks and keeping the other one still going round the outside! Which took some time to do, with various incline try-outs until it worked efficiently! Well am I so pleased!!
It makes so much difference and would suggest it to anyone to look at it, as a possibility? As it makes it, so much more interesting and far from boring!
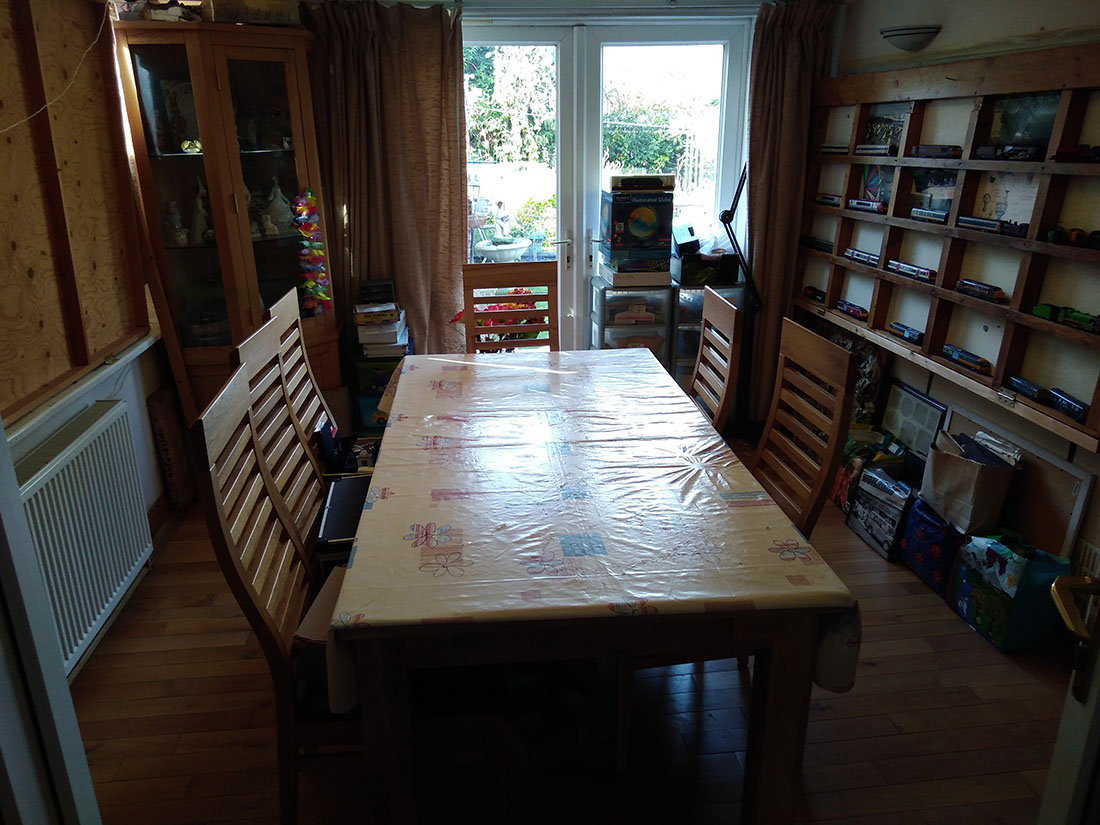
So, as I said I have two layouts one a 00 gauge on 8x4ft board and one a N gauge on a 7×3.6ft board, which are both in my Dining room of 9x13ft. Which we only use when we have guests for dinner or tea as we mainly eat our meals in the kitchen!
One on each side, both hinged to the wall on right side wall, and the windowsill on the left side! this enables me to lift them up out of the way when room is required for dining etc. But it requires a good solid bases to support and keep their shape when lifting them up & down!
The 00 gauge one hinges have removable pins, so I can detach when I need too! The N gauge is set off the wall by six inches to allow for the scenery, the 00 gage is set on the windowsill which gives good space for scenery
The other reason I got bored was that I purchased a DCC system 6 years ago which I attempted to install on my 00 gauge without success, I set up a programming track as advised, wired up the chip as instructed to no avail! Not a sign of movement from the loco!
My main frustration was not knowing if it was a faulty chip or my bad connections!! After trying different connections etc I gave up and put the layout away in frustration!
The other main frustration is how to keep couplings from coming apart???
I go to various exhibitions & shows and see how these various layouts work with mainly no problems with couplings, how do they do it, what is the big secret?? I was wondering if any of your followers might have some advice and ideas on these two frustrations??
Best Regards
Peter”

A big thanks to Peter for sharing his OO gauge layout. And who can help him with his frustrations? Please leave a comment below if you can.
That’s all for today folks.
Please do keep ’em coming.
And if you want to stop dreaming and start doing, just like Peter did, the Beginner’s Guide is here.
Remember, it’s the start that stops most people.
Best
Al
PS More HO scale train layouts here if that’s your thing.
Need buildings for your layout? Have a look at the Silly Discount bundle.

Couplings: trial & error with blobs of plasticine to weight the coupling (to stop “bouncing” out). Jewellers’ digital scales can be used to refine this & maybe, you can find teeny magnets that could replace the plasticine in due course ?
Not sure about N gauge, but with 00 I find that unwanted uncoupling can be caused by uneven track, including the point where a gradient stops or starts. Does it always happen at the same place? Entry and exit to curves, especially if they are sharp, as found in “train set” track, can also be problem points.
If it happens with the same vehicles each time, check that the couplings are at the same height. Also, are they the same style of coupling? Different manufacturers use different sizes and shapes, supposedly compatible, but…! Plus they (Hornby notably) have a habit of experimenting with variations and even completely different coupling designs. See if keeping the same type of couplings in each train helps…?
If the couplings are fitted into NEM sockets it is easy to change them and relatively cheap to do that. Older metal types may have got bent out of shape and can usually be carefully corrected using the Mk1 human finger and thumb 🙂 Otherwise, those held in place with a small screw can be replaced if damaged; the plastic ones moulded as part of the bogie or body are difficult to replace, but then again are less likely to go out of shape.
Hope that helps, have fun!
Had the same problem and discovered that i had left the dc track coupler in . It stops the dcc working because it has inbuilt resistors etc.
hope that helps
DC
Hi
That’s a nice layout it’s nice to recognise the buildings like I’ve got that church!
Two little helpers. Use a small pair of pliers and adjust all your couplings from the sides so they are absolutely level I’m guessing they are probably all Hornby but if not there’s another problem if you have different makes of coupling they will tend to disconnect. Try making a train up of only one type of coupling. Certainly the Bachman small couplers don’t like early Triang and Hornby.
As to the DCC issue never ever use a standard track connector as it has a tv suppression in it which will play havoc with all the electronics. Try using little crocodile clips to the track. Test the track with a 12 volt bulb a spare from your car would do. If that’s looking good recheck you footed the wiring for the decoder the right way round. Depending where you are in the country with our lockdown you could take the loco in to a model shop for them to test run on their dcc track.
Hope this helps
Roger
Hi Peter
Love your layout, how about some pictures of the N scale.
Steve is pretty much on the mark with the differing designs in the couplers and keeping them “matched”. The situation with N scale is diabolical, something as simple as a sticky coupler can bring it all undone. I personally make up block trains using simple hook and eye connectors.
Hope this helps
Peter, Both of your layouts look great. I’m amazed by how much track and detail you’ve managed to squeeze into the OO layout. I especially like the park with the country fair booths. As to your DCC problem, you can buy a DCC tester from several companies on Amazon that will tell you if the DCC board is good or not. If you had problems wirng the board, it’s possible that you’ve damaged it in the process.
I couldn’t tell from the photos what kind of couplers you’re using on your rolling stock. With Kadee couplers, you just need to check the height and alignment with the gauge and that the magnetic brake line that hanges below the coupler is bent at the right angle. If you’re using some other style of coupler I’ll have to leave that for our European friends to suggest solutions.
Peter,
After reading all of the posted comments and suggestions there is little I can add. I am pushing 70 and also just started collecting and putting together layouts. I collect vintage and some new and suffer with the same coupling issues. I have learned a lot and in my mind all of the recommendations have merit and the fixes are pretty much covered. I use all types of couplers and the european types are the best in my opinion, especially those used by Marklin, Hornby, etc.. However, they even have issues because of subtle differences in size and heights made across the ages. It is an issue that plagues everyone at some point. I do test all of mine and even find direction can be a cause of uncoupling as well as a fix for it. I do agree, the simpler the coupling, the better. I know this isn’t much help but just want to let you know you are not alone with the problem.
In closing, I also use the hinged layout approach in my shed during the winter when that space is needed for bigger toys like my side by side, zero turn mower, 4 wheeler, etc. But I stay away from inclines so the platform (4′ X8′) will hug the wall when I need that space. In reading your story it was uncanny how close to my situation it sounded. But I do stay out of the dinning room for health reasons, i.e. my wife is supportive of my hobby but she does draw the line. Keep at it, you will find a fix that works best for each type.
Best wishes,
Dave
Peter
Congrats for proving, once again, that where there is a will, there is a way. Can’t help with your problem areas. Good luck and happy modeling!
Peter there are numerous variables that could be causing your DCC problem. First off was the engine that you installed the decoder in DCC ready from the factory or is it an older unit that may have a motor which is not isolated electrically from the frame. If the engine is very old the motor grounded to the frame maybe the problem. What DCC system are you using to control the trains and do factory installed DCC engines work fine with it? Remember all DCC decoders come setup to run on #03 address until you reprogram them. If you test the programming track for power the indication should be about 14.5 volts on the AC setting which is not really AC voltage but is only an indication available to us without special meters. Basically we need as much help from you telling us what you did as you need from us.
Mine train layout is going look something that. Neat layout.
Peter………On your uncoupling problem……. check your trackwork and especially check the leveling of your track work. I had uncoupling issues also and it took me a while to realize that the changes in elevation (no matter how small) from section of track to track causes the couplers to move up and down and become separated. Also, imperfections in your trackwork can cause uncoupling. Run your fingers along the rails and feel for misalignments or separations. The smallest of imperfections in your trackwork can cause a uncoupling. Hope this helps.
OK, What are bacon butties??? Im in the USA and honestly am intrigued by this item….
Peter, you layouts are so interesting. I like how you have created so many scenes to explore!
On the couplings, I have found there is benefit in using the same brand for all the cars. I noticed that when I mixed brands I started having problems, so I switched all my cars to Kadee couplers and most of my problems were solved. As a few other folks have noted, it also matters that the couplers are mounted at the same height. If they don’t line up with each other that will lead to disconnects as well. Good luck to you, and thanks for sharing the pics of your layout!
Peter is in England and they don’t use Kadee style couplers over there. So all the advice doesn’t work for Peter. If you remember Dave tried the Kadees at one point. He would be the best to advise Peter since he has experimented with so many couplers.
Bob from Towson: Butty is just slang for sandwich. If you want to start a whole new argument we could debate whether a bacon butty should have butter on the bread and/or ketchup on the bacon. Could take all day!
Re couplings, one of the problems with NEM pockets is that the couplings that slot into them tend to drop slightly, which can lead to them riding over one another or to the droppers catching on point blades, it may be necessary to add some thin packing under the coupler in the pocket.
Rod
Hi Peter, My name is Rocco and I am from New Jersey in the good old USA.My advice to you on your coupling problem is, Try going to http://www.Kadee.com website this company has a big array of couplers that you can use. Of course you will probably have to do some modifying, but it will be worth it. They also have couplers for european lines. The only thing is that you must have NEM pockets on the cars for the couplers. If you don’t have those pockets then you are going to have to modify the cars. I am also 76 years old and have been at this for a good 60 years. I feel that Kadee couplers is your best choice. Look up the website. Good Luck.
I also swear by Kadee couplers on my OO layout, but as others have said, the coupler height is critical.
So also is the change of gradient at the top or bottom of a hill. If you go straight from a 2% grade to flat, longer locos and carriages will lever their ends up enough to change the height of the coupler and it will disconnect, sending everything back to the bottom again! Make the gradient change gradual.
Peter
The room looks better with trains in it. LOL
You must not have DC electrically connected with a DCC system to the layout. I do it with selector switches. First test is take a multimeter, set it on ohms, and check for shorts between the track. There cannot be any shorts.
Looking at your layout you have a decent amount of switches so you might need more power connectors with DCC than you might with DC.
I am perplexed why the test track doesnt run because it should only be DCC and absolutely & totally separated from the layout. It should only be used for programming decoders and not have any affect on the main layout or you’ll reprogram all the engines by mistake. Again, electrically use selector switches or manually switch the DCC power from the main to the test track. You should never be able to run the main & test track at the same time.
As to couplings the group has given you sound advice, I agree, and cant add further.
Best
really nice job.
Well pretty much all the bases have been covered with the fellow modelers comments , I’m certain you will or have already sussed out the issues . All the advice aside , wow! , what a great layout , love that you have hinged access in the dining room . We’ve all heard the story of the biker rebuilding his Harley in the kitchen , I believe you’ve got him beat ..
well done & love the church
I like his work. Sand, gravel and stones are not mixed all together, very orderly and pleasure to view, how it should be…
Rich, Regarding
Peter Is that park bench for an occasional giant strolling by the pond/? lol.
Size does matter. The barge is loaded with no where to go.