Cameron and Rob have been back in touch with more on their model train buildings:
“Dear Al,
Yet another instalment.
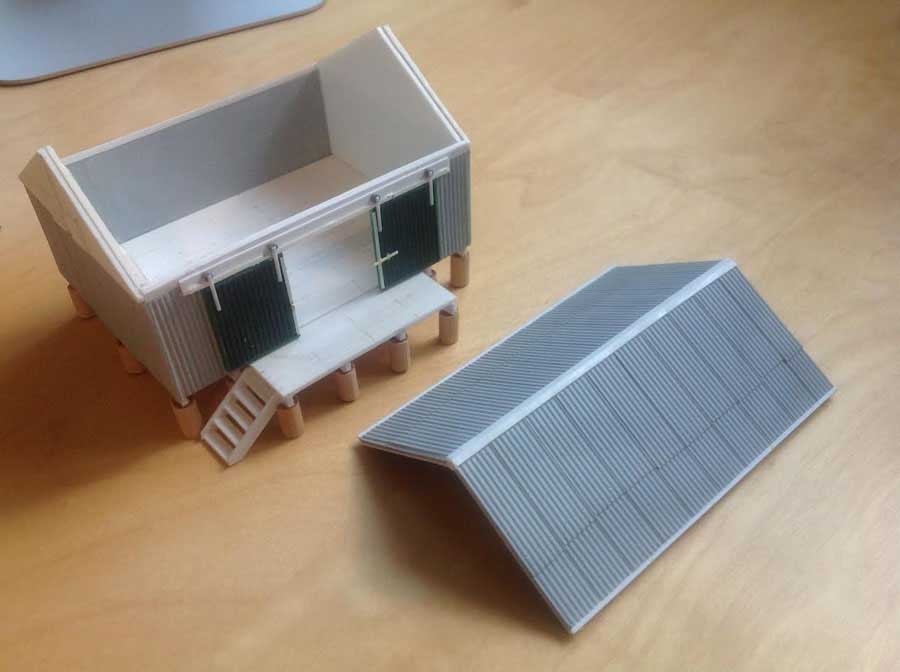
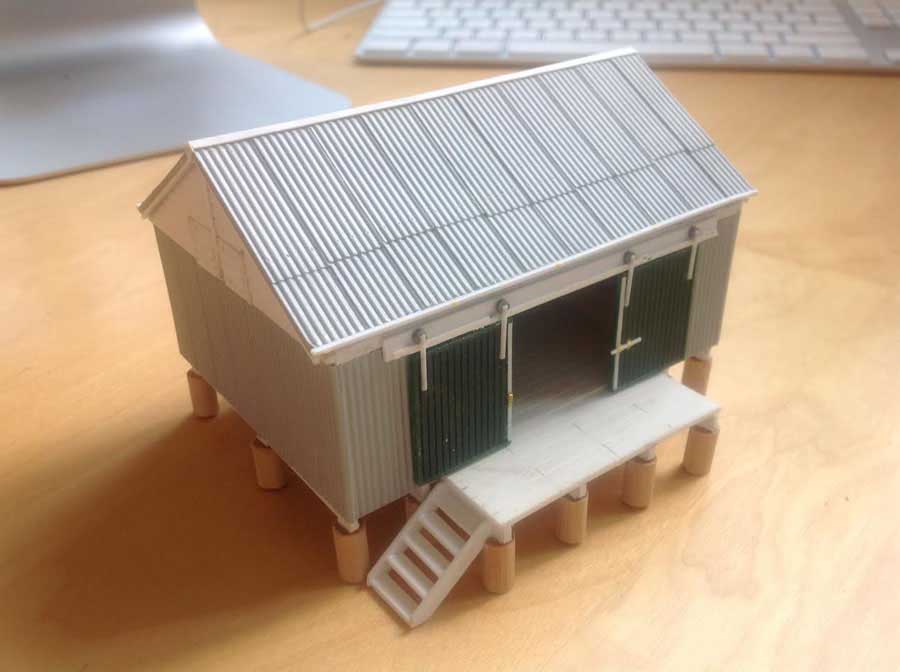
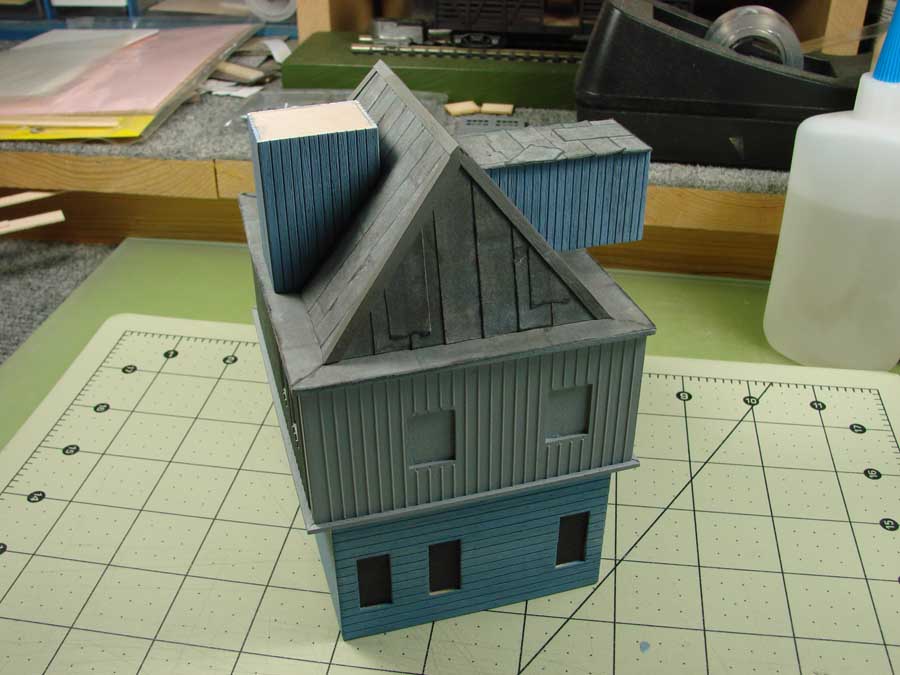
The third building constructed for the layout was a provender store located at the end of the siding. This most likely would have been used by private feed suppliers for the surrounding dairy farms. There was little in the way of photographs of this building available other than in the background of a few grainy black and white photos.
I looked for photos of similar structures to fill in the gaps and filled the shed with feed sacks which more than likely would have been stored in the prototype.
Like my other buildings this is also made with plastic card except for the stumps which are timber dowels. I always keep an eye out for plastic card sheets at the second hand stalls or buy/sell events organised by my local clubs.
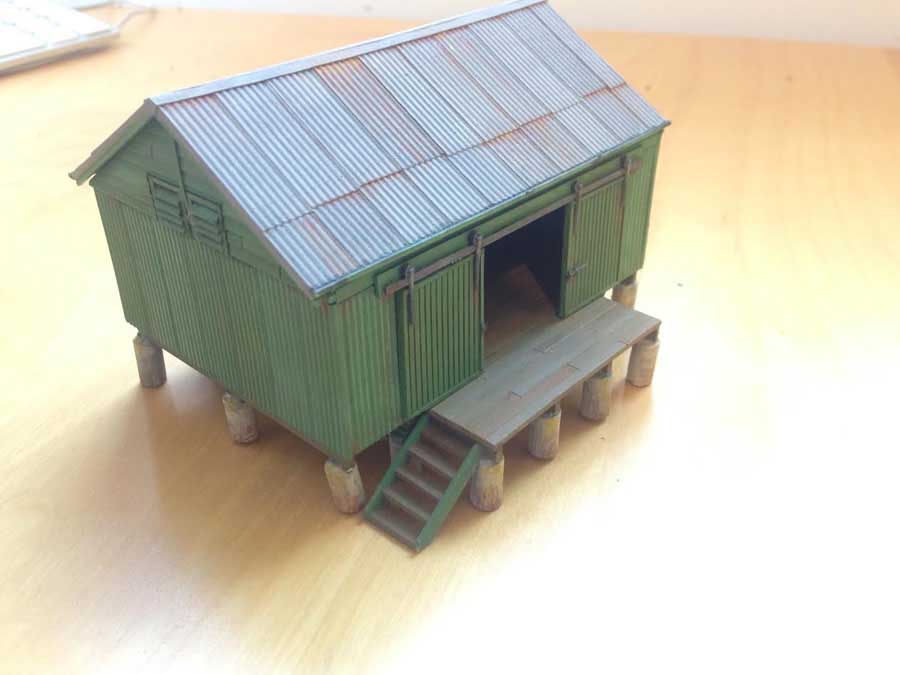
I got some comments on the weathering on the previous posts so I thought this might be a good chance to share my method for this. In the past I have tried all sorts of weathering techniques including weathering powders, acrylic paint, real coal, talcum powder etc.
These all work well but there is a lot of trial and error before you find the right combination. For these buildings I have just used a few basic enamel colours (gun metal, orange, dark grey and yellow) combined with some dirty turpentine to get the desired effect. I like this method because there is less to remember and it is easy to move between one effect and the next. As with any weathering it is important to work of photos of real weathered objects.
Cameron”
You can see more of Cameron, here.
Next, Rob with his model train buildings too:
“Hello Mr.Lee:
My name is Robert …a 75 year old Ho scale modeler.
The intent of this email is to share an alternative method of building model railroad structures.
I started modeling HO scale almost 50 years ago. Back then Campbell Scale Models was one of the key manufacturers of Ho scale kits.
These kits…as well as…other manufacturers required a lot of time to build.
Start to finish could be as much as a month depending on the complexity of the kit…ie: Fine Scale Miniatures.
Fortunately…a number of major improvements have made the Ho scale scene.
Pre-cut parts…plastic detail parts…and currently laser kits.
Even the latest technology requires a lot of time to fabricate a kit.
Specifically…reinforcing the cutouts with bracing…set aside to dry…and then assembling the various braced components into a basic structure…making certain that all is square and true.
At my age I am on the short end of the stick and time is valuable.
I cannot afford to spend more than a day or two building a structure.
Hence…I am sharing my process for speeding up the building process.
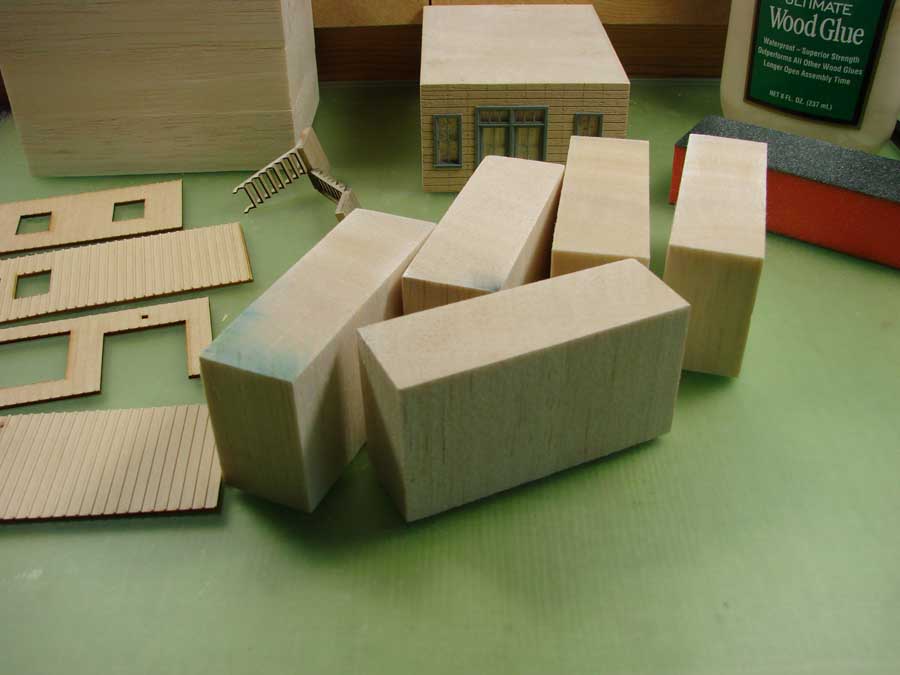
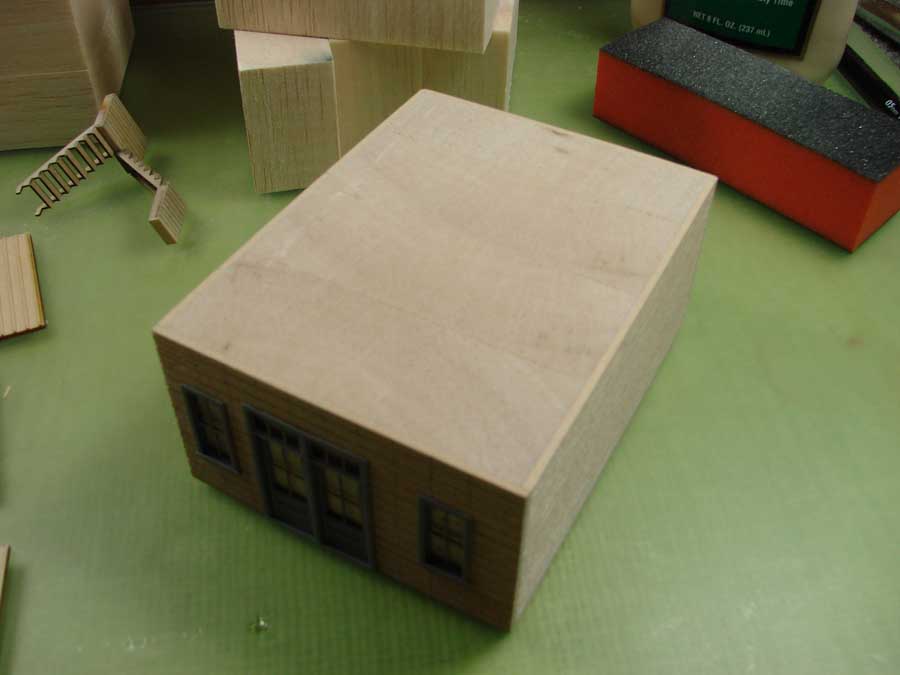
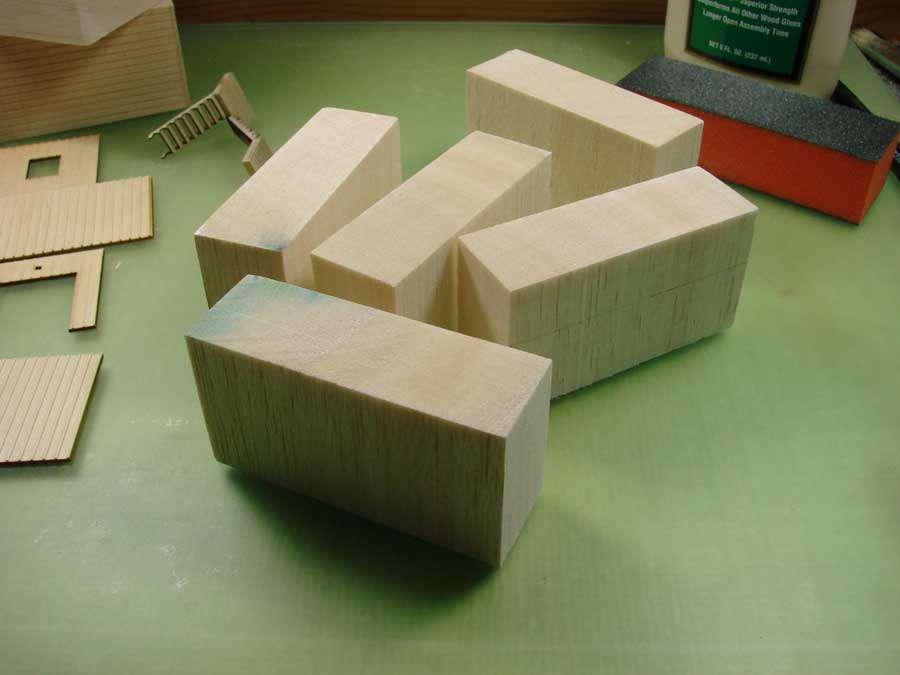
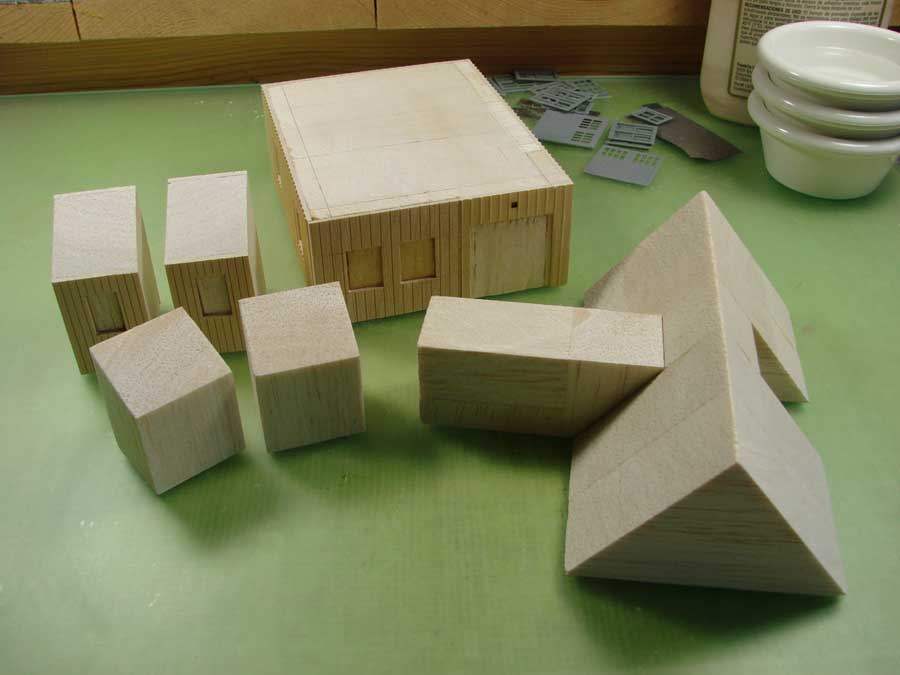
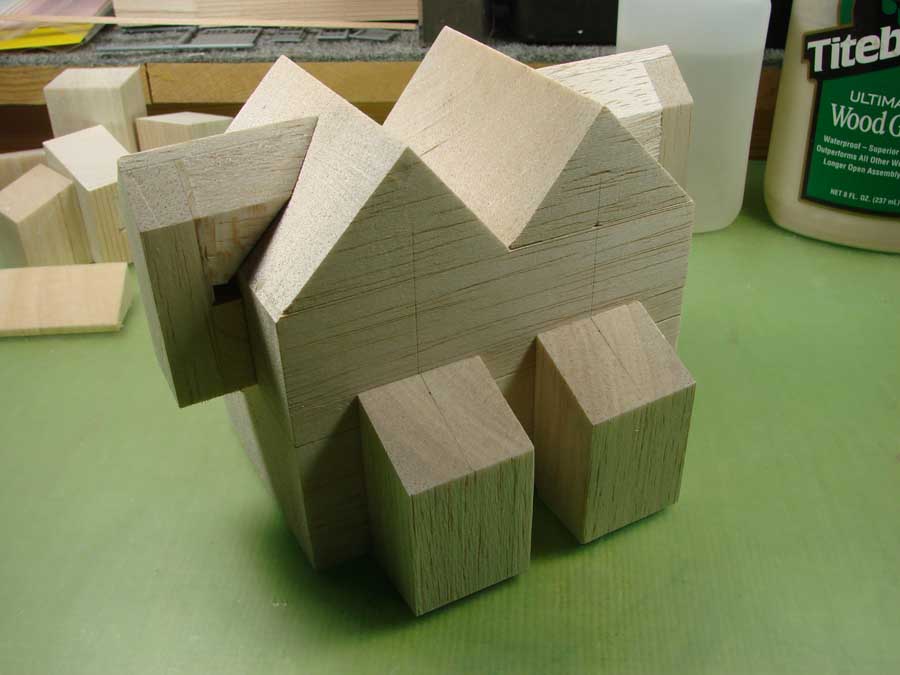
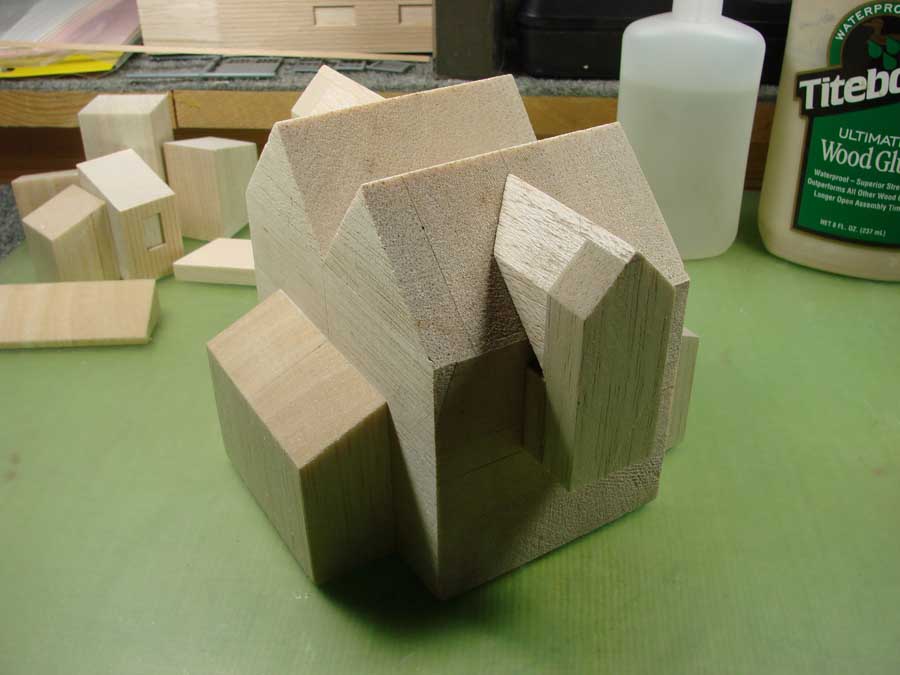
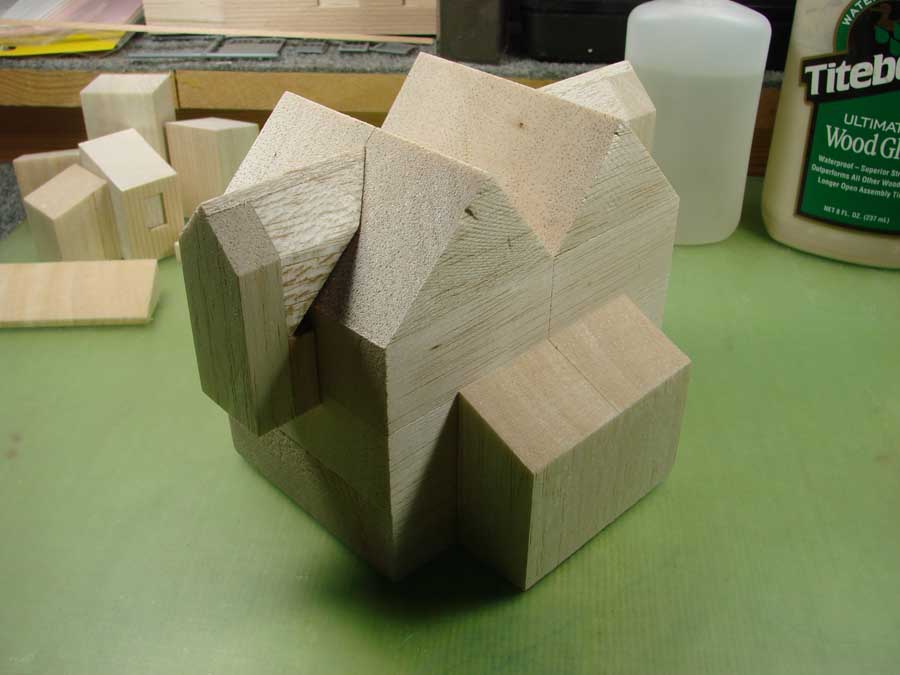
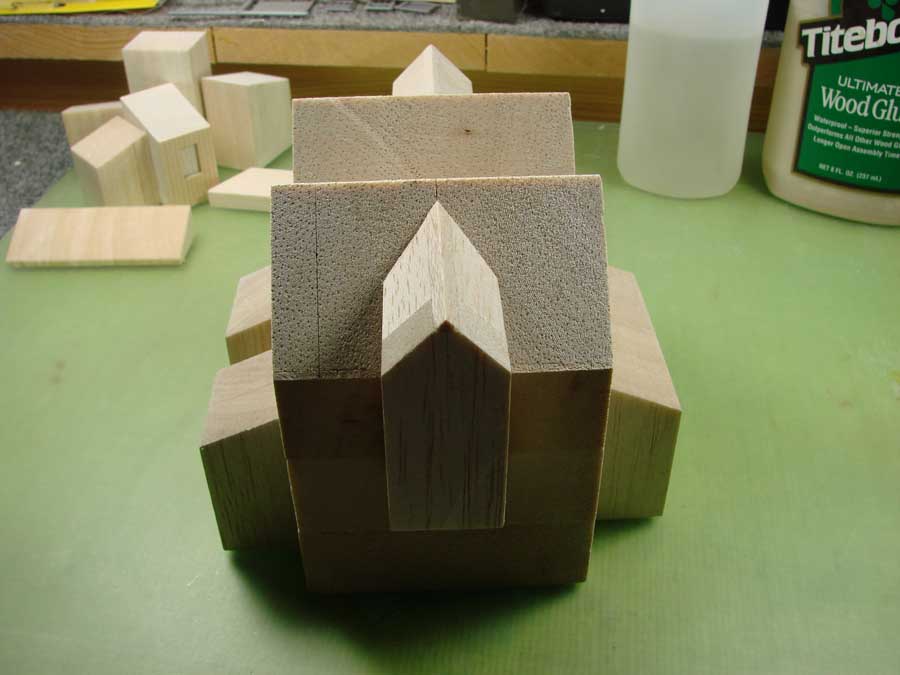
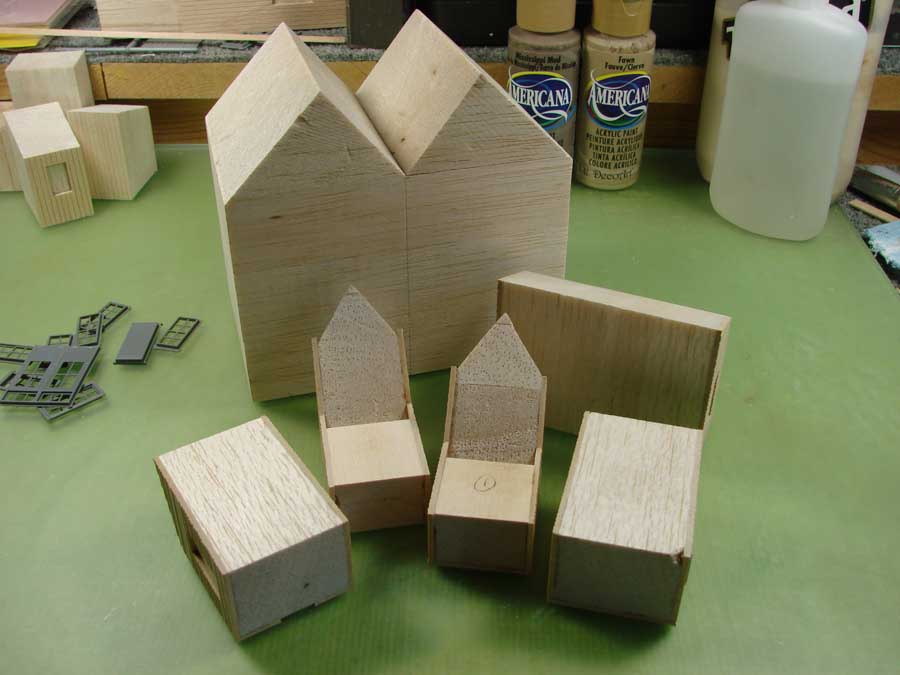
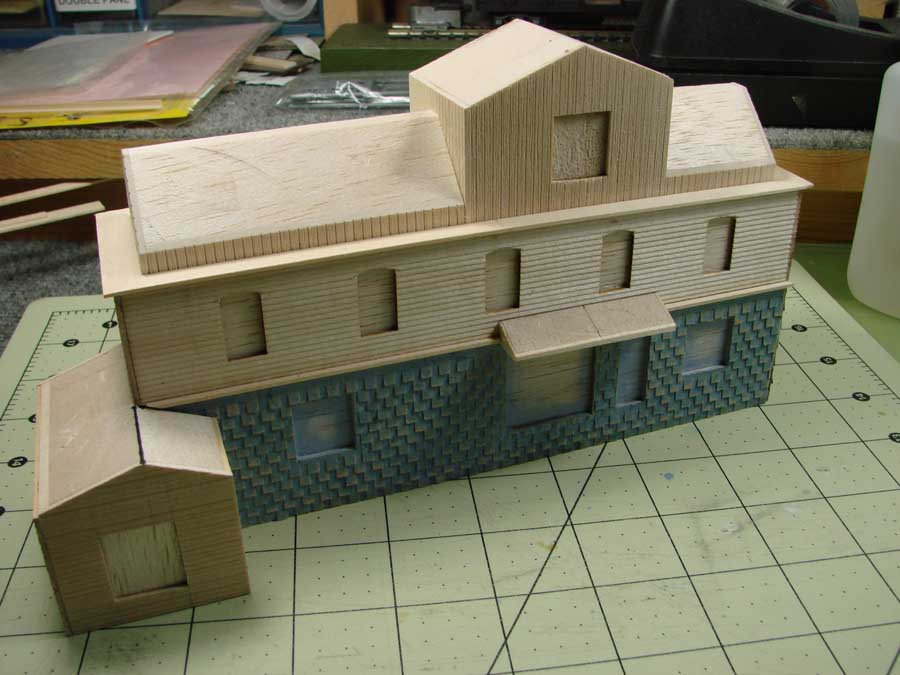
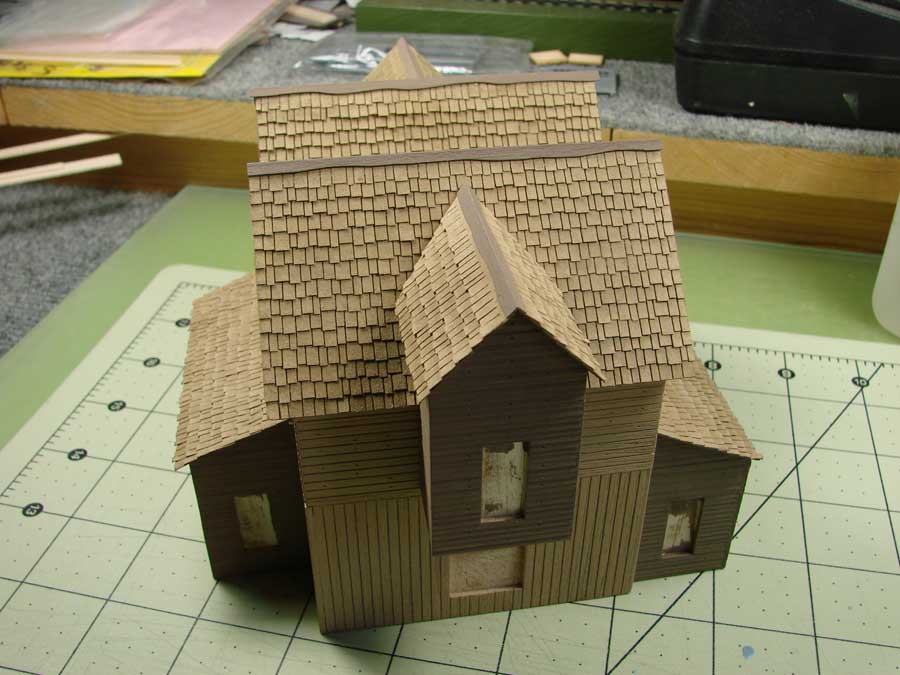
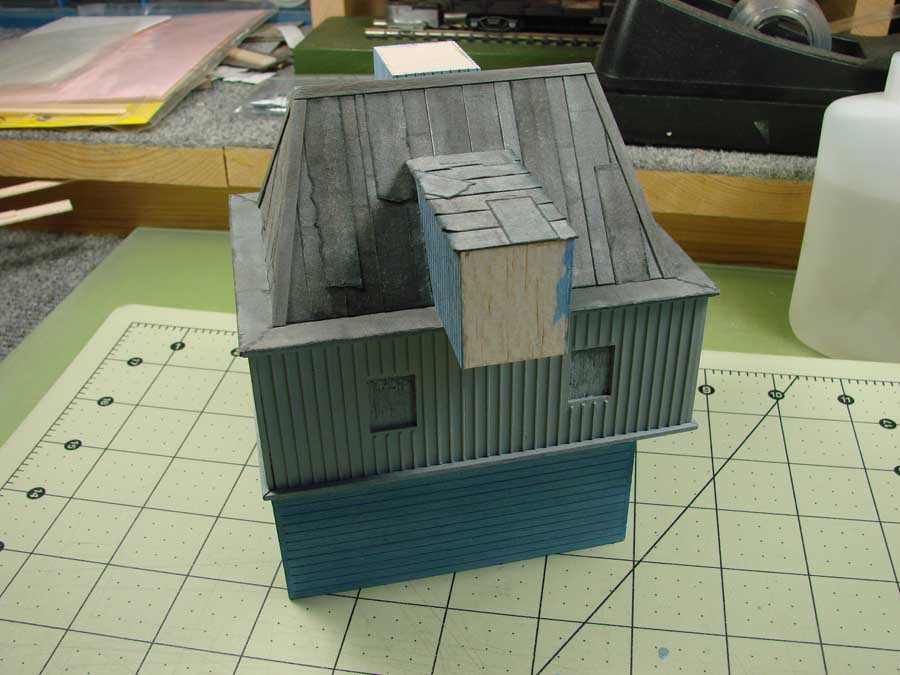
I now build solid balsa cores that I veneer with the type of finishing materials required to complete the model.
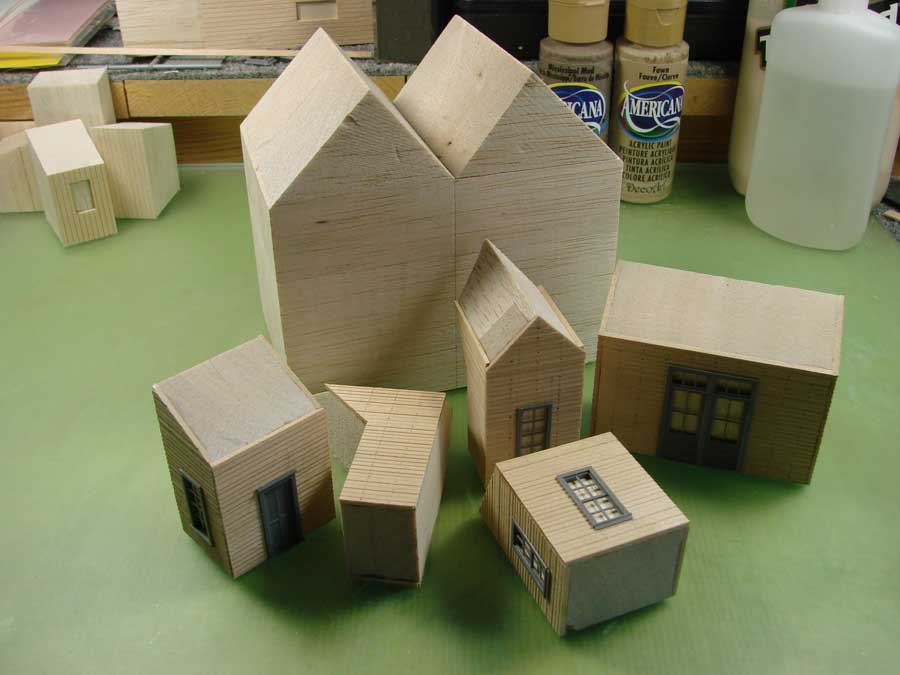
Attached are some photos of my process and I no longer have to anguish over bracing…drying time…combining components hoping that all is square and true.
The structures that are almost complete took me less than a day to build from start to finish.
Best regards,
Robert, USA”

Model train buildings:
Now on to Dave:
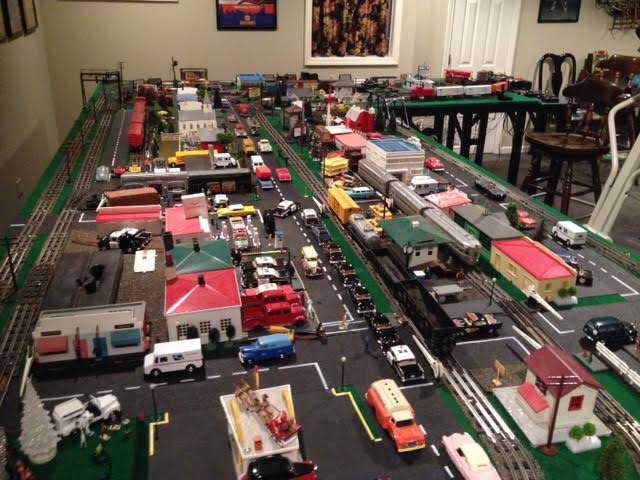
“I’m new to your great site. I’m 66 years old, retired, and lucky enough to have my first Lionel 027 set from 1951. I’ve added to it past few years. Theme is Des Plaines, IL where I lived as a child.
Time frame is 1949 to 1961. The train set, layout, buildings, scenery, etc. sort of defined itself because Plasticville buildings from then look just like Des P looked then. Train station, bank, first McDonalds rstd., O’Hare airport which was in Des P until Chicago annexed it, and lots more. Des P was known as “City of Roses” back then and was primary local industry, so of course I have greenhouses. Lots of little touches. I find inspiration in your postings.
Thanks,
Dave”
Now on to Bern who sent in this fab layout:
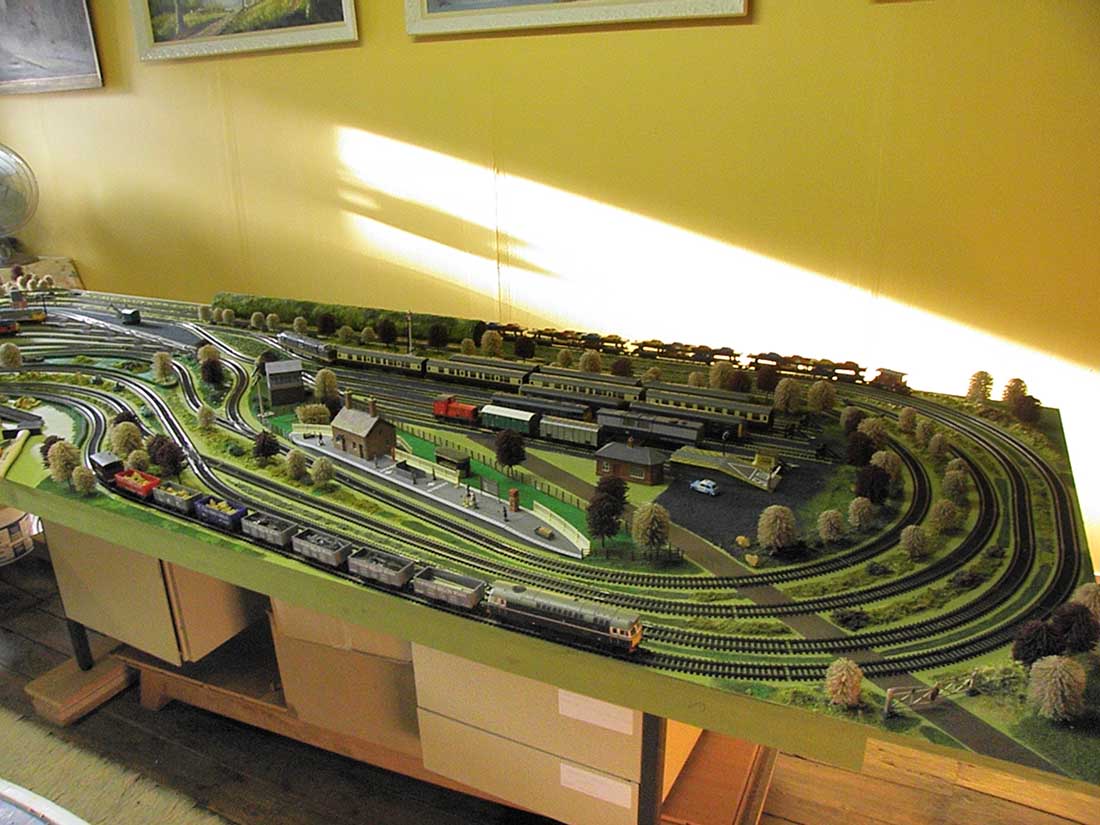
“This project started in July and at last I think I have sorted out the track as I want it, now the big task is to fill in the scenery.
Because of the spacing between the tracks, organised that way to get the longest running time, I am limited to what I can fit in so decided against buildings, choosing to give a more country look.
Trees have been bought on price at an average of £2 for 3, given the quantity I needed to give a “woodland look”.
Most of the grass area is made up with sawdust dyed with green food dye, it does lose its colour, so I am now going over it again adding commercially bought scatter of different colours which seems to be working.
The outside running track is fitted with crossovers giving four circuits of the board to return to the starting point, at an average speed this takes 2.25 minutes.
With planning and quite a bit of luck I have run three trains at one time but a watchful eye is needed to avoid a crash at the crossovers.
With this in mind I fitted three sets of points allowing to change between tracks.
There are five sidings for passenger trains and seven sidings for freight all installed on two 8 x 4 foot boards fitted together in an “L” shape.
One of the next things, do I ballast the tracks ? As you can see there is a lot of it, around 90 metres, and I am a little concerned that I will end up with something totally immovable.
Living in rural France, near Mont St Michel, I have been unable to find anyone interested in model trains, the shops that do have any trains are very expensive and extremely small amounts of stock and tell me no one had been interested for the past 12 years.
Is there anyone out there near me ?
Regards
Bern”
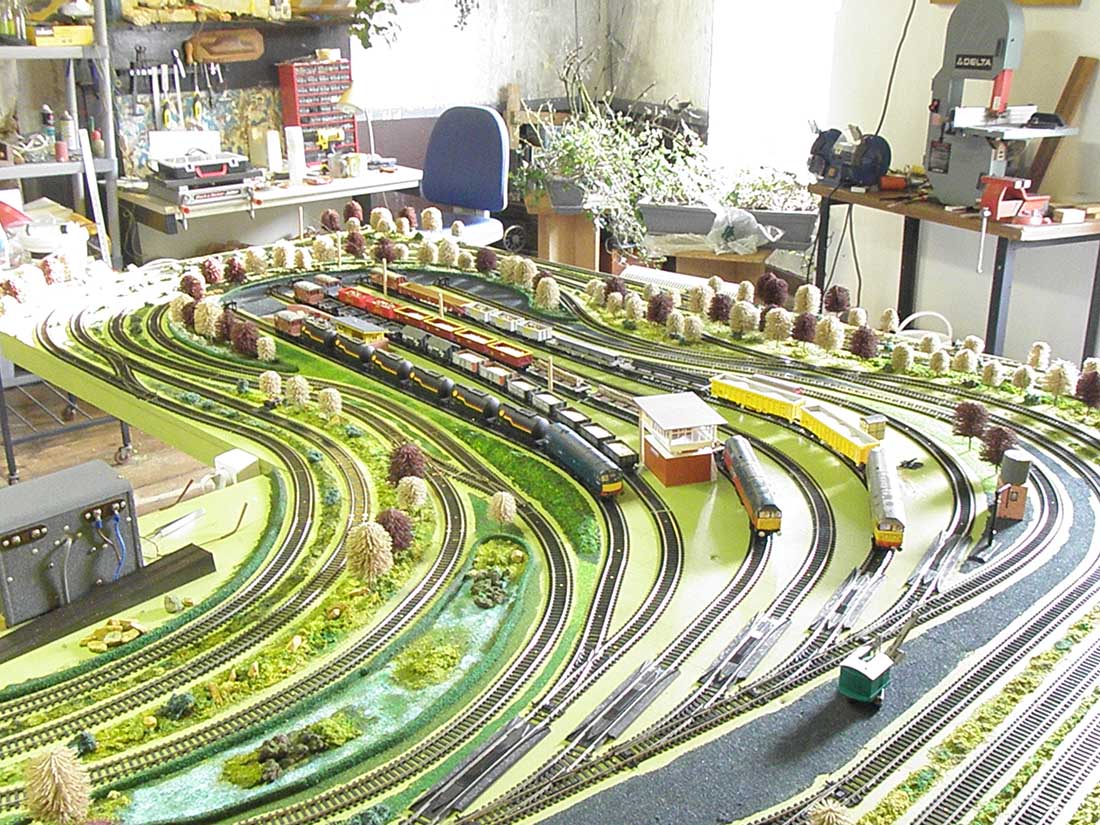
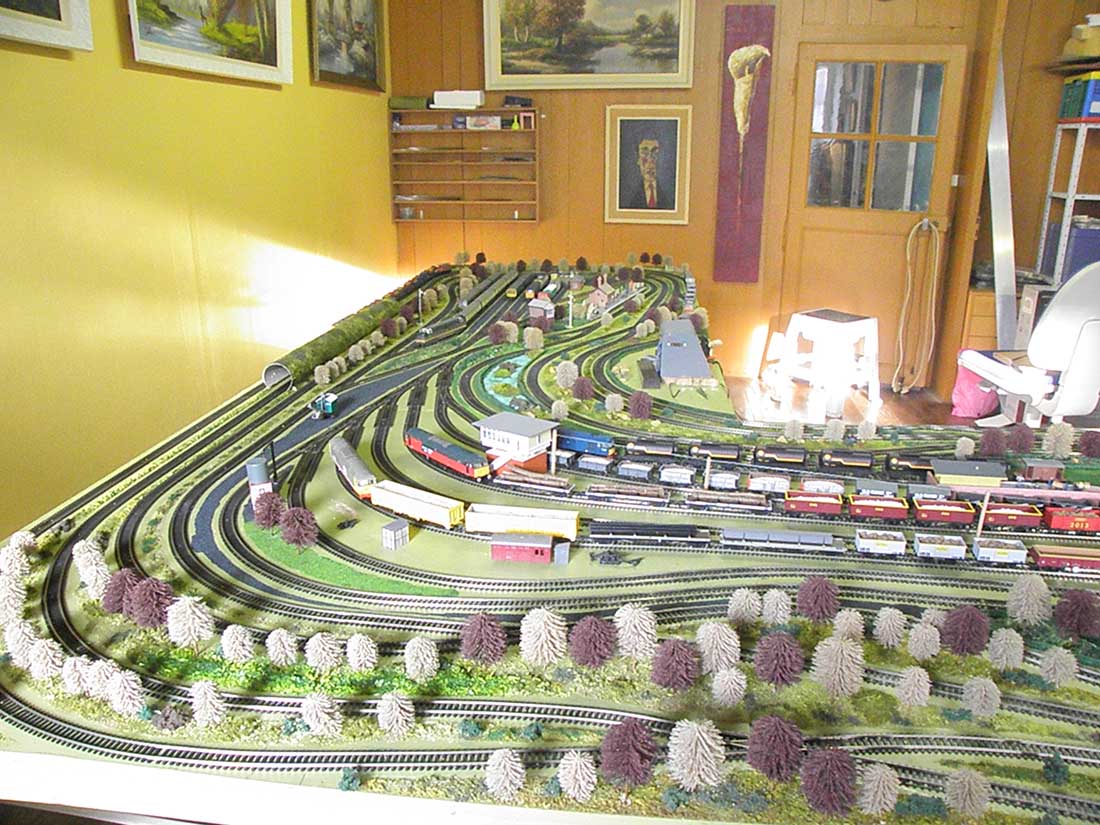
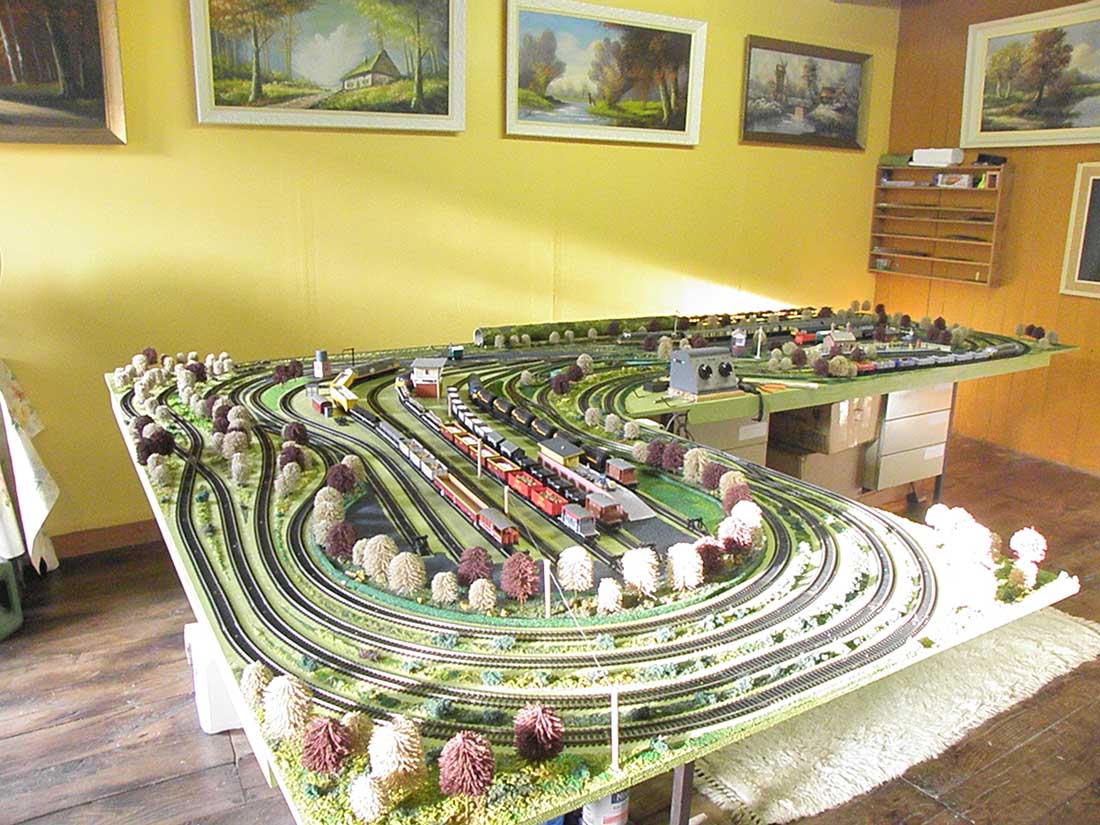

Just loved the busyness of Bern’s layout. I think it’s superb.
A big thanks to Bern, Rob, and Cameron for sharing their model train buildings.
That’s all for today folks.
Please do keep ’em coming.
And if today is the day you get started on your layout, the Beginner’s Guide is here.
Best
Al
PS More HO scale train layouts here if that’s your thing.
Need buildings for your layout? Have a look at the Silly Discount bundle.

Bern,
Great layout. Congratulations.
France is not a great place to buy Model Train equipment as it is not a popular hobby. I stopped buying from shops a long time ago. I get everything online either from Ebay (the german one – Ebay.de) or from other online shops (DM-Toys etc…).
My advise : Google what you are looking for and you’ll find a place where it is cheaper.
Do ballast the track.It add so much more realism…
Hi Bern, A great little layout, and unusual too. Good way of watching the trains go by, and some nice scenic work. Really envy the space in your work room.
Cheers – Steve R UK.
brilliant
Bern you have built a great layout with the facilities that you have in France its very difficult , like as been suggested better buying on line , a lot of Uk and Australian modellers use Hattons of Liverpool here in the UK and they export at reasonable prices , as for ballasting ..its a rotten job (Ia always reckon ) but well worth it when done properly ..Dave
Nicely done… Do you have Sedum Plants in France? We have them here in the states and I take the fall flower, dry them, and finish with Woodland Scenics earth and fine grass products. Many comments on this site say my trees look real…Because they are. I have 3 plants in the yard and they yield about 30-40 trees per year of various sizes. Mix them in with the store bought trees.
WOW…all that in just 6 months.
That’s alot accomplished.
I spent 6 mos. on a mountain range.
I would say make sure you have done lots of running before you balast the track to make sure it runs well and you dont have to make any changes. Then ballast the track. Also there is nothing saying the the balast has to be heavily glued down unless the layout is designed to be portable. much of my layout stil has loose ballast. It makes changing things much easier, in fact I never glue ballast at turn outs beacause they require maintenance and sometimes even replacement. Kevin
Dear Bern,
As stated earlier Google online model train shops. There are many in Germany and they do have a good discount. Modelbahn Lippe is one of them. I get a lot of trains in India from him.
Great looking layout. What gauge is it ‘N’??
Always enjoy pictures and video when posted.. Get great ideas.
Don’t have a layout up at present, but have a collection of
‘HO’ that was up 8′ x 12′ and had to be moved. Hoping to put
things together soon. Wish everyone would state their gauge
when posting.. Looking good Bern, keep it up…
Dear Bern,
I observed 2 things. One that your trains are British. Are they OO?. The shop that I have stated is more of HO. That should not be a problem as it would run on the same tracks.
As far as the diamond crossover, why don’t you make a flyover such that there are no accidents. The long length can easily accommodate a slope.
if you or folks you know have flower gardens chances are the are plants you can dry that will give the effect of trees.
I am not familiar with the types of flowers that grow in France therefore I can’t suggest which ones to use.
Great work, Bern. I would agree that the internet would be your best source of “stuff”. Ballasting your track would look so much better. To avoid the track being “set in concrete”, first lay your ballast (take great care with the points) then soak the ballast with 50/50 water and alcohol before applying white glue and water mixed (again 50/50 seems good) once dry it will be quite firm but, should you need to move anything, soak with plain warm water and the glue will dissolve.
Hi Bern, great layout and agree that you should ballast! I’m also in France, but fortunately on the Swiss border near Geneva. I have 3 very good model shops near me just over the border in Switzerland, nothing in France! The Swiss are very much into model railways with several clubs nearby and also regular modellers markets. I use eBay and online shops a lot, as Swiss supplies are expensive, but convenient when wanting something in a hurry. I also restock when visiting the UK. Good luck, Colin.
A suggestion for natural plants for trees, try ‘Spirea Anthony Waterer’, a small shrub that produces an abundance of flowers that make great trees with added scatter. Other varieties of Spirea are also good. Sorry I do not know a common name for the shrub.
Many people also use large Sedum but they tend to look like the trees that grow native to Aus. with flat tops & long trunks.
Bern, yes do ballast the track, I agree it will enhance the layout tremendously. Your layout looks amazing even without any buildings. I am amazed how much can be accomplished in such a small space. Great job.
like the large busy lay out
Sorry Gent’s, the layout is OO gauge. I have already found Hatton’s where I bought 90% of the stock but didn’t mention it as I was not sure of the rules on advertising ! You have to watch postage charges to France, some can be silly.
Thanks for the comments
Bern
Bern,
Wonderful layout. Running time and how to expand it within a relatively small space (4′ x 8′) has been my challenge. Might you send a track layout diagram to share?
Thanks!
John
Bern,
Beautiful job you’ve done there. As far as ballasting goes it will make it look even better. Spraying with diluted white glue with a bit of dish washing detergent
added to it helps it to lay out nicely. As the gentleman has stated above , it can always be reconstituted with warm water if the need arises. Perhaps a few very small sheds, or piles of track supplies and a few road vehicles etc. would fill in the tiny empty spots. Fine job sir!
…………………………….Fitz
only six months for all that! Great size layout. Keep on it Bern, looking very good. Pete, Calif.
Hi Bern.That is a nice layout. I noticed you don’t have telephone poles. I make my own and you maybe interested in building some.I did 16 poles and total cost was 49 cents. Don’t know how to do it.But if you can get my email address I can send a picture of my pole’s and a how to make them. Talk to Justin about my email address as I don’t have a problem others having it if it pertains to model train.
oops I said Justin.Sorry Al brain fart.I mean Al lol oh I just got another one.Al has the golden key and im sure you can go and look it up. Sorry Al
Like the look of your layout, mine is still in its infancy and I have the same problem as yourself in finding a local supplier residing in Spain. Though my layout will be in English ´N´that is 2mm or 1:148 it will offer me a 12ft x 8ft oval with a few branch lines for fun. I would advise that you cetainly ballast you track it f laid properly will improve the quality of running and sound improvement. I do not know if you are aware of other ballasting methods other than loose chippings but unless your track is firmly fixed already with track pin you could also consider as being quicker. I have also one further suggestion as money and time allows is for you to add more trees to your wooded areas as they look a little sparse at the moment.
Steve
Fantastic, great job.
Good job, but too flat, needs ballasting, weathering, and more plants. It’s a nice train board. Kids would love it.
What a beautiful layout. Nice and clean and very interesting to look at. My layout is 17 feet by 7 feet and has lots of detail like yours. G
What a beautiful clean layout Bern. Lots of detail and very easy to look at. My layout is 17 feet by 7 feet and I have lots of detail just like yours. Keep up the good work and I hope you don’t tear it down to change anything, it’s perfect just the way it is. Great work Bern.
HI BERN,
Gongratulations,great layout.You are too fast!! a fantastic layout in just 6 months.
If you ballast your track it would look much better!!!
keep railroading!!!
WOW!!! What more needs to be said? Terrific layout,Bern.
Great Layout! Bern S. Portland, Oregon, US
Hi Bern – I love the layout. It is always hard to put HO scale in such a small space and still have it look realistic. Love how you accomplished this.
I was just near Mont St. Michel twice in the last year… would have loved to see this in person. I am just starting my layout (Marklin HO) but will likely be a tad bit larger, and multi-levels. Always enjoy seeing these layouts – esp. w/ European trains! 🙂 keep it up.
Great job Bern, You have a super run of track thanks for sharing
very nice railway
Very Nice Layout! Looks Great.. Now is the time to use it. Make sure everything works perfectly before ballasting. Many like ballast but you decide.It will take some time to do and material. Make sure you are satisfied with the layout.
Enjoy !
Love you layout, it looks fantastic. Here in Canada, I am modelling HO scale and have a very large U shape layout in my basement. One complete section of the layout is rail yard. I love the rail yard probably more than the rest of the layout. That is where the action is I guess as the towns and villages are fairly quiet. Always busy o the farm to though. Keep up the great work and run the trains. I do most of my purchasing on E-Bay but our loonie is taking a big hit and right now with the huge exchange rate, it is not worth while at the moment. In my little townie do have at least one small hobby shop here.
Bern
If you are a little tentative about ballasting, have a look on You Tube. There are plenty of helpful videos explaining what to do. As for buying train stuff EBay is a great source & you can buy from anywhere in the world.
Good layout. Focuses more on the tracks and rolling stock.
Have you tried shopping on ebay. You get some good bargains sometimes.
Regarding ballast I was at a pet shop recently (USA) and saw reptile sand dyed varios colors for 10 lb bag only $15.00. much cheaper than model shop ballast
You have to provide a plan. I tried to draw it from the pictures, and I’m missing a few connections. Thank you.
A very beautiful and well built layout. I noticed a lot of attention to detail was applied. I wish you continued success in your layout. I know I am from Philadelphia, Pennsylvania USA, but I have noticed and been to many sites in GB, Germany and Switzerland that are model railroad enthusiasts. Google them, I am sure you will find many additional items at your convenience to purchase. There are many fine items I have seen on sale in GB and Germany for railroading people. Please do not stop and keep us updated on your layout time to time. Very nice and interesting to say the least. Regards, Ray Appenzeller
I don’t like spending too much money on trees, etc., and have found two kinds I can fashion myself.
(1) I grow ‘Astilbe’ (also referred to as false Spirea) in the garden. Google can show you a picture of ‘Astilbe’. Let the plant go dormant in the fall (the flower part will have fallen off), and cut off the tops with a pruner. Since the tops are brown, paint or spray them in the desired green. Trim the foliage to a good shape, touch up the trunk with a bit of color, and you have a good facsimile of a lodge-pole pine for that mountain scenery.
(2) Along the lake shore at our vacation cottage grow some weeds with woody stems. In the fall after the small leaves have fallen off, I select those stalks which look most like tree trunks and branches. The stems (trunks) are brownish and need little touch-up, and only some greenish or yellow/orangy foliage needs to be added to create a natural no-two-alike tree.
Try making some, and you will save some money.
Herb — Long Island NY
Sparse Trees ! ! You are correct, I have just added some more and it looks much better, Thanks
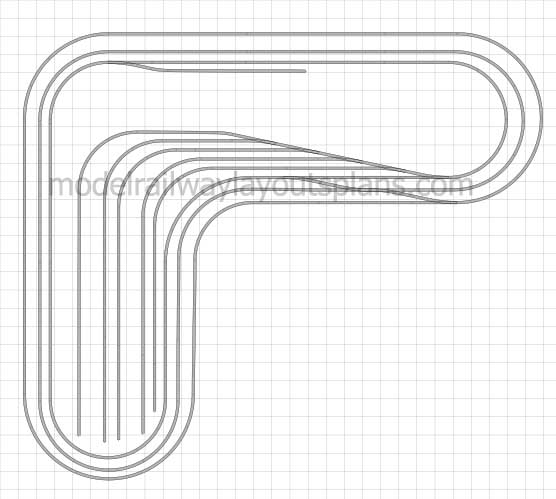
I don’t have a track plan but did use AnyRail to give me a start off and filled in from there.
If it helps, I use Hornby 100 rail with double 2nd & 3rd degree curves, straight and flexi rail. The two four foot ends, working from the outside in I used:
Track 1: 3rd, 3rd, short straight, 3rd, 3rd.
Track 2: 2nd, 2nd, short straight, 2nd, 2nd.
Track 3: 2nd, 3rd, 3rd, 2nd.
Track 4: 2nd, 2nd, 2nd, 2nd.
Making sure the carriages pass before fixing, it’s tight but it worked.
Thanks for the comments
Bern
Very nice layout, Bern, as said above a track plan will very much appreciated, as it is an inspiration to attempt.
Regards Peter.
Fantastic job in a 4X8 sheets. Any chance you have the plans and a material list? Would l like to build this in HO scale here in the USA.
Anyone out there able to tell me where i can find a set mostly already built for sale?
Bern,
I live next to Coutances, not to far from you, for a few months of the years, plus long weekends. Other then that I’m Parisian.
There is a HO model railroad club in Coutances, ltc50. You can find them on the WEB or on Facebook.
I’m setting up a two loop N gauge railroad here in Normandy; in Paris I have a small test track so I can test block occupation, signals and software.
Richard
Very nice layout Bern. The trees will make it even better. I wished I lived near you! Beautiful country there.
Beautiful layout…….I love the fact that it is more train oriented then scenery oriented.
Gary M
Can I get track plans for this fantastic layout ?
Hi All: Great layout! Track cleaning will be a chore? The ballast will add weight to the layout but, will also add to the attractive nature of the layout.
Regards: Ray, PA USA
It is a super fine island layout with access all around. Kids will love having multiple trains running. I like watching children watching trains going around and around.
Everyone envies your large well sun lighted space. The sidings showcase a great collection. I want some of the art on your walls, too. Good job .
Bern; Try modellbahn shop Lippe. I use them from over here in the United States. Great selection of stuff. The Germans love model railroading so I am quite sure there are many places you can mail order from to find what you want. The Chinese make a lot of trees at reasonable prices. i see them advertised all the time on ebay.
Hi Bern,
I live near Avignon and like you have found there are no reasonable model shops to buy from. I buy everything off the internet either from Hattons or other UK suppliers. I also download building prints from Model Railway Scenery and Scalescenes. My layout is similar in size to yours but I have been building it over the last 5 years and recently extending it during the pandemic lockdowns. By the way, it takes time but ballasting is a must.
Peter
If the cost of ballast is a worry to you, find a brand of clay based cat litter that has the grey or earth tones you would think appropriate for the area you model. Sieve it extensively to reduce the size of the granules to (in your case) OO scale and treat like ordinary commercial products.
Alternatively you could use appropriately coloured tile grout which you may need to run a heavy duty magnet over just to make sure there are not metallic elements that could go into your motors …
Hope this helps
Cheers from Australia
Trevor
I am envious of your space. Have a look on you tube at speed ballasting it could be a big help and it works.
Our model railway clubbing Basildon is “twinned” with Rail Club de Meaux. We went to an exhibition there and it is was very busy. I know it is some way from you but you may get some help from them. They are lovely people and have a club room that is fantastic!
Bern,
Try fabric dye for dying the sawdust. I have not had any evidence of fading.
Bern, That looks like a great operations oriented layout. I can’t imagine how you would keep three trains running simulaneously without crashing into each other, but it sure would be fun to try. 🙂 I agree that more trees of varying sizes and colors would be an improvement. Ballast would also make it look more realistic. You’ve accomplished a lot in just six months. Keep us posted when you have more photos to share.
Fantastiques résultats en si peu de temps, félicitation.
As for Kim, for your pole how to. It would be nice to send it to Al site and
every one would benefit, just a though.
Léo, Québec
For technology I would go with the German site for scenics. It mazes me how far behind them the Brit railway industry is. I was in Germany as a kid in the late 50’s early 60’s I hand a Bunders Bahn Deisel with directional lights and a working level crossing with working barrier and light, all pre digital. admitted the crossing worked with the weight of the approaching train. They can’t have been expensive as my fther was a Private in the army. The names to look out for Marklin, Faller and Trix. Nice layout Bern
Bonjour, très belle mise en page et des heures à regarder les trains passés. Pour le ballast j’utilise des pierres de déco de chez Action que je passe dans un vieux moulin à café et le tout pour un prix très raisonnable.
Pour mes achats je commande chez Nancy train pour un prix normal avec expédition gratuite au delà d’un certain montant.
Bonne chance et bon jeu.
building things by hand is more satisfying. nice job.
Nice layout Bern. Like your trees and the detail, you have planned so stunningly. I am just getting started on my third layout and am in the planning stages. I am going to have a small rural town, some ridges, a mesa covered with aspens and pine. Don’t know yet where to find the aspens but if I have to, I’ll make them myself. I am limited on putting kits together since I have arthritis in my hands and fingers, but buying fully assembled buildings and such are expensive.
You are right about Ebay; I buy a lot from them…. Good luck and Joyeux noel..
Just shows how wonderful this hobby can be. I really like wood block buildings.
All great stuff. Just shows what a diverse hobby this is. Merry Christmas, happy holidays and have a great new year.
Jim AZ
Dave and Bern, you both have real nice layouts, awesome work.
Dave,
I lived in Des Plaines from 1949 to 1954. Your story brought back memories. I used to go up into the tower where George lowered the crossing gates when the the trains were coming. Some times he let me push the buttons to lower the gates and raise them at his direction of course. Our crowd went to Mc Donalds and the Sugar Bowl which was across the street from the train station. I am not a modler but tried it in HO in the late 50’s. Then came the military, marrage, divorce, remarriage, work, etc. Now 83 and retired and don’t feel like starting again.
Dave,
I also grew up in Des Plaines. And I, too, still have my Lionel and Marx trains and 027 track. Thanks for the memories! But where is the Choo-Choo Restaurant???
It’s dark here in Virginia now. Four of the kids have left after a great visit. None of them got into trains or modeling of any sort. Alas….
I want to wish all of the “team” that read and post and send in all these marvelous photos, stories and tips, a most wonderful Christmas and happy holidays. And a special “Thanks” to Al who surely is a robot to be able to keep all this in order.
Bill B
Bern
Great layout… love the 4 times around concept.
What scale? Can we see a track plan?
Thanks,
Cameron
Living in a land down under and in a rural location my nearest hobby store is 140 kms (about 88 miles) away. As a consequence I have resorted to online shopping for some of my landscaping supplies and electrical stuff. I have found Aliexpress very helpful. I have noticed that they do have styrene sheets in varying thicknesses and bundles. The prices are generally fairly low and often postage is none existent.
Hope this assists.
Man, that is good modeling, really nice!