Rob’s been in touch with his German model railway layout:
“I’ve been a fan of your blog for several years, and have learn so much from the contributors. I look forward to opening my email each day to see the wonders you send forth.
I’ve been working on my Murren and St. Goar Scenic Railway since I returned from a trip to German and Switzerland in 2009.
I wanted to recreate views and moments from that trip in HO scale.
I’d not done any railroading since I was a teen back in the 1960s, so it’s been a real experience relearning everything.
It’s encouraging to read posts of others who have questions and made mistakes we can all learn from.
My submission shows a small addition to my city (based on Freiburg, Germany) three streets off the Main Avenue.
There was a block of empty space left over from other building installations. I’d debated what to do with it for some time, and finally decided to just tackle the space with basically what I had on hand.
Our recent stay in place orders here in Michigan have provided many extra hours of time to ponder and work on train projects.
I tend to work on my German model railway layout in an organic fashion, and have found that I greatly admire those modelers who can build a layout with all those yards, mainlines and switches.
I’ve also learned that I’m not very good at that part of the hobby.
What, it turns out, I really like is doing building kits and creating landscapes for the train to run through.
Your blog has reinforced that there is no “right” way to do model railroading, and that ideas can come from any source.
Attached are several pictures showing the progress of the city block addition from start to finish.
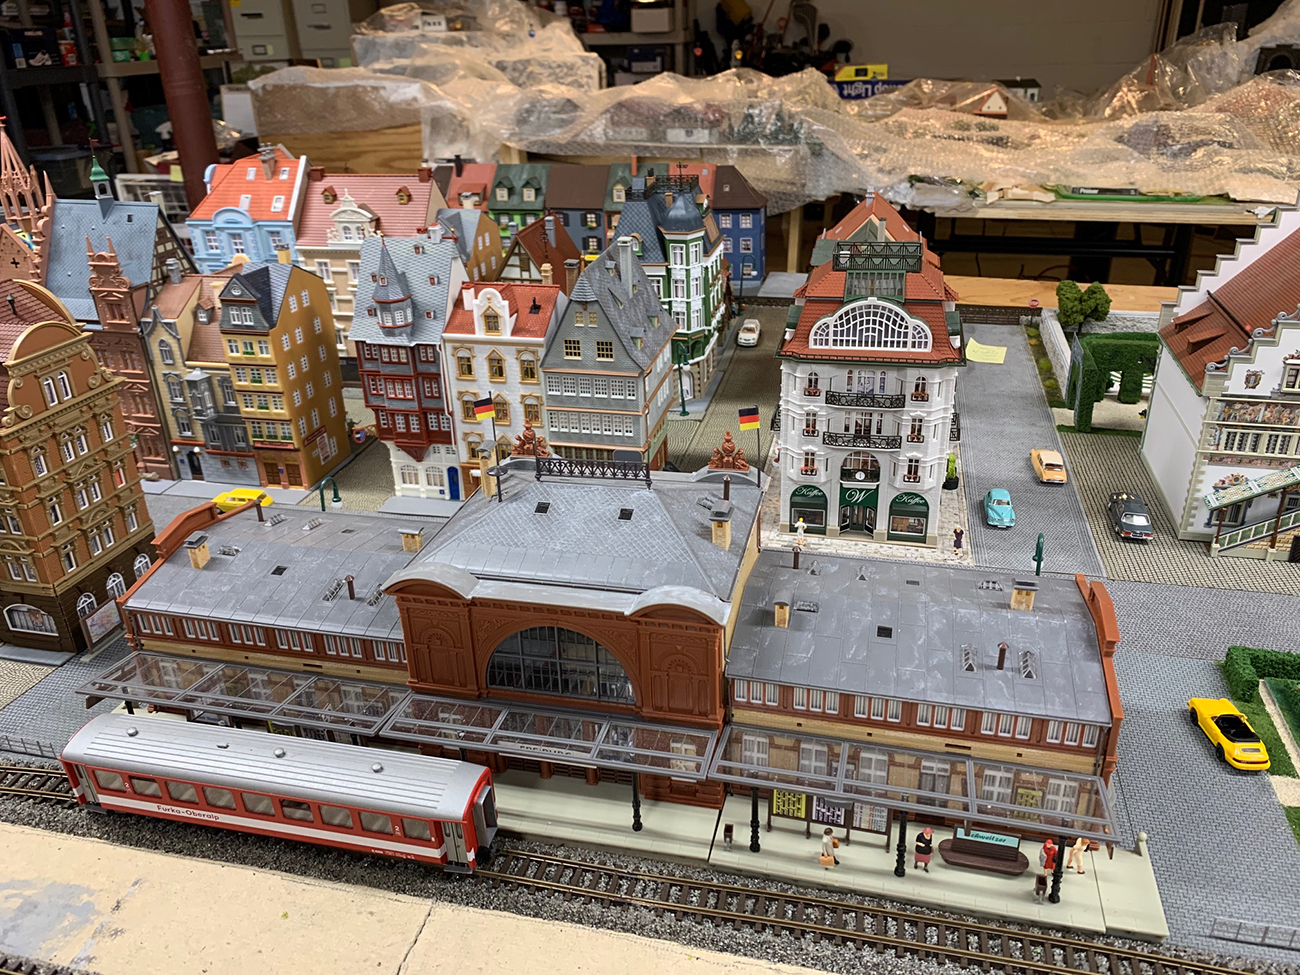
View from the main station looking back toward to area where the new block addition was added. All the city buildings are lighted for night effect.
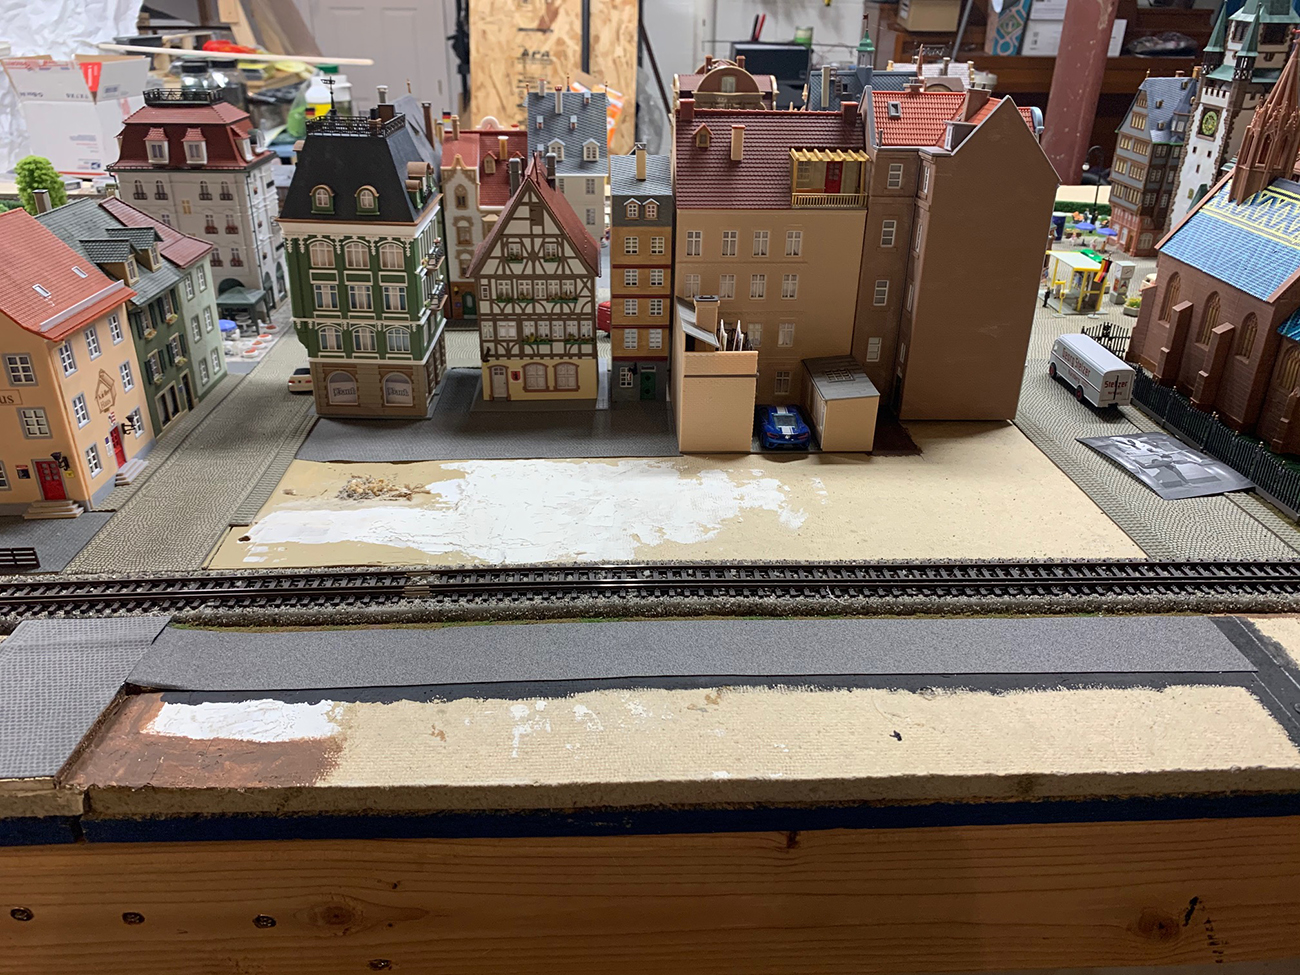
The block as it looked before I started. The backs of the buildings on the facing block provide the background. I added a narrow road opposite, next to the tracks as a first step.
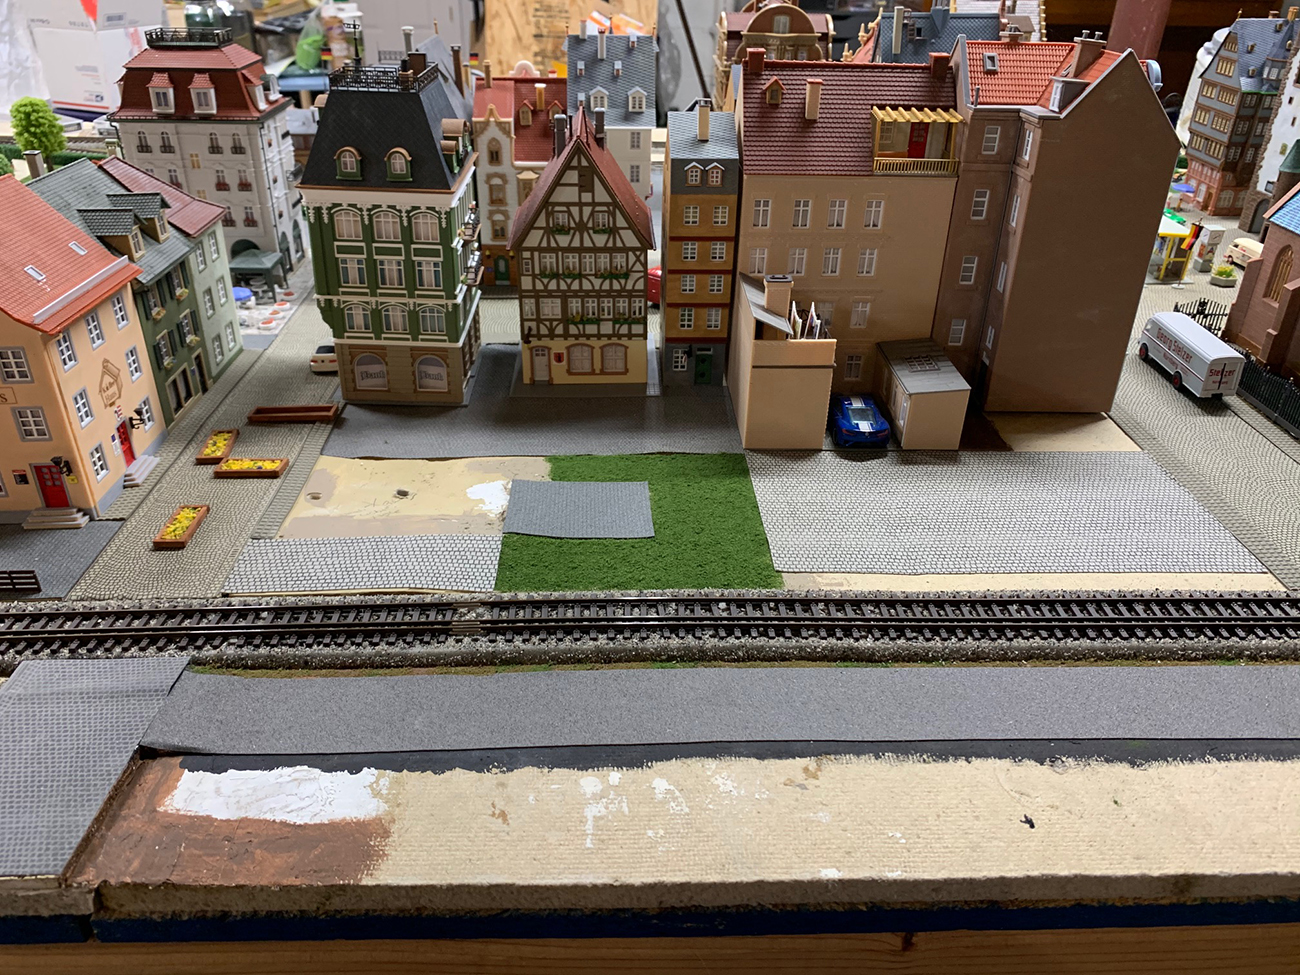
I first added some grass for a small park which is to set behind the building on the block corner. Then I added stone paver sections to create a courtyard as seen in many German cities behind buildings. I found, and assembled a building kit that allowed a drive through from the side street into the courtyard to anchor the other end of the block.
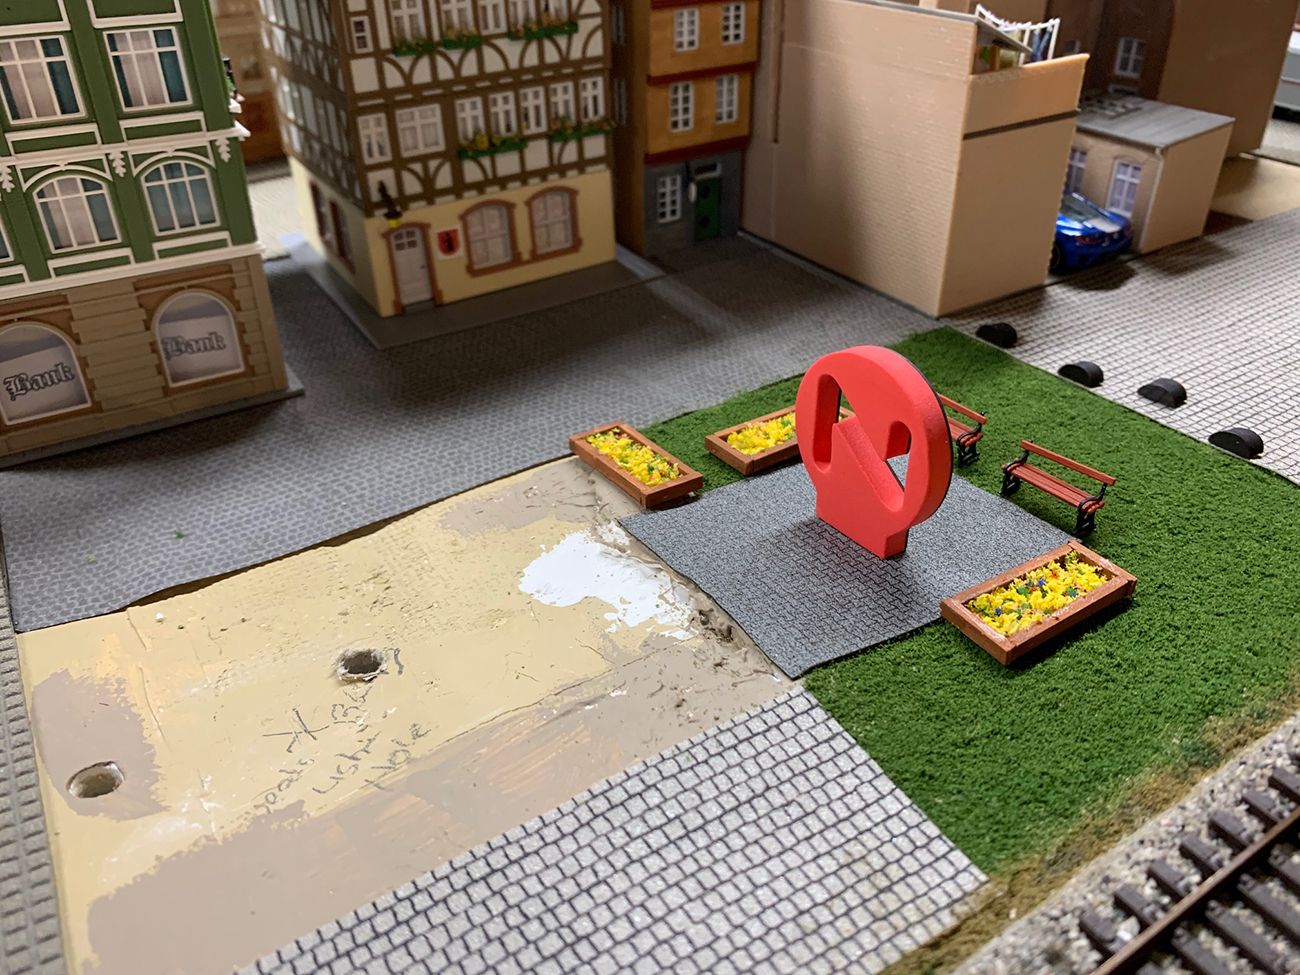
I built some simple planters, added benches and found a sculpture piece for the park. My youngest daughter teaches first grade so she has many craft and classroom items that can be adapted to the layout. In this case the sculpture is a throwaway piece from a lettering kit.
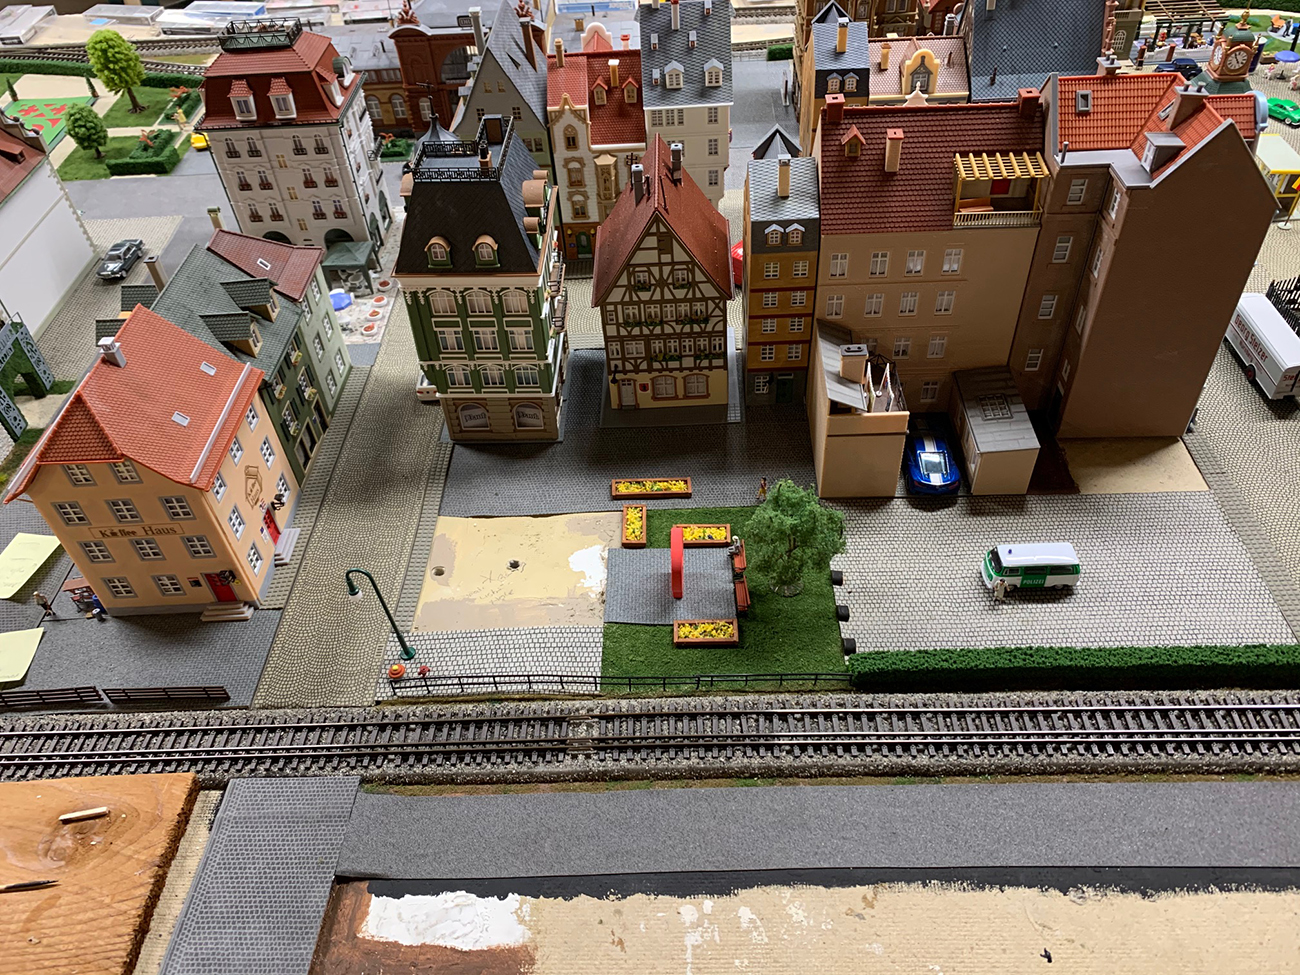
Next I added some people, a tree, a hedge and a fence next to the tracks. These were all left over parts from other scenes on the layout.
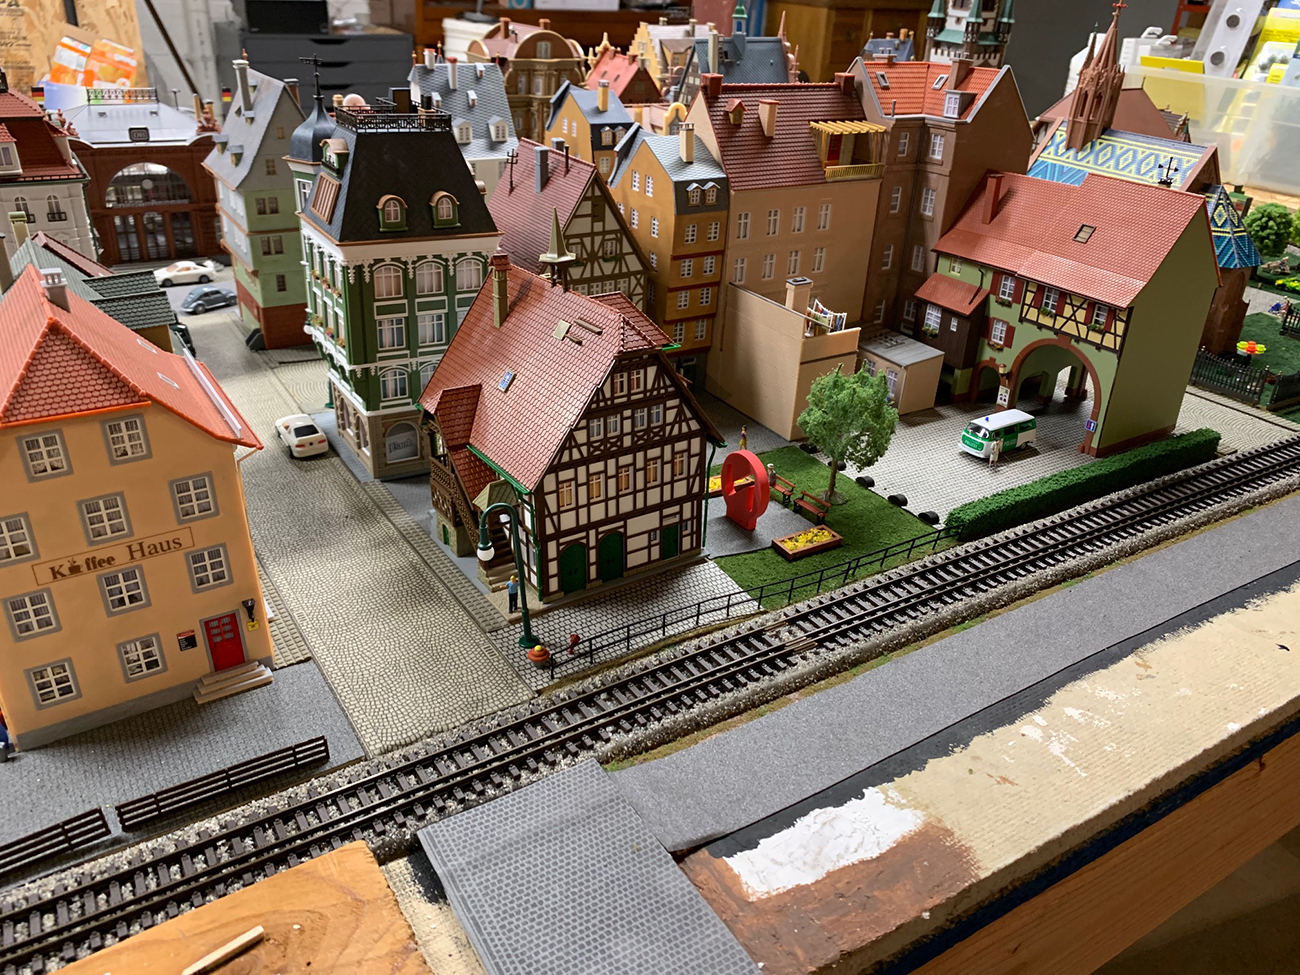
Then I added the two buildings, one at each end to enclose the block. One building I already had built, but did not use for a different scene, the other was purchased to allow the drive through into the court yard.
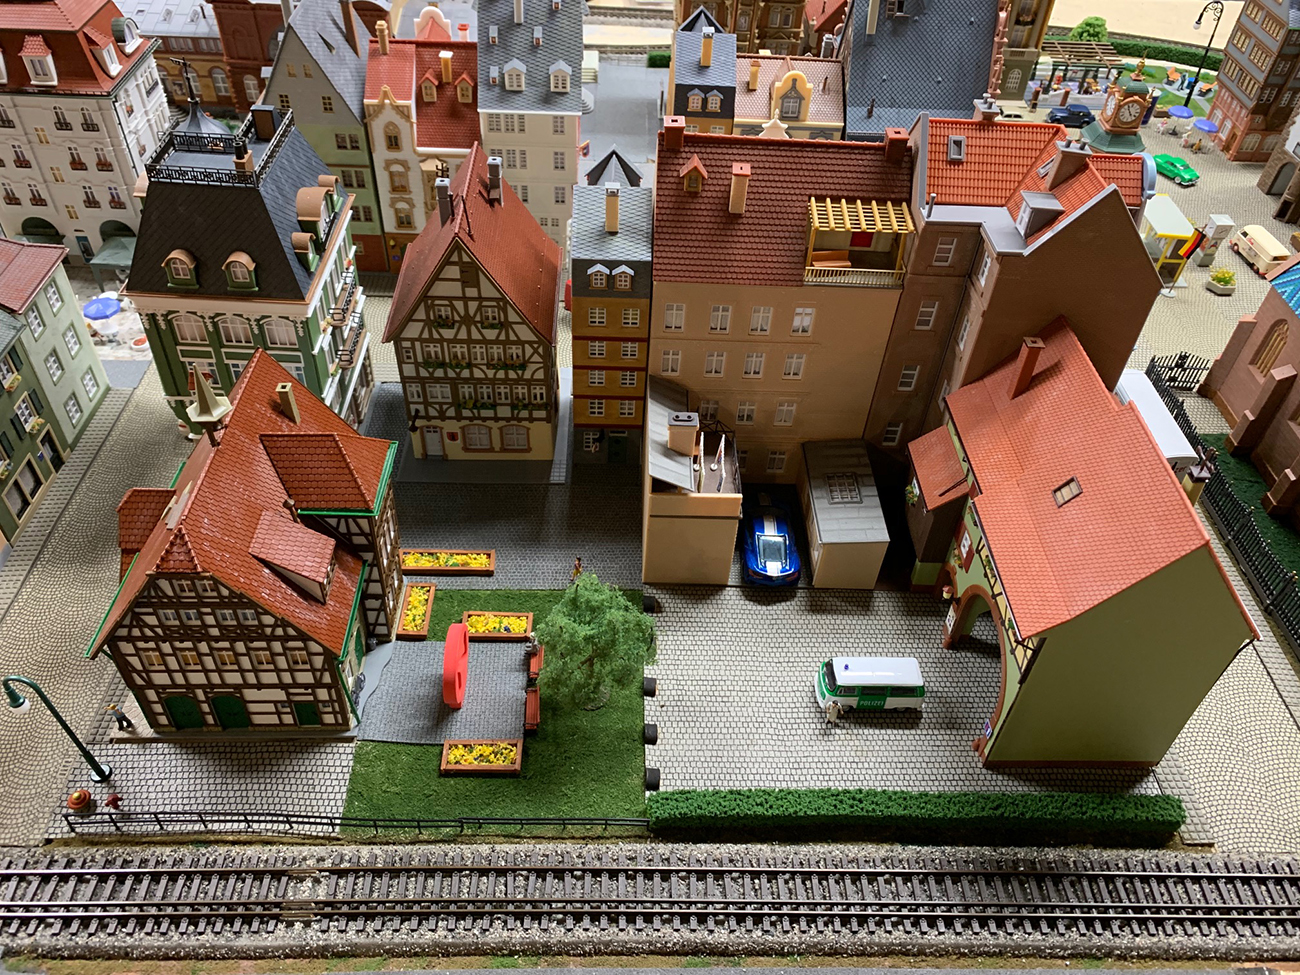
View of the completed block.
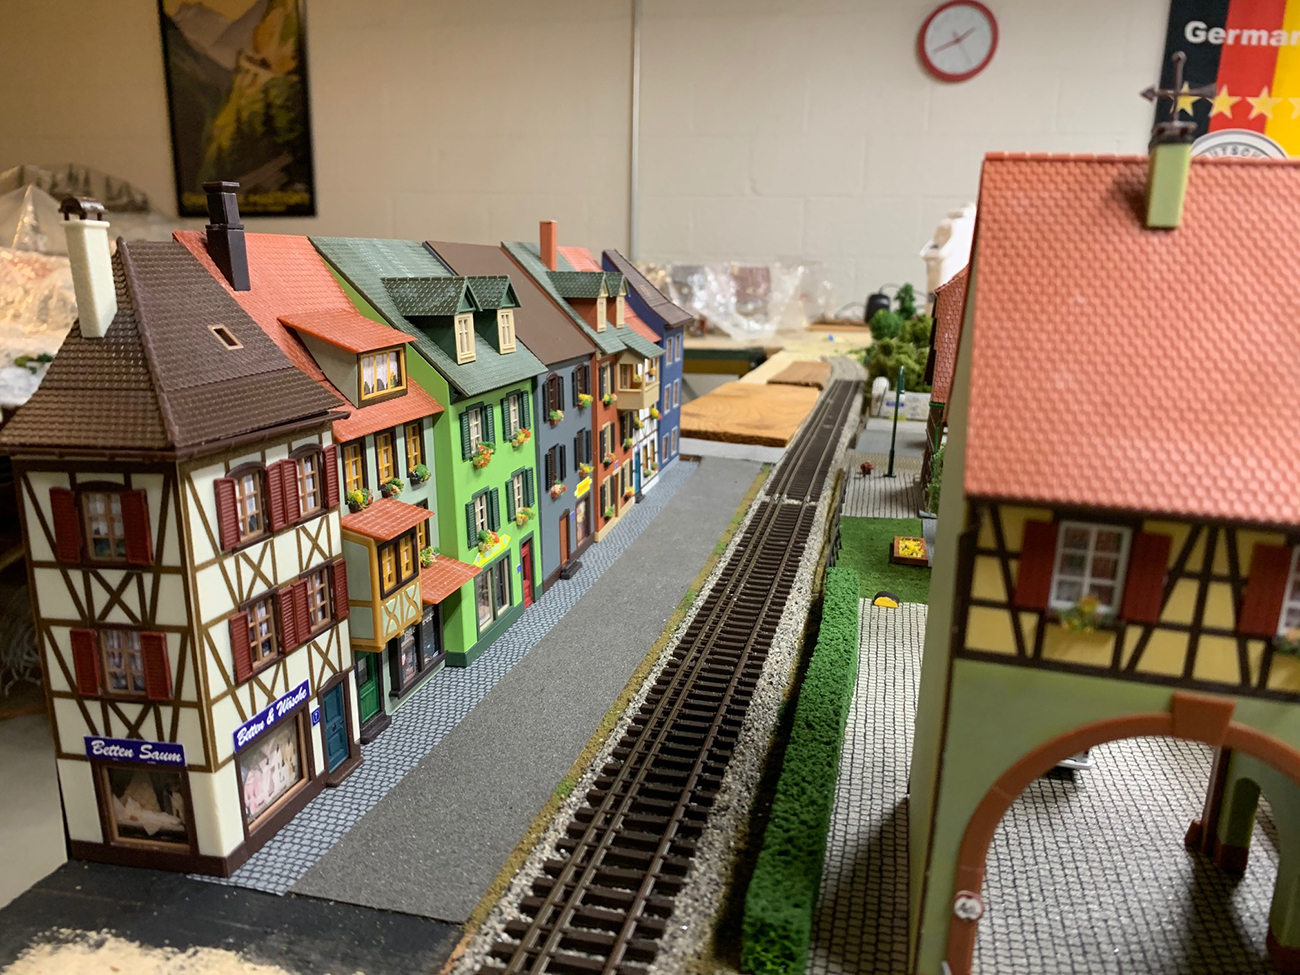
Wwith the recent article on how to finish the edge of the layout causing some discussion, I decided to try adding buildings across the street on the other side of the tracks. I purchased a set of kits for those half facade buildings that one puts up against walls. Only I don’t have any walls so I just placed them on the table edge and put a backing board behind them so they won’t fall off.

I colored this row of buildings based on those I saw in Innsbruck on my trip to Switzerland this past summer. The middle building on the block is make up from leftover parts from the other kits in the set, and allowed me to fill the space completely.
I hope your readers fine them interesting and even useful.
Rob,
Murren and St. Goar Scenic Railway,
Ann Arbor, MI, USA”
A big thanks to Rob, it reminded me of Michael’s: German model railway layouts.
“Hi Al ..Just loaded this video to answer a few of the queries regarding my inclines and how steep they are in % , and of course showing how those magnetic couplings do hold even with a rake of 6 coaches on the inclines.
I would also like to thank all who sent there best wishes for my wife’s Deb (aka the Stig ) recovery with her hand.
I did eventually get her to A & E and with a Xray showed she has a broken wrist, so looks like Dave is going to be busy in the home for a while yet…
Regards
Dave”
Latest ebay cheat sheet is here.
A big thanks to Dave and to Rob for sharing his German model railway layout.
That’s all for today folks.
Please do keep ’em coming.
And don’t forget The Beginner’s Guide is here if you feel like you are missing out and everybody else is having all the fun.
Best
Al


These Hunt couplings look great, but, how do you do automatic uncoupling?
Rob, your new section looks great. I especially like the sculpture garden idea.
Jack in Pa.
Rob
Unbelievable work, planning, and precision. Thanks for the great narrative.
D. Dave
Wish you & the wife the best. Sounds like some train plans will take a back seat. Thanks
George from NY
Wow Rob…. Your building kits look awesome… Can you tell us where did you purchase the kits from? Your skill in building them and then making a whole city is way over the top. I tend to relate totally with your introduction on liking the landscaping and building part better than electronics and running the trains like the real would. However, with the virus lock down I am working hard on that part now down in Hillsdale MI….!
RE: Rob’s Railway. Okay, first off let me say that I have never been to Europe so I am not familiar with their railway systems. However, I did work on the railroad in the U.S. for a short period of time. My question is about the third rail on Rob’s HO layout. I don’t know the purpose of this third rail. I realize that some U.S. subway systems use an electric third rail, but not at grade. Could you please explain the third rail. Thanks, Mike.
Love Rob’s railroad. It reminds me very much of Weisbaden. I lived in that area for 5 years while working for GE’s European subsidiary.
Beautiful scenery work capturing the look of Germany!f
Rob, my grandma (who was from Germany) went back for a visit in the 1970’s and sent back pics from her home town. Your buildings are simply outstanding! The color and design of each are so realistic…wonderful work, thanks for sharing!
In aswer to Ian , they are magnetic couplings , like magnets they stick to each other …and thanks you for the best wishes for my wife’s recovery …teach her not to hit me so hard at the back of my head …Dangerous Dave
Dave……. I’m sure your wife will make a full recovery, especially with you taking care of her.
I always love your videos……… It always reminds me how much more work I have to do on my layout and that you never are truly finished. What I like best about your layout is that it is all about the TRAINS; the scenery is outstanding, but it is all about the trains.
Gary M from Long Island
Rob’s city is fabulous. We also have urban setting for Christmas village. The sculpture is quite cleaver and it all comes together beautifully.
Hi: To Mike: The third rail on this layout is more than likely a conductor rail used by Marklin HO trains (German). Similar to what you mentioned about subway systems.
Regards: Ray
WOW great layout
Thank you Rob and Dave. Take care of that arm mrs Howarth!
Never had a chance to experience German rail services. I was an Army dependent back in ’47 to ’50 living in a suburb of Mannheim. Loved Germany, it’s a beautiful country and I love your layout. Looks fantastic.
You folks take care.
Ron
All the best for Deb’s full recovery to health and wellness.
And thanks for another great video
Answering those who had questions about my post.
1) Michael Dean about the 3 rail track. In Germany you do see some areas that have three rails of track. It is to accommodate both standard and narrow gauges on the same line. I began my layout with a Bemo HOm starter set. HOm is European narrow gauge. Part of layout has only that track. After a while I decided to add HO capability. So the new section of the layout has the three rail track so that the narrow gauge trains can run everywhere.
2) Gerald Brown on building kits. The buildings you see come from three European manufacturers of kits: Faller, Kibri and Vollmer. I purchase mainly from three on line sites. Blueridge Hobbies, Reynaulds, and Micro Macro Mundo. They all carry items from those manufacturers in various degrees. It does take a bit of research to locate items as not everyone of them has everything in stock.
A special shout out to Dave’s Deb with hope her wrist feel better real soon and that we all get out of quarantine soon as well.
Rob, Murren & St. Goar Scenic Railway, Ann Arbor, Michigan USA
Rob, I go to Europe quite often, and really enjoy the traditional architecture. I am starting a similar HO layout with he same type of look. Your structure kits are beautiful, and I am unable to find really nice ones like yours. Please tell me who makes your kits, and where you purchase them. I have to do most of my shopping on-line as there are no regular hobby shops in my area, much less any having model railroad kits or accessories.
Mike, Rob’s track looks like Micro Engineering dual gauge HO-HOn3 track to me which allows him to run both gauge engines on the same track.
Rob. Nice job on your cityscape update. I’ve never been to Germany but I’ve seen lots of photos of German towns and your model railroad captures the essence of the German and Austrian towns. That was a very nice tutorial you put together explaining how you designed the addition. Keep up the good work.